Updated: 10/24/2016
I want to point out that unlike camping and camper stuff that have a longevity in production, backpacking gear changes quickly. Old models are discontinued often, especially clothing and footwear. If I find a garment or shoe that I like and want to use long term, I usually buy several of each item, because if it is good the manufacturer will probably soon discontinue it and replace it with a “new and improved” model that is mostly marketing hype or worse — simply discontinue it.
Original Post May 1, 2013
When backpackers get together; whether it is hiking, off the trail, or online it seems that conversation often turns to gear. Over the years little has changed gear-wise, other than improved materials used in the manufacture of backpacking equipment and clothing. The one exception is the plethora of electronics that many seem to drag along with them these days.
If one analyzes it,
backpacking is just walking. It is a bunch of day hikes, one after another, laid end to end with a night of sleep in between each. It is not about the gear.
But many backpackers are constantly stressing over their gear, looking for the newest and lightest doohickey. They are constantly fretting about or tweaking their gear list or spreadsheet. All of this misses the point — just go out and walk in wild places. You can assemble a fairly light and functional kit by shopping at thrift stores, swap meets, mass market department stores, hardware stores, and sporting good stores. Many people make their own gear and clothes. There nothing wrong with improving your kit, but it is best to spend most of your time actually walking than playing with gear and gear lists at home.
My gear hasn’t changed a lot since I started backpacking in the 1960’s except I now use lighter versions of everything. Once I am happy with an item, I am generally done searching for a few years or more. The one big change for me these days is to own several similar pieces of gear and switch them out depending on the trip in regards to weather/season, temperature, duration, and terrain.
So I thought I would share what I use most often and why. I am not a gear expert. People rarely seek my opinion in these matters — which is good because I don’t have the time or inclination to be giving advice. So keep in mind that I am not presenting any of this as a so called expert. I know what works for me and others may have different opinions.
In my early backpacking days there were few places to buy gear; mostly Army/Navy surplus stores, department stores, sporting good stores, and a mountaineering store if you were lucky enough to live near one. In the 70’s Backpacker Magazine appeared and their reviews were pretty good. Many readers like me, were exposed to gear they did not existed. Once Backpacker became more mainstream and started cow-towing to advertisers, losing their objectivity, I quite subscribing. That was several decades ago. In the 70’s REI and Campmor (among others) got into the mail order business on a grand scale. I still remember anxiously awaiting the catalogs; especially Campmor’s with all the weights for everything. Today Campor’s mail order catalog is much the same as it was 40 years ago.
Today we are overloaded and overwhelmed by the amount of gear we can buy online. Plus it seems everyone with a website or blog is reviewing gear. Some of them are very good. Others (seems like the majority) I am skeptical about. Some bloggers review more gear than I have owned all my life, others get free gear to review, or are “ambassadors” for some gear company that provides free gear or gear at a steep discount, with the stipulation the user promote the company’s gear. Even when a blogger discloses an association, I am wary because it can be very difficult to be truly objective. Even BPL, who once was the most objective of all, has in the past couple of years published a few reviews of questionable integrity. All in all, BPL is still probably the most objective website, especially the articles by Roger Caffin.
Starting in 2008 I began researching and upgrading most of my gear with the current offerings. I had been using the same gear for almost 30 years. Most ultralight equipment is only available from cottage manufacturers via the Internet. That means you cannot go to a store and try it out. Much of the gear is not robust, meaning you have to develop the skill and know-how to effectively us it. Some of the gear I bought just didn’t last, did a poor job for the task it was designed, or was inconvenient to use. Some I threw away, some I gave away, and some I kept. Today my light kit is solid and there is no longer the need to search for more “improved” versions. I can do what backpackers should do; focus on the hikes – not the gear.
I should also point out that my gear selection is defined by where I hike and I how I hike – most specific is that I hike solo most of the time. That means there is no gear that can be shared with a group, and the gear is designed to be used by one person. For example, small stoves and pots that are only good for cooking a single meal.
Many people are critical of solo hikers, thinking they take too much risk and their friends and family are in a constant panic, worrying about the hiker when he or she is out backpacking. I am going to heartily disagree with this. I dislike “group-think” in all situations. Too much time wasted trying to come to a decision, because solutions must be for the common good and the lowest common denominator. There probably a tendency for some hikers to be pressured into doing things above their comfort level or skill when the group makes a decision. I would think that in a group hiking situation there is socializing going on, which distracts from paying attention to the hike. The solo hiker knows that injury or getting lost may have dire results, so they are probably more careful. The solo hiker pays more attention to navigation, he or she needs to know exactly where they are at all times.
Packs
10/24/2106: Nothing has changed with my backpacks. I am happy with what I have.
This the one piece of gear that generally should be purchased last, so it can house all the gear. I have tried to use one pack for every kind of trip, but it doesn’t work out. From 1971 – 2008 my main pack was a Kelty D4. For winter trips or trips that required hauling a lot of water, I used two iterations of the Kelty Serac. All of these Keltys were external frame packs, which are have declined in popularity starting in the early 1980’s. For a look at my Kelty backpacks click here. Recently I did a couple of trips with my old gear, which include the gear lists. You might be surprised how light many of us were in the ‘Old’ days: A Nostalgic Hike with Chuckawalla Bill and A Nostalgic Hike to Carey’s Castle.
In the 80’s I bought a Mountainsmith Frostfire II and a few years ago a Gregory Whitney 95; both internal frame packs. I was unhappy with both. I gave the Frostfire to a Boy Scout troop and the Gregory is stored in the garage.
In 2008 I started using ultralight frameless packs and a couple of light packs with minimal internal frames. I found the frameless packs awful when the total pack weight was over 12 pounds and never warmed up to either of the light packs. I gave most of them away. I now have 3 packs that I use for all my backpacking, and don’t plan on ever buying another pack unless the smallest one wears out.
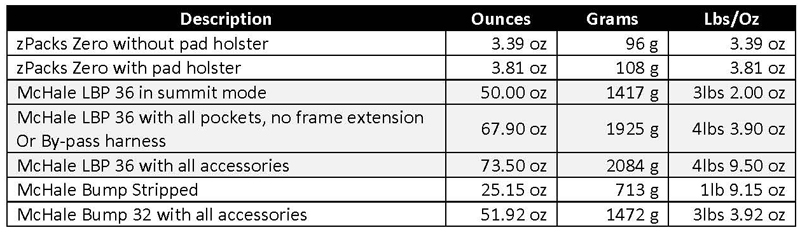
- zPacks Zero: This is a small frameless pack. I only use it on trips where my total pack weight is around 12 pounds or less. I probably use this pack on about 10% of my trips. It won’t last forever. The pack is constructed from Cuben Tech fiber. zPacks Website
- McHale Little Big Pack (LBP 36): Easily my favorite pack. It is made from full Dyneema and Spectra fabrics and is virtually indestructible. Carries like a dream. I use this around 40% of my trips. McHale Alpine Packs Website
- McHale Bump 32: When my gear weight is above 12 pounds and the LBP is too large, I use this pack. If is constructed from Dyneema grid and spectra at key wear points. McHale Alpine Packs Website
Many lightweight backpackers are critical of “heavy” packs. They focus on the weight, not function or comfort. My McHale packs are not considered “light” by many. They are extremely comfortable, easy to live out of, and durable. With these packs I can hike anywhere, terrain or conditions do no limit where I can go. Is a 3 or 4 pound pack too heavy? I submit that most of the so-called lightweight hikers would be better served by losing 5 or 10 pounds of body fat and getting a great pack.
Shelters
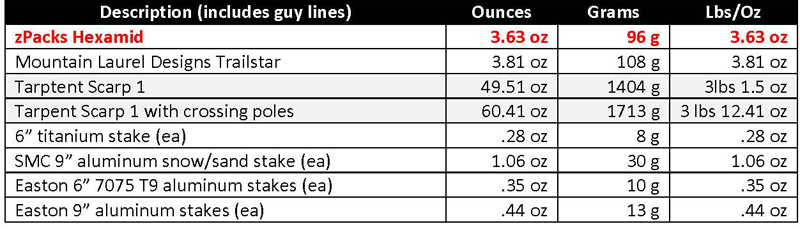
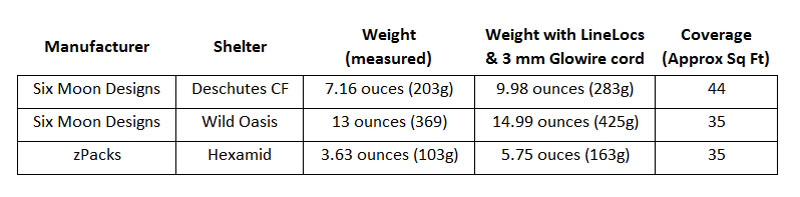
10/24/2106: Last year I replaced the zPacks Hexamid with a Six Moon Designs Deschutes CF shelter. You may want to click the link and read the post as I present shaped several tarps and a lot of useful (in my opinion) about the use of tarps as shelters.
If there is no precipitation in the forecast, I just sleep under the stars. I have always preferred tarps as shelters. For bad weather (think snow) I use a tent.
- 10/24/2016: Today, on most trips, I use a Six Moon Designs Deschutes CF solo shelter (Six Moon Designs Website), which is basically a tarp. It is made from Cuben Tech fiber.
- For winter trips in snow I use a Tarptent Scarp 1.
RecentlyIn 2013 I purchased a Mountain Laurel Designs Trailstar for extremely windy conditions.
Stakes vary from small 6” titanium stakes, 9” SMC aluminum snow/sand stakes, Easton 6” or 9” aluminum stakes.
10/24/2016
Added the Deschutes CF Comparison Table Below
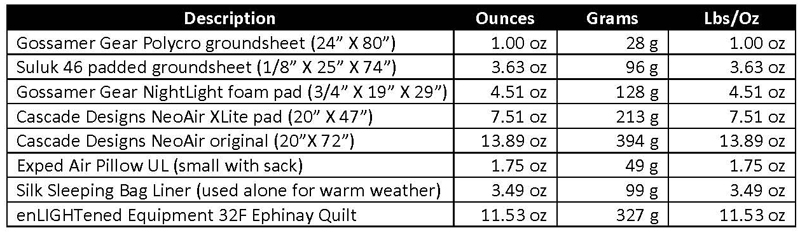
Sleep System
I consider this a ground sheet, pad, sleeping bag/quilt, headwear if quilt does not have a hood, and pillow (if used). Normally I don’t use a groundsheet because my foam pads are waterproof. I am slowly transitioning from sleeping on foam pads to air mattresses as I get older. Below is what I use on most trips:
- Suluk 46 padded groundsheet
- NeoAir xLite air mattress
- In 2015 I bought a Cascade Designs Therm-a-Rest NeoAir xTherm (R value = 5.7) in size Medium (20″ X 66″) and it weighs 14.36 ounces or 407 grams. It is a great air mattress for winter camping. Cascade Designs no longer makes this size. For current offerings, go to the Cascade Designs website.
- enLIGHTened Equipment 32F Ephinay Quilt (all cuben shell)
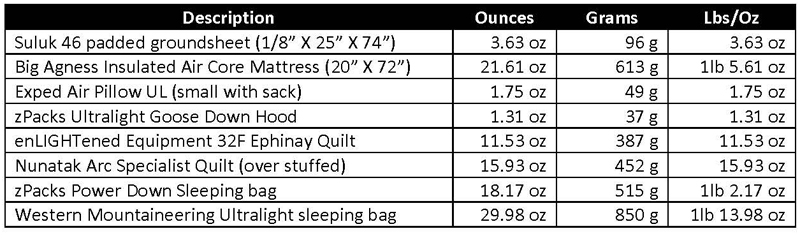
In winter I use several combinations.
- 1/8” Foam Pad
Big Agness Insulated Air Core Mattress- In 2015 I bought a Cascade Designs Therm-a-Rest NeoAir xTherm (R value = 5.7) in size Medium (20″ X 66″) and it weighs 14.36 ounces or 407 grams. It is a great air mattress for winter camping. Cascade Designs no longer makes this size. For current offerings, go to the Cascade Designs website. It replaced the much heavier Big Agnes Insulated Air Core Mattress
- EE Cuben Quilt inside of Nunatak Arc Specialist Quilt (32F) – no hood
- zPacks Power Down Sleeping bag (20F) – no hood
- Western Mountaineering Ultralight sleeping bag (20F)
Clothing
Regarding clothing or shoes, when I find something I like I buy several because manufacturers usually discontinue good products. My clothing choices haven’t changed much other than I have switched my cold weather trousers from wool to Schoeller soft shell and down clothing today uses a much higher fill.
Layering System
This changes by season. But basically consists of:
- Base layer to wick perspiration
- Insulation layer to keep you warm (usually something like fleece – down gets wet)
- Shell layer (wind or rain)
For times a hiker needs extra warmth when resting, or when at camp and extra insulation layer is used (usually down for most hikers). I usually hike with just a base layer and add other layers when needed. Keep in mind that I usually do not need a 3 layers system most of the time. I may hike in just a base layer (shirt and shorts), a base layer and wind shirt, or all three. What I wear is determined by wind, temperature, humidity, and the amount of physical effort (flat ground versus steep hills).
Shorts/Trousers
- Shorts: Patagonia Baggies (5″ inseam). Been using these since the 80’s. I cut out the mesh liners to adhere to Colin Fletcher’s Second Law of Thermodynamic Walking: “give your balls some air.”
- Trousers (3 season): Since the 80’s woven nylon has been my favorite choice for most clothing items. Using Rail Riders Eco-Mesh for the past 4 years.
- Trousers (cold winter weather): REI Mistral Schoeller trousers.
- Trousers (really cold winter weather): REI Acme Schoeller trousers.
When wearing the shorts or woven nylon trousers (Rail Riders Eco-Mesh), these are usually the only layers I am wearing. I may put on a wind shirt or poncho if conditions dictate so. Sometimes in colder weather I may hike with a wicking layer under my shorts or trousers. There are many combinations, and mixing layers over the course of a trip gives the hiker many options and flexibility.
10/24/2016: It appears REI has discontinued the Mistral and Acme trousers. Fortunately I bought several pairs of each.

Shirts
On all my 3 season hiking trips I wear (only) one of these:
- Rail Riders Eco-Speed T (short sleeve)
- Mountain Hardware long sleeve Cliffer T (merino wool/poly)
- Rail Riders Eco-Mesh Shirt
10/24/2016: Mountain Hardware has discontinued the Cliffier T.

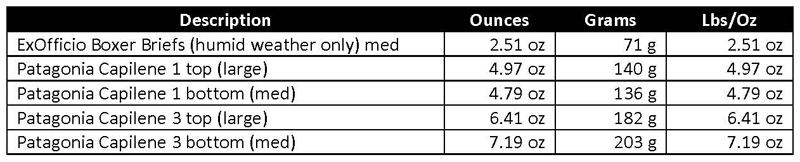
Base Layers (may not be worn all the time while hiking)
A note on the ExOfficio Boxer Briefs: I only wear these in humid weather or sometimes in extreme heat where I anticipate sweating profusely. See my article on Chaffing & Jock Itch.
Patagonia has changed their Capilene designations (1, 2, 3, and 4) to lightweight, midweight, and thermal weight. Instead of 4 weight there are now only 3. Not sure the exact differences, but I am happy with what I have. I highly recommend Patagonia base layers.
Insulation
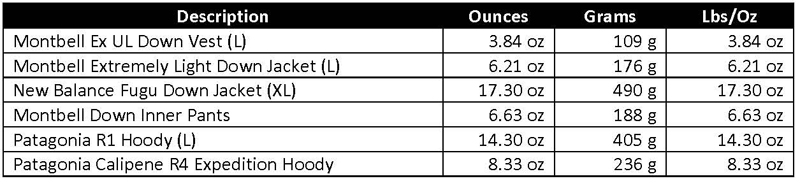
 It is rare for me to wear any of the first four items below (down garments) while actually hiking. You do not want to wick moisture into a down garment, as wet down is useless. When I need insulation while hiking, it is usually one of the Patagonia items below. However, here is a “real world” scenario: cold windy morning in the desert. Temperatures in the 30’s F, gusts up to 40 mph. I expected the weather to improve significantly in a couple of hours. I started my hike with Patagonia Capilene 1 bottoms and a pair of Patagonia Baggies shorts. For my torso I was wearing a Rail Riders Eco-Speed T-shirt, followed with a Patagonia Houdini Wind Jacket and a Montbell Ex UL Down Vest on top of the wind jacket. This helped keep the down dry. I also wore a REI eVent baseball cap and a pair of Smartwool merino wool glove liners. I was a little cold for the first 10 or 15 minutes, but soon reached a nice comfortable micro-climate for my body. After an hour, the sun started warming things up and I took everything off except the shorts and T-shirt.
10/24/2016: I can no longer find the Montbell Ex UL Down Vest, Ex Light Down Jacket, or the Down Inner Pants. Not sure if they are discontinued, but if you can find them, they are highly recommended. The New Balance Fugu Down Jacket was discontinued years ago too and New Balance doesn’t make anything like it any more, which is too bad. The Patagonia R-1 Hoody is still available and the R4 Hoody is now called the Thermal Weight Hoody.
Shells
I take my Houdini wind shirt on almost every trip. I have another one for around town. Sometimes I layer it under a down jacket or vest. It is my most versatile piece of clothing. Many hikers try to use a single jacket as both a wind shirt and rain protection. Waterproof breathable jackets will make you sweat and will eventually leak in heavy rain. I am surprised few people use a poncho. They are water proof and breath fairly well through the side openings. Ponchos have been my main rain gear since I started backpacking. One thing about ponchos is that they are large and can flop around in wind and catch on brush.
The zPacks poncho/ground sheet is smaller than any poncho I have used, thus not flopping around and doesn’t catch on shrubs easily. The only down side is it is shorter than other ponchos. I have solved this with a zPacks rain skirt which goes down to my knees. It has worked well.
Once in a while I don’t take a poncho and on these trips I take a Marmot Essence rain jacket – usually when there is only a slight chance of rain.

Shoes
I have been hiking in trail running shoes since 2008. Actually cross country flats, which are even lighter than trail running shoes. My favorite is the Mizuno Wave 4 Universe. When I need “heavy duty” trail runners I wear Salomon XA Pro 3D Ultra Trail Running Shoes. I have several pairs of each shoe because as with all good pieces of gear, eventually they will be discontinued. For thoughts on minimal shoes, click here.
Both shoes below are still available from some retailers, but new models have been introduced by both companies.

For winter footwear see this article.
Socks
I mostly wear Smartwool merino wool socks, Wright Socks, or Asics Trail Sensor Socks. What I wear for each trip is what is at the top of the drawer. Most weigh around 1.2 to 1.5 ounces per pair.
10/24/2016: As my socks wear out I am replacing them with Darn Tough merino wool socks. They last longer, work great, and have a lifetime guarantee.
Hats
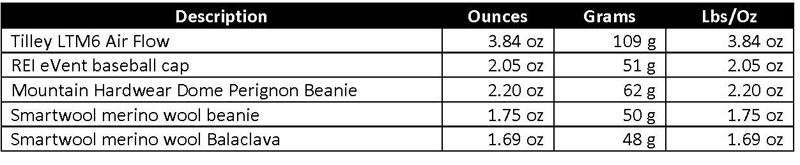
I always bring some sort of headwear, but don’t wear it a lot of the time. For years I wore an Army surplus Boonie hat. You can buy them for around $10. In really hot weather you should wear a wide-brimmed hat with good ventilation. It doesn’t get much better than a Tilley LTM6 Air Flow hat.
In cooler weather, especially if there is a good chance of rain a waterproof breathable, REI eVent baseball cap works well for me. It is perfect under a poncho hood to make it easier to seek.
In cold weather I like the Mountain Hardwear Dome Perignon Beanie. It’s warm, comfortable and windproof. If it is really, really cold I’ll take a Smartwool Merino wool baclava to layer under other headwear and to cover my nose and mouth.
I have several Smartwool Merino wool beanies and often take one to sleep in.
10/24/2016: The REI eVent baseball cap is no longer available. All the other hats are still made and available.
Gloves
On most trips I take a pair of Smartwool merino glove liners or a pair of Possum Down Gloves. If I expect temps to be around freezing at night, it’s a pair of military surplus wool glove liners. In winter with snow, I take several pair of merino wool liners, zPacks fleece mittens with Cuben rain mitts – gloves will get wet in snow, so you need extras! For really cold weather; a pair of Marmot insulated Randonnee Gore-Tex Gloves with insert liners.

Trekking Poles/Hiking Staff
A long time ago I started using a hiking staff. Can’t say it was any help hiking, but it was good for setting up a tarp shelter, moving rattle snakes out of the way and a myriad of other tasks. I guess I brought this along on nearly every trip for almost 40 years out of habit.
I few years ago I bought a pair of trekking poles. Same result – couldn’t confirm it helped at all hiking, but they were useful for all kinds of tasks. I do take a pair of Black Diamond poles when snow shoeing.
But on most trips I take neither.

Knives
I don’t understand the fixation many hikers have on big knives. For the most part I just need one to cut open food packaging or cut some tape or piece of cord. A small pair of scissors is nice to trim finger and toe nails (Victronix Swiss Army Knife Classic). I recently bought a Victronix Little Vicky knife for spreading peanut butter, instead of using the handle of my spoon. I haven’t used it yet, but think it is going to be a nice piece of equipment. For more thoughts on knives, click here.

Stoves
I don’t cook. I boil water and eat instant types of food. I also enjoy coffee, hot chocolate, and an occasional cup of tea. My stove systems have gotten really simple and light. Mostly I use Esbit tabs or denatured alcohol for fuel. In winter I have mostly gotten away from white gas and use a MSR WindPro II with an inverted canister. Sometimes I will still use my MSR Dragon Fly for snow melting duties, especially on longer trips. I probably bring my Caldera Cone system on 90% of my trips, which includes stove, pot, and windscreen. I have been using a LiteTrail cook system on a few trips and like it so far . Sometimes when I want a fast and easy stove, the Snow Peak LiteMax canister stove is quick, easy, convenient and light.
10/24/2016: I replaced the Caldera Cone Foster Keg kit with a Trail Designs Caldera Cone Fissure. I also dug out my old Svea 123 and am using it more often. You can read about why I made the switch here.

Cookware/Utensils
10/24/2016: I replaced the Caldera Cone Foster Keg kit with a Trail Designs Caldera Cone Fissure. I also dug out my old Svea 123 and am using it more often. For these two stoves I am using a Toaks 850 ml titanium pot and a Snow Peak 900 ml titanium pot. You can read about why I made the switch here.
The Caldera and LiteTrail don’t need a separate pot. With the Snow Peak I use a MSR Titan Kettle (.8 liters/28 fluid ounces). If I am using the WindPro or Dragonfly, I am melting snow and need a larger pot, which is a Snow Peak Titanium Pot (1.4 liters/48 fluid ounces).
I rarely bring a cup, but when I do it is a MSR Titan cup (.4 liters/13.5 fluid ounces).
The only utensil I need is a spoon. Since I boil water and add it to a bag full of instant food, I like a long handle. The Sea to Summit Alpha Long Spoon, made from anodized aluminum fits the bill.

Water bottles
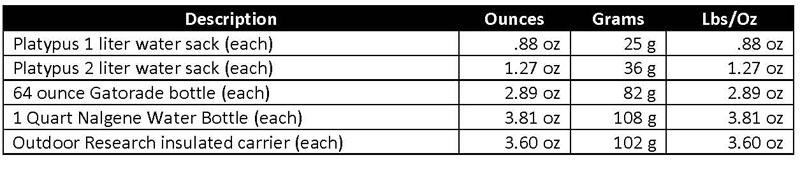
One most trips I bring a couple 1 liter Platypus soft water bottles. If I have short periods of time where I need a lot of water, I might bring an additional 2 liter Platypus.
If I need to haul a gallon or more of water frequently and I must have totally reliable bottles (no breakage), I bring two or more 64 ounce Gatorade bottles.
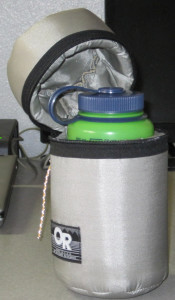
For snow and temps well below freezing, then it is Nalgene bottles with Outdoor Research insulated carriers.
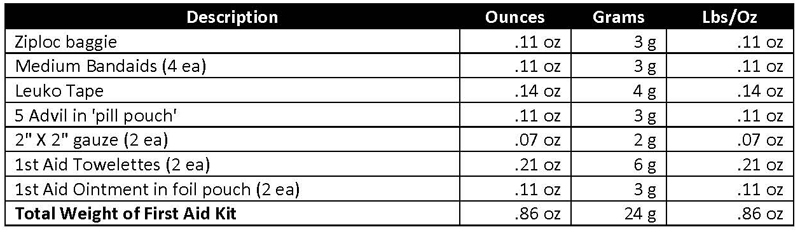
First Aid Kit
The experienced solo backpacker is careful and rarely gets injured. Most injuries are minor cuts, scrapes, bruises and blisters. Being smart, careful, and knowing how to improvise outweighs any first aid items in your kit. Over the years I have stopped taking any first aid item I never used, and my kit is quite small.
Lighting
I do not like to hike at night, unless it is in the desert with a bright moon to help guide the way. On most trips I only bring a small Photon II light, that I carry on a string around my neck (along with a whistle). I have had to hike a couple times in the dark with this light and it is next to useless for that purpose. But for task lighting it is good.
If I am hiking in winter (short days and long nights) I may also bring a Petzl e+LITE Headlamp (w/o case). Having the light on your head keeps the hands free for tasks. This is not very good if you need to do night hiking.
When I anticipate I may need to do some night hiking, I bring a Petzl Tikka XP2 Headlamp. Probably not the best on the market for night hiking, but it does the job for me.

Miscellaneous
Bandanna
One goes on every trip. Can be used as a water filter (get the big stuff out, sun screen, towel/washcloth, pot holder, and whatever you imagination can think up.
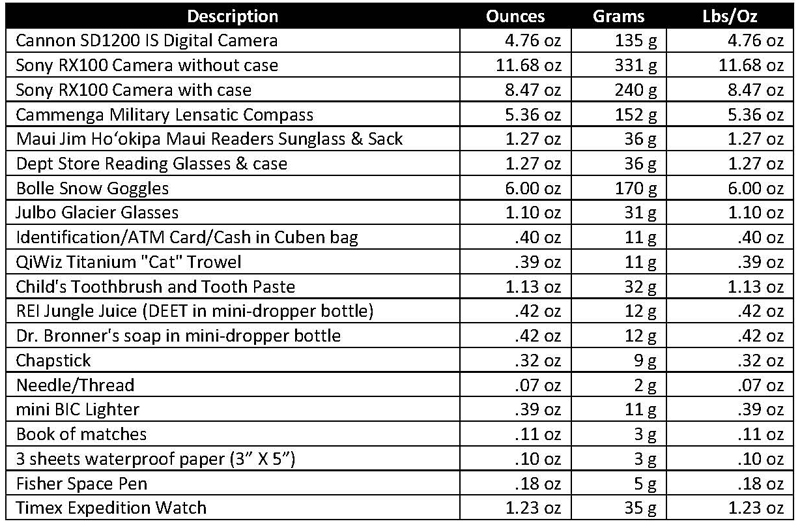
Camera
Probably half the time (or more) I don’t bring a camera. Cameras distract you and can suck up time. For the past few years I have used a Canon SD1200 IS digital camera. It has a 10 mega pixel sensor. What I like most about it is the built-in view finder. I also have a waterproof case for it that can be used underwater when snorkeling, but never take that backpacking. What I don’t like about it is the battery cannot be charged via the USB port. It is light, compact, and durable.
This past Christmas Joyce bought me a Sony RX100. Awesome camera. 21 mega pixel sensor, can shoot raw format, great lens. Only negative is the lack of a built-in view finder. If I take a camera backpacking, this is now my favorite. Much heavier and larger than the Canon. Also because it is an expensive camera, I keep it in a case with a neck strap, which adds weight. I will probably explore some lighter case options for backpacking.
Map and Compass
One the most important backcountry skills is expertise in using a topographical map. It is often more important than compass skill. A good map and the skill to use it, often means you can leave your compass in your pack. I will have to admit that my compass skill had decreased over the years, being able to primarily navigate with only a map. On one trip in desert canyon country, this became a little problematic – but I am happy to report that since then my compass skills are back to where they need to be. In the US the best maps are the US Geological Survey 7.5 minute maps (1” = 24,000 feet). These maps are 22” X 27” and weigh a little over an ounce each. You can buy these from the USGS directly, and many specialty shops carry them. An option is to download free PDF versions from the USGS and have a store like Staples print them on the proper size paper. On some trips I would need a dozen or more maps, which become heavy and bulky. For this I use the full USGS map for the sections that are more difficult to navigate and print smaller maps for the other areas using National Geographic’s Topo! software. I have heard that this software has been discontinued.
Many people now rely on GPS units. I have used them (and their smart phone brethren) and find the screens to small to be useful. Being electronic devices they are subject to dead batteries, breakage, and stray electrons. Most hikers who use them tell me they bring a back-up map and compass. That seems redundant. Might as well just bring the map and compass and leave the GPS at home.
Most backpackers who bring a compass use one of the light base-plate models. I prefer a military lensatic compass, current official ones are only made by Cammenga. There are two versions:
- Model 3H Tritium (official military issue)
- Model 27 Phosphorescent
These models are identical except the 3H uses radioactive tritium to illuminate parts of the compass at night. Tritium has a half-life of around 10 years, so the compass should work well for 15-20 years. The Model 27 uses a phosphorescent paint which absorbs light and will last for several hours at night. Since I have switch to LED lighting, these lamps do a poor job activating the phosphorescent paint compared to an incandescent light, so I have switched to the Tritium Model. As a solo hiker who often goes off-trail a quality and tough compass is critical for me. These compasses outperform any base-plate compass on the market. Unlike base-late compasses that are liquid filled and prone to developing bubbles, the Cammenga uses a jewel bearing. Unlike most base-plate compasses, which have an adjustment to compensate for declination, the Cammenga does not. But when you become expert with a lensatic compass, you don’t need the compass to adjust for declination. Specs on the 3H compass:
- Luminosity: Tritium
- Jewel Bearing: Sapphire
- Rotating Bezel: Bi-Directional
- Climate Capacity: -50 F to +150 F
- Frame Materials: Cast Aluminum
- Waterproof: Yes
- Expected Luminous Life: 10 Years
- Accuracy: +/- 0002 mils (0.1125 degrees)
- Dial Readings: Degrees & mils
- Casting: Aluminum
- Damping Process: Induction
- Carrying Pouch: LC-1 w/Belt Clip
- Lanyard: Included
- Colors (Body): Olive Drab, SWAT Black
- Warranty:Included, 1 Year
If you decide to buy a lensatic compass, make sure you get a Cammenga model. Most others on the market are cheap and inferior.
Glasses
Old age is catching up with me and now I need glasses to read. I normally do not wear sunglasses, even in the desert. But I normally bring a pair of Maui Jim Ho‘okipa Maui Readers Sunglasses. These are bifocals, with the bottom magnification at 2X. Other times I bring a pair of drug store reading glasses. They are exactly the same weight as my sunglasses. In snow, sunglasses or goggles are critical. When I expect a lot of blowing snow and super cold wind I have a pair of Bolle snow goggles I have been using since the 80’s. Sometimes I bring a pair of Julbo Glacier Glasses. But most of the time just sunglasses for snow work.
Wallet/Keys
I usually carry my driver’s license, ATM card, insurance/emergency card, and a couple $20 bills in a cuben sack (2.5” X 3.5”). I have never been comfortable hiding my car key outside or even leaving it in the car (since I have remote entry). Just too many scum bags out about, plus my car is often left at some very remote spots.
Hygiene & Misc
Taking a Poop: I admit it – I use toilet paper. Some folks, in order to reduce weight, go without using rocks or plants instead. If you use toilet paper, make sure you know how to properly dispose of it. For digging catholes I use a QiWiz Titanium Trowel.
Toothbrush: I use a child’s toothbrush to save weight. I normally take one of the small travel size tubes of toothpaste, but have dried and cut toothpaste into small “dots” to save weight. It really isn’t worth the time and effort.
Mosquitoes: REI Jungle Juice (DEET) repackaged into a mini dropper bottle.
Soap: Dr. Bronner’s repackaged into a mini dropper bottle. Best to use the unscented version in bear country.
Lips: Plain old Chapstick.
Fire: Mini-bic lighter and a book of matches. On long trips sometimes two lighters (just in case). I have never had to need to bring some sort of kindling/firepaste.
Writing Materials: Many people keep a journal during their trips. I don’t. But I take a Fisher Space Pen and waterproof paper in case I need to leave a note for some completely unforeseen reason. I often make notes on my maps though.
Electronics: iPods/MP3 players, cell phones, iPads/Tablets, Kindles/eReaders, GPS units, Personal Locater Beacons, etc. Leave them at home. You are in the wilderness for God’s sack – time to cut the tentacles and get back to the world of the wild. Plus, intelligent people don’t get bored, so you don’t need additional entertainment.
Now I can see the use of a smart phone for a very long hike (weeks/months) to keep family apprised of where you are. I have even experimented with GPS and smart phones on a few trips. All-in-all they are better left at home.
Watch: There are all kinds of fancy watches that can perform miracles. I mostly hike with an inexpensive Timex Expedition Watch that has an Indiglo backlight. It is several years old and I think I am on the 3rd replacement battery. Fabric bands are more comfortable than plastic or metal.
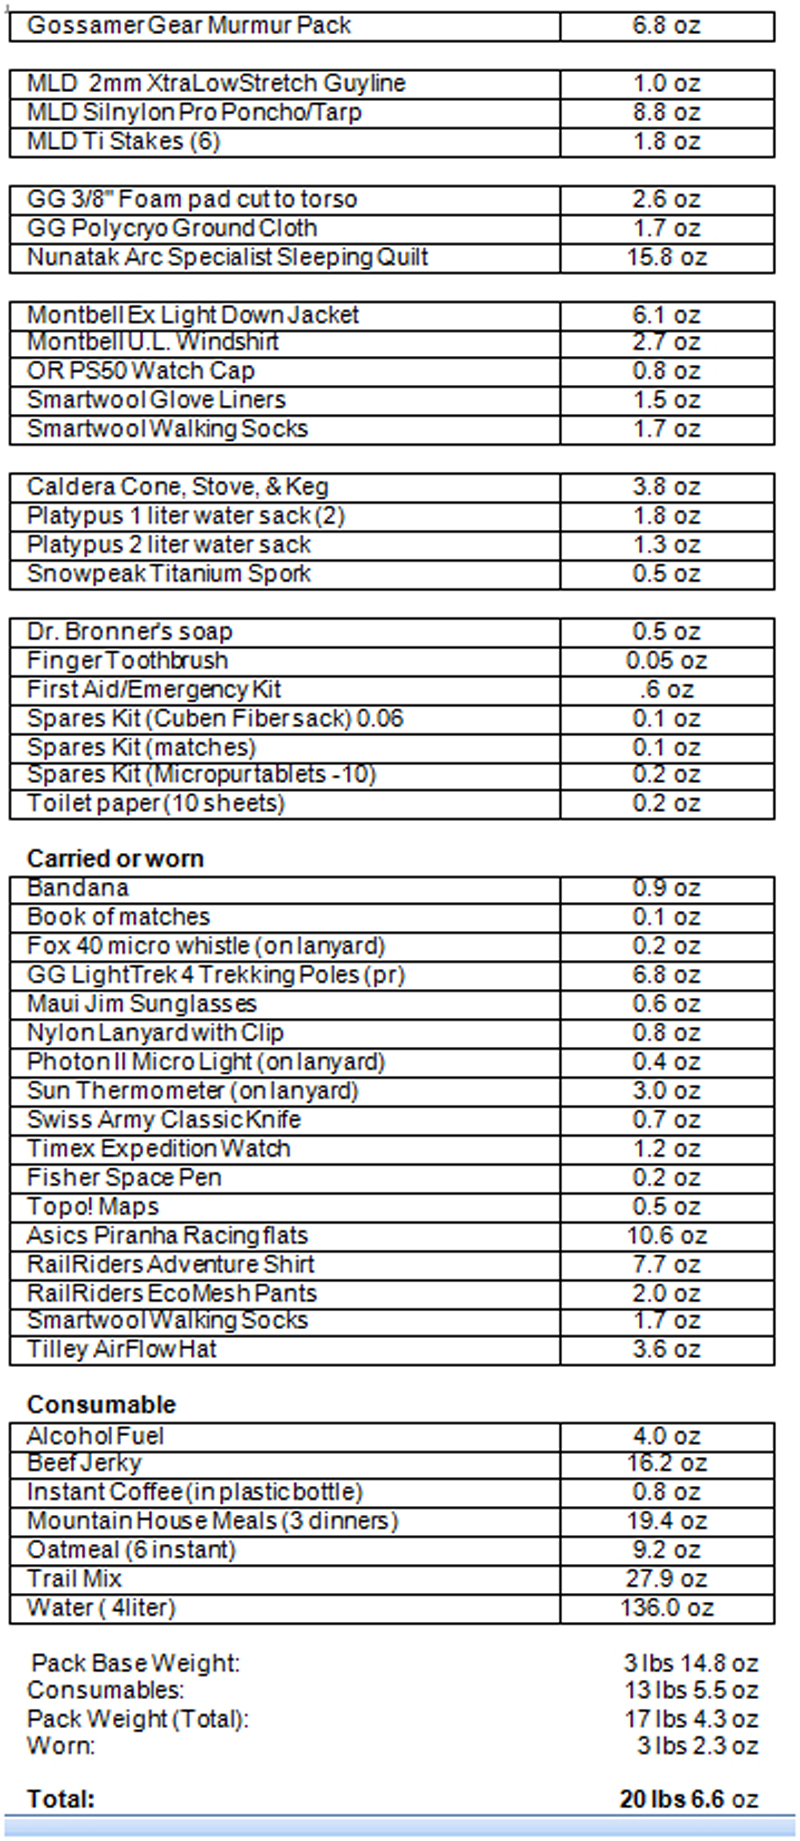
Gear Lists
Sample Gear Lists from Actual Trips
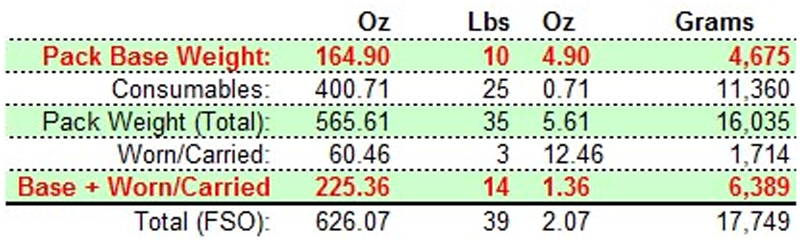
Extremely Ultralight
This is from a trip where I wanted to see how light I could go and be warm, dry, and safe. I also wanted to see if I could do several days with all gear carried or worn to weigh less than 5lbs. The trip included rain and nighttime temperatures right at freezing. Even had a bit of snow.
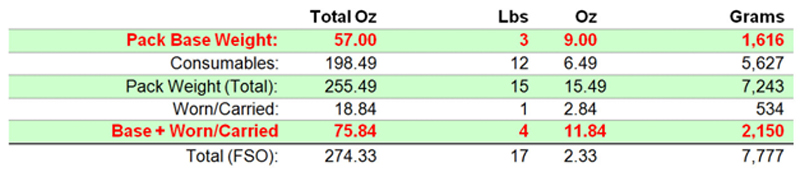
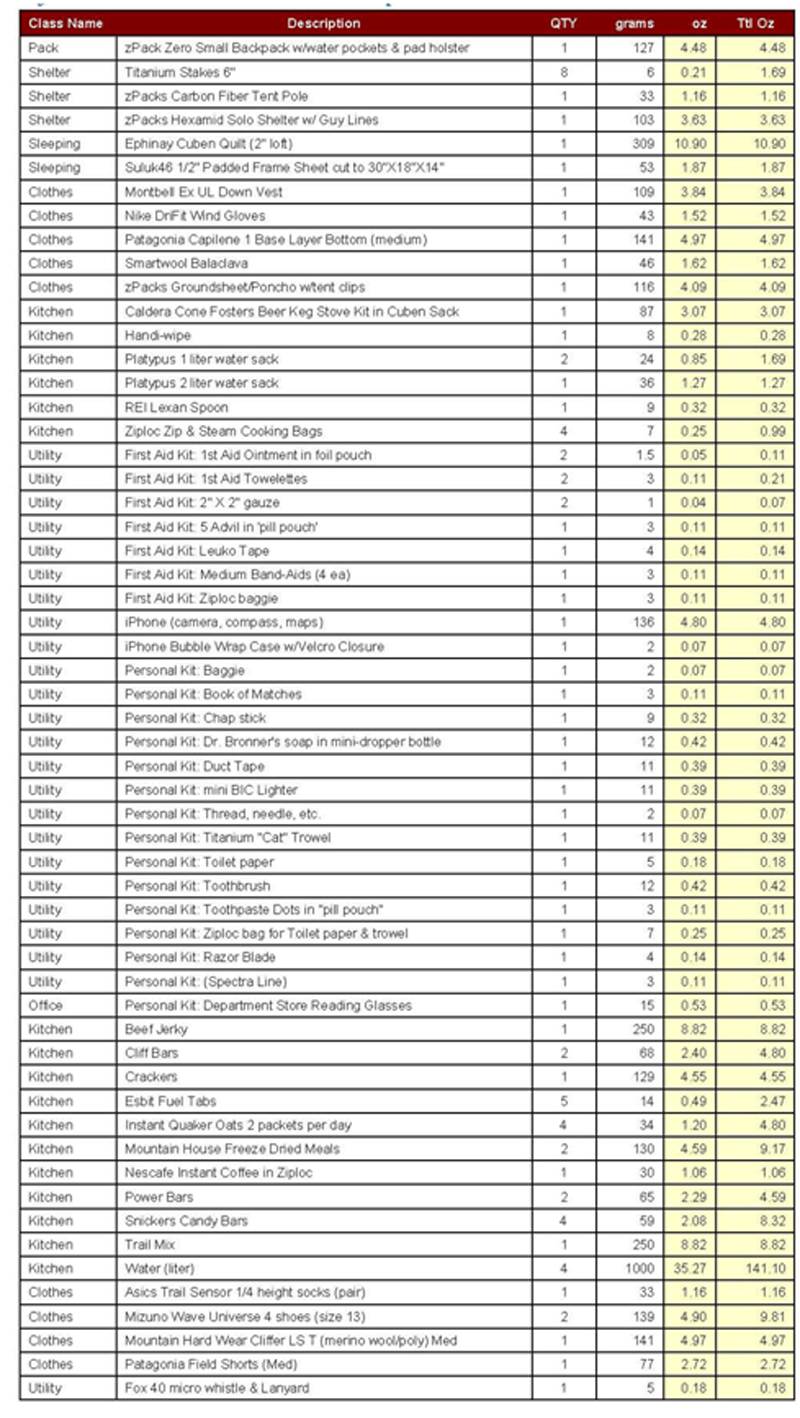
Super Ultralight
All gear in pack under 5lbs. Excludes food, water, or fuel (consumables)
Typical Trip