You don’t have to be a genius to know that the lighter your backpacking kit is the easier it is to hike. The easiest way to lighten your load is to discard things you don’t need, get rid of duplicate items, and opt for items made from lighter weight materials. Often gear can be jettisoned and replaced with skill alone.
At some point the parring down process reaches a point of diminishing returns and can enter the realm of “stupid light” as described by well known adventurer Andrew Skurka.
Today I hear many backpackers, who are trying to lighten their gear, ask, “What is the best pack that weighs less than X ounces?” and often that request for input that has an arbitrary formula such as:
X <= 16 ounces
One might wonder what rationale or unfounded thought process brought these folks to the conclusion that X ounces is the defining criteria for a piece of gear. It is the concept that less is more, or the lighter your pack the more enjoyable your trek will be. That may be true to a point, unless you cross into stupid light or into the kingdom of diminishing returns where weight compromises comfort and efficiency.
Less is more is an oft quoted concept of the modernist architect Ludwig Mies van der Rohe. What it means is good design is dependent on focus and simplicity. The corollary proposition to this concept is the modernist architecture mantra of form follows function. The shape or design of an object must be based on its function or purpose, not some random goal such as a specific weight as the only consideration.
How did we get to this point where pack weight trumps function? We can blame Don Jensen, Dana Gleason, Wayne Gregory, Ray Jardine, and a multitude of other pack designers.
In the 1960’s my first pack was a Boy Scout pack I bought at a swap meet. I think it was an Antelope brand. That pack is long gone. From 1971 until 2008 my main pack was a Kelty D4. I had several other special packs, but this D4 was probably used over 90% of the time.
Note of interest: In January 2012 I decided to take a trip with my old Kelty D4 pack and noticed that the seam in the divider between the upper and lower compartment had separated along most of its length. I contacted Kelty to see if they could repair it, expecting to pay for the repair. They emailed me a form to fill out and attach to the pack bag. Three weeks later I got it back and it had been expertly repaired at no charge. The form said it was covered under warranty – 41 years after I bought it.
During the 60’s and 70’s Kelty packs were the dominant pack in the market. Seemed like everyone had a Kelty. So I thought I would start out with a little Kelty history.
KELTY
Kelty History (from the Kelty Website)
1952:
Dick Kelty hand forms and welds packframes in his garage, while wife Nena sews each pack bag. First packs to use aircraft-aluminum contoured frames, padded shoulder straps, waist belts, clevis-pins, nylon pack cloth, sell 29 packs for $24 each
1953: sales triple to 90 back packs
1954: sales now more than double to 220 packs in this year
1956:
Dick Kelty quits his carpentry business to focus on Kelty Packs full-time. Opens first retail store and “factory” in an old barber shop in Glendale, California.
1962: retail and mail-order divisions are moved to a larger building on Victory Blvd.
1965: backpack rain covers are introduced.
1966: Kelty packs are used on the National Geographic Antarctica expedition.
1968: production facility is moved to a new factory in Sun Valley, California.
1969: new BB5 pack is introduced in red with a large main compartment and five outside pockets.
1970: Dick Kelty designs and produces the first stainless steel, quick-release waist belt buckle used on a back pack.
1972: Boston-based CML, Inc. purchases Kelty, and Dick remains chairman through CML’s six years of ownership.
1973: introduces the Tioga and Serac packs, the first new designs since the early 1950’s.
The following information I gathered from some receipts and old brochures. I think it is fairly accurate.
In the early 1960’s Kelty offered two external frames and three pack bags. You ordered the frame and bags separately.
The Backpacker frame had 4 cross members and Mountaineer frame had 5 cross members.
Pack bag options were:
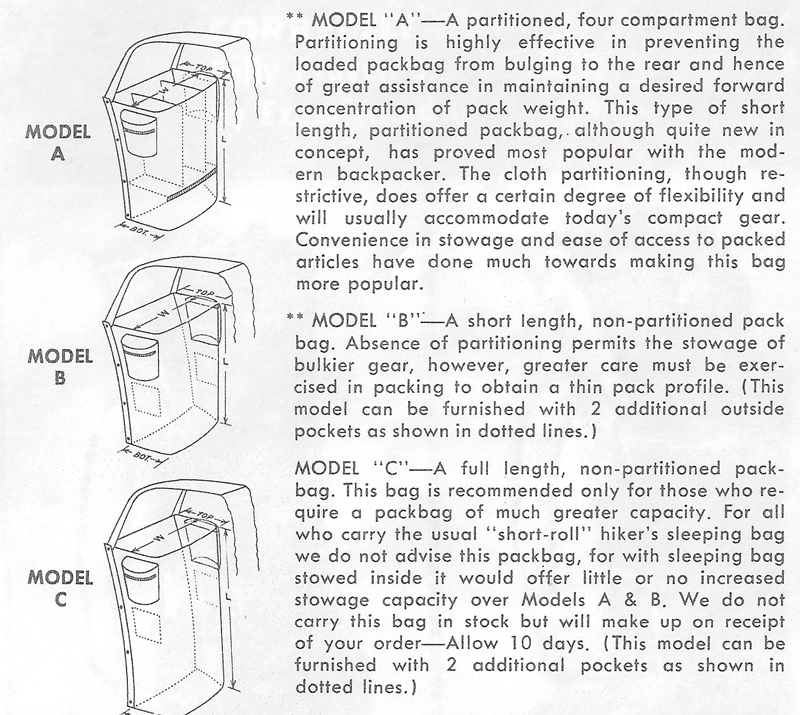
Models A, B, and C. Model C was not kept in stock and was a special order item. I have never seen one.
In 1973 the Serac was introduced. This came on the Mountaineer frame only with an extension crossbar, was a full length bag, with a separate bottom compartment meant for a sleeping bag. The extension bar could be extended higher. It came with 4 external side pockets, a front pocket under the flap, attachment patches and an ice ax loop.
Sometime in the 80’s a larger Serac was introduced. I think it was called the Serac Expedition, but am not sure.
My Experiences with Kelty
Prior to 1971 I knew nothing about Kelty packs, except I had seen a quite a few on the trail. When I got out of the service, I flew into LAX, close to my parents’ home, landing in the evening. I really didn’t know what I wanted to do with my life, but had saved enough money to live for a year without working. I had around $2,000. So I went to the ticket counter and asked where the next flight out was going. Fresno. Well I had been to Fresno before, so I took the plane. I got a hotel room and wandered around Fresno for a day or too. Then I decided to go backpacking for a few months. I found a mountaineering store and as chance would have it, purchased a Kelty pack and a down sleeping bag, along with a few odds and ends. I bought some additional gear at an Army surplus store, kept some of the things I had in my luggage, threw most the rest of the luggage and contents away, sent a few things home, and sat down to plan a trip. As it turns out, the winter of 1971 had one of the biggest Sierra snowfalls in history and there was no way I could enter the Sierras from Fresno. So I hitch-hiked to Kernville and spent the the 2nd half of April, May, and June hiking around the southwest part of the Sierras. As the snow melted I headed north almost to Yosemite Valley, didn’t like the crowds, turned around and hiked back to Kernville. By now it was mid September or so, and I went home.
I did another big trip in 1972 with pretty much the same gear, except for a white gas stove. When I returned in late ’72 I got a full time job. But I still hiked whenever possible.
Around ’73 I bought a Serac model. This was meant only to be used on trips where I needed more capacity, such as in winter snow. Sometime during the mid seventies I found out that Kelty had been sold to another company, and worried that they would discontinue the line of packs, I purchased an early Kelty Model B with the optional two external pockets, mounted on a Mountaineer frame, from the original owner. This pack was brand new, never used. Since my fears about the D4 wearing out or would break never happened, this 50 year old pack has never been used.
In 1977 I bought a used Kelty A model for my first wife. The original owner had used it once, on a 3 day trip. My wife used it only once, on a 7 day trip and decided backpacking was not for her. I used it a few times also. So this Model A pack is in almost new condition too and around 50 years old.
Sometime in the mid 80’s I wanted an even bigger pack to haul water in the desert and for winter trips, mostly in the San Jacinto and San Bernardino Mountains. Also kids were on the “to do list” and I anticipated family backpacking trips, so I bought the Serac Expedition. That pack has been used quite a bit, but the original 1971 D4 was the work horse until I switched to internal frame packs in 2005.
Identifying the Age of Kelty Packs
I don’t know what kind of logos Kelty use in the 50’s, but from the early 60’s until 1973 Kelty used a triangular logo patch with mountain in the in the background and an arrow behind the Kelty name. Until 1963 or so, it also included “Glendale 1, CALIF” under the Kelty name. Around 1963 the Zip Code was added after Calif. In 1968 when Kelty moved the manufacturing to Sun Valley, the logo was “SUN VALLEY, CALIF 91352.” The logo was changed again in 1972 after Dick Kelty sold the company with a more modern background and no city or state.
Above: Logo on the never used Model B pack. Notice that everything still looks factory fresh. There is no Zip Code, so the pack was probably manufactured before 1963.Above: Logo from the Model A pack, it also looks brand new. There is no Zip Code, so the pack was probably manufactured before 1963.Above: Logo from the 1971 D4 pack. Notice that in has Sun Valley on it.Above: Logo introduced in the early ‘70s.
Model B Bag
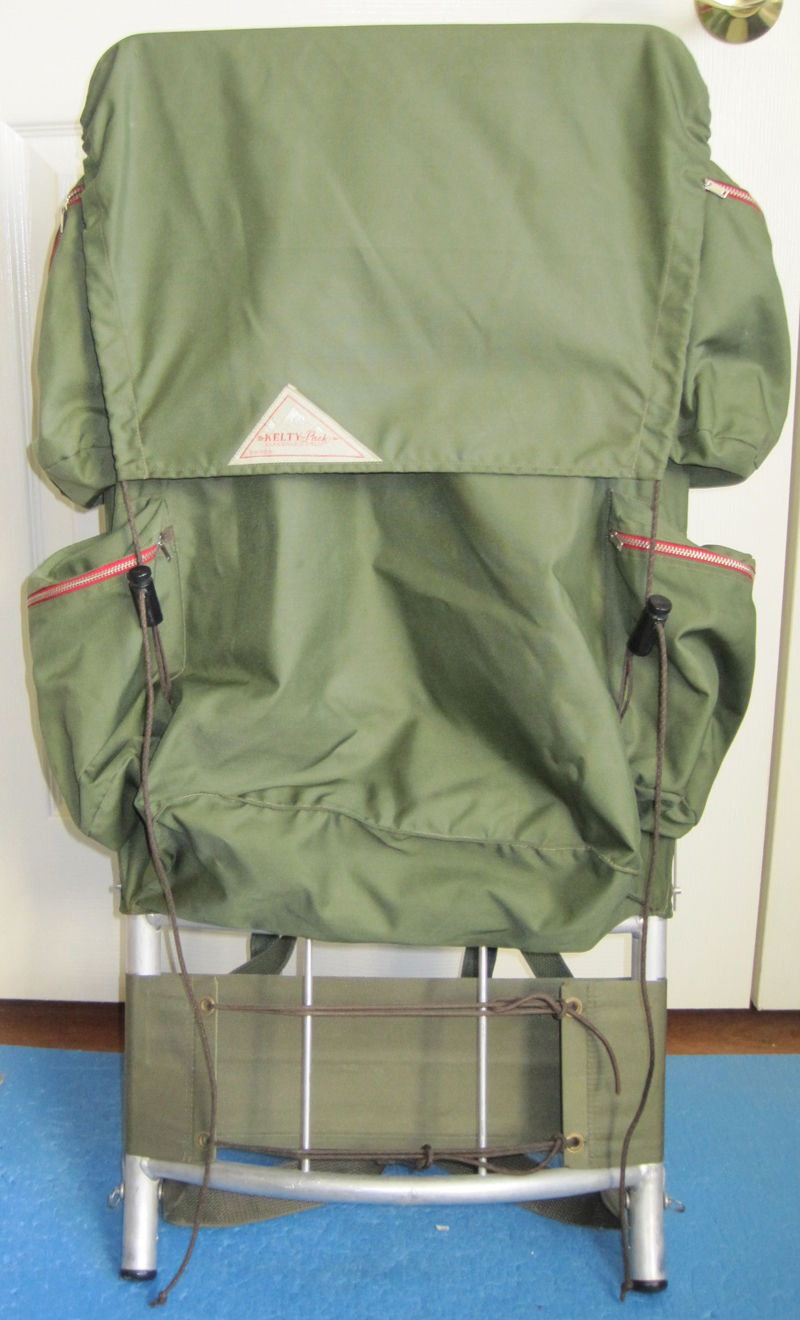
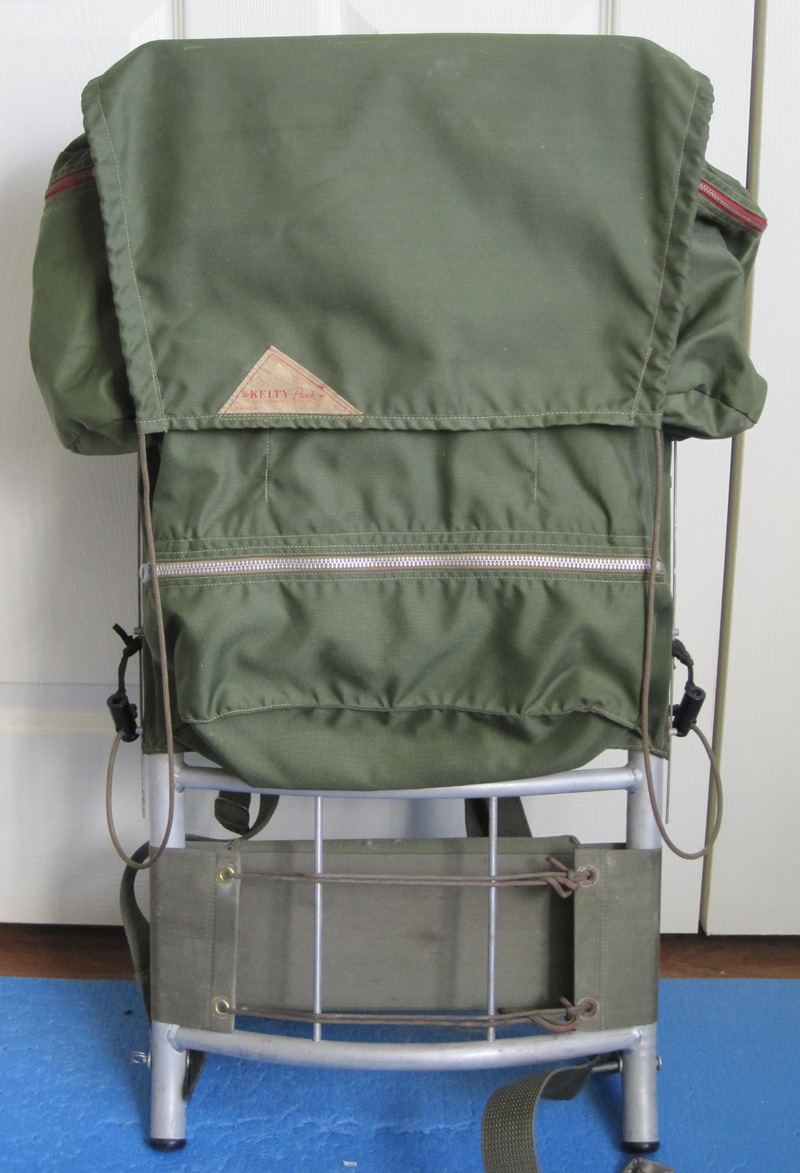
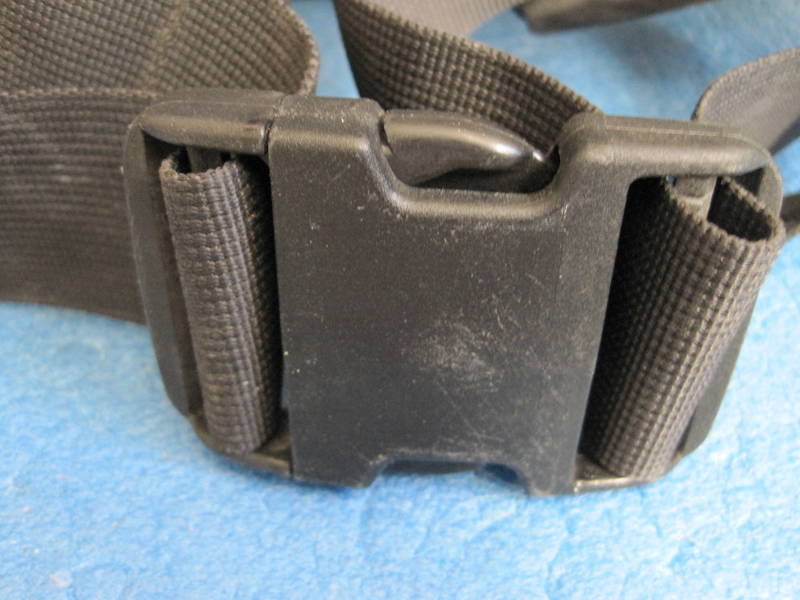
Above: Front view of the still new Model B pack. I am showing this first because it has all the original equipment on it. It has a mountaineering frame.Above: This is the back of the Model B. Notice the two plain nylon back bands on the frame. The belt is made from a canvas/nlyon material with a jaw clamp type of buckle.Above: Close up picture of the early belt and buckle.
Model A Bag
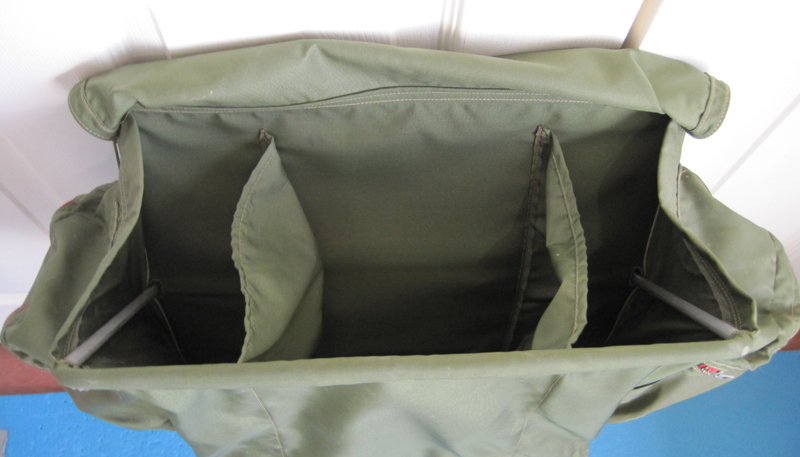
Above: This is the front of the Model A pack. It has a Backpacker frame. Notice it only has two external pockets.Above: This is the back of the A Model pack. Notice that the lower band is different from the band shown earlier on the B Model. This is not the original back band. It came off the D4 pack I bought in 1971. You will see why later. Also you can see there is no cross member at the top of the frame like the one in the Model A shown earlier.Above: A unique feature of the A Model bag was the divided top compartment. Not very practical, except it made you select gear very carefully, no stuffing large items in it.
Model D4 Bag
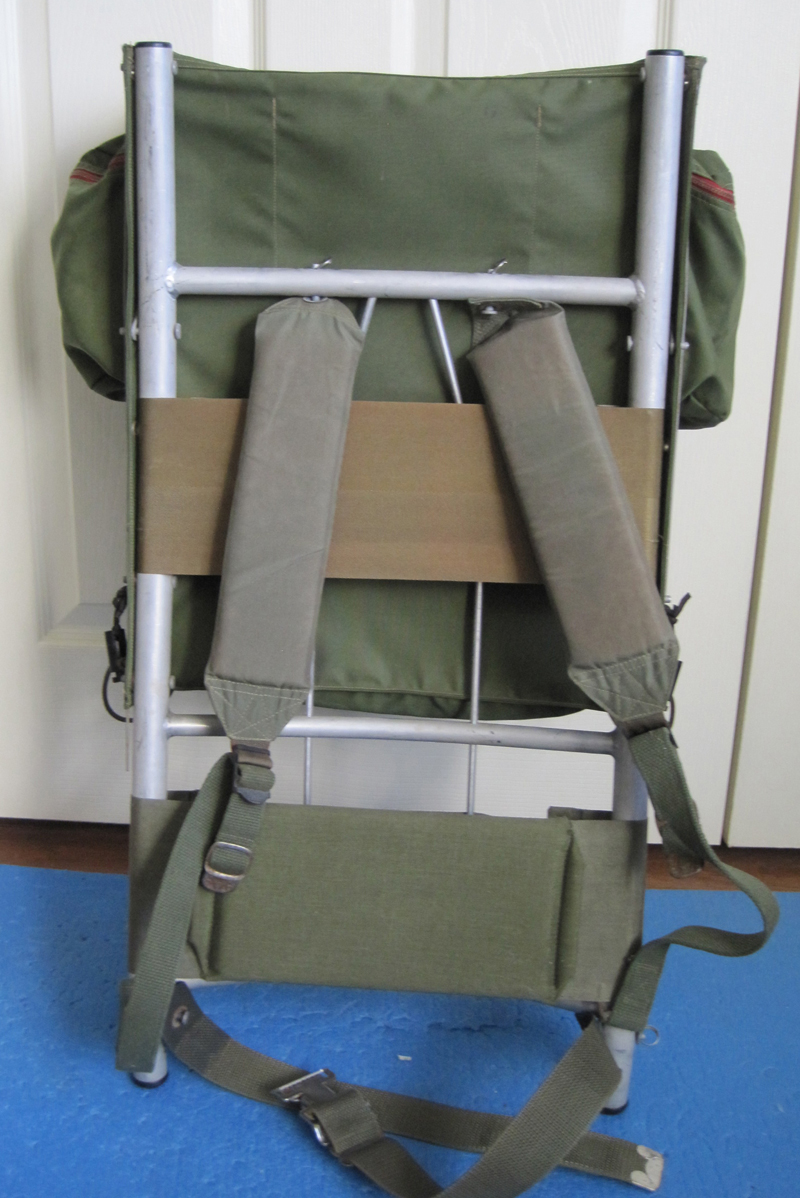
Above: Front of the 1971 D4 pack.Above: Back of the 1971 D4 pack.
Those are not the original pack straps, the originals wore out many years ago, probably around 1977. Note the wrap-around hip belt. This was a Kelty option, and I think it may have been introduced in the early 60’s sometime. The belt buckle is the famous Kelty Cam-lock buckle. It worked so well that many owners of other brands of packs switch to these. They were sold in many stores, such as R.E.I. The original lower band is now on the Model A pack shown earlier. Also the original belt on this pack was made from nylon instead of canvas and had a metal quick release buckle. Notice that the top back band is now made from a nylon mesh material instead of solid nylon.
Above: Picture of 1971 D4 optional belt with Cam-lock buckle.Above: The top belt is the early canvas/nylon belt an buckle. In 1970 Kelty came out with the metal quick release buckle and a wider nylon belt (bottom). This is the original belt from the 1971 D4 pack that I never used. The quick release belt is different than the cam lock. The quick release is tighten by pulling the belt through the metal hardware, the cam-buckle is similar to early car seat belts.
One thing that I did not show was the optional cross-over frame extension that was later standard on the Serac models. I added one to the D4 when I purchased the pack, allowing me to carry additional gear on the top of the pack. When I later bought my first Serac, I removed the bar from the D4.
Since Models A, B, and D were ¾ length bags, they could be re-positioned on the frame. I never did this, but here is a picture from an early brochure. (Above)Above: Detail of early Kelty wrap-around belt with metal cam-lock buckle.
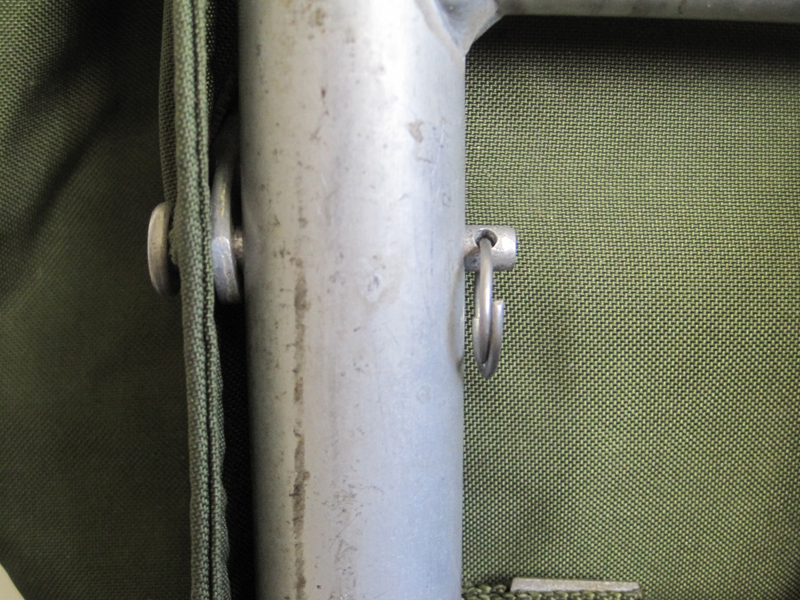
Above: One of the weak points of the early Keltys was the Key Wire that was used to secure the bag to the frame and clevis pins. Top of Key Wire shown.Above: Bottom of Key Wire. Clevis pins were also used to secure the hip belt and shoulder pads, but a circular wire was used to secure them.
On one trip I mangled and bent the key wire on some brush, so I removed the Key Wire and used circular wire to hold the clevis pins securely (above). I had intended to get new Key Wires, but never got around to buying them. Remember, in those days there were few retail outlets or Internet, so most things I purchased were via mail order. The Key Wires are no longer available from Kelty. Securing the bag clevis pins with a wire hook shown.
Above. A nifty item was this little loop that could be attached to the clevis pin, for attaching light weight accessories such as binocular or camera straps. I don’t think they were offered by Kelty; probably A16, REI, or Campmor.
Serac Model introduced in 1973
Above: Front view of Kelty Serac. This is a full length bag with 4 external side pockets and a front pocket under the flap. It was somewhat difficult to stuff a sleeping back into the lower compartment with just a horizontal zipper. This bag had 3 compartments for the main bag. You can see the zipper flap for the middle compartment just below the flap. The bottom section is constructed from Cordura nylon.Above: Kelty Serac (back view). Notice it has a wrap around belt and a cam-lock buckle.Above: Serac cam-lock buckle. The release is made from plastic unlike the earlier metal ones.
Serac Expedition
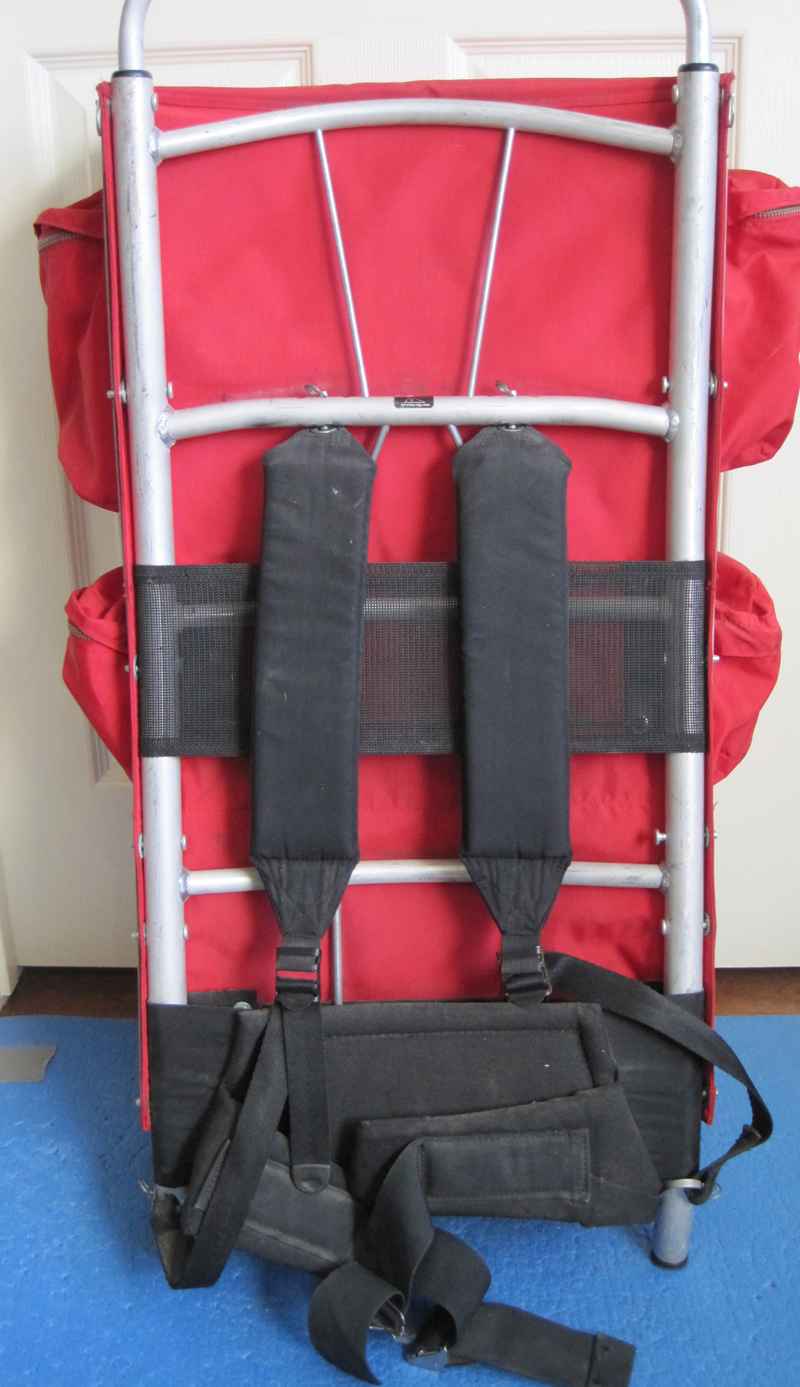
Above: Kelty Serac Expedition Front. This pack is huge! 5 external side pockets (one very long), a pocket under the flap, and a pocket on the front of the flap. The bottom section now has a U-shaped zipper. The bag only has two compartments in the main bag (unlike 3 in earlier Seracs), and the divider can be unzipped to convert into a cavernously large bag.Above: Kelty Serac Expedition Rear. When I bought this pack, I knew I did not want the stock shoulder straps. Notice the upgraded straps include a haul loop, sternum straps and webbing to attach external items. This is not a Kelty option. I think it was made by A-16, and I bought it at their El Cajon store.Above: The wrap around belt was still standard, but notice the plastic belt buckle. Somewhere I have a couple extra metal Cam-lock buckles but never got around to replacing the plastic ones, since they have surprisingly has held up.Above: This belt also had a lifter/stabilizer strap connected to the frame.Above: Kelty Trio (L-R) D4, Serac, Serac Expedition.
The zPacks Zero Cuben Backpack is really a stuff sack with straps. Mine has two options:
External water bottle pockets (because I often need to carry lots of water in the desert).
Sleeping pad holsters. These are removable, and I only use them when I am using a GG NightLite sleeping pad. This is the easiest way to carry this kind of pad. I remove the holsters if I am bringing a rolled 1/8″ pad to protect my NeoAir air mattress.
Additionally I made a sternum strap out of some Tripease cord and a couple of mini-biners, because the straps tend to slide of my shoulders.
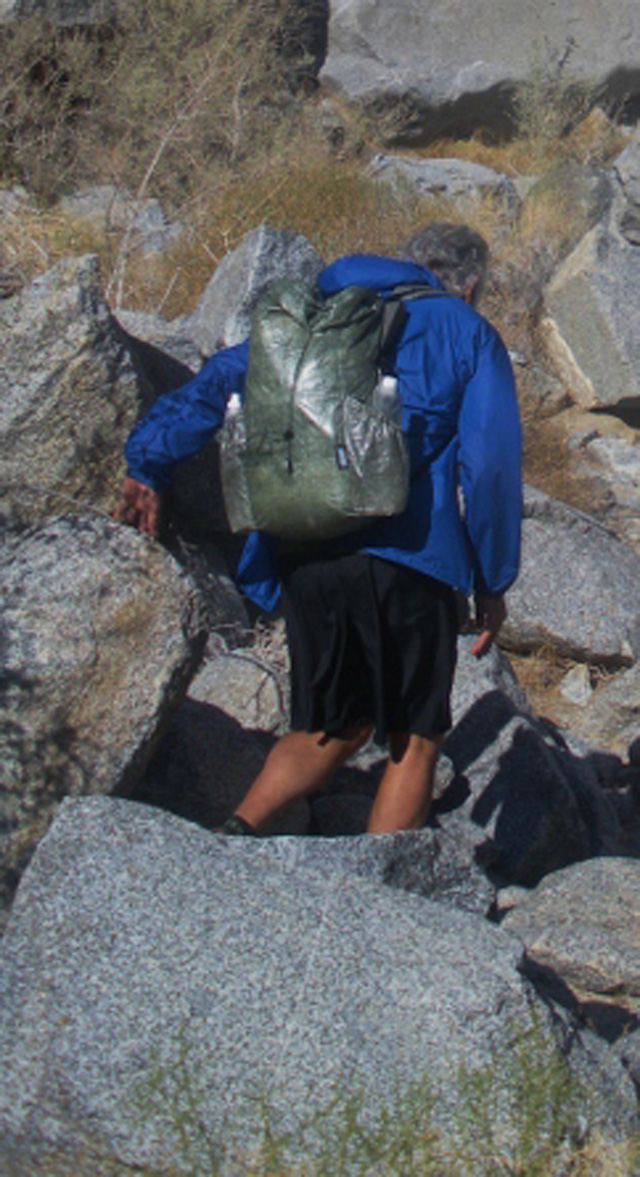
I use this pack on “fast and light” trips. For an example read this trip report. But it is not my “go to” back. I normally use either a McHale Bump or a McHale LBP 36. The Zero is also used a carry-on luggage, suitcase, and gear bag for car camping or camping in our tent trailer. I use it a lot for day hikes.
The volume is about 1500 cubic inches (24.5 liters) and the total weight with options is 4 ounces (113 grams).
A stuff sack with straps. The top of the back is closed with the drawstring, then folded over, the drawstring is then placed in a loop at the bottom of the pack where the toggle catches the loop and then everything is pulled tight. If I bring a 1/8″ rolled pad instead of a folding sleep pad, I use Velcro wraps around the pad and through the drawstring to attach it to the pack.
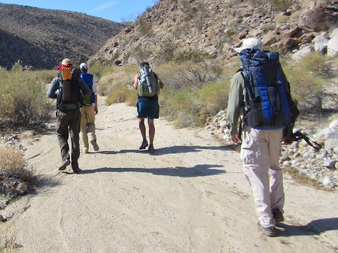
Sleeping pad attached to the drawstring. Look at all the heavy stuff everyone else is carrying or wearing. 🙂
Gossamer Gear NightLite pad in the holsters.
Small and light.
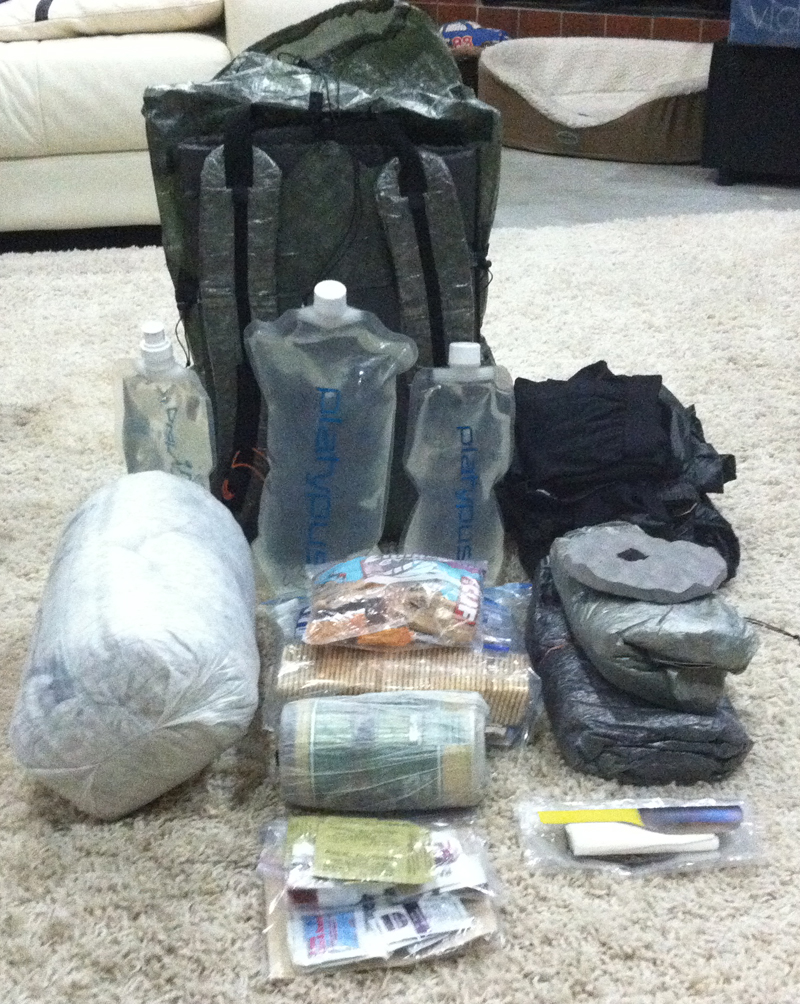
Packing for a 4 day trip.
Not much else to say. Its just a stuff sack. But I like it and use it a lot.
At the end of 2010, I purchased the last backpack I would ever need, a McHale LBP 36. You can read about it here.
Well, with a capacity of 39 liters in the main bag before tightening things up with all the compression straps, the pack was a little large for some of my short trips. So I needed a new smaller pack that would hold up. To be honest, I didn’t really need another pack. My wife needed some suggestions for Christmas gifts. So a new small pack would be really nice.
The goal of this pack would not be an ultralight pack, but a small volume that can comfortably carry a lot of water. A smallish pack that I can do a 7 day trip in 3 seasons, but with a real suspension. I like the options of my McHale LBP with a full double-buckle belt. Also his side pockets can hold a 64 oz Gatorade bottle. I have torn up most of my UL packs on brush and rocks and don’t want a pack to determine where I can go, I want a small pack that can travel where I want to go.
So it was time to call Dan McHale again.
I wanted a pack with a narrow width (circumference). I can carry 128 oz of water in the McHale LBP side pockets, which is a little over 8 lbs at the bottom, so with a tall and narrow pack I can better distribute the rest of the weight.
In 3 seasons my other gear has gotten ridiculously light and small (Tim Marshall quilt, cuben Hexamid, z Packs cuben poncho/ground sheet, torso length foam pad, MB Ex UL vest, Houdini, Capilene 1 bottoms, FAK, and a Fosters Caldera Cone (cone and Esbit fits inside the can) is about all I carry on most trips. Once I get through most of the food and water I have to fluff up the down stuff to fill out my smallest UL packs.
After my call with Dan he came up with a brand new pack and it looks like it has been a good seller for him this year. It’s a little pack called Bump 32 (32″ of circumference).
The McHale Bump pack thoroughly exceeded my expectations. Handles 35 lbs with ease, and the internal aluminum stays inside the pack are used as the frame, keeping the pack close to my center of gravity. This was an expense that was well worth the investment. The only difficulty through the entire purchase process was figuring out what material to make it from. Dan McHale wanted to make it from Cuben Tech fabric. I am leery of Cuben for the long term. The Cuben that Dan uses is a hybrid with a polyester laminate and he has tested it thoroughly. So I opted for Dyneema X Grid. The fabric Dan uses has the Dyneema threads spaced at 3/16” of an inch, versus the ¼” most of the UL manufacturers use. So his has about 25% more Dyneema thread in it. The pack has a full Dyneema bottom and the back of the straps is also made from full Dyneema. Dyneema is the strongest material known, and has replaced Aramid as the preferred material used to make military bullet-proof vests. The front of the pack has a mesh panel to help with sweat.
The back does not have compression straps or a front pocket. I did order the following options, which can be added or removed from the pack at any time.
Options (all can be removed)
Top Lid
Water Bottle Pockets (easily hold 2 Liter water bottle); 2 each
Hip Belt Pockets; 2 each
Shoulder Strap Pocket; 1 each
Specifications
Main Bag Volume (excludes any optional pockets) ~ 1863 cu in or 30.5 L.
Main Bag Volume (including the roll top and optional pockets) ~ 2496 cu in or 40 L.
The stays and internal pad are removable. The padded double buckle hip belt is removable.
Weights
Without optional pockets or lid = 2 lbs. 6.1 oz.
All Options Included = 3 lbs. 2.2 oz
Front of pack (stripped)
Back of pack (stripped).
Inside of pack. Cuben pocket for foam pad. The black sleeves are for the aluminum stays.
Inside of pack. Notice the robust backing Dan uses for the daisy chains and attachments. It is not sewn directly to the material only.
Bump with all accessories added.
Bump in action.
The top lid has a small cuben security pocket on the inside.
McHale LBP 36 on the Summit of Fortification Hill, Lake Mead Recreational Area, December 2011 Camped along the Colorado River below Hoover Dam, December 2011
Introduction
Around 2008 my backpacking equipment started moving towards the spectrum of Ultralight and below. I was approaching 60 and lightening my gear would allow me to continue hiking at the same level (speed and distance) I had been doing all my life. Ultralight is a base weight (the total weight of the pack minus consumables such as water, fuel, and food) of 10lbs or less. Over a period of a couple years I did many multi-day trips with base weights in the 3lb – 8lb range using 4 different cottage company packs. These included two frame-less and two framed (aluminum stays) packs. Total weight with food and water can be anywhere from 12 lbs to 30+ lbs on these trips. When it gets above 12 lbs, it is usually due to the amount of water I need to carry.
On almost everyone of these trips, the packs cause some level of discomfort. Be it the shoulder straps on the small packs or the hip belt on the larger ones. It is not constant discomfort, but at some point on every trip all the packs become a little bit of an irritant. So my thought was, is there a “perfect” pack? Or is it necessary to have a selection of packs for varying conditions. If there is a perfect pack, then why not deal with 3 season base weights of 6 lbs – 11 lbs, a pack for winter trips, and always be comfortable and happy?
The other downfall with some of these light packs is they are fragile. Light materials and construction are not going to last years and years. And some of them can be easily damaged. I had to replace a Gossamer Gear Murmur pack due to damage from cross country travel and many ‘errant’ trees and shrubs. This was not the fault of the pack, I just took it places it was not designed to go. To me it is crazy to have a collection of packs and to replace them periodically. In addition, it got almost to the point that these packs dictated where and when I go, instead of meeting the needs of almost any trip I want to take.
Along with my inventory of light packs, I had collected an assortment of more traditional packs over the years, all of which were too large for the light equipment I had evolved to in recent years. So I decided to check out McHale packs. I first heard of McHale Packs in Colin Fletcher’s The Complete Walker IV, where he said custom gear, “is the sweet stratosphere of McHale Packs and Limmer boots.” This did not mean I was going to buy one, but was going to research them. I started out by spending a lot of time on Dan McHale’s website. This was rather intimidating, as it was not easy to figure out what was what with all the McHale offerings and options. Dan is a pack builder. He also built his website, but he will tell you his expertise is packs, not website development. After talking to Dan, seeing a pack in person, and reviewing the DVD he sent me, the website quickly became easily to navigate and understand. More important, I quickly saw that he knew packs… probably better than anyone in the business.
I do want to make one thing absolutely clear. I did not get this pack to impress anyone. I hike alone most of the time, so there is no one to show it to. Also, a McHale pack is a sizable investment. I really want to emphasize the term investment. At first it was “expensive.” But considering the advice I received from Dan during the fitting process, the materials used, and the construction; at the time I was certain it was the last pack I would ever buy. For me it was an investment, not a purchase. A year later I purchased a smaller McHale pack… so much for one size fits all!
During my initial website research, I was unsure of which pack might fit my needs, so I skipped the Web order page and just called Dan. Left a voice mail and he called me back within an hour or so. Dan talks to all his customers — each and every one. He takes his reputation very seriously.
I had read that Dan was a very “opinionated” person. But what I experienced was a very knowledgeable man, not opinionated. I get a sense that he is very proud of every single pack he makes. They are not “things” he sells. He customizes every pack to what the customer needs. He asks a lot of questions to determine these needs. However, he will not build a pack to a lesser specification than his standards require. I like his attitude.
So after our first call, it was loosely determined that a LBP (Little Big Pack) with all the trimmings was what I needed. However, he stressed that this determination could only be finalized after I tried out a demo pack. Next step was for me to do all the measurements according to the instructions on the Website, and to mail a deposit for the demo.
After he received my measurements, he called me back and reviewed everything. It is obvious that he is expert at looking at measurements, and he needs many more measurements than just torso length and waist size that other manufacturers use to size a pack. When he looked at all my measurements, he said that I might not have measured my torso accurately… and he was correct. I re-did the measurements and received the demo pack within a week after mailing the deposit. His demos are not necessarily constructed with the exact materials the customer wants, because sizing is the purpose of the demo; and all requested accessories are included.
When the demo is sent out, Dan sends an email with instructions on how to load the pack and take pictures for his review. After he reviews the pictures and talks to the customer, he will either start making the pack, or if the pack does not fit right, send out another demo pack. My fitting process required several hikes with different weights in the pack. After each trip I would send Dan pictures, he would review them then have me make adjustments to the pack and do it over.
The demo pack arrived with an instructional DVD. This DVD included a lengthy section on configuring the bayonet system, plus how to do a lot of other stuff. In the DVD it is suggested to turn the pack inside out to really see how the system works (this is not necessary to adjust the bayonet system; he just wants people to see how it is built). So I did that and inspected the construction. Everything is top quality and “bullet proof.” There are so many ways to set-up the pack for specific needs, and the design engineering is quite impressive.
So after spending a couple evenings playing around with the pack, I had to try it out! I removed all the options, except the two water pockets and hip pockets (not sure I wanted them, because hip pockets are usually not very functional for me).
I loaded the pack with 30lbs of stuff, including two 640z bottles in the water pockets (total of 1 gallon), and put a bunch of stuff in the hip pockets. I then went on a 16 mile hike. About 2,000 foot elevation gain in the first 4 miles. Part of the hike was at over 6,000’ elevation along a ridge-line, and then down into the high desert with a trail-less cross country section and a lot of brush. Temperature for most of the hike was in the low 90F range. The purpose of the hike was to evaluate the pack, but to be honest after about 4 miles I completely forgot about the pack and just enjoyed the hike. I really forgot to pay attention to the pack. That is because I have never worn a back that just becomes part of the body. And I have owned many, many brands and types of packs.
The first thing you notice about a McHale pack is how comfortable the hip belt is. The belt is tall and not very thick. I don’t know why, but the double buckle set-up makes the belt stay glued to your hips. The belt does not slip or work its way down.
The hip pockets are about 7.5” long and 4.5” tall. You can put a lot of stuff in them. I put some snacks and a compact camera in one pocket. In the other I placed a small pair of binoculars and a Garmin GPS (two items I almost never carry). The pockets are very easy to access. A few times I had to reach down to make sure the pockets were still attached, because they never interfered with my hands, like hip pockets usually do.
The morning after the hike, I had ZERO discomfort on my shoulders or hips, like I normally do. As a matter of fact, I pushed and rubbed both to see if there were any after-effects from the hike. None at all.
My Pack Arrives
I was backpacking in Nevada over Christmas vacation in 2010 when the pack arrived. Sure would have been nice to have been able to have received it earlier. But each McHale pack is custom built, and that takes time. My pack is constructed from full Dyneema fabric including a kangaroo pocket, the shoulder straps, and accessories. I chose very subdued colors, so the pack would not stand out. I also got summit flap with a bear canister holder, two hip belt pockets and one should pocket. I will not be using all of these at the same time. One thing about a McHale Pack is all the different configurations of the pack to meet varying trips.
Details
The pack is a LBP36, which is a Little Big Pack with a circumference of 36″
The pack bag is generally cylindrical
The frame (aluminum stays) is 23.5″ but after bending them to the contour of my back it is smaller
It has the P&G Bayonet frame extension system
Full Dyneema construction
Kangaroo Pocket with flap
2 water bottle holsters
2 large hip belt pockets
1 Presto shoulder strap pocket with flap
Summit Lid with bear canister straps
Volumes
Basic pack back w/o roll top extended ~ 39 liters
Everything including roll top extended ~ 59 liters
For comparison, my Gossamer Gear Mariposa Plus has a total volume of 59 liters
Weights
Everything = 4lbs 9.5 oz
Without P&G extensions, by-pass harness straps and canister straps = 4lbs 3.9 oz
Without all the accessories and optional pockets = 3 lbs. 6.0 oz
For 3 season multi-day use, my base weight will be well under 10lbs using the McHale. Plus I will be able to carry as much food and water as I need. For snow trips, it can carry everything in comfort, including a four season tent for really nasty trips.
LBP 36 makes a winter trip at 10,000 feet with lots of snow and wind. Comparison of sizes: Gossamer Gear Mariposa Plus (left) versus McHale LBP 36 (right), both at full capacity The bottom of the lid has straps for attaching a bear canister. You could also place a hydration bladder here, use the straps for a fanny pack of sorts. The straps can be removed, and still allow you to keep the lid attached to the pack. Attaching a Garcia brand bear canister to the bottom of the top lid.
The bottom of the lid has straps for attaching a bear canister. You could also place a hydration bladder here, use the straps for a fanny pack of sorts. The straps can be removed, and still allow you to keep the lid attached to the pack.
Garcia bear canister under the top lid. The top lid has about 300 cu in of storage that is accessed with a zipper. Top of pack with lid removed. The water holster can easily hold a 640z (1/2 gallon) Gatorade bottle. … or a stove and fuel can be carried in a water holster. The Kangaroo Pocket holds about 400 cubic inches of stuff (maybe more?) View of Kangaroo Pocket closed. Large hip belt pocket. The hip belt pocket easily stores a camera, bandanna, glove liners, and a merino wool cap.
Presto Should Strap Pocket.
Presto Pocket using sunglasses as a size comparison.
By-pass Harness and P&G Bayonet Frame extension system
From the McHale Website
The Bypass Strap System. Our patented ‘Bypass’ shoulder system makes shoulder load adjustments easier and more effective than ever.
During the summer of 1991, McHale developed the new shoulder system after concluding that too many people were not getting the knack of the conventional system and were missing out on backpack comfort and performance. He actually invented it while walking down the trail after climbing Mt. Daniel in the Cascades. This of course was after trying to teach thousands of people over the years how to use the industry standard conventional system. The old system simply was not user friendly, especially when the user was tired and fatigued.
In our ‘Bypass’ system, the upper stabilizer/lift strap adjustment and the lower shoulder pad adjustment are completely independent of each other. Now, the upper adjustments’ function is to hold the backpack against the back. It no longer has the dual and conflicting duty of lifting the shoulder pad when the shoulder pad is loosened from below. Now when the shoulder pad adjustment is loosened from below, the pad simply slides upward along the ‘monorail’ of the stabilizer strap without the stabilizer straps loosening and causing the pack to fall back – as in every other system on the market. When you are ready to pull the shoulder pad back down, simply pull it down; it will slide back down the stabilizer strap without resistance and does not change the stabilizer adjustment. This new ease of adjustment is wonderful and we are sure it will revolutionize your comfort level.
Notes about the ‘Bypass’ System
At first, many people do not see how this new system could be better. For people not mechanically inclined, the beauty of the system is that you pull on it and it works! The old system, which is used by every company in the industry, is problematic because the shoulder pads will not pull down when you pull – they are held up at the other end of the system. This simple and obvious conflict causes so many problems, it would take four pages to describe them all.
In short, say you want to adjust the load on your shoulders, using our system, you simply pull the pads down or let them up. This entails one step. If you want to put more load on the shoulders with the old system you first have to loosen the top straps and lean forward because the pack will fall back otherwise. Next pull the pads down to the level you want – hopefully you let out enough strap from above – otherwise let more out.
Finally, pull the top strap forward to restabilize the pack. Unlike the ‘Bypass’ system, the old system requires 3 steps and a lot of patience and practice to master. Another problem with the conventional system that is unnerving is that letting loose either top or bottom strap will cause the pack to fall backward. With the ‘Bypass’ system, only loosening the top strap loosens the pack against your back, which is its purpose.
The P&G Bayonet frame extension system. They add length to the frame and in the process the shoulder harness converts from our simple guide harness to the Bypass Harness. The Bayonets can be used to stabilize a bigger heavier load without adding the Bypass straps as well. These bayonet stays are just under 12″ long x 1/2″ x 1/8″ and weigh 2.4 oz / set. They overlap the lower main frame for half of the length of the bayonets and make adjusting headroom a snap.
Notice how far the load lifter strap is above the should strap (left lower of picture).
You use the P&G Extensions to carry larger heavier loads. The extension adds several inches to the top of the frame, and then places the By-pass straps at the top to help stabilize loads (see the above picture).
The By-pass strap runs through a sleeve on the outside of the shoulder strap (right side of picture). The bottom of the By-pass strap connects at the same point as the bottom of the shoulder strap. Adding the bayonet extension to the top of the frame-stay. Note: the black line is where the top of the standard frame stay is. The next picture shows the height of the extension. The yellow cord shows the top of the extension. The extension adds height to the pack’s frame system, and makes the load lifters function. Extensions and canister straps removed. Extension and by-pass removed. Size compared to the fully loaded Gossamer Gear Mariposa Plus (left). For smaller and lighter loads, you can reduce the length of the stays (and the bag) by about 1 inch. Shown is access to the stays. Shortening the stays by approximately 1″ using the swivel feature. Here is the LBP 36 in “day pack” mode next to the Mariposa without the roll top extended. Front view. Side view. Rear view.
Yes, the top foam pad on the rear of the pack is removable. The lower lumbar pad is not. I can tell you it is great to sit on in snow. Other than that I am not one to fiddle with gear or comfort when hiking. Logs and boulders are great places to sit for me, unless really wet. Here are some pictures:
The pad is attached with two long strips of Velcro and a strap at the top of each corner. This is the attachment strap. Front of pad. Rear of pad. You can see the Velcro fasteners at the top and bottom. Back of the pack with the foam pad removed.
Conclusion
I have to mention that pictures cannot describe the attention to detail, quality of materials, or workmanship. Every single feature and function is well thought out to the tinest detail. Most of the sewing is double sticthed or better. All of this adds weight but you are not going to be worrying about any kind of failure on the trail.
details from the McHale website
Pack Construction
When people ask us about our guarantee we like to say our packs are built so well they don’t need one. In an industry where virtually every company has a lifetime guarantee and no company builds gear as reliable as ours, we feel the importance of saying something different. Printing words on paper is easy. To pull off the much more complex task of getting each and every customer an absolutely reliable product is something they can’t do. Enter the “lifetime guarantee.”
It is important to realize guarantees open the door for companies to compete on price to gain market share and slap a guarantee on the product to make up the difference. Dan McHale grew up building his own gear for big wall rock climbing in Yosemite. All of our gear is that tough. How tough is that? Well you can’t measure it in our packs without industrial measuring devices. For instance, you cannot kick out the haul loops on our packs with just your feet and you cannot pull out the compression straps with your hands! You would be amazed at what is out there. Guarantees are worthless in the real world but a reliable product can save your life. “Defect in workmanship” is simply not in our company vocabulary.
Naturally, most people don’t know the first thing about pack construction so when a company tells them it uses boot weight thread they’re impressed. Did you know our pack weight thread, # 92/16 lb. U.V. treated nylon, is over 30% stronger than # 69 “boot weight” 10-12 lb. thread? Did you know that heavy duty Norwegian welts used in leather boot construction are sewn with threads not nearly as lightweight as #69?!
Companies using # 69 thread generally are using clothing weight sewing machines and have to design their packs to the maximum capabilities of those machines which are the minimum capabilities of our walking foot machines. Number 69 thread happens to be the largest thread size that smaller “needle-feed” machines can hold efficiently. McHale & Co. uses # 69 nylon thread only for bar tacking, rain covers, camera cases and pack seam taping after the seams are multi-stitched with # 92-16 lb. thread. MOST packs are made overseas in contract factories on clothing machines.
Seam Margins
Seam margins are twice as wide as those of other packs. There is real substance to our 5/8-3/4 inch wide main seams. As for the stitching itself, we gravitate toward the excessive in this respect. More is always better than less. Thread doesn’t really weigh much but you will get weighted when something fails 2 years down the road. Surprise! Other companies talk about how many times they sew stress areas and the like. Read these claims as; we wish we could sew things as well as you would like but at these price points it’s impossible. Here, why don’t you take this nice lifetime guarantee instead. Count on our packs having twice as much thread as anyone else even claims.
Pack Frames
Our minimum frame requirements are 2-3 times greater than any other pack. Our packs aren’t over kill, either. Other packs are under-engineered. Carbon Fiber; so far, 7075-T6 aluminum is superior in every way especially when the companies that do use carbon fiber don’t use an adequate amount for heavy loads. 7075-T6 is used in every sporting goods industry except backpacking. McHale & Co. is the only company to use it exclusively and we stock at least 7 dimensions. Chief advantages; cannot be broken, will not become misshapen with heavy use, and can be reshaped. Carbon Fiber shapes are permanent.
Hardware
Fastex was the original “hammer proof” plastic hardware and after 25 years is still one of the best. Duraflex also has some innovative and very lightweight buckle designs that we use. Our Fixloc brand hip belt cam buckle option is the strongest synthetic buckle in the world and is also distributed by ITW-Nexus-Fastex. Custom Metal Crafters, of Newington, Connecticut, makes our zinc plated metal sliders. We also use selected heavy duty ladder locks, from American Cord & Webbing for shoulder pads and bayonet system. Our light pattern stainless steel sliders that attach non-CM belts are from Cole-Tech of Pennsylvania.
Foam
Evazote; We’ve been using it from the beginning. It’s an English import. It’s expensive but has the right structure and compressibility so we can avoid building clumsy and bulky dual density belts. In years gone by it has been known under trade names like Regalite and Cosmic Sleep.
Zippers
YKK # 10 Coil. Zippers are the most vulnerable part of a pack. No other company uses # 10 exclusively. Our zipper flaps are the widest too – they actually cover the zippers! Keeping zippers clean and protecting them from abrasion keeps repair bills down. Also, after 25 years of using self-locking zipper sliders to ensure that zippers don’t open by themselves, we’re still the only company doing so. Number 9 and # 7 YKK zippers are used in our ultra-light packs.