
For most people, myself included, the primary function of a compass is a simple “field check,” which is orienting the map to North using your compass and then visually associating the terrain to the map. Basically you know where you are, but you need to check details for such things as deciding if is best to hike to the left of a large rock outcropping or right when you are off trail or the trail has become too faint to follow.
Last summer a reader contacted me to ask about a method to quickly orient a map using the declination diagram at the bottom margin of a map. Yes, it works, but for a few reasons I don’t recommend it. Let’s review how this method is used.
Here’s a declination diagram on one of my maps.
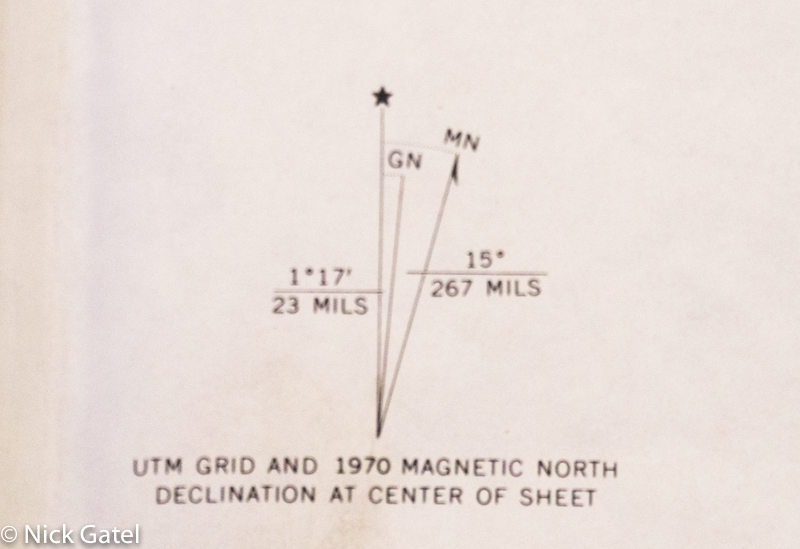
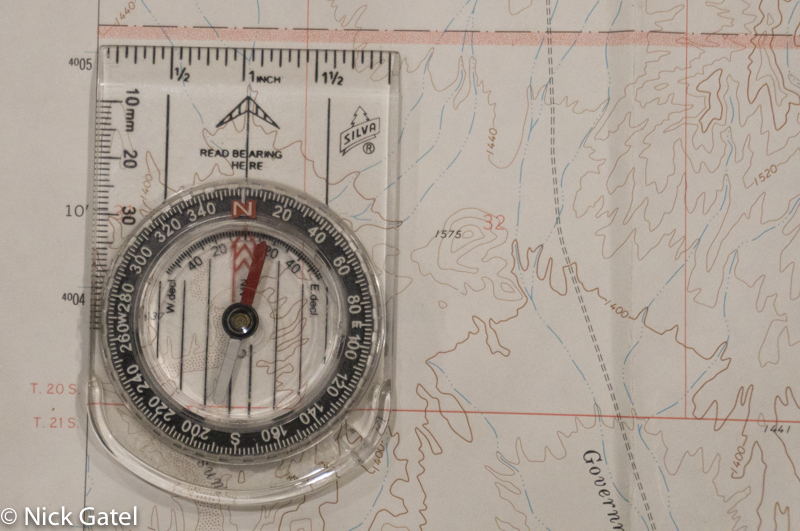
The method is to align the edge of the compass along the Magnetic North (MN) line, and then move the map and compass together until the compass needle points north. (Note: if you have a compass with an adjustable declination the adjustment needs to be set to zero). The picture below shows the map has been oriented with a compass using this method.

Most of the time this method is good enough for a field check. So why don’t I recommend this method?
- First of all, we need to ask an important question. Is the angle in the diagram accurate? In this case is the angle actually 15 degrees? The answer is yes, I measured it with a protractor. But will every map be accurate? I don’t know.
- Secondly, if you look at Picture 1 above, the comment below the Declination Diagram says that is the declination in the center of the map. We are taking a measurement at the lower right of the map. But, honestly, it isn’t going to make much of difference.
- The MN line is not very long, less than half the length of the compass, so it is easy to not get the compass exactly aligned to the MN line. A small error at the bottom of the map will create a much larger error at the top of the map. Again, it isn’t going to make that much of a difference.
- Now take another close look at Picture 1, the Declination Diagram. The Magnetic North was measured in 1970. Ooops… has it changed? Yes, it has. Today it is 11˚33’ East. About 3.5 degrees less than 1970. Again, not a real biggy.
- Does every USGS Topo Map have Declination Diagram? Nope! See the map below.

Even though there is no Declination Diagram on this map, the information text on the left tells us the declination for this map was 14˚30’ East in 1980. That is useful information. If your map is old, and many USGS Topo maps are, it is a good idea to get the current declination at http://www.magnetic-declination.com/.
So if we take all the above concerns together, you could orient your map pretty far off from North. For a simple field check it probably won’t be that big a deal.
So, if I don’t recommend this method, what do I recommend? Before I answer, let’s analyze what we did in Picture 2 when we oriented the map. Let’s take another look at Picture 2:
Magnetic North is East, it is to the right of North. This means if don’t make any adjustments or compensations our compass will be pointing too far to the RIGHT.
In essence, when we align the compass along the MN line and move the map and compass together until the compass needle points North, we are turning the map 15 degrees LEFT of Magnetic North.
Nick’s Method
The advantage of my recommendation is that the compass can be placed at the center of the map, making it easier to turn and orient everything. If there is no Declination Diagram on your map, or if the declination has changed quite a bit, the method works the same way. Bottom line is you can use the same method for every situation.
Another, and to me the most important, advantage is you will be mentally working with declination and over time it will help you better understand and remember how declination works.
Demonstration
We will use the same map that has a Declination Diagram of 15˚ East. First we will orient the map with 15˚ and then demonstrate the same map with the current accurate declination of 11˚33’ that we will have to round up to 12˚ since compasses used for backpacking are usually set up in 2 degree increments.
15 ˚ East Declination
Adjust The Map and Compass to North

Since Magnetic North points to the RIGHT (see Picture 1) we need to Turn our map and compass together LEFT 15 degrees. See the picture below:
12 ˚ East Declination
Adjust The Map and Compass to North
Since Magnetic North points to the RIGHT (see Picture 1) we need to Turn our map and compass together LEFT 12 degrees. See the picture below:

That’s all there is to it. Below are links to several map and compass posts I published last year.
Set Up Your Compass Faster and More Accurately with a Map Protractor (part 1)
Set Up Your Compass Faster and More Accurately with a Map Protractor (part 2)
A Couple of Map Protractor Tips
The Inconsistencies of USGS Topo Maps — WTF?