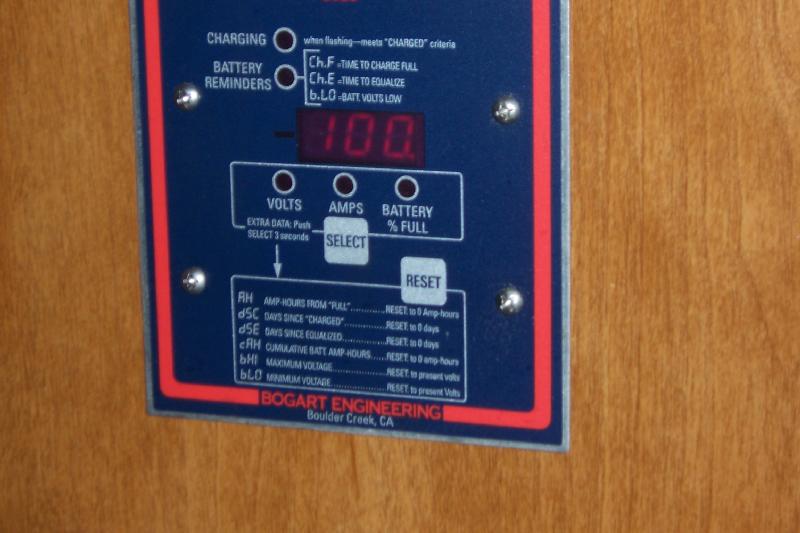
If you have a RV solar system get this if you don’t have a shunt-based battery monitor.
If you are planning on installing a solar system on your RV, buy this first. It can be used to determine your energy needs before buying solar panels. I will be publishing a guide on how to size a solar system in a few days.
This post will explain what a battery monitor is and how to install and set up a TriMetric Battery Monitor.
About Bogart Engineering
Bogart Engineering designs and manufactures the TriMetric line of products. Apparently this is all they do. This is a California based company that has been in business for over 35 years. Their website says their products are made in the USA.
Our TriMetric Battery Monitor History
In 2003 I installed a TriMetric 2020 in our 1992 Starcraft Meteorite along with a solar system. In 2005 I transferred it to our new 2006 Fleetwood Niagara Tent Trailer solar system. You can read about both of these on the Tent Trailer Solar System page.
In 2013 our Fleetwood Niagara was vandalized and declared a total loss by our insurance company. In the process of ripping things apart the thieves damaged our TriMetric monitor. We replaced the trailer with a Milan 26RLS and installed a solar system that included a newer monitor, the TriMetric 2020RV.
A few months ago I was looking to buy another TriMetric for another project and found a brand new TriMetric 2030RV for less than 1/2 of the retail price. The seller couldn’t figure how to install it and installed a voltmeter instead.
A voltmeter is not a battery monitor!
A solar controller display is not a battery monitor!
In all fairness to the seller, the TriMetric manual and instructions can be intimidating. The manual is also a textbook on how batteries work. Before diving into how to install a TriMetric Battery Monitor, it makes sense to me to explain how a battery monitor works.
What Is A Battery Monitor And How Does It Work?
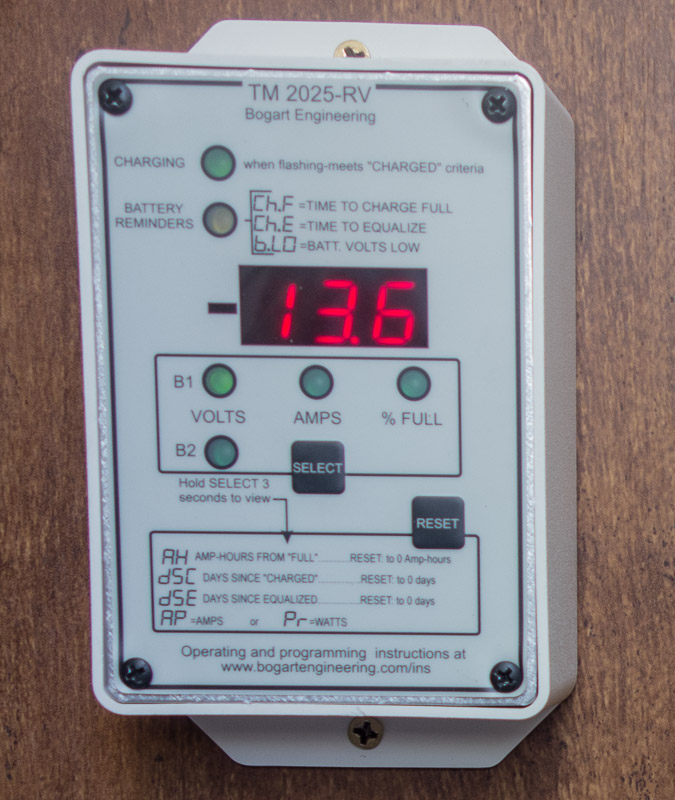
On an off-grid solar system, such as an RV, there are two systems. The solar system and the storage system or battery bank. The solar controller provides information about the solar system performance. The battery monitor provides information about the battery bank.
Normally, when everything is working, there is no need to monitor either, other than an occasional glance at the battery monitor. For those times when we are camping in poor weather for an extended period, I pay more attention. We might need to adjust our electrical consumption until the sun returns.
If, for some reason, there is a problem charging the battery bank then both meters (solar and battery) can help to quick diagnose and hopefully fix the problem. This is where the “textbook” aspect of the TriMetric manual comes in handy — it explains how a battery bank really works.
Today it seems that people want technology that just works without knowing a lot about it. With a solar system on a vehicle with moving wheels, things can vibrate and come loose. No one wants to end a two-week vacation because on day 5 their battery went dead and they are 120 miles from the nearest town. Knowledge is power!
TriMetric Battery Monitor Basic Data
There are three basic displays on the monitor:
- Battery Voltage
- Amps going in or out of the battery
- Percent Full: This display shows the state of charge (how much energy is left) based on voltage and current
The TriMetric gets this information from a shunt.
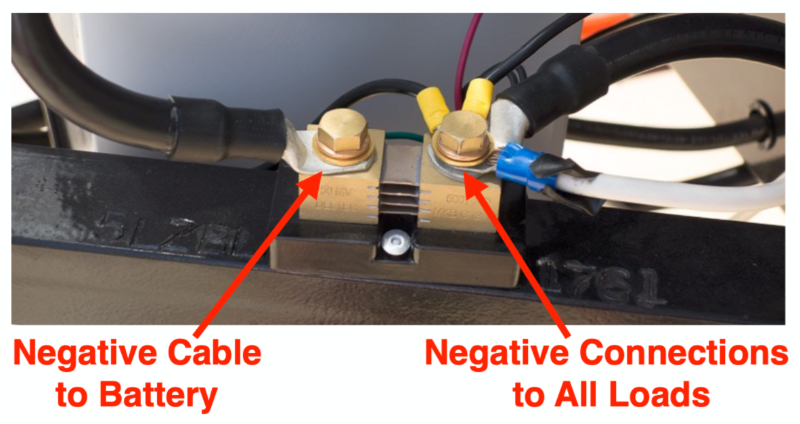
As shown above, only the battery negative cable is connected to one side of the shunt. All other negative connections are connected to the other side of the shunt.
For our travel trailer, the Negative Load Side would include everything in the trailer such as:
- inverter
- water pump
- furnace
- lights
- 12 volt power ports
- entertainment unit
- solar panels
. . . everything that runs off the battery.
When a load is present — that is we are using something — the current will pass through the shunt. When the solar system is putting amps back into the battery that goes through the shunt too. With a shunt that battery monitor can accurately measure how much energy we are using and how much energy the solar panels are putting back.
Connecting the TriMetric Wires
There are five connection terminals on the back of the Trimetric monitor.
This schematic is from the TriMetric Installation Manual:

Note the “+B2” terminal in the diagram above. This is for motor homes that have a starting battery. The +B2 would be connected to the starting battery, but the monitor will only report its voltage. All other functions cannot be used for this second battery.
Small wires can be used (18AWG to 26AWG).
The old fashioned telephone wires are 22 gauge as a comparison.
Three of these small gauge wires from the TriMetric Battery Monitor are connected to the “Kelvin” screws on the side of the shunt.
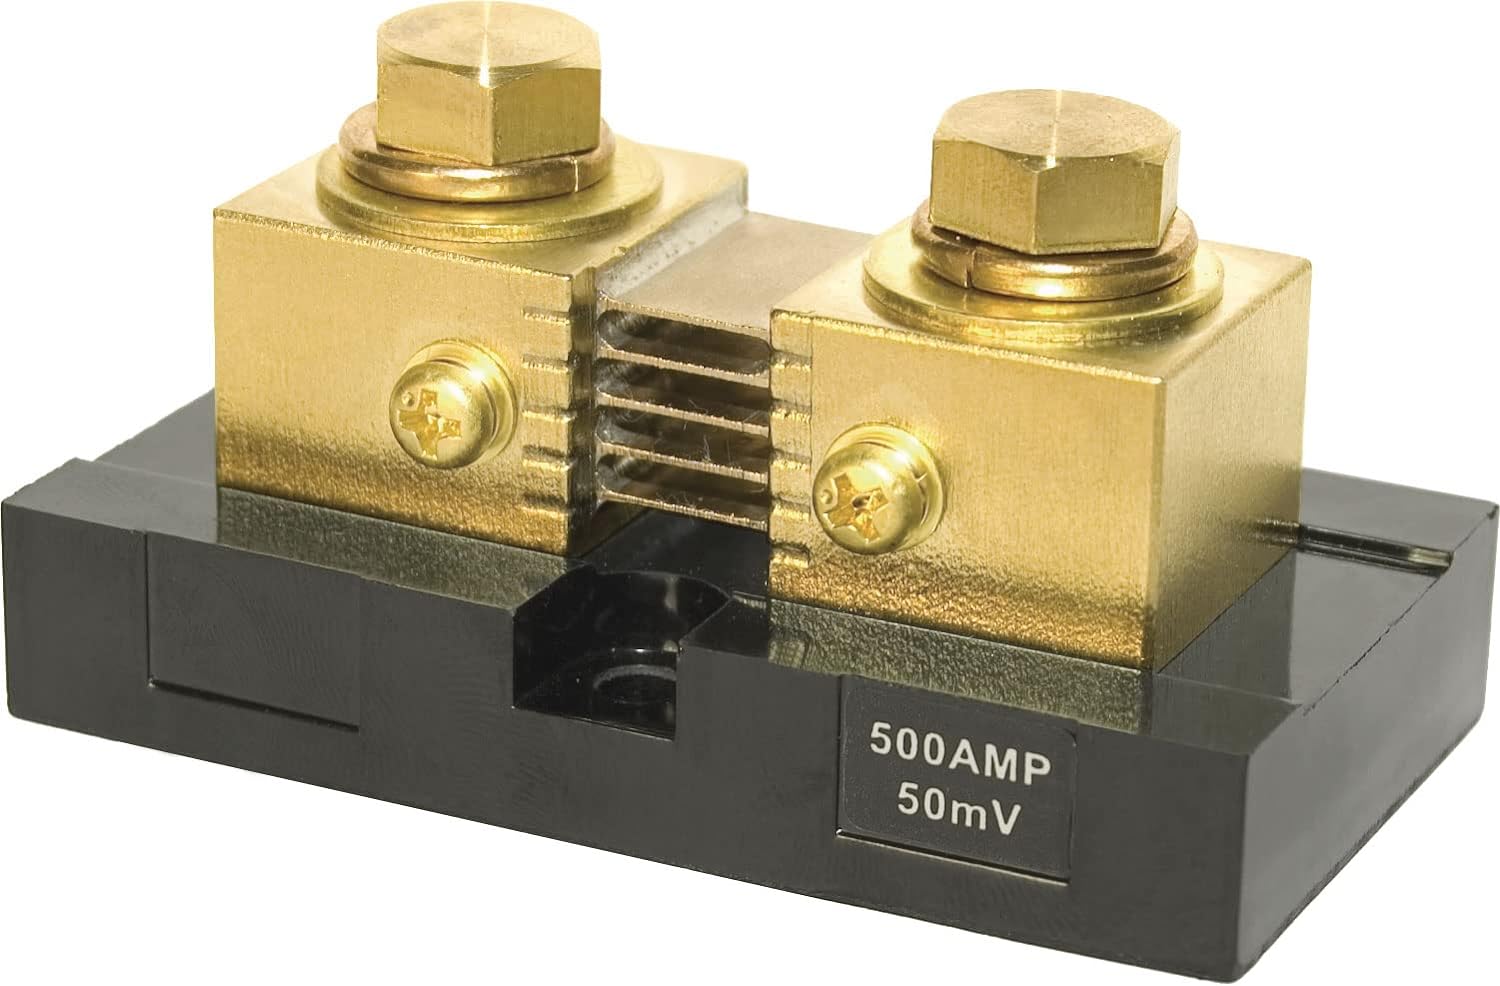
The TriMetric Battery Monitor also has a 4th wire that goes to the positive side of the battery bank (+B1).
Below is a diagram of all the connections, as shown in the TriMetric Manual (below).
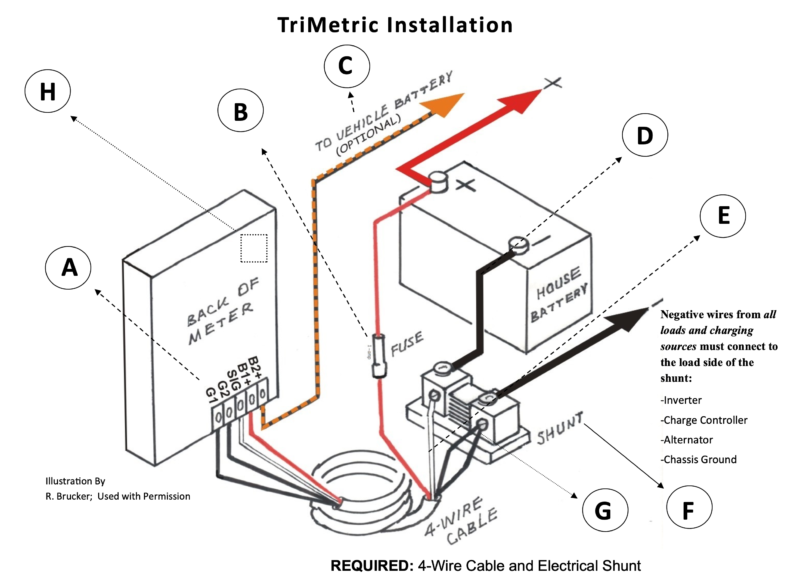
TriMetric Terminal Connections
To help explain the connections, I annotated some pictures. Below shows the three wires from the TriMetric Battery Monitor that will be connected to the shunt. The fourth wire, not shown, will go to the positive terminal of the battery, along with a fuse that is included with the monitor.
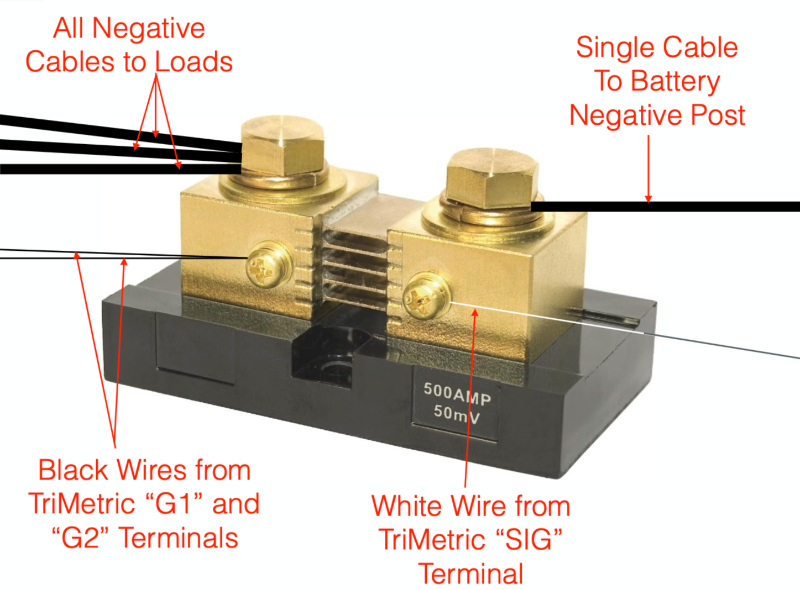
In the picture below I used larger gauge wire (16AWG) because I didn’t have anything smaller — the wires barely fit. Also I didn’t have a white wire, so I used a piece of white electrical tape around a red wire so I wouldn’t get things mixed up.
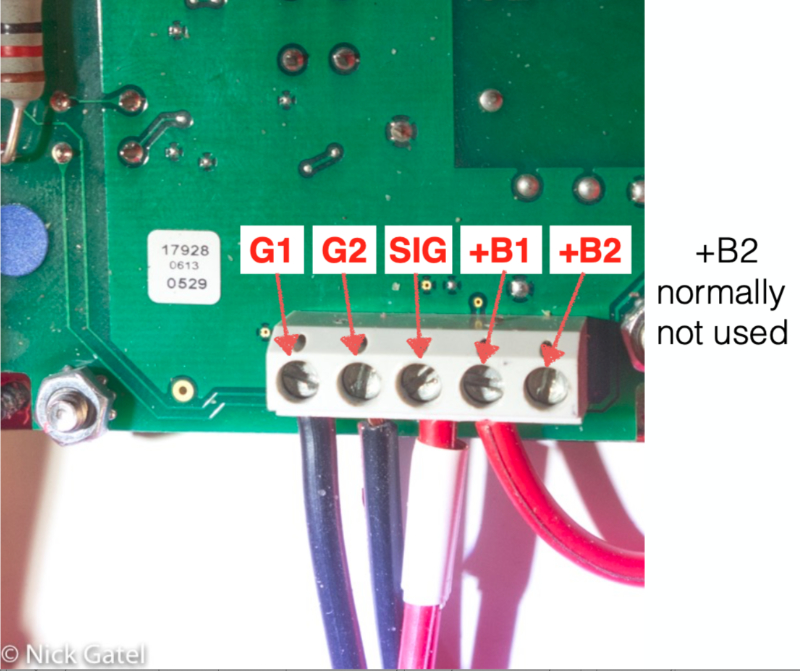
Shunt Sizes Compatible with the TriMetric Battery Monitor
There are two choices:
- 500A 50mV (can handle up to a 500 amp load, which is huge)
- 100A 100mV (100 amps, 100 mili-volts)
The 500A 50mV is accurate to 1/10th of an amp. The 100A 100mV is accurate to 1/100th of an amp. Buy according your expected needs. 500A 50mV is by far the most common shunt used on RV systems, especially if a larger inverter is used.
Shunts are fairly standard. You just want to ensure the battery cable terminal and signal wire terminals are matched to the bolts or studs and for the Kelvin terminal screws.
Other TriMetric Battery Monitor Data
The monitor can also show (where applicable)
- Amp-hours from full. This is another way to indicate percentage full. When the battery is full, this value is zero. When the battery is less than full, the value is a negative number, which shows how many amp-hours should be returned to the battery to fully charge it.
- Days since charged. This value shows the number of days since the battery was last fully charged.
- Days since equalized. Provides a reminder to perform a manual equalization. Note that equalization is never performed on some batteries such as lithium batteries.
- Lo-battery audible alarm.
- Cumulative lifetime Amp-hours drawn from the battery. Acts like an odometer for batteries.
- Historical data for the last 5 discharge-charge cycles as shown from the TriMetric Manual below:
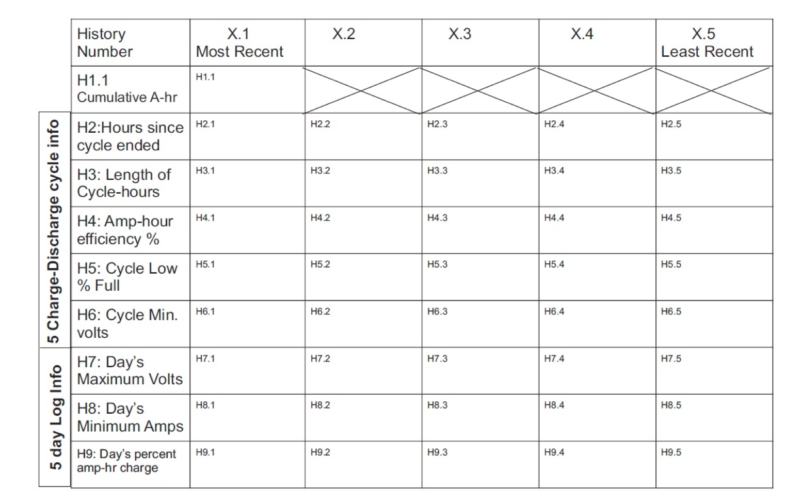
I’m not going to delve into the advanced screens and data. Most of them I have never used.
Programing the TriMetric Battery Monitor
Yep, you have to program it. It is more involved than most monitors, however it does allow you to set parameters that other battery monitor products do not allow. This can be important because different battery manufacturers have their own battery specifications — there is no industry standard. Programing consists of pushing a couple buttons on the display.

To enter the programing mode Press and Hold the SELECT Button for 5 seconds AND release it when P1 appears on the screen.
Once P1 appears, you can select the different parameters by pushing the SELECT button. There are 22 different P parameters. When you want to change a parameter of any of the 22 choices, quickly press the SELECT AND THE RESET buttons at the same time.
When you release the SELECT AND THE RESET buttons all three green LEDs should be flashing green, indicating that your are in CHANGE MODE. Now press the RESET button to change values. Long presses will scroll through the values faster. Once you have the value you want, then press the SELECT button to exit the CHANGE MODE.
Below are the common programming points
- P1 — the charging set point. On my solar system with a Lithium battery (LiFePo4), the charging set point is 14.6 volts. This is the value I used to program P1.
- P2 — the default is OFF. I left it there.
- P3 — Battery Capacity in Amps. My battery is rated at 300 Amp Hours and this is the value I used.
- P4 — Amps or Watts. Amps is the default, which I used.
- P5 — Days since charged alarm set point. OFF is the default, which I used.
- P6 — Days since equalized alarm set point. OFF is the default, which I used.
- P7 — User “complexity” level. L1, L2 ,L3, or L4. Note: L3 or L4 is required to access P8-P21 program parameters. Default is L1.
Viewing TriMetric Data
Once the parameters are programmed, you shouldn’t have to change anything again unless you replace the battery with a different type or different capacity.
The basic data can be viewed by simply pressing the SELECT button, which will cycle through four different displays:
- Battery Voltage
- Amps (positive which is charging and negative which is discharging)
- Battery Percent Full
- No display (the numerals can be fairly bright)
What I Don’t Like About The TriMetric Monitor
Programing and accessing the Advanced Data is kinda archaic. On the other hand, in 20 years of use and never, ever having a dead battery bank, there has never been any need for me to access the advanced data.
There are probably some folks who would like to view this data for particular purposes and those kind of folks probably won’t be bothered by the access steps. I think these people are commonly referred to as Geeks or Nerds
On the other hand, Bogart Engineering sells an optional Wi-Fi module that can easily access ALL the data. The module works with any device that has a Web browser. I have considered buying one many times — but always tell myself that it would be a silly purchase — to spend money on something I don’t need.
What I Like About the TriMetric Monitor
Pretty much everything, especially that is a shunt-based monitor.
Reliable, accurate and durable. Nice size display. Given I have bought three of them over the past 20 years should be an indication. The last two have been the RV flush mounted units. I really prefer the panel mounted units, but I found better prices for the last two units I purchased.
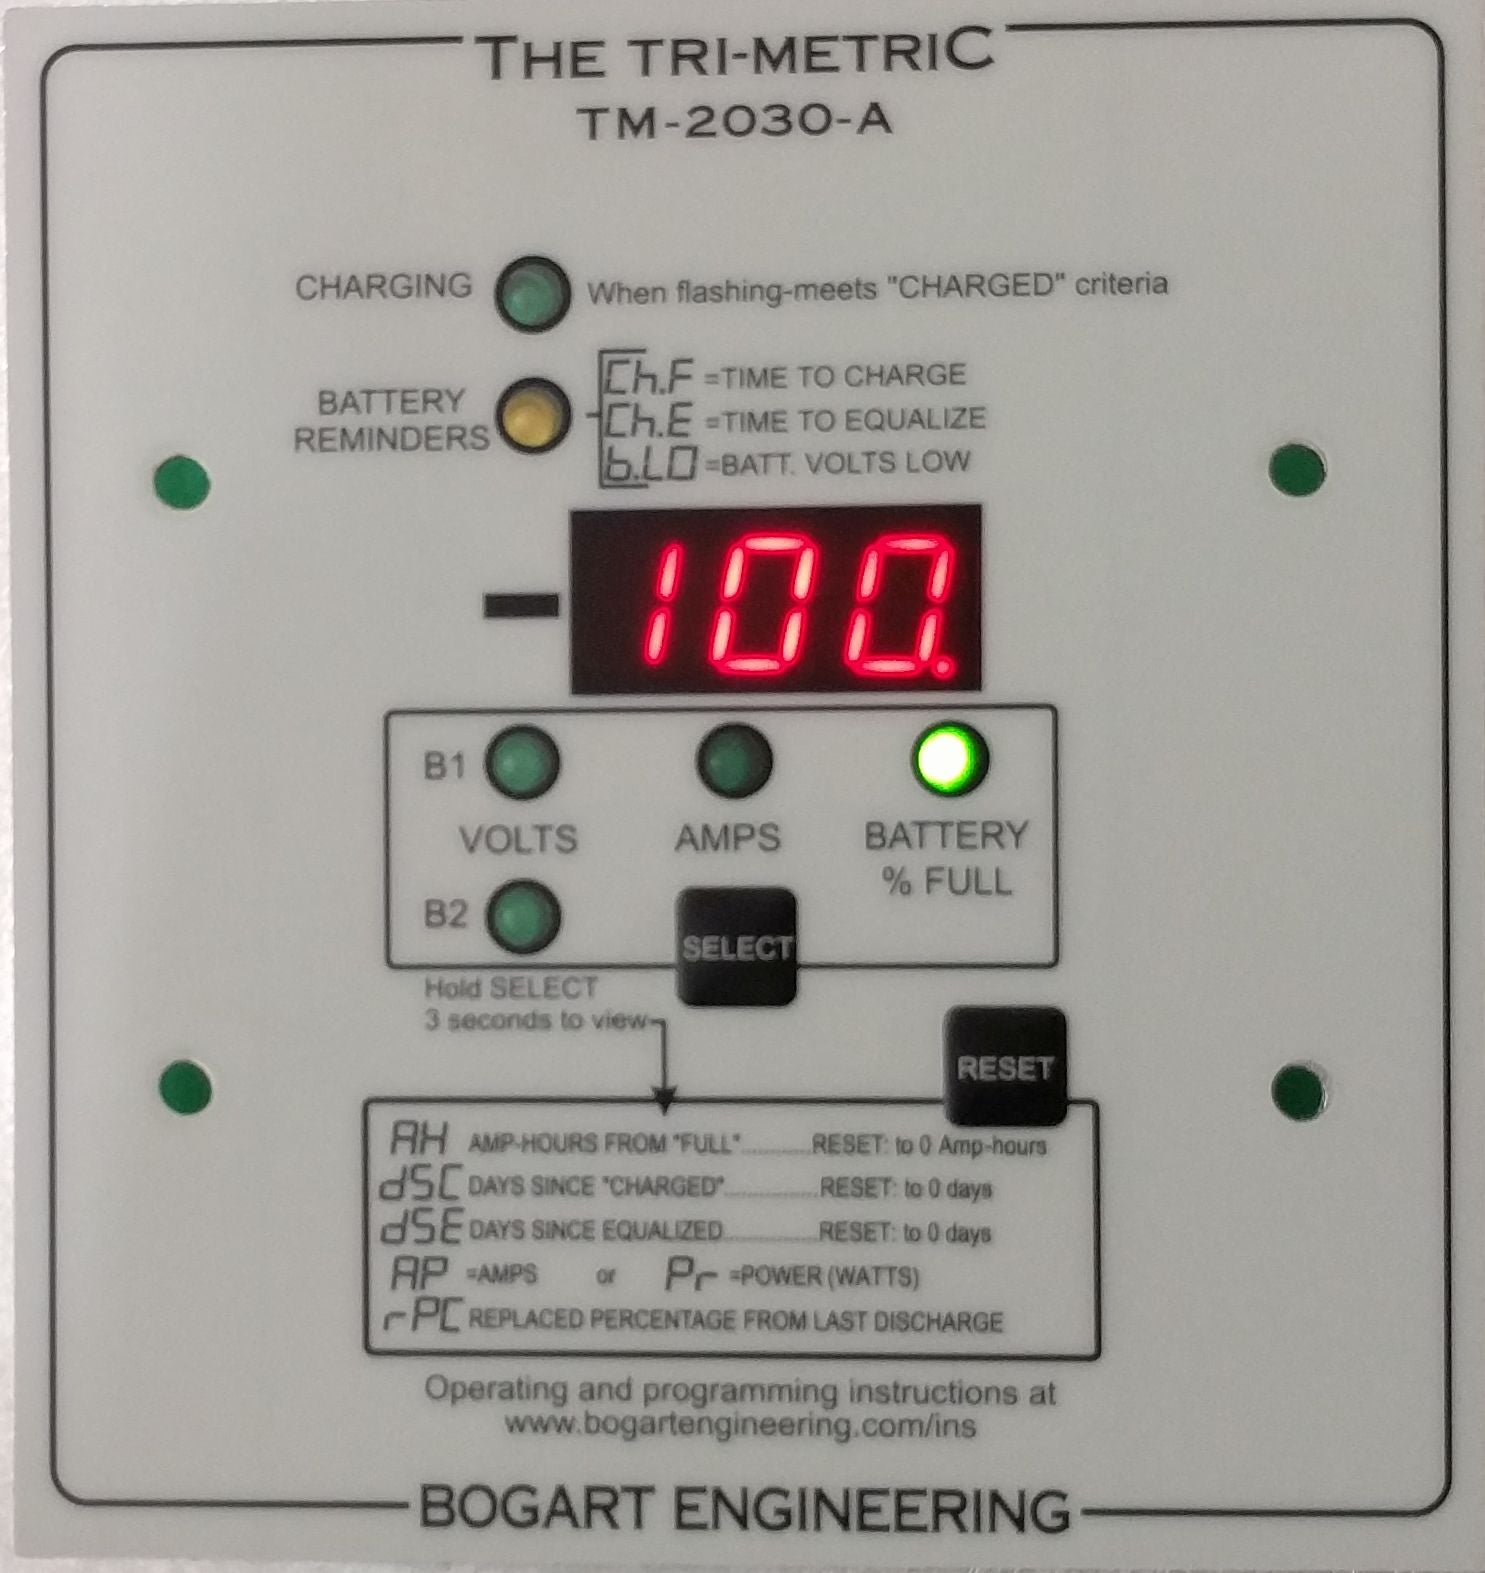
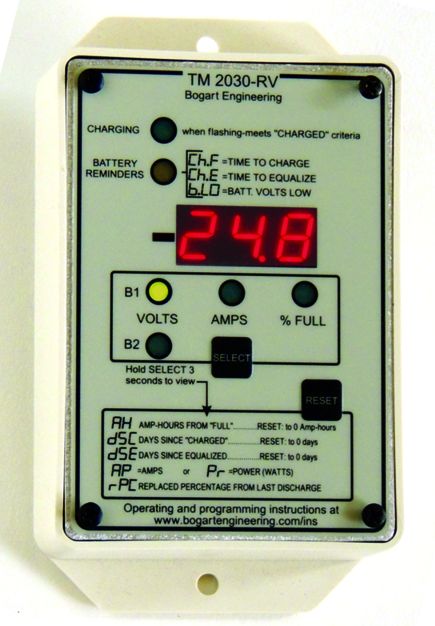
Two Variations of the TriMetric 2030
This is the current model.
The 2030-A model is a panel that can be flush mounted. It can be mounted on a flat surface like the first 2020 we purchased in 2003 (see the picture of the 2020 at the very top of this page).
The 2030-RV model is a flush mounted box.
Where To Purchase
The TriMetric Battery monitors can be ordered directly from Bogart Engineering or authorized dealers. Please note that I don’t get any compensation if you purchase for Bogart or any of their dealers. I’m just a super happy long-term customer!!
TriMetric Resources and Manuals
This website may be compensated for linking to other sites for sales of products. As an Amazon Associate I earn a small fee from qualifying purchases at no additional cost to the purchaser.


