In my article Astrophotography Equipment I didn’t delve into the difference between taking pictures of deep sky objects versus terrestrial photos such as landscapes or portraits. So I need to start this page off with some comments.
Consumer grade astrophotography cameras use off the shelf sensors, mostly made by Sony. These sensors capture what we can see. Which to be honest isn’t a lot when viewing the night sky, other than a lot of stars and a few larger objects.
However, digital cameras are light buckets. They capture photons. Lots of them. The longer the exposure, the more photons we collect. Even though we may not see all the details in a picture, the data is there. We just need to coax it out.
It should be somewhat obvious that if we take an 8 hour exposure, we will capture much more data (information) than if we take a 60 second picture. The only problem with an 8 hour exposure is a gust of wind, and airplane crossing in front or even satellite will ruin the picture. But there is a trick to collect the data . . .
Integration Time
As it turns out, if we take 480 one minute exposures ( 8 hours) and stack them one on top of the other, we will collect the same amount of data as we would with a single eight hour image. Thus we over come the difficulty of wind gusts, airplanes, satellites, or other events. And if several of our one minute exposures suffer a calamity, we just discard it and use the remaining ones.
The importance of integration time
The more data (total hours) we collect the more detail we accumulate. We also significantly reduce the amount of background noise in our final product.
Strategy
With some targets I want to use different filters on the same target, especially on what we call an emission nebula that is rich in Ha and Oiii gases. We really can’t see these very well but we can with special filters.
My strategy with these kinds of targets is to take a series of images with one filter and then stack all of them into a single master. Then take images with the second filter and stack them all into a second master picture. I can then combine the two master pictures into one final picture. It sounds complicated, but it’s not. I explain more as we go forward.
My filters
As mentioned in my Astrophotography Equipment article I use two kinds of filters:
- UV-IR Cut Filter for most targets (these are usually 60 second exposures)
- Dual Narrowband Ha / Oiii filter (these are usually 5 minute exposures)
Integration
Integration is stacking all the individual images (we call these “sub” because each is a subset of the final product). With special software we can do even more than this when we stack all the subs.
Astro Pixel Processor (APP)
For integration I use a program named Astro Pixel Processor by Aries Productions. Below are some of the things it does aside from stacking images:
Calibration: APP subtracts and corrects sensor imperfections: It removes hot pixels and any amp glow from the sensor’s electronic circuitry. Corrects uneven field illumination between subs. Normalizes exposure differences.
Normalize Backgrounds: Equalizes background brightness between subs. Removes gradients from light pollution or moonlight. Matches sky background levels across sessions from multiple nights.
Integrate (Stack) Images: All calibrated, aligned, normalized frames are stacked into one master image.
And so this is how I take pictures of the same target over multiple and create a single master image.
Alas, this isn’t then end of the job. We need to go on do a lot of post-processing after the Integration step.
Post-Processing
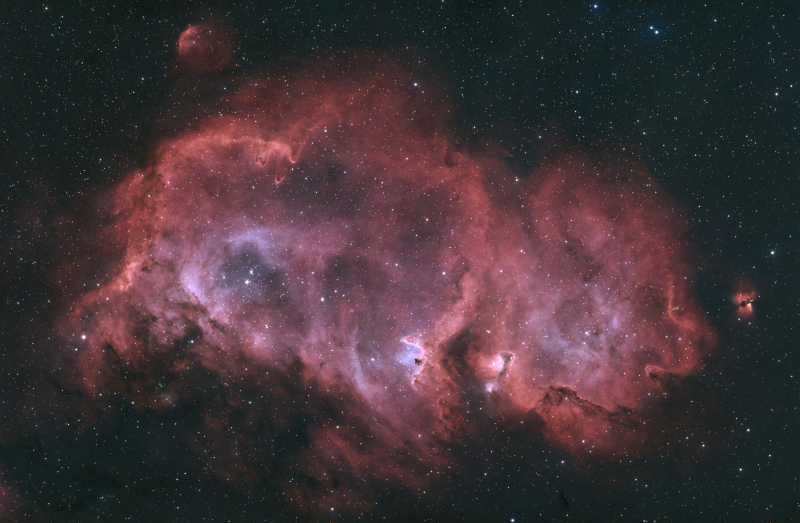
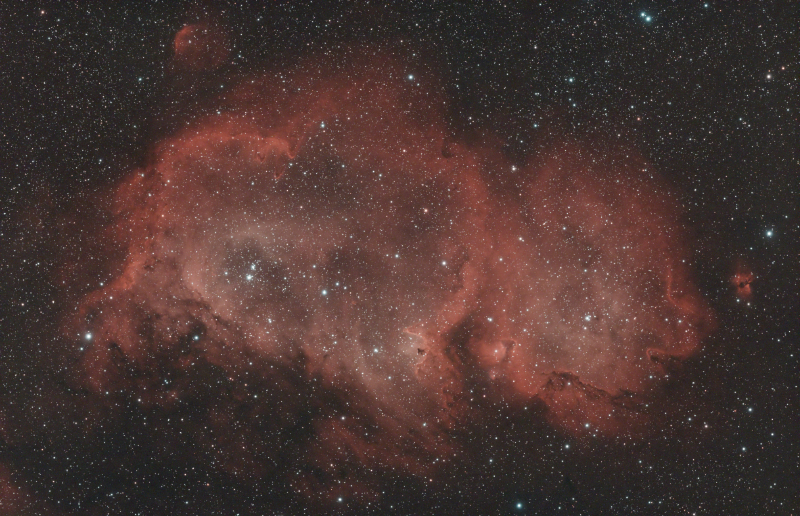
This often takes a lot of time depending on the target. It also moves away from “science” and into the realm of “art.” Once we start manipulating our master image it becomes our interpretation. So let’s start out with a target I did in September 2025 — the Soul Nebula, which is an emission nebula — meaning I used two different filters:
- L-enhance Dual Narrowband Ha/Oiii Filter: 360 X 300sec 94 gain (30 hours)
- Optolong UV-IR Cut Filter: 90 X 120sec 94 gain (3 hours)
- Total Integration: 33 hours
There’s a lot of data in the master image from the Ha/Oiii filter — 30 hours. So I’want to take a quick walk through of what we start out with and what we end up with using the Dual Narrowband Ha / Oiii stacked image.
Stretching the image
In astrophotography post-processing, stretching is the process of redistributing the brightness values in an image so that very faint celestial detail becomes visible without blowing out the bright parts.
It’s one of the most important—and most misunderstood—steps in deep-sky image processing.
Why stretching is necessary
Astrophotography cameras record data linearly:
- Most of the signal from faint nebulae and galaxies is packed very close to black
-
Bright stars and cores occupy a tiny fraction of the data range
If you displayed a raw stacked image:
- It would look almost completely black
-
The object is there, just hidden in the lowest few percent of brightness values
Stretching makes that hidden signal visible.
PixInsight
For post-processing I use the software program PixInsight by Pleiades Astrophoto. It does much, much more than stretching, but we’ll just stick to stretching for this article.
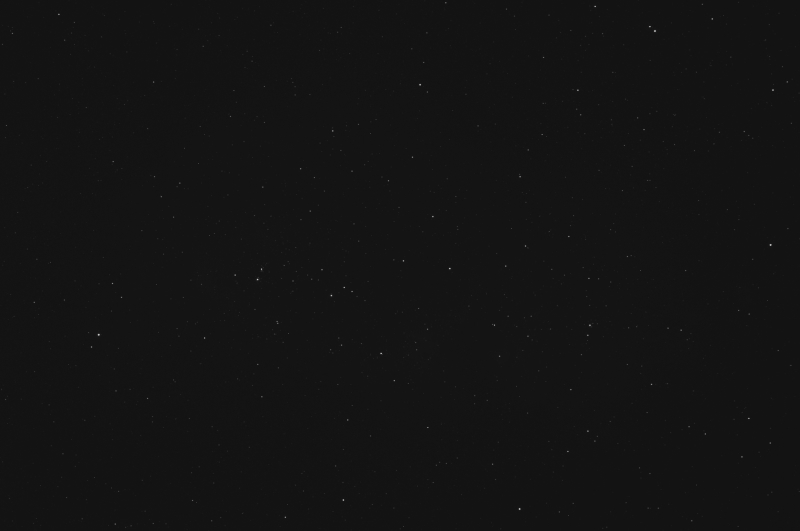
A single sub
I want to start with a single sub (image) as an example. This one is a 5 minute exposure. There is little to see other than a few stars.
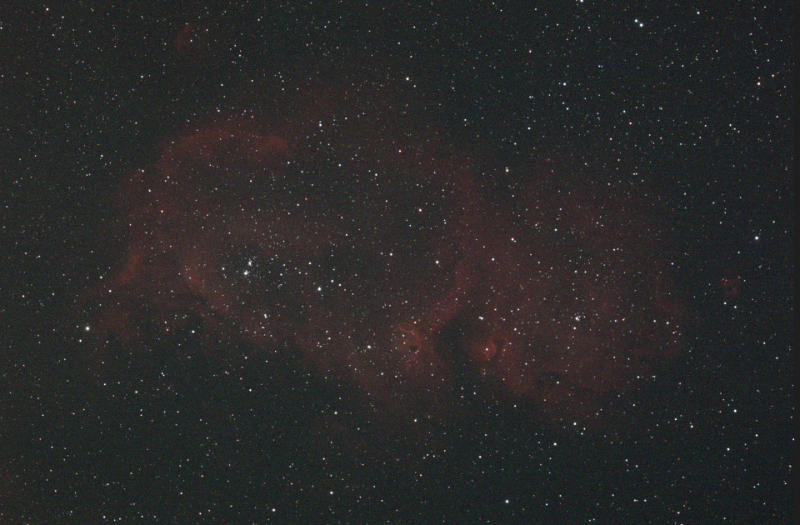
Now let’s stretch the image and see what we get. There is some faint red cloudiness that is mostly Ha. Not a spectacular product, to say the least.
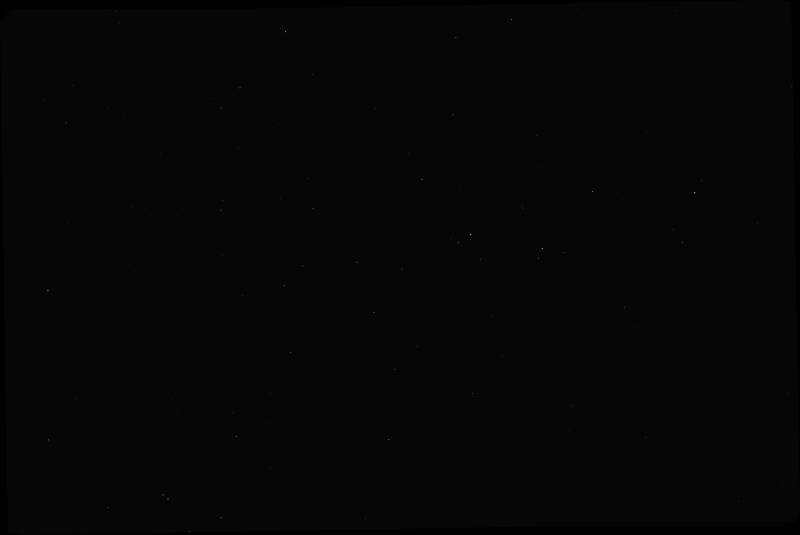
The 30-hour narrowband stack
First up is the un-stretched master image. Most people are surprised that little is visible after 30 hours of exposure, and it looks about the same as a single sub.
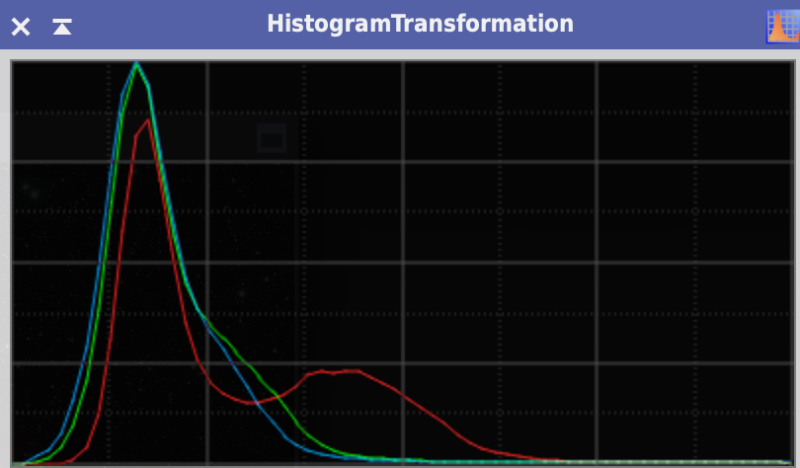
Histogram Transformation
Using PixInsight’s Histogram Transformation tool, we can get a visual chart to show the distribution of our data.
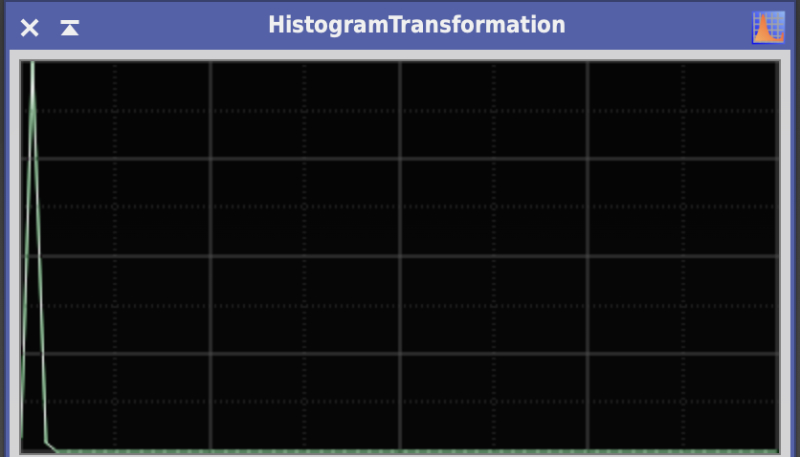
The far left of the chart (above) is black. All the way to the right would be pure white. As we can see the light blue inverted “V” at the left of our chart represents all the data (the Soul Nebula) that is very compressed near the black point of our histogram.
We need to stretch the inverted V to reveal the nebula. As you can see (below), the data is now widened and we can see the distribution of our three foundational color hues (red, green, blue) for computer screens.
The final product
We aren’t done yet. There’s a lot more post-processing to be done. The final image with the combined UV-IR stack and the HaOiii stack took several hours to complete. I won’t go through the steps as they are very technical and long. However, the bottom line is I am pleased with the final product. Most of the reddish color is Hydrogen-alpha (Ha) gas and the blueish is double ionized oxygen (Oiii). The blueish area are star forming regions.
Nebulae are the stellar nurseries where new stars form from vast clouds of gas (mostly hydrogen and helium) and dust.