Senior Moments
Where has Nick been? I haven’t posted in a while. Been busy installing a new patio roof. And now it is time to plan our next camping adventure. Here’s an update of what I’ve been doing. What I have been doing is the consequence of a dumb decision I made four years ago.
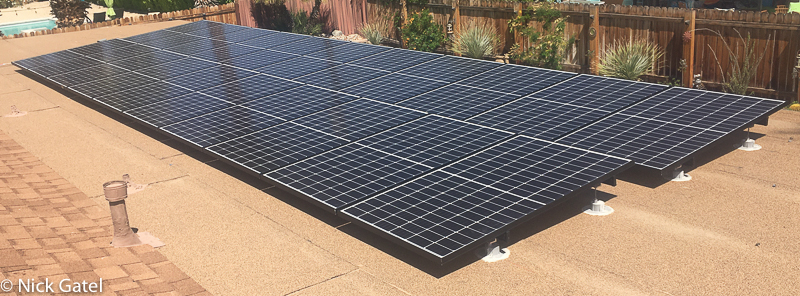
Yeah, I had a Senior Moment four years ago when we had our home solar system installed. My “moment” was my poor decision to install the panels on our patio roof. It was a mistake. In this story I’ll relate several steps that can be applied to many decision making situations; even for backpacking or camping. It has to do with researching products.
The Mistake
Solar in Palm Springs is often times a status symbol. Just like the folks who buy electric vehicles to “look green” while other aspects of their lives aren’t environmentally friendly. We purchased our solar system to save money, as the utility rates in California have sky-rocketed to the highest in the nation. I wrote about this, along with examples of the crazy price increases four years ago, in this post.
I had decided to have our solar panels mounted on our patio roof, which is not visible from the street. That worked too well. The solar salesmen kept coming to the door because they did not know we already had a solar system. I guess this is called unintended consequences.
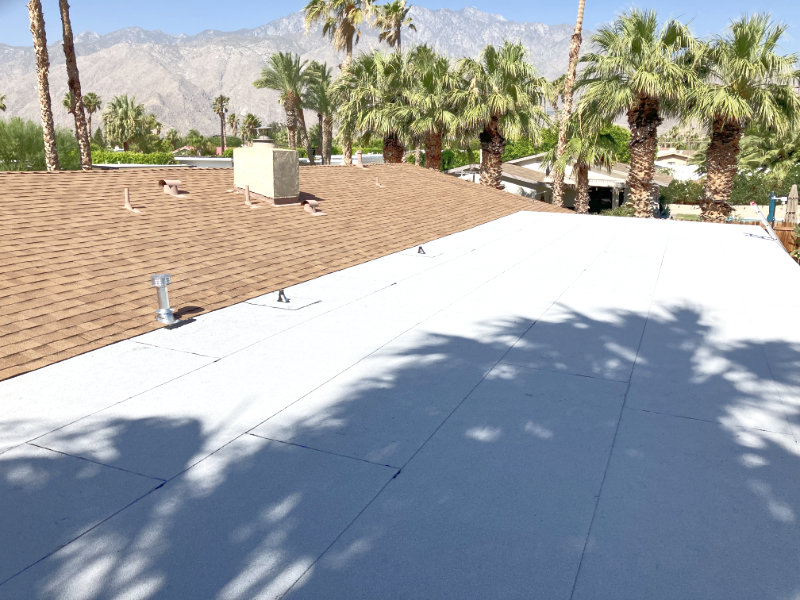
At the time of the solar system install, our roof was just four years old. The main house has architectural asphalt shingles that normally last for around 20 to 30 years. The patio roof has a rolled asphalt roof because of its low slope. This type of roof lasts 8 to 10 years in our climate.
And so, after 8 years our patio roof was beginning to deteriorate and it was time to replace it. This was my mistake — having the solar panels installed on the patio roof — but it didn’t register in my brain that the patio roof wasn’t going to outlast the main house roof. It was now time to take action!
Relocation of the Solar Panels

To replace the patio roof, the solar panels would have to be removed. I decided, with Joyce’s approval, to have them installed on the main roof facing the street (south). This would require new mounting hardware since the main roof has a much steeper pitch than our patio roof.
Moving the solar panels wasn’t a job for me. Aside from the time required, sourcing parts, and other factors, I decided to have the original contractor who installed the system move it. A big plus is there would be no issues regarding our warranty if this company did the work. Not to mention it would just take a day or two since they would send out a crew to do the work.
The cost was more than double what I had hoped it to be, but then, everything has gotten so expensive these days. To soften the blow of this unexpected expense, I decided to replace the patio roof myself.
Research, Research, Research
First of all, our patio roof is 1,200 square feet. That’s a very large roof for a patio. The materials were going to add up in cost, so I wanted to make sure I knew what we were getting into.
Replace the rolled roof — just go to Home Depot or Lowe’s and buy some rolls of roofing material — WRONG!
Whenever I make a purchase decision for something I know little about, I do my due diligence and research. Even if I am familiar with products, I research to make sure the product I want to buy is well-priced, functional and durable. This is getting more difficult these days because retail store personnel often have little or no product knowledge, and the internet has turned into a click-bait gauntlet. So I started by reading up on building codes and roofing industry product specifications. This turned out to be a critical important step.
Roof Pitch
Roof pitch is how steep a roof is and is usually designated by something like 3:12.
3:12 means that for every twelve inches in depth, the roof rises by three inches. Or more generically, roof pitch tells us how many inches the roof rises for every 12 inches in depth.
What kind of roofing materials can be used is determined by the roof pitch.
The common rolls of roofing material found in the big box hardware stores is for roofs that have a pitch of 2.5 inches or greater. But our patio roof only has a pitch of 1/4 inch. This is allowable, on patio roof, where we live, but it requires a special kind of roofing material called a SBS Modified Bitumen product. I won’t go into greater detail, but the roof’s base layer, cap sheet (top layer), and any adhesives are specially designed for low slope roofs like ours.
Home Depot and Lowe’s didn’t stock what I needed, and neither company sold everything I needed online. Drats! Fortunately I found a local store, RWC Building Supplies, that stocked everything. It is a large family owned business with stores throughout the Southwest and they sell directly to the public; but it appears most of their customers are contractors. A big plus is the people behind the counter are experts in all things roofing. I also found their prices to be competitive, and sometimes lower, than what my research had turned up.
I placed an order and in a couple of days (the day that was convenient for us) the order arrived promptly. RWC’s service was outstanding. They actually arrived with a large truck and a conveyer belt and were willing to place all the materials on the roof for us at no extra cost. This wasn’t practical for several reasons, and they carried everything into the garage at my request.
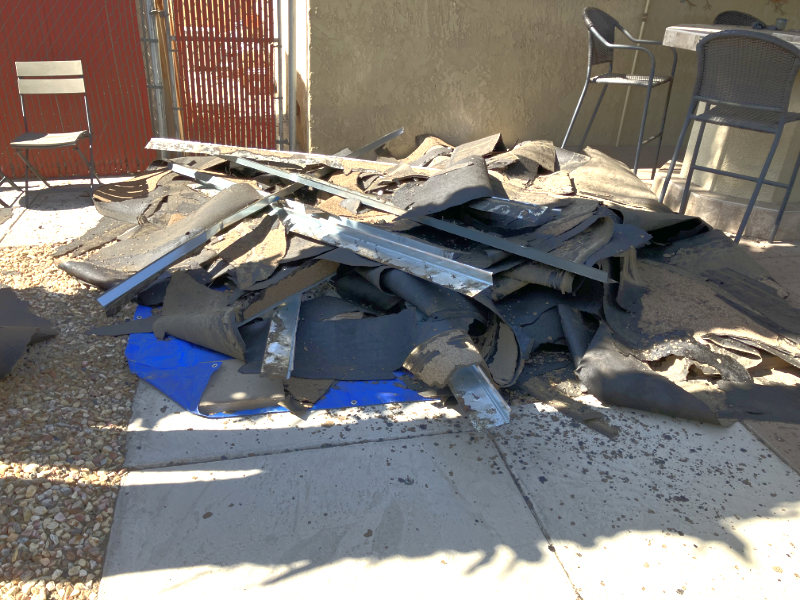
Demolition
One of the reasons I didn’t want the materials placed on the roof was because I had to tear off the old roof. Since I was going to do the work myself (with an assist by Joyce on the cap sheets), it wasn’t going to be a quick job. It was late May and we were already hitting triple digits (100° F). I figured, since I will be 74 years young in a few months, I should take my time. Plus I know that this time of year we can get close to 120° F some days.
Not a good idea to leave all the roofing stuff on the roof in direct sunlight for an extended period of time, where things can start sticking together.
Removing the Old Roof
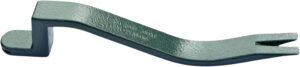
This was the hardest part. It would have been even more difficult without the roofing shovel I bought. I hate to buy single use tools — tools I only use once. In this case, it was a worthwhile purchase. The shovel removed almost all the nails along with the underlayment and the cap sheet.


This website may be compensated for linking to other sites for sales of products. As an Amazon Associate I earn a small fee from qualifying purchases at no additional cost to the purchaser.
I just threw the demolition debris of the side of the patio roof for the time being.
Below you can see a push broom and the electric cord going the the leaf blower. Very important to clean the roof deck before installing the roofing materials.
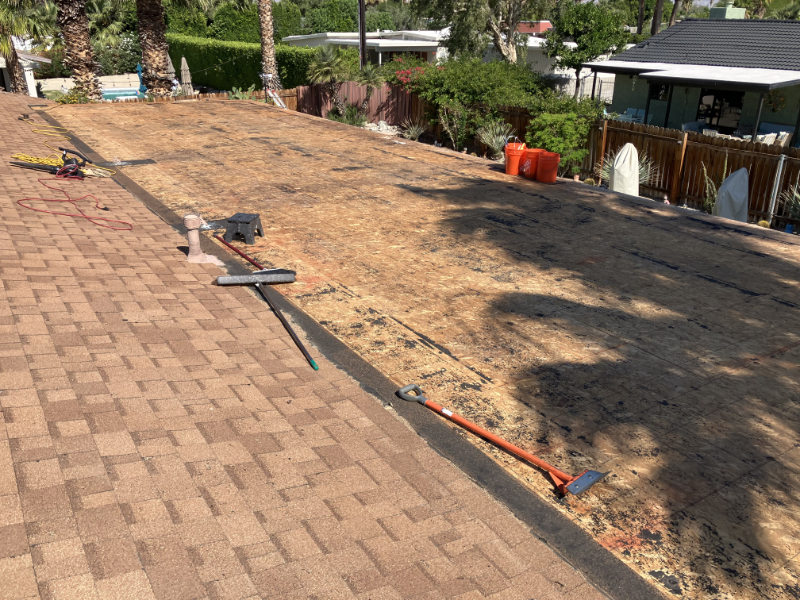
In the picture above, you can see where the shingles tie into the flat patio roof. When the new roof is installed, it will need to go at least 18 inches up onto the hip roof, under the shingles. This meant I would have to remove three rows of shingles in order to install the new roofing under the existing shingles. Removing the shingles, for re-use was time consuming, plus I needed to be careful that I didn’t damage any shingles above the rows I removed. Let me explain:
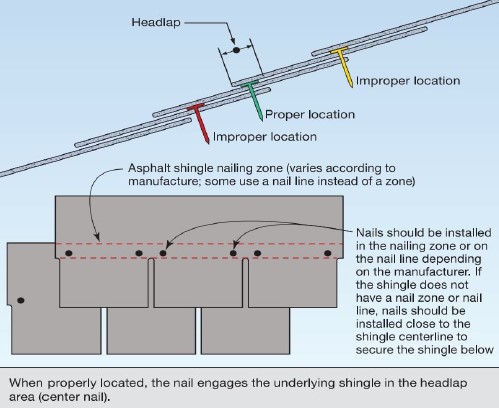
The roof shingles are about 13.25 inches tall. Only about 6 inches are visible. The rest of the shingle sits underneath the two rows above it. The nails holding the shingles in the rows above a shingle, also fasten the shingle below them.
So when I removed the third row of shingles (third from the bottom), I had to lift the two rows above it (4th and 5th rows) and remove those nails without removing any of the shingles in the 4th and 5th rows. It is hard to describe. The image below shows how it is done.
Preparing for Installation
Each roll of the roof cap sheet weighs 89 lb. We bought 13 rolls. Each roll of the base sheet weighs 92 lb. and we bought 7 rolls. I weigh 150 lb. There is no way I could carry these up a ladder. So I cut them into manageable sections of 11 to 12 feet for installation.
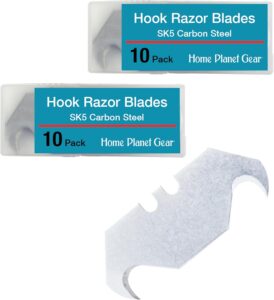
An absolute god-send was purchasing hook blades for my utility knife. I had never heard of these before and they work wonderfully for cutting underlayment and cap sheets. They do get dull fairly quickly cutting cap sheets that have rocky granules embedded in the material. As a comparison I tried the standard utility blades to cut the first couple of sheets, and the hook blades are much, much better for this kind of work.
Installing the Underlayment (base sheet)
For our patio roof, an underlayment isn’t a requirement, but it is the best way to install a new roof. For our roof we needed a SBS underlayment for low slope roofs. We could have gone with a self-adhesive (peel and stick) or a mechanically adhered base (nailed down). Self-adhered costs twice as much and require at least two people to install it. I opted for the nail-down version. It was less money, and I wanted to minimize the time Joyce would need to spend up on the roof helping me. Especially since we did have days where the high temperature soared to 113° F.
The patio roof is 60 feet long and close to 20 feet deep. Both the underlayment and the cap sheet are just over 39 inches wide. The roof would need about 6 1/2 rows of material, each row being 60 feet long. When the underlayment is installed, each successive row has to overlap the row before it. Same with the cap sheet. So these calculations need to be taken into consideration when ordering materials.
I wasn’t sure how long this would take. I had to cut 6 sections of underlayment and carry each to the roof. Then nail them down. As it turned out, installing one full row each morning was about right. There is a lot of kneeling and bending over and I’m not used to this kind of work. I would finish around 10am each morning when the temperature was approaching 100° F. I have to tell you, 100° F up on a roof feels much hotter than on the ground!
Rain in May or June is an extreme rarity in our desert, so I could take my time.
Not really necessary, but I bought a roofing hammer. It works a little better than a regular hammer and I didn’t need the included cutting blade. It is just the right size and weight. I don’t regret purchasing, and knowing what I know now, I would purchase it again.

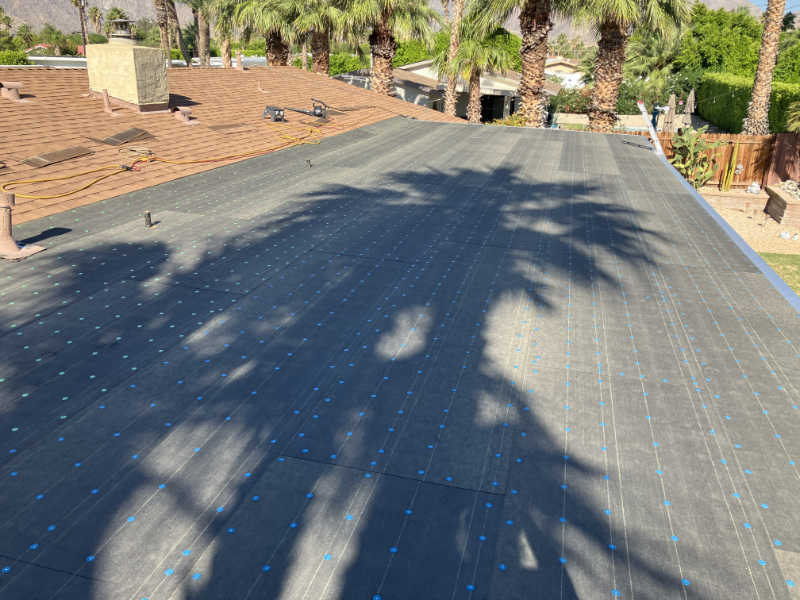
Almost 3,000 nails later the underlayment was completed (above). Seven mornings of work. This also included installing the metal drip flashing on the perimeters. Normally the drip flashing along the eaves (right side of the picture) is placed under the underlayment. However for high wind areas, there is an approved method to place it under the flashing as I have done. The rakes (sides of the roof) always have the underlayment under the flashing.
If you look the the left side of the picture, you can see where the underlayment is going up the slope of the main hip roof where I had removed three rows of shingles. You can also see some stacks of the roof shingles I removed that are sitting on the main roof.
Cap Sheet Installation
The original patio roof was colored matched to the main hip roof. I decided to go with a white roof, mostly because it was less expensive. I also figured it would keep the patio cooler in summer. Contrary to this thought, I have read that the color of a roof doesn’t matter. And since the patio roof isn’t visible anyway, I stuck with the white. Also, we bought the best quality SBS cap sheet for longevity.
I needed Joyce’s help for this. She wasn’t excited about working on our roof. In fact she wanted us to hire a roofing contractor to do the job. She didn’t make a big deal about it and once she saw I was determined to install the roof ourselves, she was happy to help. I think she was even happier when she saw how well the roof came out when we were finished.
The cap sheets come in rolls that are almost 33 feet long. Most of the sections I cut into 11 foot long pieces, which then weight about 30 lb. each. They are self-adhesive (peel and stick). This product is truly self-adhesive. If they are laid down incorrectly they aren’t coming back off. So we had to be careful and it is definitely a two person job. Joyce was a valuable partner during this phase of the re-roofing project and not a single piece of cap sheet was laid down incorrectly.
Before we did the work, I had Joyce watch a couple videos and explained why and how we would do the job, step-by-step. This is important, because if I accidentally skipped a step, she would point it out, and in the end, no mistakes were made. As with the underlayment, we did one row each morning before it got too hot. Each day was hotter than the previous, but we got a little quicker each day too.
As with the underlayment, each upper row has to over lap the previous row, and each end of each section has overlap the previous section. The top of each section of cap sheet has a selvage of adhesive that provides extra holding power to the self-adhesive that cover the entire bottom of the cap sheet. Where each section over laps, it has to be sealed with asphalt cement. A 2.8 gallon pail of SBS adhesive was more than enough coverage for the entire roof.
All these overlaps need to pushed down with a hand roller. This 3 lb. hand roller worked perfectly.
In addition to hand rolling all the end and side laps, the instructions state the entire roof should be rolled with a 75-80 lb. linoleum type roller like the one below:

I was willing to purchase one, if I could disassemble it and carry it up to the roof in pieces. But the roofing specialist told me to just take my time and walk over each section of cap sheet. He was more than willing to sell me a roller, but for a one-time use he suggested we take a little extra time and walk each section of cap sheet.
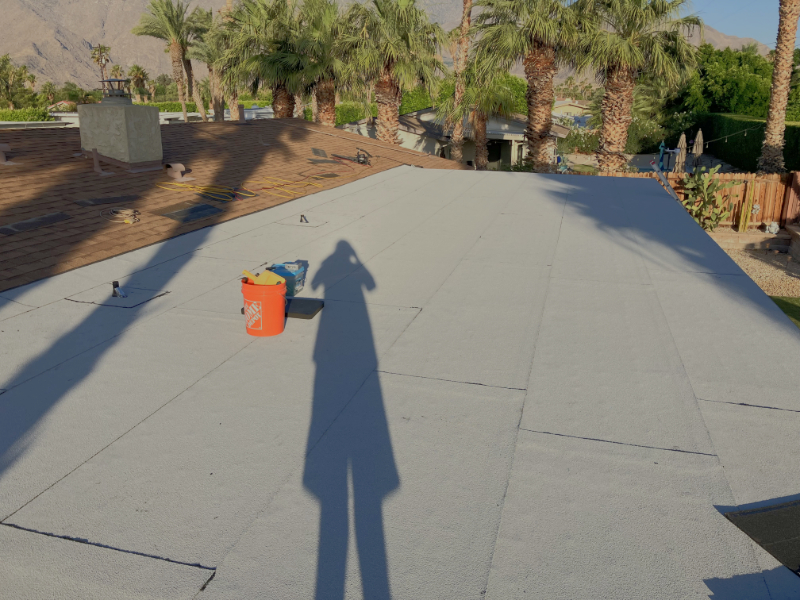
We had to replace the roof flashing for the water heater vent pipe and two soil (sewer) pipe vents. Bad idea to try and re-use old flashing. You can see the two soil pipe flashing on the left side of the roof (below).
Shingle Installation
I had removed about 100 square feet of shingles. Being the lowest shingles and the side of the house that gets the most wind, I decided not to re-use the old shingles. Three bundles of shingles was needed for replacement and total cost for them was just under $100. The new shingles were the same as the old ones (Owens Corning Oakridge Architectural Shingles).
I enjoyed this part — installing the shingles. It was the easiest of everything I had done.
Before installing the shingles, I had installed a special starter row shingle that is designed to be used under the first row of shingles.
There was one part that might not have been so easy — lifting the 4th and 5th row of shingles to nail down the third row. I bought my second one time use tool, a Roof Snake Tool that I had used to remove the nails, but it really shined for install the nails that were under the 4th and 5th row. I highly recommend it for this kind of work.
Roof shingles come with a self adhesive strip that secure the bottom edge to the shingle below it. So the three rows I installed are secured with nails and this adhesive. To lift the 4th and 5th row of shingles, I had to use a trowel to separate the old adhesive between shingles. Doubting the shingles would adhere again, I used roof asphalt cement in 10 ounce cartridges that I applied with a caulking gun. Once these rows were caulked, the job was done. Finally.
Conclusion
I enjoy projects. I enjoy the satisfaction of being productive and completing a project with the results I had hoped to achieve. Thus it is with the roofing project. But I am still kicking myself for having to spend $5,500 to move our solar panels, when they should have been installed on the main roof to begin with.
Had I not done all the research I did, more than likely, the new roof would not have lasted long. I do expect the new one to last longer than the original.
I now realize that I might be getting older. The repetitive actions of climbing the ladder to haul materials to the roof, kneeling and bending to install the roof has taken a toll. Stiff joints and sore muscles from all of this. Part of these minor aches and pains is doing actions I am not used to. But it tells me I am not as young as I act sometimes. Nothing to fret about. The joints and muscles are already getting better. If I had do it over, I would still install the new roof myself. But going forward I am more inclined to listen to Joyce and hire someone to do any big tasks. Best to save my energy and body for backpacking and camping as as long as I can.