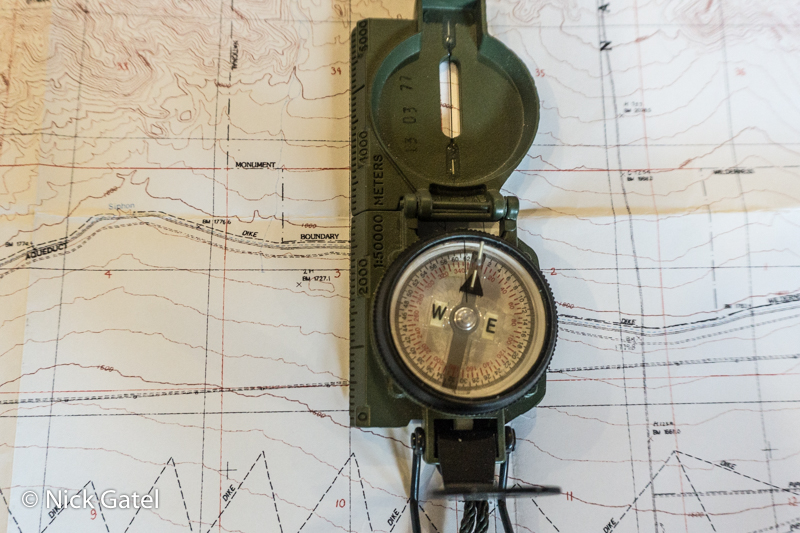
In my last post I discussed the inaccuracy of an iPhone compass, and I promised to share the results of my Cammenga compass. The task, if you read the previous post, was to align my telescope mount to true North.
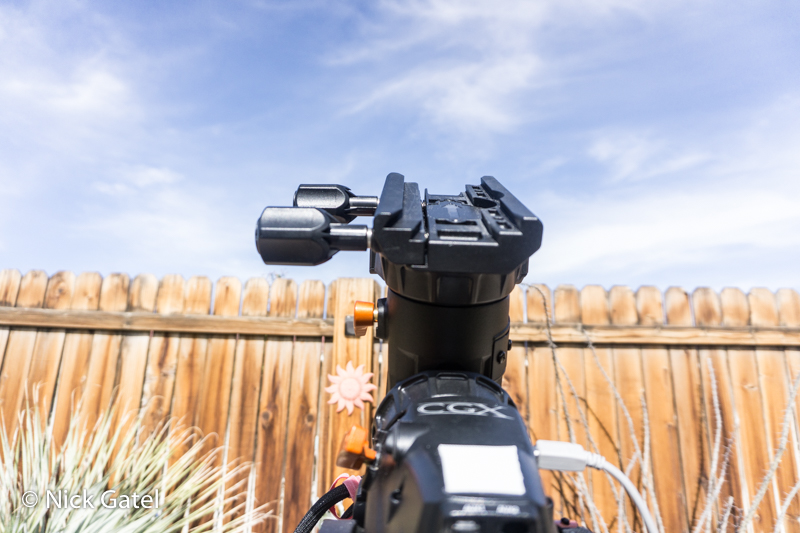
The challenge is the top of the mount is angled upward about 34 degrees, so I can’t place the compass on the top of the mount. So, I had to take a different approach.
The mount sits on top of a tripod, and one leg of the tripod is aligned with the center of the mount that needs to point north.
In the picture below, the tripod leg next to the retaining wall is the North leg.
Alignment Process
The mount weighs 44 pounds and the tripod 19 pounds. Instead of trying to manhandle 63 pounds, I removed the mount so it would be easier to align just the tripod.
The potential difficulty with this is the chance I might move the aligned tripod when attaching the mount and then the telescope. So I had to me careful.
Needed Materials
- Two Tent Stakes
- Six feet of tent guyline cord
- Cammenga compass
- Tripod
- Small level
- Tape measure
Steps
- Insert one tent stake in the ground above the point where the North tripod leg needs to be placed.
- Attach the guyline cord to the stake.
- Stretch the guyline taught and using the compass, place the compass along the guyline.
- Using the compass, adjust the orientation of the guyline so it is pointing to true north.
- While keeping the guyline taut and aligned to north, attach the end of the guyline to the second tent stake.
- Insert the second tent stake into the ground, keeping the line taut and aligned to north.
- Place the tripod’s North leg so the leg’s pointed end almost touches the taut guyline.
- Keeping the North leg at the same point, move the two rear tripod legs back and forth until they straddle the taut guyline equally. Each of my rear tripod legs were 55.5 inches distance from the center line (taut guyline).
- Using the small level on top of the tripod, adjust the length of each tripod leg until the level indicates the tripod is level in a couple different directions.
- Check the rear tripod legs are equidistant from the taut guyline. Adjust if needed.
- Very carefully set and secure the mount on the tripod. Once secured, double check the measurements and make sure the North tripod leg is still right next to the guyline.
- Install the telescope and any needed accessories.
When this post was first published I did not have a picture of the taunt string used to align with my compass. Later in the year, I took a picture of the set up at a spot in the Sierra Nevada. If you look closely, you can see the taunt orange line used to make the first “rough” north alignment.

At this point I need to wait until dark for final alignment adjustment — assuming my compass and measurements were accurate.
Polar Alignment
Most German Equatorial Mounts have a tiny polar alignment scope built into the base of the mount, which is only used to align the mount using Polaris as a reference.
My mount does not have a polar scope. Instead, I use a software program named SharpCap. SharpCap uses a camera connected to the telescope to determine where the mount is pointed.
SharpCap Software Program
Here is how it works:
- First the mount has to be within 5 degrees of True North. SharpCap has a picture of Polaris and the surround sky stored in the software.
- With the mount in the home position, SharpCap takes a picture. Once the picture is verified as in focus, it is compared to the stored image.
- If the mount is within 5 degrees, SharpCap instructs the user to rotate the telescope 90 degrees. Once the scope has been rotated, SharpCap takes another picture and compares it to the stored image.
- Now SharpCap will report how far off the Polar Alignment is.
- SharpCap begins to live stream images of the stars and gives instructions how much to move the mount. Usually the mount has to be moved in both directions: Azimuth (right/left) and Altitude (up/down).
- Each adjustment needs to be very small.
- As the mount is adjusted, Sharp reports the changes. When the alignment is “Good” or “Excellent” the Polar Alignment is completed.
- The entire process usually takes me a couple minutes, if the mount’s starting position is within 5 degrees of Polaris.
After I aligned the mount with the Cammenga compass, and it became dark outside, I began the Polar Alignment process using SharpCap.
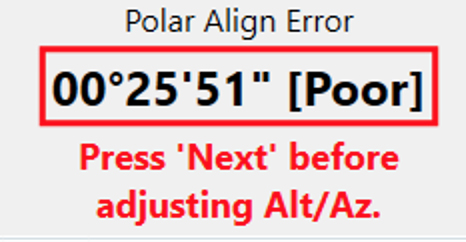
Below is the initial report:
Wow, the alignment was poor. It was off by almost 26 minutes. But is 26 minutes of error really bad?
So what is a minute?
1° = 60’ (one degree = 60 minutes)
My initial alignment with the compass was off by less than 1 degree!!
Keep in mind that we are aligning to a star that is 2,300 trillion miles distance from earth.
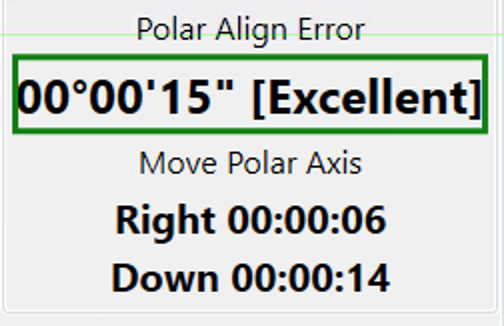
Following the instructions from SharpCap, I made several minute adjustments and ended up with this:
My total error was now 15 arc seconds (15”).
So what is an arc second?
1’ = 60” (one minute = 60 arc seconds)
To summarize,
1° = 60’ (one degree = 60 minutes)
1’ = 60” (one minute = 60 arc seconds)
or
1 arc second = 1/3600 of a degree
Is SharpCap Accurate?
Actually there are several ways to double check, and I have found all of them confirm the accuracy of SharpCap.
After I Polar Aligned with SharpCap during this session, I checked the alignment with a program named PHD2.
PHD2
PHD2 is a telescope-guiding program. Due the inherit inaccuracies in most consumer grade mounts; there is some backlash in the gears and other moving parts. To compensate for this I use an itty-bitty telescope and camera that is attached to the top of my imaging telescope.
PHD2 picks a dim star and tracks it by taking a picture every 1.5 seconds. PHD2 wants to keep the star in the same exact position in every image it takes. If the star moves more than 5 pixels, PHD2 sends commands to the telescope mount to make a position correction. These moves are so small, that during a long exposure, the movement will not show up on the captured image.
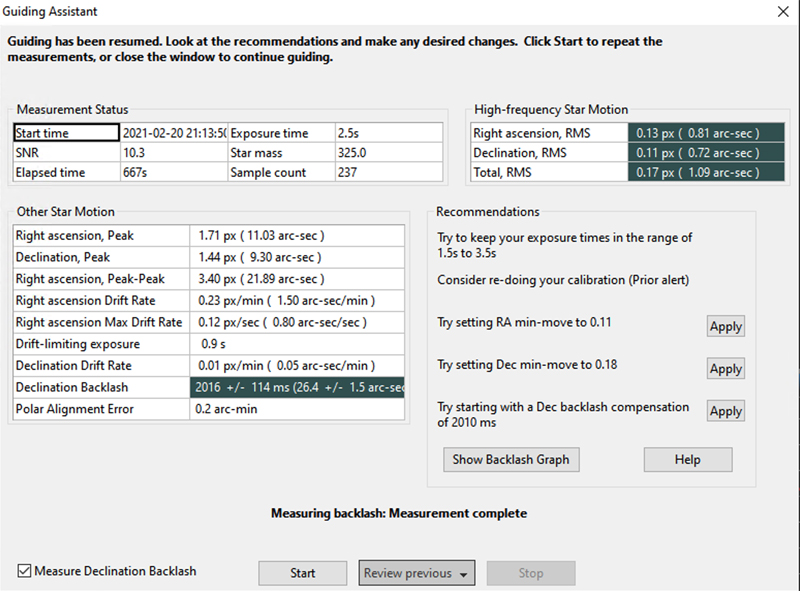
After I had been guiding and taking images for several hours, I then had PHD2 do some analysis. Basically PHD2 quits guiding the telescope mount, and measures how much the guide star moves over a period of time. In this case I ran the mount unguided for a little over 11 minutes.
Below is the PHD2 report:
The bottom cell of the left hand column in the PDH2 Reports shows the Polar Alignment error to be 0.2 arc minutes. If we remember the formulas I shared earlier, we can convert this to arc seconds:
0.2 arc minutes = 0.2 X 60 arc seconds
0.2 arc minutes = 12 arc seconds
This is even better than the 15 arc seconds SharpCap reported when the Polar Alignment was completed, and the PHD2 report was generated after about 5 hours of image taking. 12 or 15 arc seconds is an insignificant amount of error when guiding a telescope.
Conclusion
The Cammenga Military Lensatic Compass is incredibly accurate.
Had I used my iPhone, odds were pretty good that I could not have even begun the SharpCap Polar Alignment.
Oh yeah, the purpose of all this? To take nice images of deep space objects. This was the target during this particular alignment session. I took many exposures and then stacked them into one composite image. Each exposure was 5 minutes.

This website may be compensated for linking to other sites for sales of products. As an Amazon Associate I earn a small fee from qualifying purchases at no additional cost to the purchaser.
