
I knew it was going to happen. It happened on our 2006 Fleetwood Niagara.
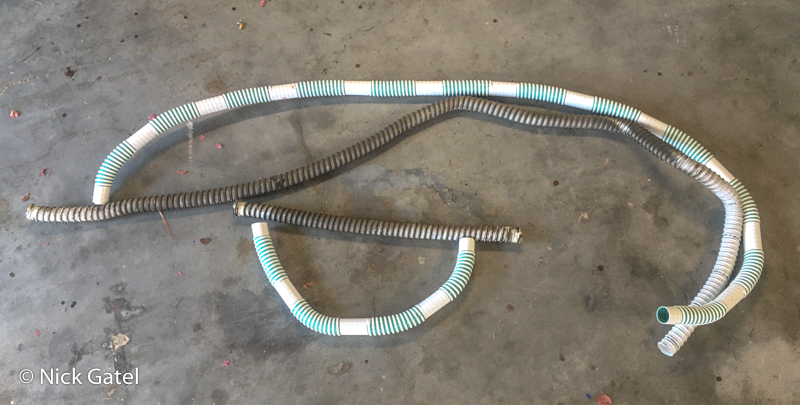
The fresh water tank fill hose started to leak. It was cracked from age.
It’s just a hose, right?
Go to the local hardware store and buy some new bulk hose of almost any kind, because the fill hose is not under pressure. Wrong. I went through this with our previous trailer, because I really didn’t want the same exact hose because, well because, it had failed.
There is one problem with this apparently simple solution — hardware stores don’t sell this size hose. I was able to come up with something on the old trailer, which was expensive, but I needed something right away as we were in the midst of leaving for a trip.
This time, time wasn’t a pressing issue.
So off to Amazon’s website I went . . .
Searching for Parts
It appears most RVs use this same kind of hose, which makes sense, because the last three campers we have owned all sourced common components from third party vendors. And it is common for most RVs to use 1 3/8” diameter hose, although some smaller trailers use 1” diameter.
Just to make sure before ordering, I crawled under the trailer to figure out what size I needed. As you can see below (after I cleaned off 8 years worth of road grime) the diameter is 1.375 inches, which is 1 3/8 inches.

While under the trailer, I measured (or guesstimated) how much hose I would. Our trailer is somewhat unique, since we have two fresh water tanks for a combined capacity of 100 gallons. This was an option we wanted, since we camp for extended periods in remote areas where there is no water, electricity, or even restrooms.
One long hose connects the front tank to the water fill opening at the back of the trailer. A second hose is connected to the bottom of each tank, which allows both tanks to fill up at the same time through the single fill opening. It works well, once I fixed (solved) the slow fresh water fill problems many RVs suffer.
Two Hose Options
One is cheaper than the other. The manufacturer, as they usually do, had opted for the cheaper, although that didn’t lead to the hose’s demise.
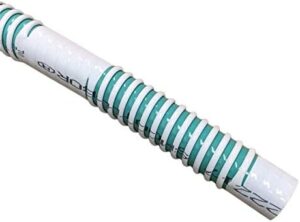
If you take a close look at the picture of the hose above, you can see the ridges on it. This is a stiff wire that spirals along the hose to give it a little structure. Since the wire spirals along the entire length of the hose, there is wire at every point along the length of the hose (e.g., there is no point where there is no wire). The wire creates the ridges seen in the image above.
Since a hose clamp has to secure the hose, it needs to be placed between two of the ridges, however the clamp will go over the wire at a section of the hose. This increases the likelihood of leak.
I found some hoses on Amazon that had complete flat areas at intervals along the hose, designed to better accommodate a hose clamp.
I ordered two hoses that were almost the exact same size as what I had.
The new hoses seem to be of a better quality, but time will tell.
Did You Know?
Hose clamps have a torque specification (how tight they should be). I have a special wrench to properly tighten hose clamps. Once the torque rating is reached, the wrench will no longer tighten the clamp any more. They’re fairly inexpensive.


This website may be compensated for linking to other sites for sales of products. As an Amazon Associate I earn a small fee from qualifying purchases at no additional cost to the purchaser.