I DON’T KNOW WHAT I DON’T KNOW
Unlike cars, trucks, and motorcycles you really can’t order accessories from the bicycle manufacturer. There are a few exceptions like Surly or Rivendell bikes, which will sell you accessories built to fit their bikes or aftermarket accessories they have tested for fitment.
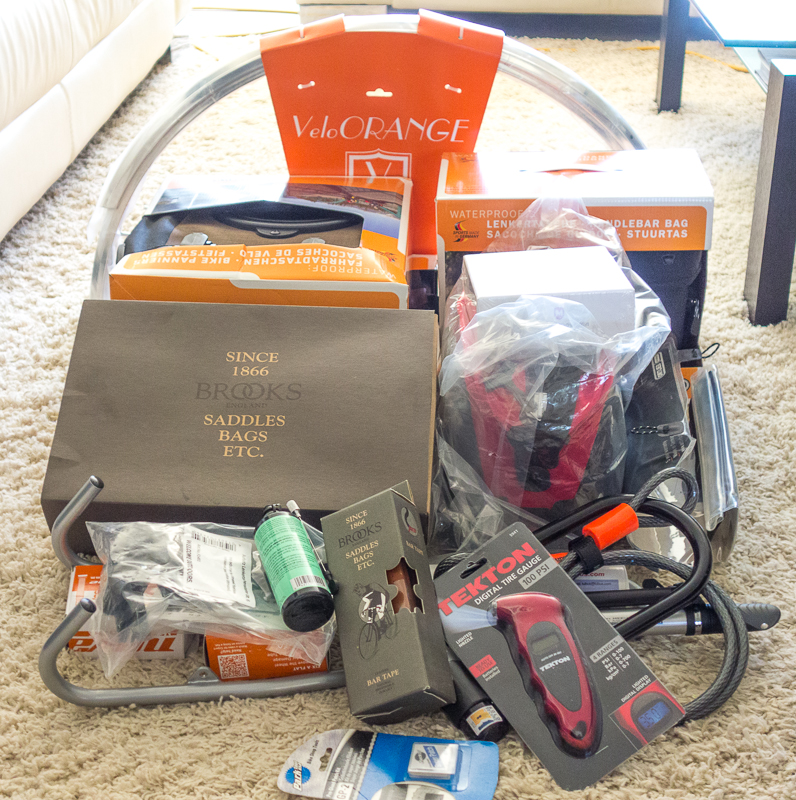
Generally bikes are like campers – a frame built by the manufacturer and most everything else is bought from vendors and bolted on by the user or the retail store selling the bike. Adding accessories is usually limited to what the aftermarket sells – meaning that accessories are not fitted to specific bike model, but are universal in design and fitment. That was our situation after purchasing our REI Novara Safari bicycles. We would need several different accessories for each bike.
For example, you just can’t contact REI and order fenders specifically made to fit a Safari; REI doesn’t make fenders. The fenders they sell may or may not fit any model REI bike. REI doesn’t specify if any fender they sell will fit any specific bike.
All of this meant that I would have to do research for each item as to fit, function, and quality.
The social networking approach
Today, it seems when someone needs equipment, whether it is for camping, backpacking or biking, most people just jump on some Internet forum or query their friends and ask what they should do.
How is it that so many people don’t know what to do? Why do they need the advice of someone else to make decisions? Our society is in dire straights when people can’t figure out what underwear to take backpacking, camping, or biking. And for the more important things such as purchasing campers, backpacks, or a bike – well, trillions and trillions of electrons are wasted everyday on the Web by people asking others to tell them what to do. Oh, I see it all the time. A typical post would be
“Tell me what ________________ to buy. I don’t have time to research, and please don’t confuse me with technical information. I just need to know what is the best, the lightest, and cheapest.”
The anti-social networking approach
For my research, I would take the road less traveled. I would do my own research and not ask friends, relatives, or complete strangers what to do. I would decide for myself, based on what I could learn and live with the consequences. I would figure out what to do own my own.
You can figure out what to do too
Amazingly, the first requisite ability is common sense. This is the simple capability to recognize, comprehend and assess things – the ability theoretically shared by almost everyone and can be reasonably expected of most people without the need for discussion or examination.
Somehow common sense has been replaced by the lowest common denominator. This is the result of the Death of Renaissance Man who has been supplanted by the social networker and/or the collaborator who both adhere to the notion of the common good.
Unfortunately, without common sense one cannot move up to the more critical concept of reasoning. Where common sense dictates an almost instinctive skill, reason demands a conscious effort to understand things, necessitated by exercising logic, establishing and verifying facts. In other words, reason is thinking and intelligence. If one cannot figure out, without help from their peers, what underwear to buy or what fender to buy for their bike; how on earth can they make the important decisions in life such as buying a house or car, investing their money, voting, or even developing a philosophy on how to live?
My approach
Having never toured on a bicycle and only needing a simple tail trunk in the past, I had little experience with bike accessories. Not inclined to “network” with others, it was necessary for me to figure it out on my own. I know this goes against the grain of what we are taught nowadays – you know: work together, two minds are better than one, the common good, and all that other nonsense.
Follow my research methodology and maybe, just maybe you can figure out what underwear to buy for backpacking, biking, or even camping. When it comes down to recreational equipment, what works for me, may not work for you – but I know why I bought every single piece of equipment I own – independent of what others think. You to can figure out what you need without asking others. If you are in the market for a new bicycle or bicycle accessories do not buy anything we purchased just because we did. That would be dumb.
If you follow my approach to gear purchases, it means you can believe almost nothing your read in magazines, newspapers, or the Internet. It means anything you hear on TV or radio should be assumed to be a lie, unless proven otherwise. It means you must scrutinize items yourself. Avoid professional reviewers – they are often liars or sleeping with the product manufacturer.
In my opinion, when tackling a new problem, your best resource is your own life-experiences. What do you know that will be applicable to this new challenge? Let’s take an inventory of how I approached this bike accessorization dilemma:
- If you buy an item, buy the second one the first time. In other words, figure out exactly what you need and then purchase the highest quality item that fits into your budget. If you don’t do this, you end up unhappy with your original purchase and need to purchase a second item – the one you should have bought in the first place. Go back and read this… it is usually cheaper to buy what you really need the first time.
- Motorcycle touring is probably like bicycle touring, and from my years of riding motorcycles I found that:
- Detachable luggage is most convenient and flexible for multiple uses.
- Critical success factor #1 for luggage is it must be waterproof.
- Critical success factor #2 is luggage must be durable.
- Critical success factor #3 dictates the mounting system be robust and easy to mount and remove luggage.
- Some sort of front luggage on the handlebar for quick & easy access to commonly needed items is mandatory. A map waterproof map holder is important too. On my motorcycle, I stored common items in the front fairing and on long trips attached a bag with map holder on the gas tank. So, a handlebar bag seemed a likely candidate for a touring bicycle. Common sense would tell you that too much weight in a handlebar bag will affect steering and stability.
- Next to front storage, a tail trunk is second in utility. Second level priority items should be stored here. Things you may need during the day, or things when you need them you need them now.
- Saddlebags (apparently on a bicycle they are called panniers) hold the stuff you need at the end of the day; camping gear, extra clothing, etc.
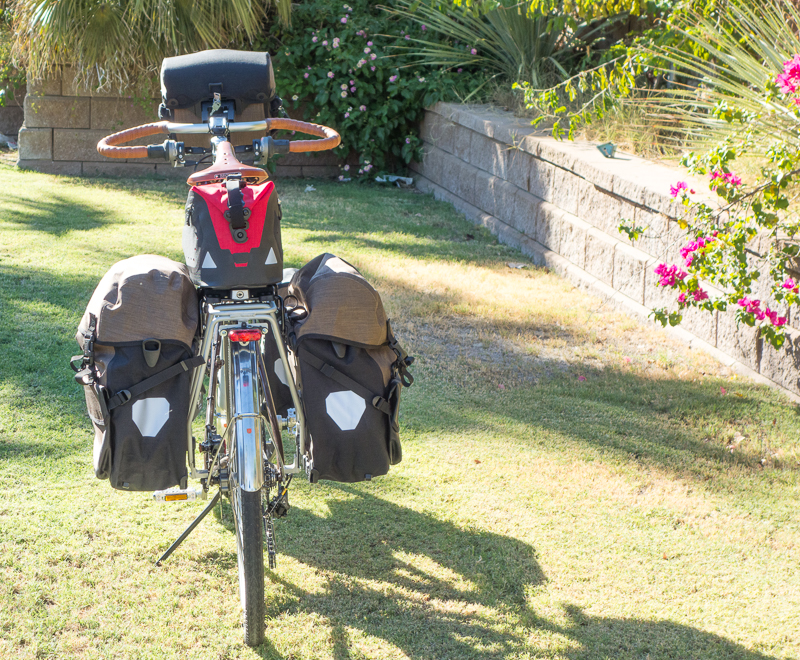
- On a long trip one would not want most of the weight on the rear of the bike in large panniers, which typically have more cargo capacity that tail trunks or handlebar bags. It would be better to distribute weight fore and aft, but much weight in a handlebar bag will have negative steering control issues. Much better to mount small panniers low on the front wheel – you would want to lower the center of gravity on the steering axle.
- From backpacking I know that buying the lightest pack to simply save weight is false economy.
- Yes, just as in backpacking I see touring riders trying to find the lightest option in luggage, without paring down all the stuff they put into the luggage first.
- I can save plenty of weight in my gear, so the weight of quality luggage is truly negated.
- I can separate the wheat from the chaff. That is I know the difference between bullshit and what works.
STAGE 1: ANALYSIS
Before buying anything, we rode our bikes to determine if there where any fundamental problems with the basic components. Just as you build a house, you need a solid foundation. We found 4 glaring problems:
- Within a few hours the handlebar tape came loose and started falling apart. Joyce told me that when she read reviews on our bikes this seemed to be a common problem, obviously not user error.
- The foam filled seats sucked. I later learned bicycle nomenclature. Seats are really saddles. But on a motorcycle a saddle is really a seat. I thought only horses wore saddles.
- The pedals, which had clips/cages on them, were difficult to use. Perhaps this takes time to get used to.
- No kickstand. No way to park the bike without a stationary object to lean it against.
So I tackled these items first.
Saddles
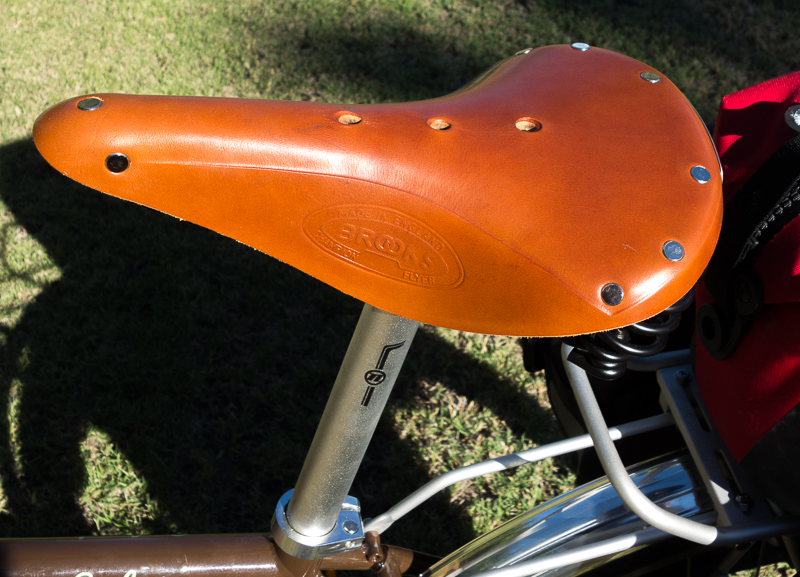
It amazes me that many people can’t sit on a log or on the ground cross-legged. People need some sort of pillow or mat to sit on. I doubt our bodies evolved to their current configuration because man sat on pillows for thousands of generations. So I decided that cushioned saddles were not natural. We needed a solid material that would allow for movement of our legs and butts without friction or restriction. A wire frame (meaning not a solid platform) used to suspend quality leather seemed like a logical solution to me. Several companies make this type of saddle and my research let me to the Brooks England LTD. This company has been making bicycle saddles for over a hundred and fifty years. There are hundreds of user reviews on the Web.
Now user reviews can be useful if one is critical about reading them. I typically focus on the negative reviews, with a skeptical eye also. Why didn’t the user like the item, did the user use the item properly, does the user seem intelligent? So my research indicated that Brooks probably makes a quality product.
Brooks makes dozens of models for specific uses and two models seemed to fit our needs. The B17 model or the Flyer model. The flyer model has springs to cushion rough roads. Now you may say, aha! Springs are cushions! Get foam. Since we are not stationary when riding a bike the springs will smooth our irregular riding surfaces while providing a solid seating surface. So I went with the Flyer model for me and a Flyer S model for Joyce. The “S” means short. A short seat is designed for women who ride with a skirt so it is easy to mount and dismount the bicycle.

Handlebar tape
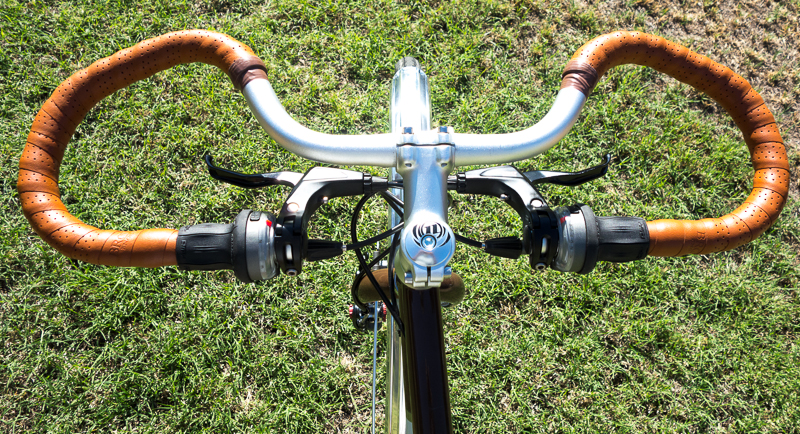
Our handlebar tape was made from some sort of plastic or vinyl petroleum product. I decided leather is better. It lasts longer, can be conditioned, looks good and is a renewable resource, whatever that means. I almost didn’t get leather because I heard Al Gore has leather seats in his fleet of SUV’s.
Since I was ordering Brooks saddles, I went ahead and got Brooks leather handlebar tape.
I have never installed handlebar tape before, but removing the old tape showed how it was done. The only issue was how to secure the last wrap. I have noticed many bikes use plain old black electrical tape.

Instead, I went to Lowe’s and found some matching brown electric tape.
Pedals
Our bikes came with plastic clips and a nylon strap. The purpose of this Rube Goldberg configuration is to secure your foot to the pedal so
- Your foot does not slip off the pedal
- You are a more efficient rider because when the pedal moves up, you can “pull” it up because your foot is secured to it
Okay, point 1 makes sense. Point 2 didn’t. When you ride a bike you are pushing the highest pedal down and you really can’t gain much efficiency by pulling up on the opposing pedal. It would be best to just let the opposing pedal rise via the down stroke the rider applies. Maybe, just maybe the few world-class bike racers can gain a fraction of efficiency and speed by pulling up on the opposing pedal. Most riders are not world class.
The problem with this clip/cage pedal is the difficulty placing your feet into them; you have to do this while moving. Also when stopping you have to remember to pull your feet out of the clips if you don’t want to fall over. Both can be learned.
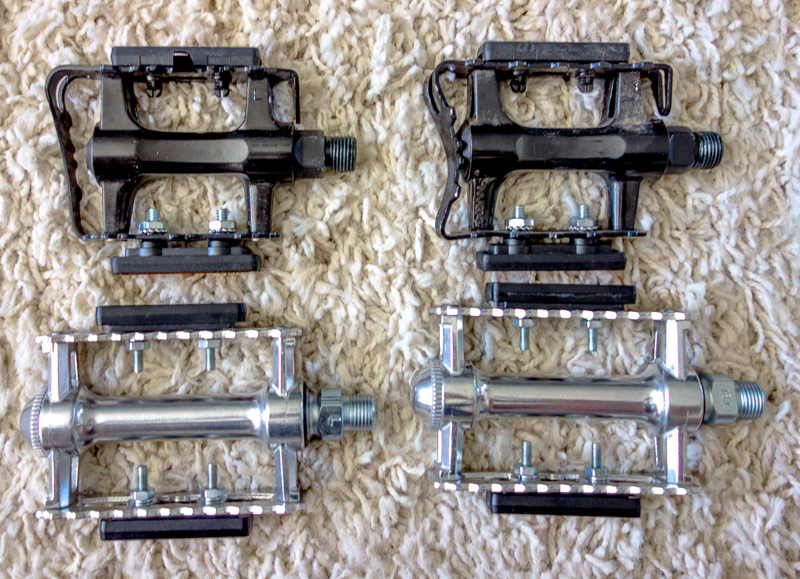
So I figured the clips had more downside potential than positive qualities. I removed the clips and straps. Without the straps, the pedals had too little surface area; each side of the pedal had a different configuration, meaning that if you placed the wrong side under your foot, it was uncomfortable.

Final analysis: they had to go. Time for research. I found there are three kinds of pedals
- Platform Pedals – these are the ordinary pedals you had on your first bike as a kid. They work. They are time tested by a gazillion kids and adults.
- Pedals with clips or cages – these are what our bikes came with. The ones we hated.
- Clip-less Pedals – not this is a misnomer of sorts. Clip-less pedals require special bike shoes with cleats on the bottom that clip into a special pedal. You must buy shoes that are matched to the pedal because there is no standardized system. This creates a huge new problem: it is not easy to walk around with cleats on your shoes. These might be good for you if you are racing in the Tour de France, but most of us aren’t going to do that. I also noticed that most people who use these clip-less pedals wear special bike jerseys and bike pants, all of which are colorful and gaudy. A t-shirt and hiking shorts will work as well and are multi-use; you can use them for camping, hiking, and backpacking too. I have come to the conclusion that most people use clip-less pedals as a status symbol. Count me out on this.
I bought some platform pedals with serrated edges to help keep our feet from slipping. A Japanese company, MKS, makes them and the model is a Sylvan Touring. We are thrilled with our new pedals.
One last item about the pedals: I bought some bolt on reflectors. Over the years, while driving at night, I have noticed that pedal reflectors are visible and the up and down movement of the reflectors in my headlights communicates there is a bike ahead.
Righty Tighty and Lefty Loosey
This article is not meant to be a tutorial or primer, but I should mention that replacing pedals is not a straightforward procedure for many people. I find this odd, because as a kid I replaced by first set of pedals at about age 7 and to me it was intuitively simple. So I thought I would share this with you.
Most fasteners (think nuts and bolts) come with two thread types. By far is what is most commonly used is often referred to as standard threads. This means the fastener is turned clockwise to tighten (turn to the right) and turned counterclockwise (turn to the left) to loosen. In some applications we want to use reverse threads. With reverse threads we turn to the left to tighten and right to loosen.
On a bike, when we push down on the right pedal we are pushing clockwise, which is the direction of a standard fastener. However when we push down on the left pedal the direction on the fastener (the part that screws into the crank) is counter clockwise. So if our left pedal used a standard fastener, we would eventually loosen the pedal by simply riding the bike. So bikes use reverse threads on the left pedal. If this is Greek to you, then you need to take your bike to a bicycle shop if you need new pedals.
Kickstands
I don’t know why bikes like the Safari don’t come with kickstands. Yes, no kickstand saves weight, but the Safari isn’t a light bike, it can’t be because it is a touring bike designed to carry gear. Not including a kickstand does save the manufacturer money. We want kickstands on our bikes. So I bought these Greenfield Retro Kickstands. They were inexpensive at around $7 each. I did have to cut about 2 inches off the bottom with a RotoZip to get the proper length.

STAGE 2: ADD-ONS
Fenders
It doesn’t rain much in Southern California. But when it does rain, not having fenders is not fun. Water, mud, dirt, and grid spray up and hit the rider – not to mention the chain and gears, which is not a good thing. Finding a good set of fenders was my most difficult task, as was installing them.
I got this nice pair for both bikes from Orange Velo. I don’t know if they manufacture them or just retail the fenders (I suspect the later).

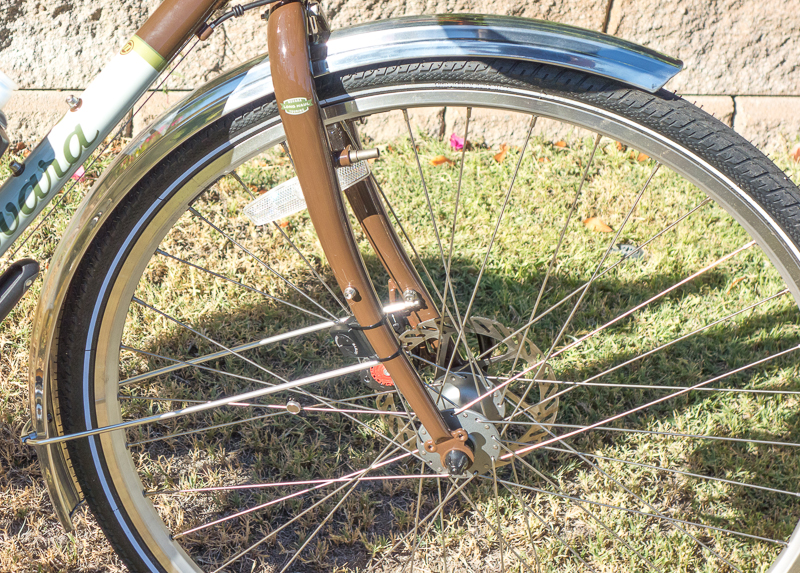
The difficulty in installation was locating the mounting points on the bike for the metal stays and other mounting positions, given that the fenders are universal. The stays had to be cut to fit with a RotoZip and time taken to carefully align the fender from side to side and along the circumference of the tire. I used LocTite thread sealant to secure the fasteners. The time needed to install the fenders was worth it once the job was completed.
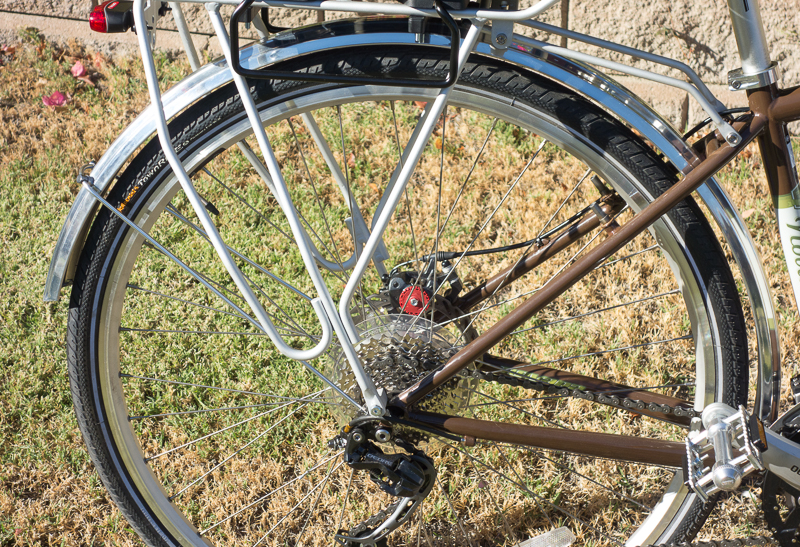
Bike Racks

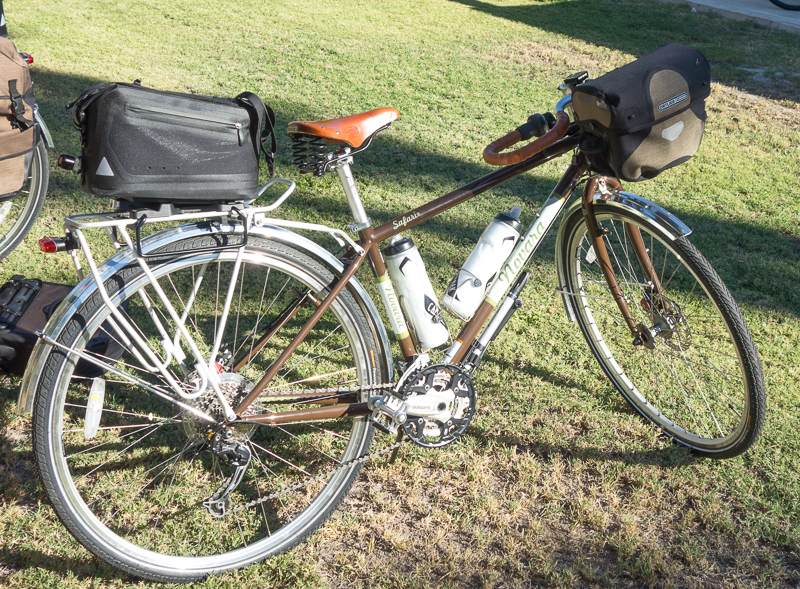
A rack is required to mount a pannier and most pannier companies do not make racks. The panniers are somewhat universal to fit a multitude of racks. Above is a picture of the rear rack that came with our bikes.
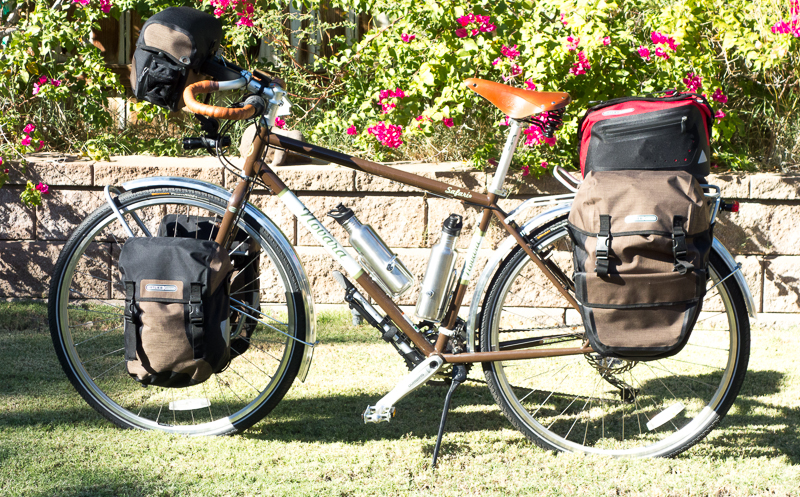
To mount panniers to the front of my bike, it would be necessary to purchase a front rack. I wanted a rack with a low center of gravity, apparently often called a low rider rack in bike lingo. I ended up purchasing a Tubus brand, Tara rack. Tubus is a German company with an outstanding reputation for building quality products.

This was the one accessory I was most concerned about fitting to the bike. As it turned out it was a 5 minute job with the Tara mounting holes aligning to the bike’s mount points.
ORTLIEB LUGGAGE
For my bike I decided to get front and rear panniers. Joyce won’t be doing any long distance touring and decided she did not need panniers. However, it will be easy for her to use mine, should the need arise. As mentioned previously the mounting system is important. I looked at about everything on the market, studied pictures, read manufacturer’s instructions, read reader reviews and studied a few blogs of touring riders who completed long rides of thousands of miles. It became apparent that the German company, Ortlieb, has the best mounting system. Even folks who dislike their bags (usually because of aesthetics) praise the mounting system. The bags I purchased came with what Ortlieb calls their SL2 mounting system.
Since the tubing rack manufacturers use to build their racks come in varying diameters, the pannier companies must have a mounting system to accommodate different thickness tubing. The QL2 kit comes with a couple different sized bushings to cover most sizes. Ortlieb’s QL2 works well, but the bushing is a potential weak link should one fail or fall out of the mount. Extra bushing can and should be purchased.
Ortlieb makes several different kinds of panniers. All are truly waterproof. One type, the “roller” bags are more than waterproof, they can be immersed in water for long periods of time and still keep the contents dry. These bags use a roll top closure, similar to what many backpacks use. The material is made from some sort of vinyl, with is thick and bulky in my opinion. If you have ever used a marine dry bag, you what the material is like.
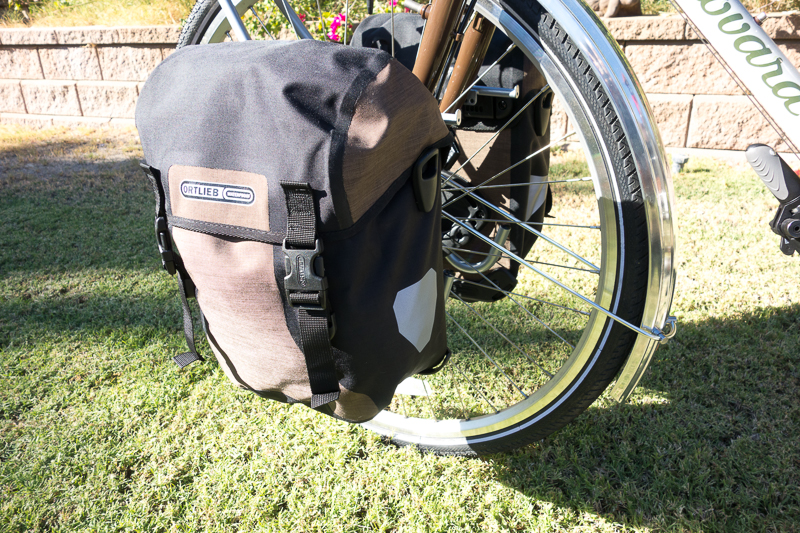
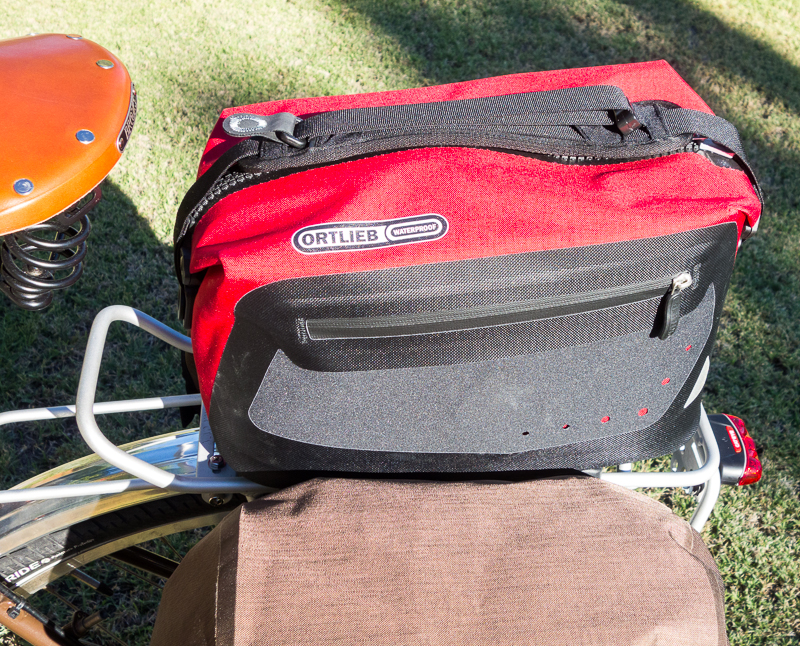
The other version of bag is made from Cordura nylon with a waterproof layer bonded to the material. The waterproof layer is one the inside of the bag. Cordura is robust and sturdy fabric. These bags use a drawstring closure with a flap that covers the closure. This is the type of bag I got. More specifically I purchased the BikePacker Plus for the rear and the SportPacker Plus for the front.

Wading through all this information was time consuming and often difficult to find the real facts. My last and best source of information was Wayne Burroughs, owner of www.TheTouringStore.com. Wayne carries several brands of luggage, is knowledgeable, provides outstanding service, and has competitive prices. After asking several questions I bought our entire luggage setup from him.
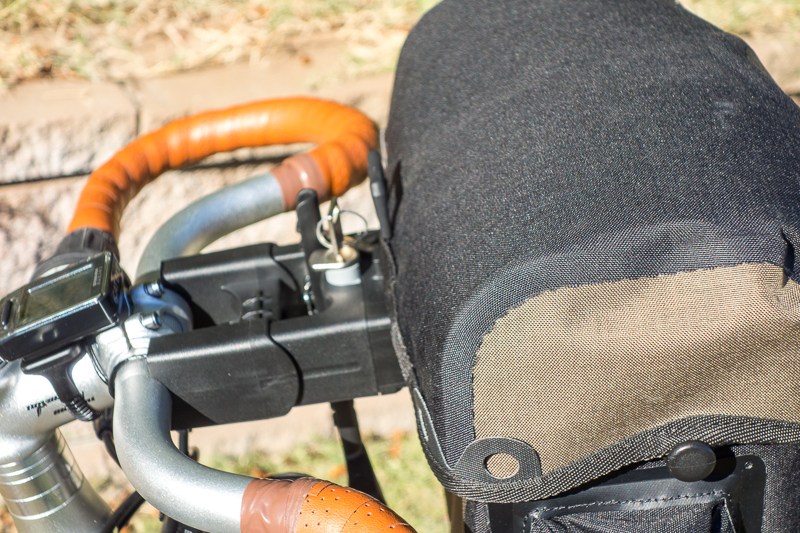
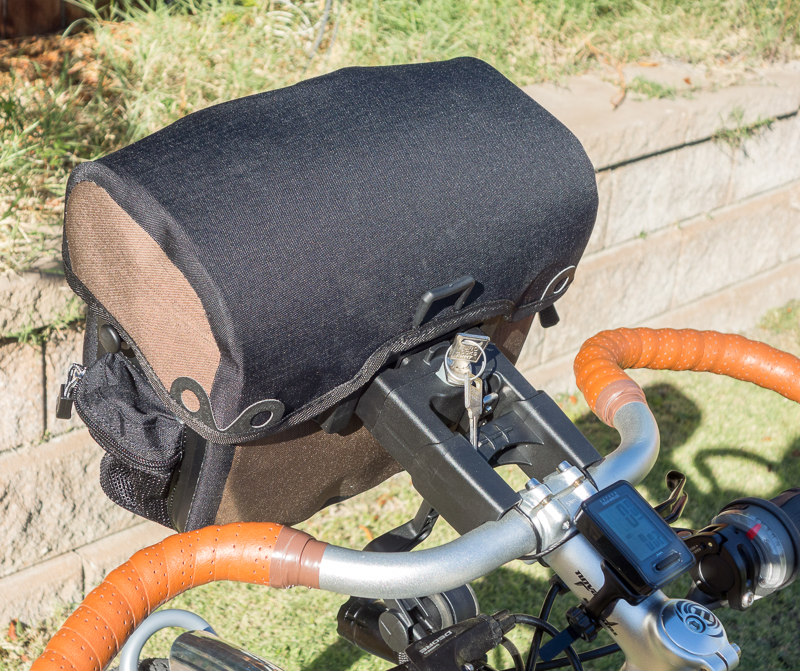
In addition to the panniers for my bike, Wayne shipped us two Ortlieb Ultimate 6 Plus Medium handlebar bags and two Ortlieb Trunk bags. All of these are made from the same Cordura material as the panniers.
Ortlieb Ultimate 6 Handlebar Bag
There are a couple things about the bag I should share. One is the mounting system that uses a covered braided steel cable to attach the mount to the handlebar. Once installed the mount is permanent, meaning you would need to buy a second mount if you wanted to share the handlebar bag with another bike. The cables can be purchased separately if you need to remove the mount from a bike.
An extension can be purchased if the bag sits too close to the handlebars and causes clearance problems. This was the case with ours. I bought an extension locally, when I saw the butterfly handlebars were the wrong shape to properly mount the bag – of course there was no way to know for sure until I got the bag.
The bag can be locked to the mount. However a thief could still open the bag and take your stuff. So it is a deterrent from the grab and run thieves that populate our cities.

The cable mount and tricks
To my surprise, the cable mounting system is incredibly secure and stable. However there is a trick to it, and if you do not exactly install it per the instructions you will ruin the cable. Luckily I read the instructions. Below is a picture.

The screw at the lower right adjusts the cable. Just turn it ONE TURN when starting the installation. Apparently people screw it all the way in. Once the cable has been installed then turning the screw, probably 20 times tightens the cable. Like I stated early, it is a slick method. The cable was also much more difficult to cut and trim when finished than I thought it would be.
Handlebar Bag Options
If you bag obstructs lights or other handle bar accessories, you can buy an adapter kit. I will show that later.
I also got a couple map holders that attach to the top of the bag.
Ortlieb Trunk Bag
The trunk bag comes with a mounting bracket to attach it to a rear rack. There are a couple mounting bracket options, so order the right one. Without this bracket you will not be able to mount panniers on some rear racks. Like the handle bar mount it also has a lock.
 The black tubing is the Ortlieb mounting bracket and the panniers clip onto it (above).

LIGHTING & OTHER STUFF
We don’t plan on riding at night, but one must be prepared. Today it seems that most lighting systems come with built in non-replaceable batteries that need to be recharged via USB. I hate that. So I found a couple that use AA batteries.
Cateye Rapid 3 Bicycle Rear Safety Light
I bought one for each bike, plus the optional mounting kit to attach them to the rear racks.

Magnus Innovation Headlamp
Not the brightest light on the planet, but it works well and I have tested it at night. It can be removed and used as a flash light. It comes with two (one is a spare) special Lithium-Ion batteries, which look like an oversized AA battery. To recharge them, you pull of a cap to access the USB plug. Also included is a battery capsule that accepts 3 AAA batteries and can be used with the light.
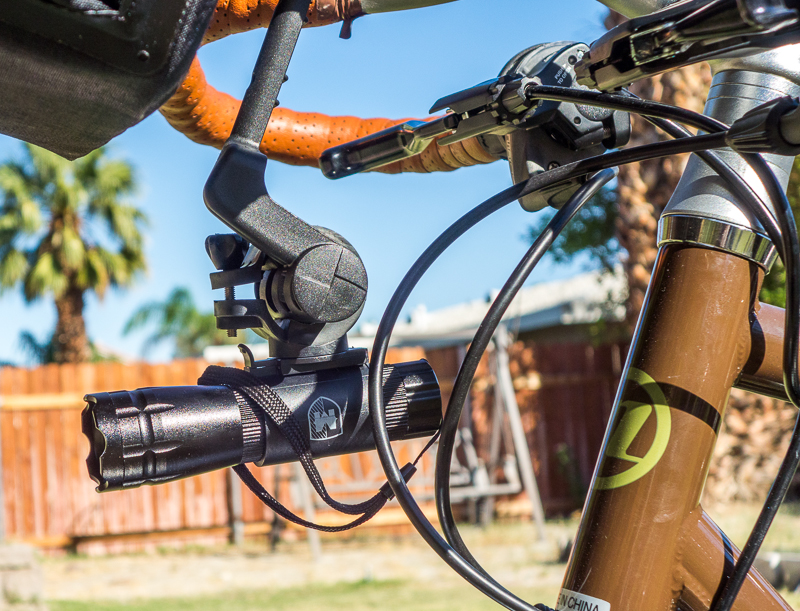
Magnus light mounted to optional Ortlieb adapter.

CatEye Urban Wireless Bike Computer
As you may have gathered from previous posts, I am not a big fan of electronics for outdoor recreation. But I felt a simple speedometer would be useful. This computer can be used as a speedometer, odometer, trip computer, and some other useless stuff I will never use. A wireless transmitter is attached to the front fork, a powerful magnet to a spoke and the information is transmitted to the handlebar mounted computer. For around $30, I think it is a good investment.


Hydration
We bought two Novara water bottle cages for each bike at REI. Joyce liked the Camelback insulated water bottles and for aesthetic and other reasons I went for a pair of Kleen Kanteen stainless steel bottles. I was concerned the stainless bottle would rattle in the cages, but they are nice and snug.

Topeak Morph Air Pump
I mounted one on each bike.

When I have time I’ll review some of the tools and maintenance gear. But we are leaving for our last boat/camping trip of the year in a few minutes.
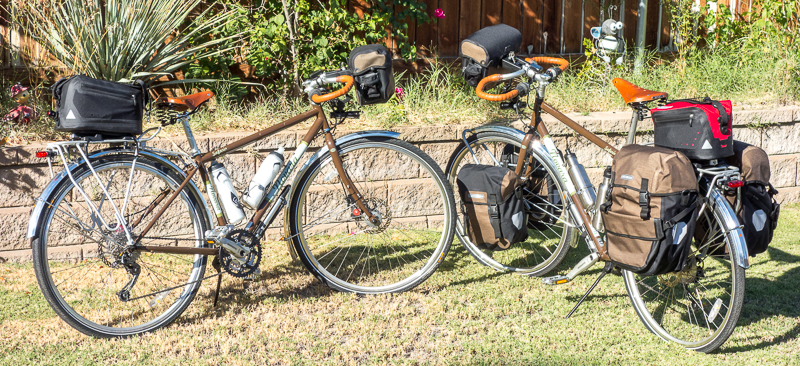
Some other pictures…