In this post we will learn how to determine our location on the map using any compass and a map protractor. But first let’s review Part 1, with a little different spin so the concepts will start to become clearer.
Part 1 discussed the many steps needed to read a bearing on a map using a typical baseplate compass. It also discussed how many fewer steps were needed to read a bearing using a map protractor. In both cases, we are adjusting our compass by compensating for variance between Grid North and Magnetic North on the compass. The only difference being that using a map protractor requires the user to truly understand how magnetic north relates to the map so the bearing can be adjusted using 3rd grade math.
In Part 1, we described how to take a bearing from a map using a map protractor and transferring it to a compass utilizing the
EAST IS LEAST, WEST IS BEST method.
Magnetic Declination Review
Most people struggle with declination, which is why compasses with adjustable declination are popular. These compasses (if used as instructed) eliminate the need to actually understand how declination impacts location and travel. I think this is a bad foundation. Truly grasping declination will catch user errors with a baseplate compass, and of course make it simple to use a map protractor.
A compass bearing is simply stated in degrees. A compass is really just a circle; and all circles have 360 degrees. Our bearing is stated in degrees only – we do not say north, west, east, or west. North is 0˚ (or 360 ˚ ), west is 90 ˚ , south is 180 ˚ and east is 270 ˚ . There is no need to use any other nomenclature. However, we do need to know our location’s Magnetic Declination; whether Magnetic North points east of west of North. So differentiate declination, we measure it in degrees east or west of north. All compasses point to magnetic north.
East Magnetic Declination
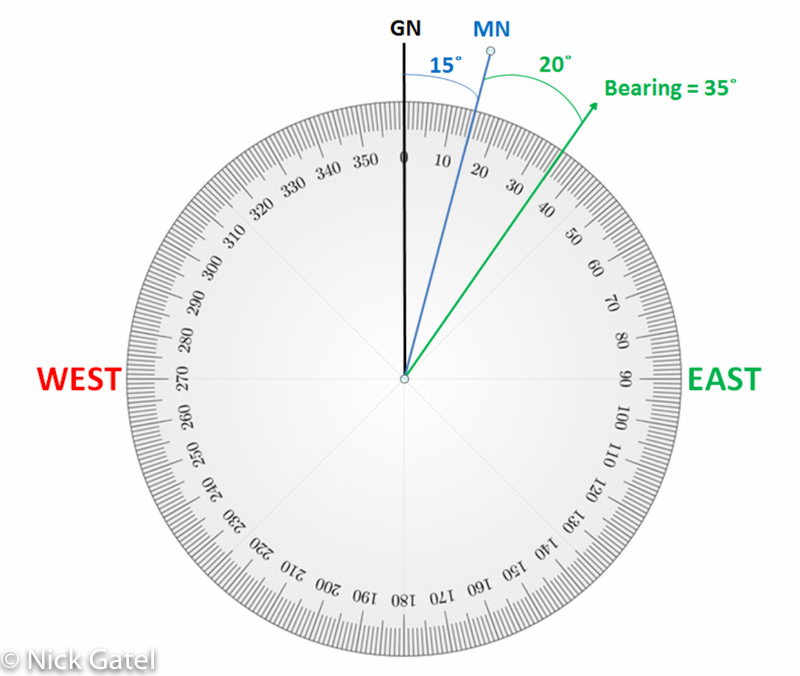
If your location has a Magnetic Declination of 15˚ East, the compass is actually pointing to 15 ˚ East when its needle is pointing to compass north (see below), unless you have an adjustable compass that has been calibrated for declination. Or we can say the compass needle is pointing too far to the right.

In other words, it is pointing too far to the right from the Get-Go.
If we wanted to travel on a bearing of 20˚ we can’t use the compass bearing of 20˚ because it would be 15˚ too far to the right, or would actually be 35 ˚ (see below).
So we subtract East Magnetic Declination from our compass to get the correct bearing. If we want to travel on a bearing of 20 ˚ we subtract the Magnetic Declination from the bearing we want to travel, and set our compass to this. In this example, we would use this formula:
Desired Bearing – Magnetic Declination = Compass Magnetic Bearing
or
20 ˚ – 15 ˚ = 5 ˚
Another way to describe it is we are moving our compass bearing back towards north, because our compass reads too far to the right of north. Or, using the saying
East is Least, West is Best
We are subtracting the East Magnetic Declination. Keep this in mind for understanding West Declination.
Now let’s take a look at West Magnetic Declination.
West Magnetic Declination
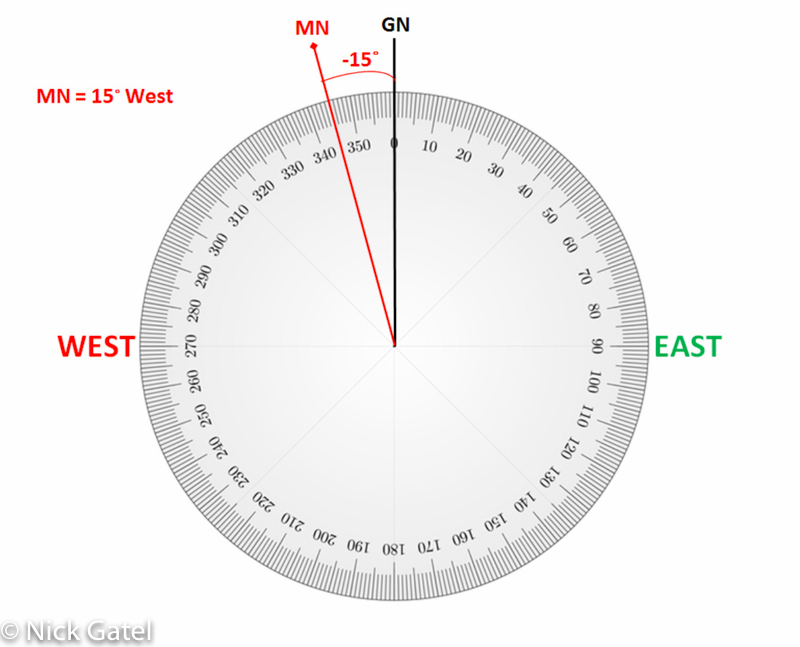
When declination is West, it is too far to the left of North. The picture below shows a Magnetic Declination of 15 ˚ West. Since our compass is set up in 1 degree increments, from 0 to 360 degrees, if our compass needle is pointing north, it is in fact pointing 15 ˚ to the left of North, which is 345 ˚ (remember compass bearings are shown in degrees only and we don’t designate north, west, south or east).
Let’s say our bearing from the map is 300 ˚. Setting our compass to follow a 300 ˚ bearing will be off by 15 ˚ to the left, and will really be 285 ˚. We need to shift it towards North. Unlike East Declination, we need to add 15 degrees to our bearing to move it North. So our compass magnetic bearing needs to be 315 ˚.
To help remember,
East is Least, West is Best
Here’s the definition of the above saying:
If something is least, it is less.
If something is best, it is more.
In other words,
if Magnetic Declination is East, it is less, so subtract it from the bearing taken on the map with a compass or protractor
if Magnetic Declination is West, it is more, so add it to the bearing taken on the map with a compass or protractor
This chart might be helpful:
Determining Your Location
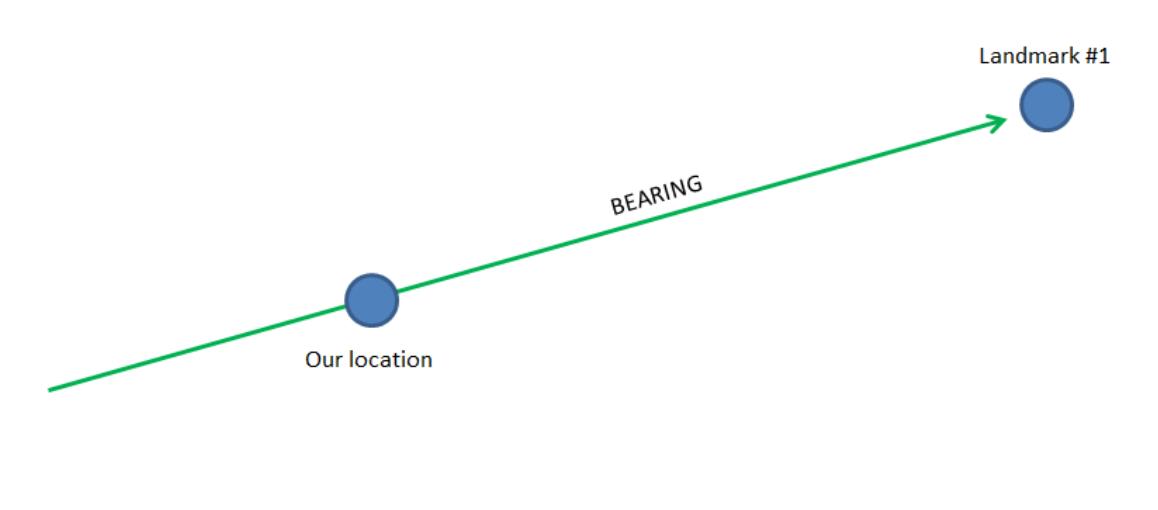
By taking a single compass reading to a prominent landmark on the map, and we draw a line on the map using the bearing to the land maker, we know that we are somewhere on the line. See below:
But where exactly are we along that line? If we take another bearing to an identifiable landmark, and also draw a line on our map to that landmark, the intersection of the two lines will be our position on the map as shown in the diagram below.
There is one potential problem with using two landmarks to determine your position… what if one of the readings is inaccurate? If one is off, then your location on the map is incorrect. By using a third reading, you can confirm the readings are correct.


Now we have to deal with declination.
From Map to Field, The Proper Yield
Up to this point all our bearings have entailed transferring bearings from a map to a compass. In today’s language we might say we are uploading information from the map to a compass. Or we can enhance our saying of East is Least, West is Best to:
From map to field
The proper yield
is
East is least and
West is best
The reason we want to enhance the saying is because if we use a compass to determine our location on a map we reverse the math. For East declination we add it to the compass magnetic bearing and for West we subtract it from the compass magnetic bearing.
I’m not going to present a bunch of graphics again as in Part 1 – just remember that transferring compass reading to a map is the opposite of East is Least and West is Best.
Let’s change the Magnetic Declination chart introduced earlier and add another row.
Sample Exercise
Imagine you are hiking the Pacific Crest Trail. You’ve been on the trail for many days, through all kinds of terrain, even desert. Things have been going well. It is now about an hour before dark and you need water. Desperately. You could have gotten water earlier in the day, but based on the past several weeks of experience you should have had enough, so you didn’t stop to fill up earlier. The afternoon was steady uphill walking, but not too strenuous. But the sun! Wow, a heat wave, and you have been mostly in the sun, as there weren’t many trees along the trail. You became somewhat dehydrated and decided to rest under a tree in the shade until things cooled down. It was a good decision. You fell asleep and slept much too long because it will be dark in an hour. But now you aren’t exactly sure where you are. You aren’t lost, you know about where on the trail you are located. But there should be a couple trails intersecting the PCT and you haven’t seen either. You need to take the second trail north for 1 mile where there is reliable water. Other than that, all other water sources are miles and miles away.
Did you pass both side trails without noticing, since you weren’t feeling 100%? Are both still ahead or are you between both? You need to pinpoint your exact location because it will be dark soon and you really, really need water ASAP.
You look around and there are three easily identifiable peaks: Bald Mountain, Pyramid Peak (that you passed earlier in the day), and Palm View Peak. You take out your map and spread it on the ground, along with your protractor and pencil. Now you start taking compass readings and mark them on the map. The Magnetic Declination is 12˚ East. If you were taking a bearing from your map and “uploading” it to your compass, you would SUBTRACT the declination…
East is Least, West is Best
But we are taking a compass reading and transferring to the map, so we are “downloading” to the map and need to ADD the declination to our compass reading.
Reference Point #1: Bald Mountain
Your compass reading is 59 ˚ so you add 12 ˚ and mark in on the map near Bald Mountain.
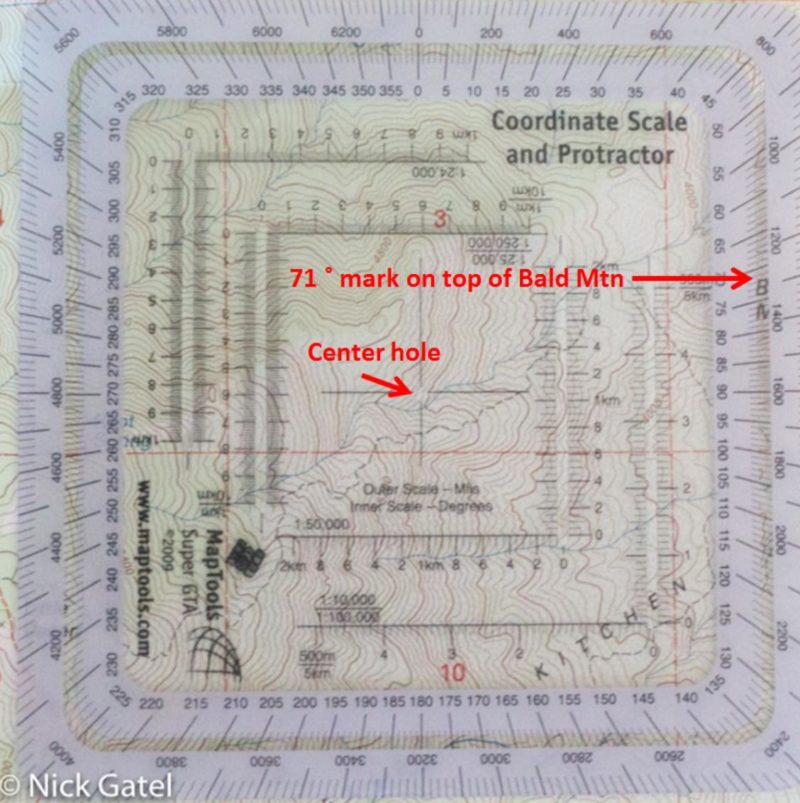
Now you lay your protractor on the map, and place the 71 ˚ mark over the landmark used to get the compass reading and align the protractor with the North/South lines on the map. You will draw a line from the landmark to your unknown position. Once your protractor is aligned, just mark a point in the hole in the exact center of the protractor.

Now remove your protractor and use a straight edge (often the protractor itself can be used as a straight edge or you can use a string) and draw a line from the landmark, through the mark you made in the center hole of the protractor, and extend it past where you estimate your unknown location is.
Reference Point #2: Palm View Peak
Take a compass reading to Palm View Peak and mark it on your map.
As you did with your reference point, place the map protractor with the 313 ˚ tick mark over Palm View Peak, aligning the protractor with the north/south grid lines on the map. Use your pencil to mark the map using the center hole in the protractor. Now you draw a line from Palm View Peak, thru the pencil mark, and extend the line past where you think you location is. It will look like this.
You now you know your location, but you should confirm it is exactly correct by using a third reference point.
Reference Point #3: Pyramid Peak
You follow the steps again:
- Compass reading
- Adjust for magnetic declination
- Place the map protractor degree mark over Pyramid Peak
- Make sure the map protractor is aligned with the north/south grid lines
- Make a mark in the center hole of the protractor
- Draw a line from Pyramid peak, thru the pencil mark, and extend it past your approximate location
If all three readings were correct and you drew the lines properly, all three lines will intersect at the same point, which is your exact location.
Take a close look at the map above. Your location is just past the first side trail. You walked by it and didn’t notice it earlier. But the side trail to your water source is just ahead, maybe only 100 yards. You are in good shape.
The map below shows your location but it is zoomed out a little bit. Your water source, Cedar Spring, is about a mile away. The contour lines show it is all a gradual downhill walk. You will reach water in 15 or 20 minutes. Congratulations!
Summary
At first, using a map protractor seems hard only because the user has to understand how magnetic declination works and make simple calculations in the field. As stated in Part 1, it is simple math. The difficulty many people have is trying to remember when to add, and when to subtract. The little rhymes I have shared have been used for decades to teach navigation. The rhymes aren’t intended to be your memory tool forever, but something to help while you are learning to become expert with map and compass. Expertise requires practice. Practice enough and magnetic declination calculations will become second nature, because you will truly understand how magnetic declination works.
Is a Map Protractor the Best Tool for Navigation?
When using a map and compass it is the most accurate tool, especially if you are using a compass with the accuracy of a Cammenga Military Lensatic Compass. Both the example map protractor and Cammenga compass were developed by our military for accurate navigation and, perhaps more importantly, to use them to direct artillery fire without endangering our troops who might be close to the target.
Unlike the popular base plate compasses reviewed in Part 1, the Cammenga is not liquid filled, but utilizes a precise bearing to support the compass needle. Liquid filled compasses are prone to develop air bubbles that make them inaccurate. Also, if you rely on a compass with an adjustable declination and the declination mechanism fails, you are screwed, because you probably won’t know or remember how to adjust for declination without it.
Base plate compasses are good tools for navigation – if – and it is a big if – IF you practice and become expert, which includes practicing periodically to keep your skills.
If you have a good topographical map and if you are expert with map/terrain association, you should rarely need a compass at all.
A map is designed to keep you from getting lost, not for figuring out where you are after you have become lost.
When visibility becomes a problem, and landmarks cannot be seen, then a compass is indispensable. Or, as in our sample exercise, you are not really lost, but you are not sure of your exact location, and need to quickly determine precisely where you are.
I learned how to navigate with a protractor, map, and compass in the military. I also learned how to navigate with just a compass and map; the protractor was just an additional and useful tool. My map training wasn’t an afternoon kind of class that REI conducts, but was ongoing training for a year, with many trips in the field for practice, to include night navigation in the Rocky Mountains during snow storms. After I got out of the military I navigated mostly without a compass. I had a compass with me, but was able to navigate with just a map, which should always be the goal. Then a few years ago, I was hiking in some remote desert canyons, and really needed my compass to pinpoint my location. Unfortunately, it had been so many years since I had to do this, my skills were pretty rusty. It was a difficult afternoon, but eventually I figured out where I was, and got to my destination without incident or harm. That day was much like our sample exercise: I needed to get water and could not afford to spend time being “somewhat” lost. But it taught me an important lesson: skills must be continually practiced to keep them sharp.
So if you want to use a simple base plate compass, a sophisticated lensatic compass, or a map protractor in conjunction with a compass, all are excellent navigation tools. What is most important is to truly understand maps, declination, and above all to practice these skills periodically.
What about GPS or Smart Phones?
These are very accurate tools. You can navigate with them. No compass required. However, they have some serious potential drawbacks. First and foremost – batteries go dead. So you need spare batteries or a way to charge them. Most are not water proof. And sometimes electronics just go haywire. So should one want to rely on one of these devices as a primary navigation tool, it would be very prudent to bring a map and compass a backup. But why use the map and compass as backup? Backup is redundancy; it is bringing two tools to do the job of one. That is why I don’t bring a cell phone or GPS on my trips.
Whether or not to use a smart phone or GPS is really a personal decision. If you prefer to use one of these devices, you should also bring a map and compass. But let’s face it. Using electronic equipment requires another learning curve, and if your main navigation tool is an electronic device, you will more than likely do even less practice with a map and compass – not a good position to be in if you have to rely on a map and compass because your electronic device died.
I will be writing one more part to this series. In it I will share a couple more map protractor tips.
This website may be compensated for linking to other sites for sales of products. As an Amazon Associate I earn a small fee from qualifying purchases at no additional cost to the purchaser.


