A Simple and Elegant RV Tank Monitor Solution
Our travel trailer is almost 10 years old and the Tank Monitor has been a constant struggle. This system is the typical unit found on most RVs these days. First, it isn’t very accurate. Secondly, the sensors in the gray and black water tanks often become contaminated, requiring cleaning and flushing. Lastly, we don’t have a way to monitor our LPG (propane) levels.
In this post I will share installation tips, advantages and disadvantage of the Mopeka Tank Sensors.
The Challenges of our OEM Monitoring System
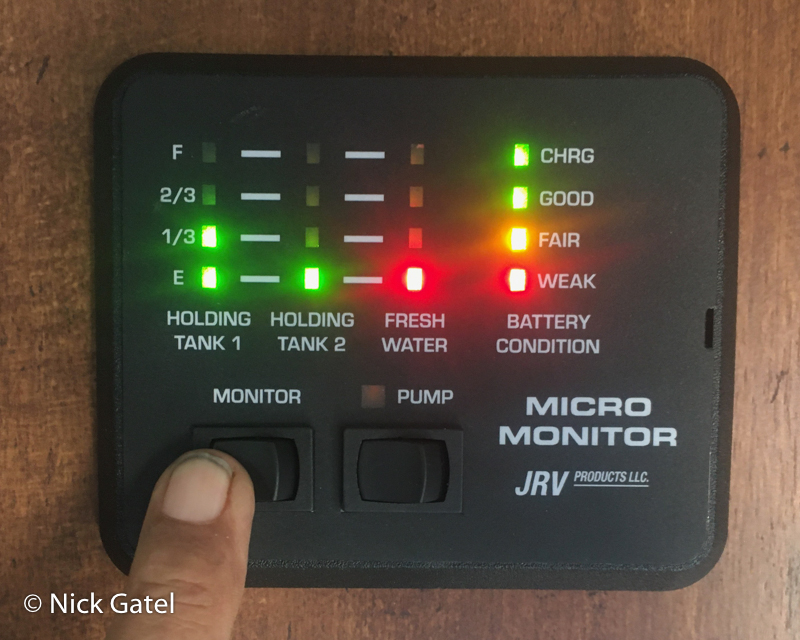
The readings for the tank monitor are:
-
- FULL
- 2/3 FULL
- 1/3 FULL
- EMPTY
Fresh Water Monitor
The fresh water capacity is 100 gallons. If we have 68 gallons of water onboard, the monitor reads 2/3 full. If it drops below 67 gallons, say 64, the monitor drops to 1/3 FULL, which is about 33 gallons. 64 gallons of fresh water in the tank will register as only 33 gallons.
Gray and Black Water Monitors
Both of these tanks have a 50 gallon capacity. 1/3 FULL is around 17 gallons. 2/3 FULL is Approximately 33 gallons. If one of these tanks go slightly above the 1/3 FULL level, let’s say 18 gallons, the monitor jumps to 2/3 FULL. 18 gallons will read as 33 gallons (or higher).
Holding Tanks Sensor “Fouling”
When debris in the gray and black tanks settle on the sensors, false readings occur — a common situation. There are “upgraded” aftermarket sensors available, most of which, are time consuming and often difficult to install. Plus, the aftermarket sensors can still get fouled.
Given all of these shortcomings, I have been able to guesstimate our tank levels most of the time. However, when we near the end of a two-week trip, often many, many miles from a dump station things can become “iffy.”
Propane Challenges
Even though we can guesstimate our holding tank levels, our propane tanks are a different matter. Especially in the colder months when we need to use our furnace or Wave 8 Catalytic Heater. Running out of propane in the middle of a cold night is something we want to avoid.
Most RVs come with 20, 30 or 40 lb. tanks. These don’t have gauges and the common aftermarket gauges that attach to the tank’s supply outlet are highly inaccurate, to the point of being next to worthless.
More expensive installations, typical on some motor homes, come with a float gauge built into the tank. Some even have wiring to connect to an external electronic gauge. There are a couple of problems with these set-ups.
One problem is these kinds of tanks are permanently mounted to the motor home, making it very difficult to remove and most owners have to drive the motor home itself to a propane supplier to have it filled — often in very tight quarters for manuevering. Much more inconvenient than carrying your propane tanks for refill.
The other issue is propane tanks have to be re-certified or replaced every 12 years, an expensive and time consuming proposition for these kinds of tanks.
Between our inaccurate Tank Monitor System and the lack of a method to monitor our propane levels, it was time to do something.
Option 1: Garnet SeeLevel II Tank Monitoring System
For several years I have been thinking about this product. It has excellent reviews and measures holding tank volume by percentages. But there are Pros and Cons:
Pros
-
- Very accurate
- Nice interior control panel
- Can get panels with switches to turn on the water pump and water heater
- Can get panels that can measure propane levels
- Reasonably priced for what you get (cost usually around $300 depending on options)
Cons
-
- Labor intensive to install
- The propane gauge only works with propane tanks that have a sensor built-in, no sensors available from Garnet
- The SeeLevel sensors have to be cut (or two stacked) and other modifications to the sensors are needed
- The sensors are circuit boards and have to be covered/sealed where the holding tanks are open to the elements (very common)
- The sensors have to be wired directly to the monitor control panel (sometimes existing wiring can be used)
https://www.amazon.com/dp/B019QGWODO/ref=as_sl_pc_as_ss_li_til?tag=popupbackpack-20&linkCode=w00&linkId=568d277310f0b95128fd6381144c8e3e&creativeASIN=B019QGWODO
Option 2: Mopeka Tank Sensors
As always, I purchased Mopeka system with my own money at regular prices. I have no relationship with Mopeka.
Mopeka uses sonar technology to measure the amount of fluid in a tank (propane, fresh water or gray water). The sensor is attached to the bottom of a tank, whether it be propane, fresh water or gray water. They do not make a sensor for black water tanks (more about this later). The sensors are wireless, can be monitored via bluetooth on iOS or Android devices. Each sensor comes with a CR2032 battery installed. Mopeka states the battery will last 2-3 years and are user replaceable. The Mopeka App is free.
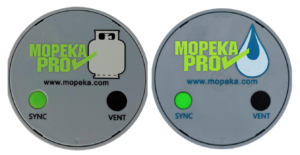
Mopeka makes two different types of sensors — one for propane and one for water.
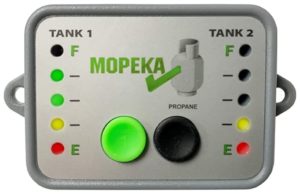
Mopeka also sells a wireless monitor, but it only works on propane tanks and is a Full, 75% Full, 50% Full, 25% Full, and Empty set-up.
The free App is so good it isn’t necessary to purchase the monitor, however it might be handy for some folks.
Mopeka Pros & Cons
Pros
-
- Easy and quick to install
- Reasonably priced (I paid $231 for two water sensors and two propane sensors)
- Mopeka App easy to set up and use
Cons
-
- Optional wall mount monitor not as good as the App
- Sensor batteries need to be replaced every 2-3 years (per Mopeka)
- No black water sensor available
Installation Notes
The installation is so easy that I didn’t take any pictures of the installation. Just used images from Mopeka. Most of what you need to know can be found in the Mopeka App. I will post some links to the Mopeka website at the end of the article.
I will also share some hints to make installation even easier.
For most people, installing the water sensors will be more involved than the propane sensors, so I will start with that first.
Mopeka Water Sensor Installation
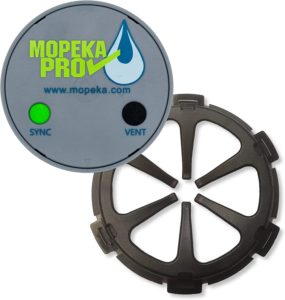
The water sensor comes with an installation cage. The cage is attached to the bottom of the water tank (fresh or gray) and then the sensor is held in place by the cage.
Water Sensor Installation
Step 1: Fill your tanks
Fill both tanks with water. This will make calibration easier, as I will explain later. Plus you can’t calibrate an empty tank.
Step 2: Connect the sensor to the App

The next step is to connect the sensor to the Mopeka App. Make sure the iOS or Android device’s bluetooth is set to ON. Now press and hold the sync button on the sensor for 5-10 seconds. On my 2016 iPhone SE, it took about 5 seconds to sync with each sensor — quicker than setting up most bluetooth devices with this iPhone.
Don’t try and set up the sensor in the App yet. This will be done after the sensor is installed on the tank.
The App also has instructions for installing the sensor.
Step 3: Determine sensor location and clean the bottom of the tank
Find a good spot on the tank for installation. It needs to be flat and as parallel to the ground as possible. It also needs to be at least one sensor length from the edge of the tank.
The key to the installation is a clean surface on the tank!
Thoroughly clean the bottom of the tank. I used Dawn dish soap mixed with water. Rinse well and dry the area.
Now clean the area with alcohol. I used 99% Isopropyl Alcohol.
Step 4: Prime the tank
This step is the “priming step.” To ensure you don’t waste primer, hold the sensor cage against the tank and outline circle it to mark the location for the sensor. My tanks are black and I found a yellow color pencil worked just fine.
The primer is included in the kit. You only want to prime the area where the sensor cage contacts the tank. I was able to use just one tube of primer for both sensors, allowing me to save the second tube.
The primer is in a vial with a sponge cork and is has a cylindrical cardboard cover. Do not disassemble the unit.
Press the black crush dot on the primer kit.

Now Apply the primer to the area where you will attach the sensor. Best to apply it a little wider than the actual area of the sensor cage.
Wait for the primer to dry (it won’t take long)
Step 5: Install the sensor cage
Separate the top of the cage from the base.
Peel the adhesive protective sheet from the bottom cage piece. Now press the cage onto the tank area that has been prepared.
Note that the adhesive is 3M VHB tape. I know of several people who have used 3M VHB tape to attach solar panels to the metal roof of their RV without them coming loose. It is durable stuff.
You want to let the base sit for at least 30 minutes.
Step 6: Apply Sonic Grease to the sensor pad
The kit comes with Sonic Grease that must be Applied to the sensor pad. It is probably just ordinary dielectric grease.
Step 7: Install the sensor into the cage
Place the sensor in the cage with one hand (sync and vent buttons facing the ground) and snap the cover onto the base with your other hand. There are 6 locking tabs, so make sure all are securely locked into place.
Now you are reading to finish the setup using the Mopeka App.
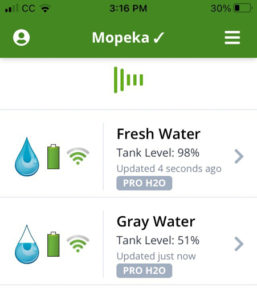
Fresh Water Sensor Calibration
Step 1: Name your sensor
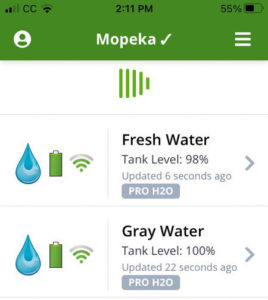
Using the App rename your sensor(s). Mine are “Fresh Water” and “Gray Water.”
Step 2: Zero the sensor
In the App, click on the sensor you are setting up. Click on the “Sensor Position” drop-down box. If the sensor is not centered, press the “Zero Sensor” and the App will center it. Don’t worry if the diagram is not exactly centered — if this “Zero Sensor” calibration doesn’t work you will get an error message.
Note: you cannot Zero the sensor if the tank is empty!
Step 3: Set the tank height
Click on the “Gear” icon at the top of the screen and locate the “Tank Height” box. I just guesstimated the height as 8 inches. This showed 100% full. Then I changed it to 9 inches and the tank showed 98% full. I left it it there, as it is really more accurate at 98%.
Note: you can only use whole numbers.
Step 4: Set the sensor update rate
Default is 3.5 seconds, which is fine for calibration. After the sensor is set up and working properly, it is best to change the sensor update rate to 30 seconds, which will conserve battery life. I don’t know if it matters, but I keep the App closed when not checking the sensors as it might also prolong battery life.
Step 5: Setup notifications
Turn on notifications.
Trigger alarm Below threshold.
I set the threshold at 20% so I get a notification if the water level drops below 20% of capacity.
Notes
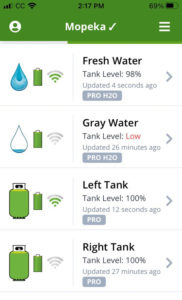
We have two 50 gallon tanks that are connected, so both tanks are always at the same level. This allowed me to use just one sensor. I used the height of just one tank in the setup since the sensor will measure in percentages, inches or centimeters. Use the percent option is probably best for this Application.
Gray Water Sensor Calibration
This is mostly the same as the Fresh Water Sensor except for a couple settings. Here I will duplicate the fresh water setting, and those specific to gray water I will show in Red Font.
Step 1: Name your sensor
Using the App rename your sensor(s). Mine are “Fresh Water” and “Gray Water.”
Step 2: Zero the sensor
In the App, click (open) on the sensor you are setting up. Click on the “Sensor Position” drop-down box. If the sensor is not centered, press the “Zero Sensor” and the App will center it. Don’t working if the diagram is not exactly centered — if this “Zero Sensor” calibration doesn’t work you will get an error message. Note: you cannot Zero the sensor if the tank is empty!
Step 3: Set the tank height
Click on the “Gear” icon at the top of the screen and locate the “Tank Height” box. I just guesstimated the height as 8 inches. This showed something like 93% full. Then I changed it to 7 inches and the tank showed 100% full. Unlike the water level, I would rather the gray show a little higher than it actually is.
Note: you can only use whole numbers.
Step 4: Set the sensor update rate
Default is 3.5 seconds, which is fine for calibration. After the sensor is set up and working properly, it is best to change the sensor update rate to 30 seconds, which will conserve battery life. I don’t know if it matters, but I keep the App closed when not checking the sensors as it might also prolong battery life.
Step 5: Setup notifications
Turn on notifications.
Trigger alarm Above threshold.
I set the threshold at 80% so I get a notification if the gray water level goes above 80% of capacity.
Step 5: Testing the gray water sensor
To test the sensor, I started slowly draining the gray water tank. I could see the percentage slowly drop in one percent increments.
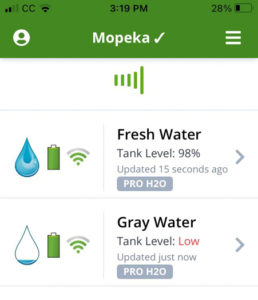
When the level gets too low for accurate measurement, it will show “Low” instead of a percentage.
The same procedure can be used to test the fresh water tank.
What About the Black Water Tank?
We rarely “use” water, such as taking a shower outside with the outside shower head. We mostly drink bottled water. The black water tank level is easy to calculated. Percent of fresh water used, minus the amount of water in the gray tank gives the answer. For example:
Fresh Water Level = 65%
Amount of Fresh Water Used = 100% – 65% = 35%
35% X 100 Gallons Fresh Water Capacity = 35 Gallons Used
Gray Water Tank Level = 40%
40% X 50 Gallons Gray Water Capacity = 20 Gallons in Gray Water Tank
35 Gallons of Fresh Water Used – 20 Gallons in Gray Tank = 15 Gallons in Black Water Tank
15 Gallons in Black Water Tank = 30% of Black Water Tank Capacity used
Mopeka Propane Sensor Installation
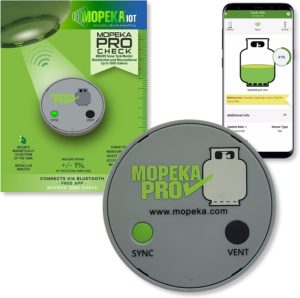
For most people, installing the propane sensor will be much easier than the water sensors. Most tanks are made of steel and the Mopeka Pro Check Sensor attaches with built-in magnets.
If you have an aluminum tank or other construction without a steel bottom, you will need a Mopeka Pro Check Sensor – Aluminum LPG Cylinder kit, which uses a cage, just like the water sensors.
My Unique Situation
The bottom of a propane tank is convex, meaning the bottom of the tank curves outwards. Since the sensor has to sit at the center of the tank, which is the most outward point of the bottom, spacers (included in the kit), are needed to keep the sensor above the surface supporting the tank.
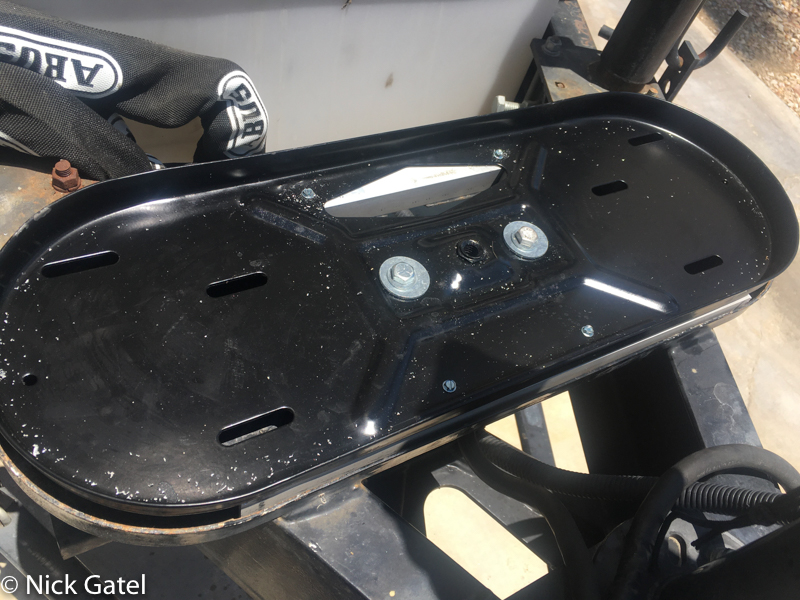
Because I had installed a ProPride hitch, there was a “U-bolt” in the center of the propane mounting plate.
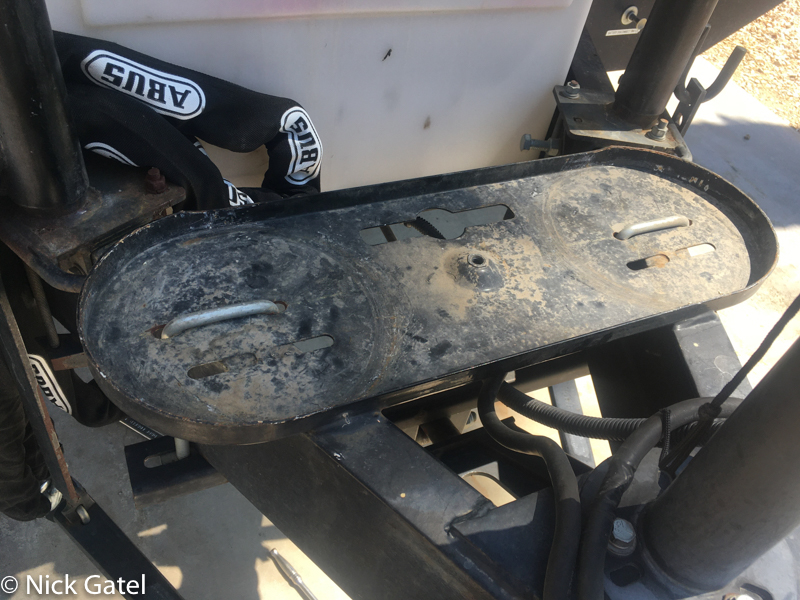
These U-blots prevented the proper spacing to accommodate the sensors. Additionally, there is no room on the trailer tongue to relocate the propane plate. I was unable to find any kind of spacer to lift the tanks high enough.
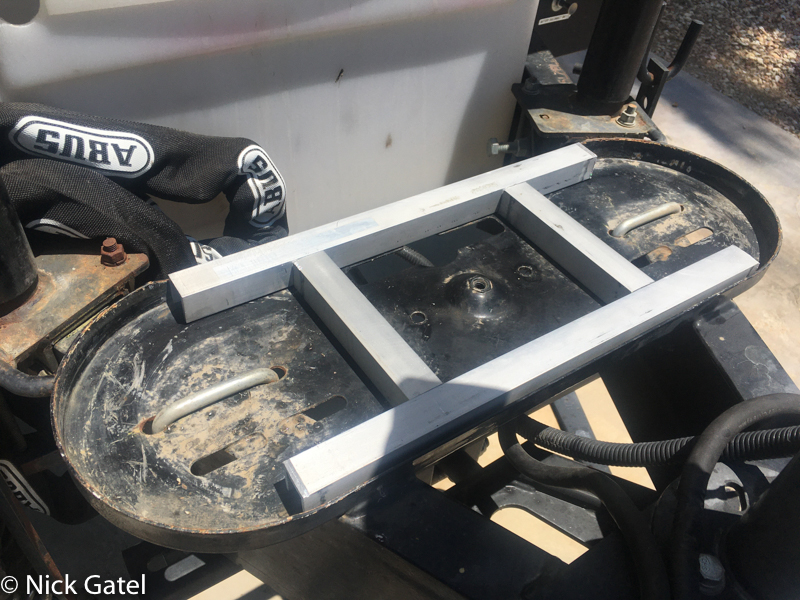
My solution was to bolt another plate on top, raising it with aluminum U-shape Channels.
Tank Spacers
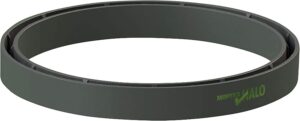
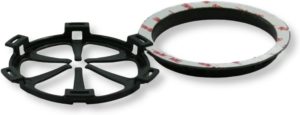
The kit comes with three small aluminum tank spacers to lift the tank high enough. Mopeka also sells a tank “halo” ring that is even better, in my opinion (see below).
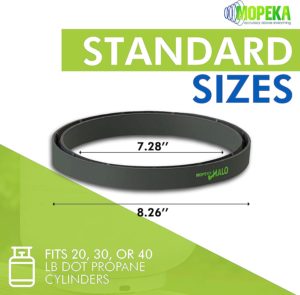
The halo fit into the original propane tank just fine, but is was just a hair too big to fit the new propane plate that I installed. So I had to use the included aluminum spacers. More on these spacers later.
Typical Propane Sensor Installation
Step 1: Make sure the tanks are not empty
You cannot calibrate an empty tank. So if you tanks are not full, it might be best to fill them before installation.
Since the tanks are removable, the calibration can be done on a flat surface without needing to mount them to the RV. This is the step I took.
Step 2: Connect the sensor to the App
The next step is to connect the sensor to the Mopeka App (or the remote display). Make sure the device’s bluetooth is set to ON. Now press and hold the sync button on the sensor for 5-10 seconds. On my 2016 iPhone SE, it took about 5 seconds to sync with the sensor.
Don’t try and set up the sensor in the App yet. This will be done after the sensor is installed on the tank.
The App also has instructions for installing the sensor.
Step 3: Clean the bottom of the tank
The key to the installation is a clean surface on the tank!
Thoroughly clean the bottom of the tank. I used Dawn dish soap mixed with water. Rinse well and dry the area.
Now clean the area with alcohol. I used 99% Isopropyl Alcohol.
Step 4: Apply Sonic Grease to the sensor pad
The kit comes with Sonic Grease that must be Applied to the sensor pad. It is probably just ordinary dielectric grease.
Step 5: Attach the sensor to the center of the bottom of the propane tank
The sensor has a couple of magnets so it is easy!
Now you are reading to finish the setup using the Mopeka App.
I knew one of my tanks was nearly empty, so before calibrating I had the tank filled.
After filling the tank, I calibrated the sensors.
Propane Sensor Calibration
Step 1: Name your sensor
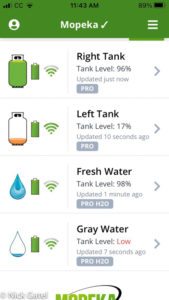
Using the App rename your sensor(s). Mine are “Left Tank” and “Right Tank.”
Step 2: Zero the sensor
In the App, click (open) on the sensor you are setting up. Click on the “Sensor Position” drop-down box. If the sensor is not centered, press the “Zero Sensor” and the App will center it. Don’t working if the diagram is not exactly centered — if this “Zero Sensor” calibration doesn’t work you will get an error message. Note: you cannot Zero the sensor if the tank is empty!
Step 3: Set the tank size
Click on the “Gear” icon at the top of the screen and locate the “Tank Size” box and select your tank size (different from the water sensors). Mine are 30 lb. vertical tanks.
Step 4: Set the sensor update rate
Default is 3.5 seconds, which is fine for calibration. After the sensor is set up and working properly, it is best to change the sensor update rate to 30 seconds, which will conserve battery life. I don’t know if it matters, but I keep the App closed when not checking the sensors as it might also prolong battery life.
Step 5: Setup notifications
Turn on notifications.
Trigger alarm Below threshold.
I set the threshold at 20% so I get a notification if the propane level drops below 20% of capacity.
Step 6: mount the tanks on/in your RV and a Warning
I had to use the aluminum spacers as mentioned earlier. Unfortunately the kit only comes with 3 spacers. Apparently, at one time, it came with 4. Looking at the installation instructions on the Mopeka site, it shows 4 spacers on a tank.
Update (11/06/2023): I was able to find a propane tank tray that the Mopeka Halo Rings fit. It’s a much better solution. Click for updated solution.
![]()
You can see that the spacer with the green arrow and the one directly opposite are not centered over a slot of hole in the base. The other two are placed over an oval slot, which keeps them more secure. Unfortunate most tanks don’t have slots placed so one could place each spacer over a slot and allow them to be equidistant for each other.
So I bought some spare spacers (always good to have) and insert 4 of them on each tank, all of them over a slot.
![]()
![]()
Summary
At this point in time I am thrilled with our new tank monitoring system. I am not big on iOS Apps and would prefer something I could mount inside our trailer and get the same information as the App provides.
I suspect in the near future there will be an inexpensive option, either from Mopeka or some other company.
Lastly, I need to use the system for an extended period of time and report back if the Mopeka sensors live up to their promise and reputation.
The sensors can be purchased directly from Mopeka, but I found them on Amazon for the same price, ordered them on a Friday night and they were delivered on Sunday.
Click here for my update on how I better secured our propane tanks to work with the Mopeka sensors.
This website may be compensated for linking to other sites for sales of products. As an Amazon Associate I earn a small fee from qualifying purchases at no additional cost to the purchaser.