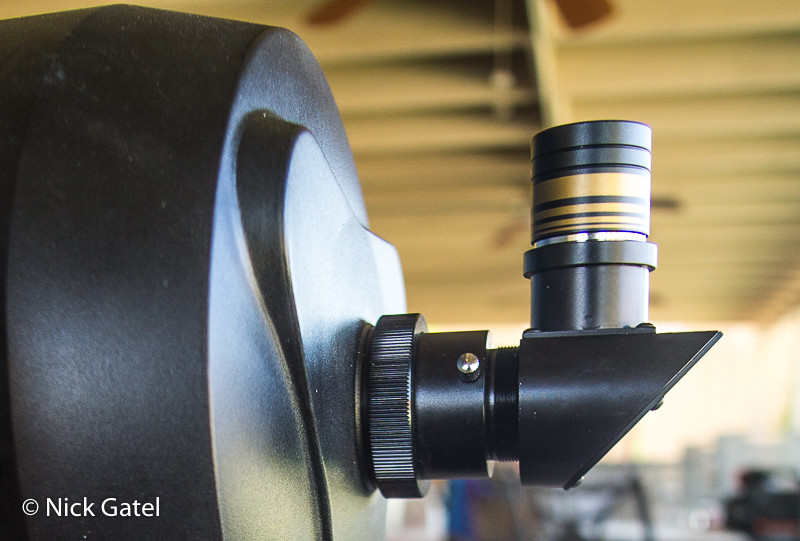
Eyepieces
Most telescopes come with one inexpensive eyepiece. One of the first purchases a new telescope owner will make is a selection of eyepieces. Online astronomy forums have hundreds upon hundreds of pages debating what eyepieces are the best. Some amateur astronomers have invested more money in their eyepieces than they paid for their telescope!
Time to discuss eyepiece basics.
Expectations
Perfect is the enemy of good.
— Voltaire
Eyepiece prices can range from around $10 when bought in a kit to well over $500 each. It should be obvious that a $500 eyepiece will be superior to a $10 one. But how good is good? We can compare this to a stereo system.
A $79 bookshelf stereo system in a large living room isn’t going to sound as good as a $1,000 stereo system. On the other hand, how much better will a $10,000 stereo system sound compared to the $1,000 system in the same room?
Most people will be satisfied with the $1,000 system. A few discerning audiophiles with the financial wherewithal will opt to spend $10,000 or more for their stereo system.
We can make the same comparison with televisions. 20 inch versus 32 inch versus 85 inch sets, low resolution versus super high state of the art offerings, or a 32 inch in a small room versus 85 inch in the same small room.
Bottom line we need to consider the size and quality of a telescope and match eyepieces to what we have.
Good is Good Enough
Most of use will be happy with a good eyepiece. Whatever “good” is. For me good is above entry level and well below perceived perfection.
The discussion of eyepieces must start with the telescope itself. And, unfortunately, we will need to include some mathematical formulas. I’ll keep it simple, mostly because I am not an expert. But as I used to tell my kids when they were young,
Numbers are your friends.
Why Do We Need Eyepieces?
Obviously we need an eyepiece to see objects in the sky. Well at least if we are looking at the sky visually. We can replace the eyepiece with a digital camera (DSRL) and view the camera’s screen and take pictures at the same time. Specialized astrophotography cameras can replace the eyepiece, but the only way you can see or capture images is to connect the camera to a computer.
The Light Bucket
A camera is a light bucket. It collects the light that enters the front of the telescope and directs into a pinpoint of light at the spot the eyepiece is attached to the telescope. The larger the aperture (the diameter of the lens of mirror) the more light that is captured. For visually viewing, aperture is king. More aperture is better. Typically an 8-inch aperture can collect twice as much light as a 6-inch scope of the same type.
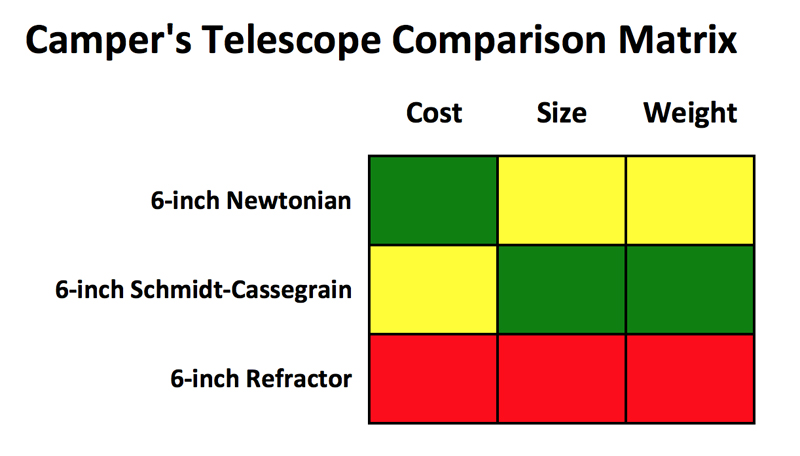
Keep in mind that more aperture costs more, and larger scopes get longer, heavier, and require a more robust mount. As campers, we need to balance all of this as I wrote in PART 1.
Telescope Focal Length
The focal length of a telescope is how far the light travels from where it enters the optical tube to the point where it is viewed with the eyepiece.
Refractor Telescopes
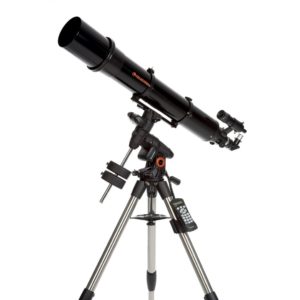
Refractor telescopes have the longest tubes compared to the diameter of its aperture. These scopes are constructed with several lenses and do not use mirrors.
Newtonian Reflector Telescopes
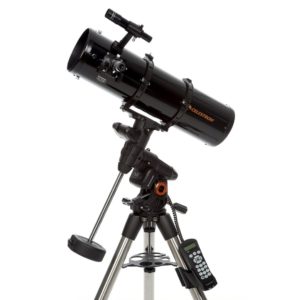
Reflectors have a large primary mirror at the bottom of the scope. The diameter of this primary mirror is the aperture. A 6-inch aperture means the primary mirror has a diameter of 6 inches.
The light that enters the top of the telescope is collected by the primary mirror and reflected to a secondary mirror at the top of the scope. Just below this secondary mirror is the eyepiece. The focal length of these telescopes is the distance traveled by light from where it enters the telescope, travels to the primary mirror and then travels to the secondary mirror. Keep in mind that these optics are placed inside the optical tube and are not flush with the top or bottom of the tube assembly, so the physical dimension of the tube itself is not used to calculate focal length, but the distance of the mirrors.
Schmidt-Cassegrain Telescopes
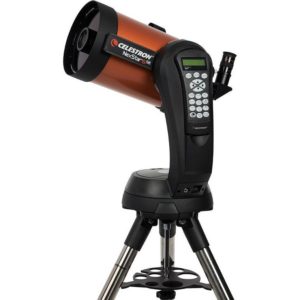
Somewhat similar to Newtonian reflectors, these also have a primary and a secondary mirror. In addition it has a tube that goes through the secondary mirror.
Light enters the scope, hits the primary mirror and is reflected to the secondary mirror, just like a Newtonian. But from here, the light is again reflected to a tube that passes through the secondary mirror at the bottom of the telescope. The light is reflected twice, and has three lengths of light traveling through scope.
Unlike the Newtonian that has the eyepiece at the top of the optical tube (just below the secondary mirror), the Schmidt-Cassegrain eyepiece is at the bottom of the optical tube.
Thus, with the same aperture as a refractor or Newtonian reflector, a Schmidt-Cassegrain will have the longest focal length. The table below shows the specifications for popular scopes of the three kinds of construction.
All the above scopes have an aperture of 6 inches. Notice the Schmidt-Cassegrain is almost ½ as long as the reflector, and it is 1/3 the length of the refractor, making the Schmidt-Cassegrain much more compact than the other two. At the same time, the Schmidt-Cassegrain has the longest focal length. It also has the highest focal ratio.
Focal Ratio
The focal ratio is the focal length divided by the aperture. The exact measurement of the 6” Schmidt-Cassegrain in the example above is 150mm (5.91 inches) and the focal length is 1500mm.
Focal Length ÷ Aperture = Focal Ratio
1500mm ÷ 150mm = 10
Focal Ratio is signified by “f/” in front of the result of our equation, which is 10, or f/10.
What Does This Mean?
Generally a higher focal ratio results in higher magnification and a narrower field of view. High focal ratios are better for viewing the moon, planets, or double stars. But for view wide deep sky objects such as galaxies, star clusters, nebulae, or the Milky Way, lower focal ratios are better. But . . . small aperture scopes won’t be large enough to provide much detail in these deep sky objects.
So there are give and takes for each type of telescopes and one isn’t necessarily better than another. For campers who may want a compact and light set up to view the moon or planets, a Schmidt-Cassegrain fits the bill. Usually a Newtonian is a little cheaper though. Again, referring to the chart I created in PART 1 of this series, there is not a perfect scope. Each has its pros and cons.
Just as a backpacker may have two or more backpacks for different types of trips, serious amateur astronomers have two or more telescope set-ups for specific tasks. Commonly a large Schmidt-Cassegrain (8 to 14 inch aperture) and a small refractor for astrophotography 51mm (~ 2 inch aperture) to 80mm (~ 3 inch aperture) are common. I use a 61mm refractor for astrophotography and it isn’t much bigger that a large DSLR camera zoon lens.
Eyepiece Magnification
Every eyepiece also has a focal length. My NexStar 8se came with an inexpensive 25mm focal length eyepiece.
Eyepieces determine the magnification, and the magnification is dependent on the focal length of the telescope. By dividing the focal length of the scope by the focal length of the eyepiece we can calculate the magnification. The magnification is how many times larger an object will be compare to visually looking at it with a “naked” eye. Here’s our formula:
Telescope Focal Length ÷ Eyepiece Focal Length = Magnification
If we use a 25mm eyepiece with the scopes above, we get the following magnification for each telescope:
The Newtonian reflector’s focal length is half that of the Schmidt-Cassegrain (750mm versus 1500mm) and if we use the same eyepiece in both we would expect the reflector to have half as much magnification, which it does at 30x versus 60x for the Schmidt-Cassegrain.
This information is useful because we can use it to select eyepieces, and to purchase a minimum number of eyepieces, thus stretching our budget. To plan eyepiece purchases, we also need to know how much useful magnification our telescope has.
Most telescope manufacturers provide specifications for maximum magnification and also useful magnification. We only care about useful magnification.
From Part 1, I mentioned the useful magnification is roughly 50 times the aperture measured in inches or twice the aperture measured in millimeters. Since all the telescopes we have been comparing have the same aperture of 150 millimeters, we get this:
150mm X 2 = 300 times magnification
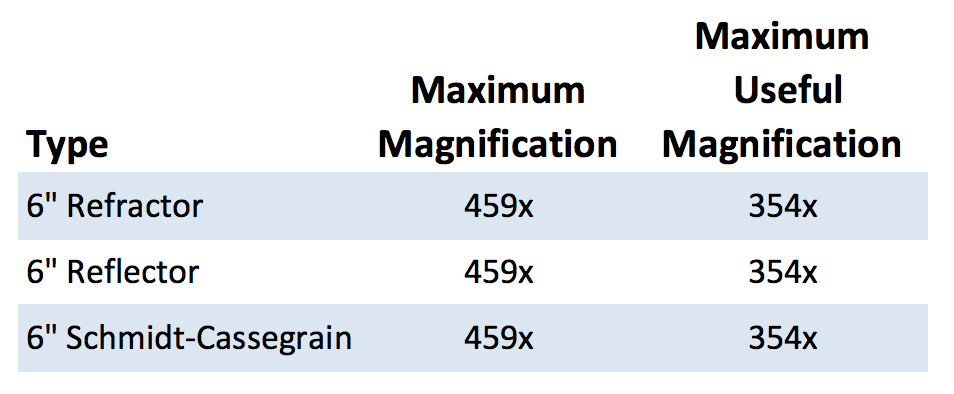
Celestron makes all the telescopes in our example and the actual specifications for each are:
Now, let’s assemble a set of eyepieces for the 6” Cassegrain. It came with a 25mm eyepiece. Although not the best eyepiece it works okay. Before we start calculating, let’s discuss a Barlow lens.
Barlow Lens
A Barlow lens is inserted into the telescope and the eyepiece is inserted into the Barlow. Barlow lens increase the magnification. Typical magnifications are 2x, 2.5x, and 3x. So using one Barlow we can reduce the number of eyepieces we need. Of course, you want to purchase a quality Barlow.
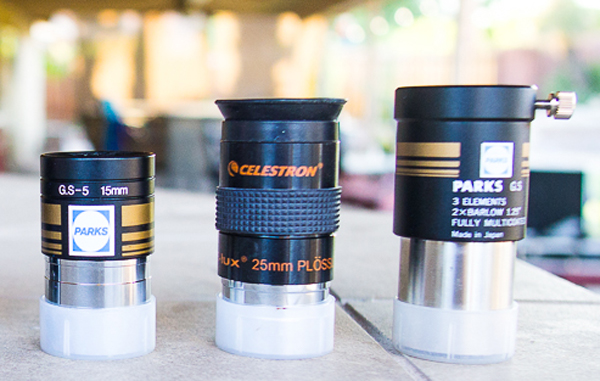
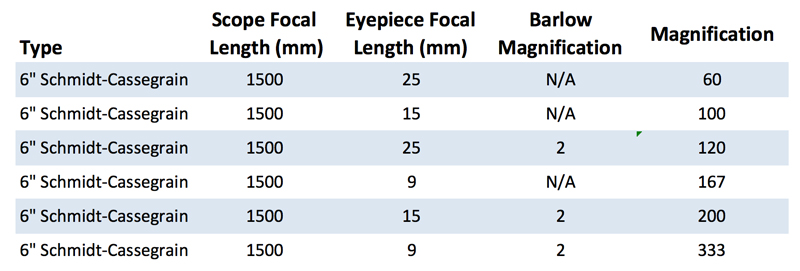
If we keep our 25mm, and buy a 9mm and a 15mm eyepiece, along with a 2x Barlow, we now have 6 different magnifications by purchasing just three different items. The chart below shows the different magnifications we can put together.
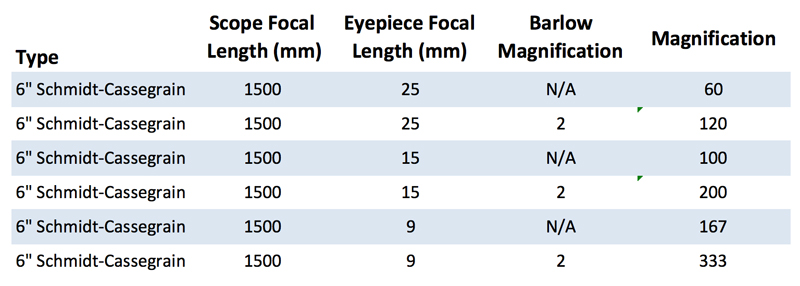
If we sort the chart by magnification, we get a better feel for the magnification range.
Types of Eyepieces
Eyepieces use all kinds of lenses and construction methods. Construction can vary the apparent field of view too. This is a complex subject, and as with any complex subject, the quality of the view is often a matter of opinion. So I won’t delve into it, nor will I suggest any particular construction method.
Given that, I will suggest one zoom lens that has 5 different focal lengths, plus it can be adjusted in between these focal length stops. It is a great optic and is highly regarded for general visual use. In addition, it can be used with a 1.5 inch star diagonal or a 2 inch star diagonal. I will discuss diagonals a little later in this post. The lens is a Baader Hyperion Mark IV zoom lens.
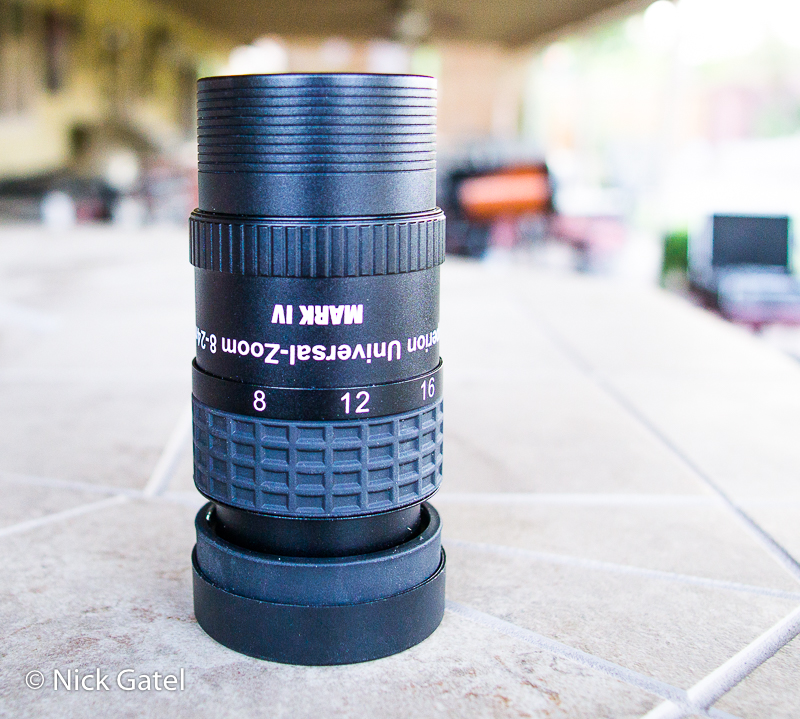
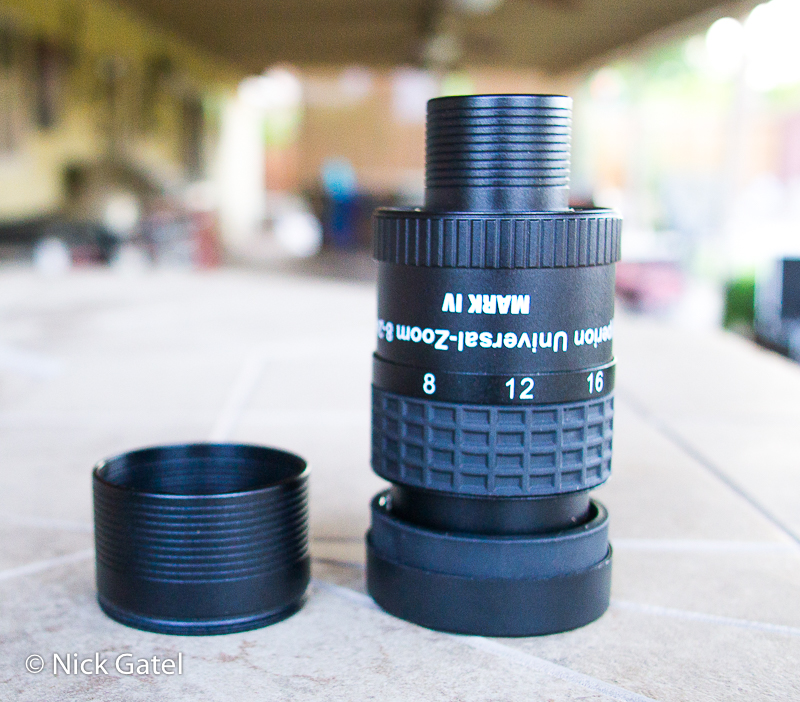
At first I was wary about a “jack of all trades” zoom lens. Seems that multiuse items often do a lot of things, but they do few things well. The Hyperion Zoom is an exception.
Baader Hyperion Zoom Mark IV
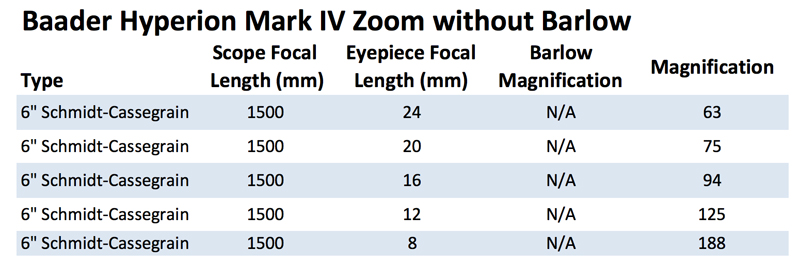
This lens sells for $289. Here’s a link to the Baader website. Baader also makes high quality Barlow too. Below is a chart calculating the magnifications with our 6” Schmidt-Cassegrain example.
Combine it with a Barlow you get a deep range of magnifications with just two items; one eyepiece and one Barlow.
I have never seen this lens for sale on sites like Amazon, so you’ll probably have to contact a telescope specialty company to purchase one, or a local store if you have one.
Star Diagonals
A star diagonal is an optical 90-degree elbow. Unlike Newtonian reflectors that have the eyepiece at the top of the optical tube, refractors and Schmidt-Cassegrain telescopes have the eyepiece at the bottom of the tube, usually making it impossible to view objects with just an eyepiece.
A star diagonal makes visually viewing easier, and with a tall enough chair or stool, one can spend hours viewing in relative comfort.
Most refractors and Schmidt-Cassegrain telescopes come with a star diagonal. Lower priced scopes usually include an inexpensive diagonal, which is a good first upgrade. Diagonals use a prism or a mirror to bend the light 90 degrees. Generally prisms are better, but there are very high quality mirror diagonals.
If a scope comes with an inexpensive diagonal, a quality replacement can be had for well under $100 for a diagonal with a 1.25” barrel. 2” barrels are more expensive. Which leads to a discussion of 1.25” diameter eyepieces vs. 2” diameter eyepieces.
1.25 or 2 Inch?
1.25″ diagonal (left) and 2″ diagonal (right)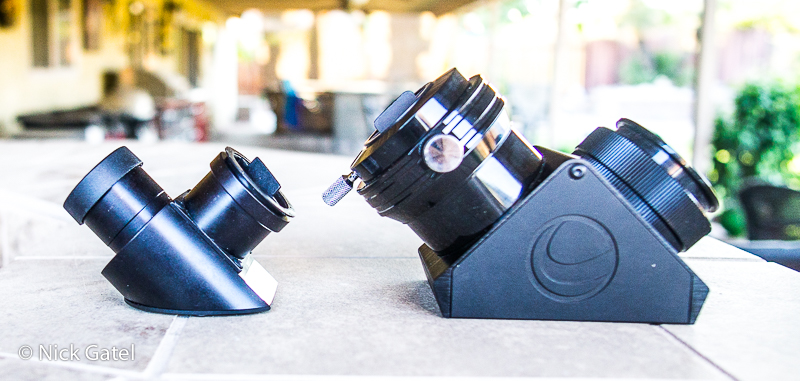
Now I wish I had never purchased these 2″ eyepieces and Barlow (below), along with a 2″ diagonal. I only use the 30mm eyepiece and rarely at that. I could have saved the money and applied it to the purchase of a Baader Hyperion Zoom Mark IV. This is part of the purpose of this telescope series. To help others learn from my mistakes and what has actually worked out.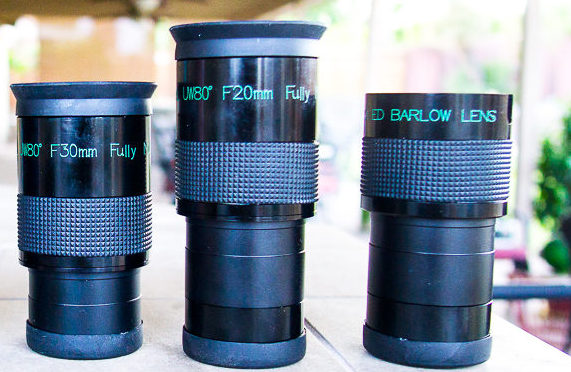
My NexStar 8se came with a 1.25” diagonal, which I upgraded soon after I bought the telescope. The back of my scope has a 2” threaded fitting and came with a reducing “visual back” converting it from 2 inches to 1.25 inch. I also bought a 2” diagonal that attaches directly to the scope’s fitting.
Pros
2” eyepieces have a wide field of view. My 20mm and 30mm 2” eyepieces have an 80° field of view, versus around 50° for my 25mm 1.25” eyepiece. The magnification of same focal length eyepieces in the same scope will not change, but you can see more in a 2” eyepiece because the field of view is wider.
Also, it is easier to view objects with a 2” eyepiece because the exit pupil size (diameter of the viewing part of the eyepiece) is larger. See below:
I have found no advantage of 2” eyepieces over 1.25” except when view with low magnification such as the 30mm 2 inch eyepiece. I rarely use the 30mm 2 inch eyepiece. However, the 2-inch diagonal comes with an adapter that makes it easy to switch between 2” and 1.25” eyepieces.
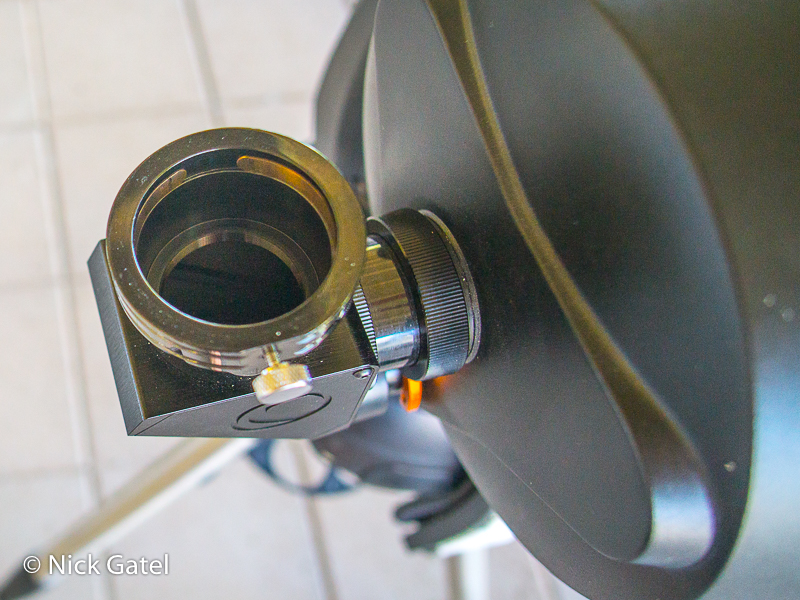
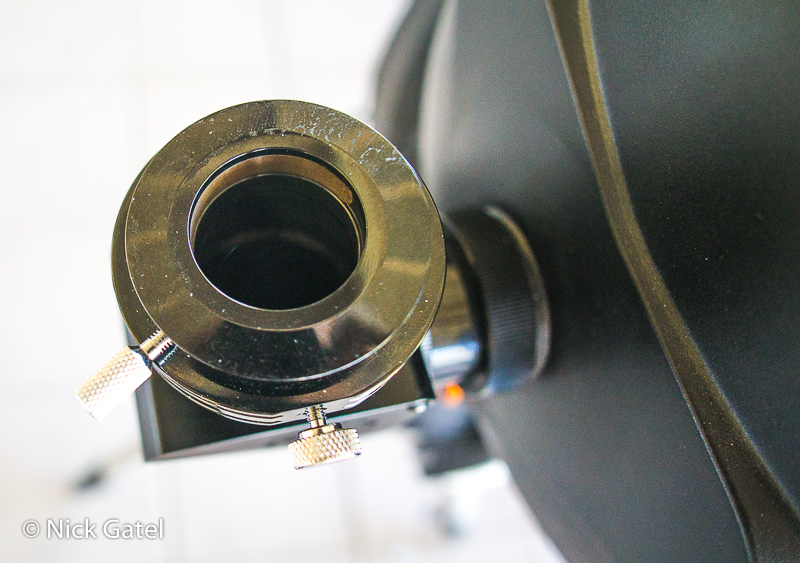
At first, 2” eyepieces are easier to view with for beginners, but with a little practice the 1.25” are easy to use. Also, there are expensive 1.25” eyepieces that have comparable field of views. So as I first mentioned, selecting eyepieces will take quite a bit of research. I suggest spending ample time with the stock eyepiece and perhaps a couple inexpensive ones to get a feel for what you want and need before investing in more expensive upgrades. The one exception is the Baader Zoom Mark IV that I covered earlier.
The Baader Zoom will fit both 1.25” and 2” diagonals. The field of view varies from 48° to 68° as you go from high magnification to lowest magnification.
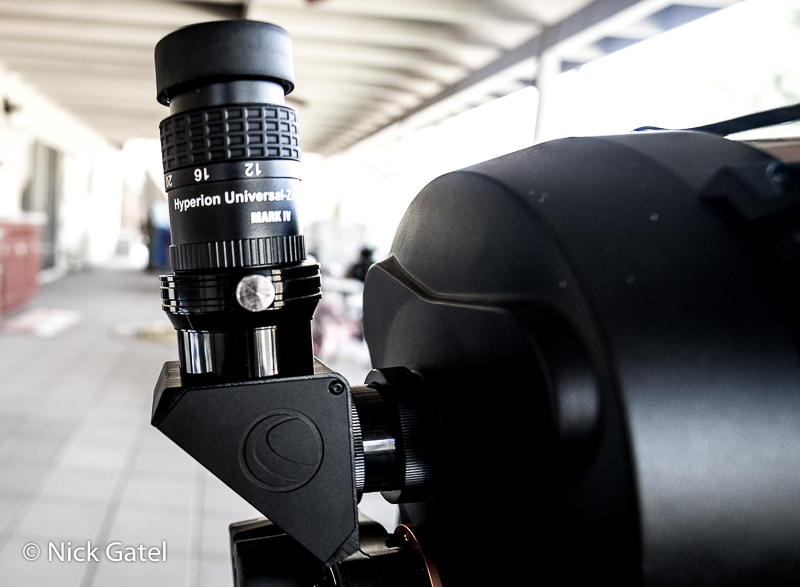

Large telescopes such as 11” and 14” Schmidt-Cassegrain usually come stock with a 2 inch diagonal.
Cons
2” diagonals and 2” eyepieces are incredibly heavy compared to their 1.25” brethren. Not only can 2” components upset the balance of the scope on its mount, but with some mounts the larger and longer diagonal and eyepiece can interfere and hit the mount as the scope moves towards the zenith.
Buy the “Best” Eyepieces the First Time
You’re going to need additional eyepieces when you purchase a telescope. Researching a selection of eyepieces will be time consuming and complicated. Aside from maybe buying two or three inexpensive eyepieces along with a Barlow lens maybe the best method before investing a lot of money.
Many amateur astronomers spend as much, or more, money on eyepieces as they do on their telescope! Buying the Baader Zoom Mark IV maybe the best option to get a “selection” of quality eyepieces at a reasonable price.
This website may be compensated for linking to other sites for sales of products. As an Amazon Associate I earn a small fee from qualifying purchases at no additional cost to the purchaser.

