
A lot of people struggle with the concept of layering clothes for backpacking. Hopefully, I can simplify it, with some real world examples. Backpacking is a good example (vs. snowshoeing or mountain climbing). The backpacker spends most of the day walking with an occasional rest break. He also spends time in camp doing chores and often a little bit of time just sitting in camp. So we can “define ” these activities as sitting, light work, and heavy work. Impact-Site-Verification: 329d9066-0a94-4b4e-8ff9-65d7ee7893a5
For backpackers the following layers are almost universally accepted as the best way to dress for the backcountry:
- Baselayer
- Active insulation
- Shell (wind and or rain)
- Insulated outer garment
Most of the time these are not all used at the same time. Weather, temperature, wind, level of activity, and the individual’s metabolism determined what layers should be worn under what conditions.
Clothing Goal
Under most conditions we need to stay warm and dry. We can be a little wet if we stay warm; that is, our inner temperature needs to stay within one degree of 98.6 Fahrenheit.
In this post I will only be discussing torso coverings as they are the most difficult to assemble to keep the backpacker warm and dry. I also will only be referring to the products sold as mens clothing. Patagonia does make the same products for women and sometimes offers a fuller lineup for women, such as vests. However I can’t really say what would work well or not on the women side of their products. I suppose, given product popularity, a lot of women are happy with what Patagonia sells.
Why Patagonia as a Guide?
There are three reasons I am picking Patagonia clothing as a guide:
- Most of the clothing layers I use are made by Patagonia
- Patagonia was the outdoor industry leader in teaching the public how to layer
- Many experts (I am not an expert) use certain Patagonia items as a standard to measure competing products
Patagonia History
Most of the really good research regarding clothing comfort, since WWII, has been done by the US Army Natick Laboratories. This 1969 (revised in 1973) paper, The Comfort and Function of Clothing (Tech Report 69-74-CE) was very influential in the ‘70s and ‘80s. It is long, at over 300 pages and is very technical. Natick Laboratories has continued their research, refining clothing for US soldiers, especially as new materials are developed. We also need to keep in mind their research is for soldiers who are in much better physical condition than the average backpacker. Much of how I have layered my clothing, over the years, comes from this document, as was the commercial research and product development in the 1980s.
In the late ‘70s and ‘80s Patagonia was a leader in selling clothes that worked. At first hey sold several weights of polypropylene “long underwear,” which we now call baselayers. They also sold “pile” garments for insulating layers. Pile, is similar to today’s fleece garments. A pile garment looked like pile rugs, and the construction is similar. Many users of pile garments complained that the material “pilled,” that is, the surface started collecting little balls of material over time, which really did look ugly.
The following five paragraphs are from Patagonia’s Website recounting their history, which can be found here. They can tell their story better than me.
Polypropylene Baselayers
It does no good to wear a quick-drying insulation layer over cotton underwear, which absorbs body moisture, then freezes. So in 1980 we came out with insulating long underwear made of polypropylene, a synthetic fiber that has a very low specific gravity and absorbs no water. It had been used in the manufacture of industrial commodities like marine ropes, which float. Its first adaptation to clothing was as a non-woven lining in disposable diapers.
Pile Insulation
At a time when the entire mountaineering community relied on the traditional, moisture-absorbing layers of cotton, wool and down, we looked elsewhere for inspiration—and protection. We decided that a staple of North Atlantic fishermen, the synthetic pile sweater, would make an ideal mountain layer, because it would insulate well without absorbing moisture. But we needed some fabric to test out our idea, and it wasn’t easy to find.
Patagonia Teaches the Public How and Why to Layer Clothing
Using the capabilities of this new underwear as the basis of a system, we became the first company to teach, through essays in our catalog, the concept of layering to the outdoor community: inner layer against the skin for moisture transport, middle layer of pile for insulation, outer shell layer for wind and moisture protection.
Malden Mills and Patagonia Fleece
Finally, Malinda Chouinard, acting on a hunch, drove to the Merchandise Mart in Los Angeles. She found what she was looking for at Malden Mills, freshly emerged from bankruptcy after the collapse of the fake fur-coat market. We sewed up some samples and field-tested them in alpine conditions. Synthetic pile had a couple of drawbacks, but it was astonishingly warm, particularly when used with a shell. It insulated when wet, but also dried in minutes, and it reduced the number of layers a climber had to wear.
Although both pile and polypropylene were immediately successful, we worked hard from the start to improve our quality and overcome the problems of both fabrics. We worked closely with Malden to develop first a softer bunting fabric, and eventually Synchilla®, an even softer, double-faced fabric that did not pill at all. While Malden’s access to capital made many of the innovations possible, Synchilla never would have been developed if we had not actively shaped the research and development process. From that point forward, we began to make significant investments in research and design.
A deeper dive into the history can be found here.
Today the original Malden Mills is the well-known company Polartec. I found this Wikipedia article interesting.
Patagonia Capilene® Baselayers
Again, from the Patagonia website,
Our replacement for polypropylene came in 1984. While walking around the Sporting Goods show in Chicago, Chouinard saw a demonstration of polyester football jerseys. Milliken, the company that made the jerseys, had developed a process that permanently etched the surface of the fiber as it was extruded, so that the surface became hydrophilic—it wicked moisture away from the body to the outside where it could evaporate. Chouinard saw the fabric as perfect for underwear, and Capilene® polyester was born.
Understanding How Layers Work
Unfortunately I need to get a little technical. I won’t go into all kinds of formulas or a deep dive into all the minutia, because it is boring to most people, and I cannot tell you I am some sort of expert. But at the end of the day, I know what works for me and this should be your goal – determine what works best for you.
And this is part of the problem when we try to get too technical. How my personal physiology works and what typical conditions I encounter, won’t match up to most people. Unfortunately, what works for you will probably require some trial and (hopefully not too much) error.
Understanding Baselayers
I like to call baselayers “contact” layers. The primary purpose of a baselayer is to wick moisture away from your skin, keeping it dry. Water conducts heat. In colder weather, we don’t want water to lie on our skin as it draws too much heat from our bodies, and it can permeate your insulation, which is another bad thing. If we get too wet we cannot stay warm in colder weather, which can lead to hypothermia and even death.
The reason I like to call baselayers, contact layers, is because the layers must be in close contact to the skin in order wick the moisture from your skin and evaporate it into vapor as it passes through this contact layer. Baselayers wick water (sweat) and turns it into vapor, which can pass through the insulation layer, and dissipate.
Insulation Qualities of Baselayers
Most people buy baselayers to stay warm, but they provide very minimal insulation. As I just pointed out, the primary purpose of a baselayer is to wick moisture from the skin. However, and I’ll get to this later, if you wear a loose fitting baselayer over your skin contact baselayer, this second layer will act as an insulation layer, but not too effectively because most baselayers are thin.
An insulation layer needs to be at least 1/8 of an inch thick to provide any noticeable insulation,
which is why baselayers really don’t insulate.
Baselayer Materials
Cotton Kills
In the ‘60s and ‘70s most baselayers were made from cotton (think long johns). The thought here was not to wick moisture, but to have a thin insulation layer on top of the skin to keep a person warm in cold weather. When it is dry, cotton is a good insulator. But cotton absorbs water and when it absorbs too much water, all the air between the fibers are replaced with water. Now you have a garment that is soaked in water, the fabric loses its loft, the water conducts heat, and now this insulation layer does exactly the opposite of what we want it to do. Thus the saying, cotton kills.
Polypropylene
This fabric absorbs zero water. It is probably the best wicking material we have for baselayers. You can still find polypropylene online on such sites such as Amazon. But it soon stinks to high-heaven. I can hike for a week or two without showering or bathing, and I don’t think I smell bad at all. But when I wore polypro, I couldn’t stand my own odor. That’s how bad it is, in my opinion.
Merino Wool
This is a special thin wool layer that, unlike most wool, isn’t scratchy. It wicks well, and doesn’t stink like synthetic fibers do. Its drawback is it doesn’t wear long, especially under backpack straps. For several years I used a long sleeve polyester/merino wool blend baselayer sold by Mountain Hardwear, but I wore out several of them.
Nylon
This material can be used as a base layer and some nylon is comfortable against the skin, with a feel similar to cotton. But nylon absorbs a little more water than polyester.
Polyester
Polyester absorbs something like 1% of its weight in water. Polypropylene wicks better, but overall polyester is a better material for baselayers and it is what most quality baselayers are made from, with Merino coming in second place.
Insulation Layers
This is what keeps us warm and dry. For periods of intense exercise, a good insulation layer should be able to dump the excess heat we produce. This means an effective insulation layer should breath extremely well and absorb little if any vapor expelled by our baselayer.
How Insulation Works
Insulation keeps us warm by capturing the heat we produce, because our bodies are always producing heat.
If there is one important thing to remember about insulation it is:
The materials do not insulate us; the “dead air” these materials capture and hold, insulate us.
Even when we sleep or sit in a neutral environment, our bodies produce energy that needs to be dumped as waste heat.
Our bodies are like car engines. Car engines are not very efficient. They generate a lot of heat, most of which is dumped into the air via the exhaust system. The temperature of an engine’s exhaust runs in the area of 300° F – 500°F.
Our bodies are like an engine.
The higher the intensity of our work, the more waste heat we generate.
When we sleep this excess is expelled from our respiratory system, and through our skin via insensible evaporation.
In colder weather we cannot dump all of this excess heat because our inner core would get too cold. We need to keep a certain amount of this excess energy in our insulation, and dump the rest. The thickness of insulation determines how much heat we retain — the thicker the insulation the more heat is captured. If we capture too little we are cold, and if we capture too much we are hot.
It used to be that we could fairly accurately determine insulation’s effectiveness, or rating, by its thickness, because what is important is how much warm air it retains in the garment.
Insulation materials (other than down insulation from ducks and geese) contain thousands of tiny fibers surrounded by air. An efficient insulation will capture the heat our bodies release into the space between the fibers. When wool and polyester get wet, the moisture sits on top of the fibers; leaving warm air in the space around the fibers. The insulation will continue to provide insulation, but at a lower lever, because the moisture in the material will conduct heat, cooling the air between the fibers by up to 25% or so.
If you remember, I stated that water replaces the air in cotton, which makes it a very poor baselayer.
Down works a little different, because it isn’t made from woven fibers. But it works on the same principle; only an inner and outer layer of fabric holds all the down feathers in place. Unlike polyester and wool insulation, down is like cotton, it can’t pass moisture (it can pass some vapor). When down gets wet it can’t insulate at all, which is why it is a poor choice as an insulation garment that is layered between a baselayer and a wind or rain shell.
When cotton and down get wet, the moisture fills the air spaces and compresses the material. If other words, the loft decreases. This does not happen with wool and polyester materials. Wool and polyester retain the insulation’s thickness ( a.k.a loft).
Most Common Insulation Used in Backpacking Garments
- Wool
- Fleece
- Down
- Synthetic polyester batting
The first three have already been discussed. The fourth, continuous filament polyester is a popular choice for backpacking insulation layers. Two of the more popular materials are Polarguard® 3D and Climashield® Apex. It still retains some insulation when it is wet. These are a little heavier than down, don’t compress as well as down for storage, and quickly degrade over time compared to down garments. Unlike down, which doesn’t insulate when wet, these material will provide some insulation when wet.

I no longer own any of these continuous filament polyester garments for the reasons given above. I concentrate on keeping my down garments dry, meaning I don’t use down as an insulation layer. I do use down as my outer insulation shell when in camp and I use in in all my sleeping bags/quilts.
Insulation Thickness
Although not very scientific, we can generally say the thickness of an insulator will be almost the same, no matter what material is used. Here is a 1978 chart from 3M, the manufacturer of Thinsulate insulation. The high loft materials (every thing except Thinsulate) comes from that 1969 Natick paper.
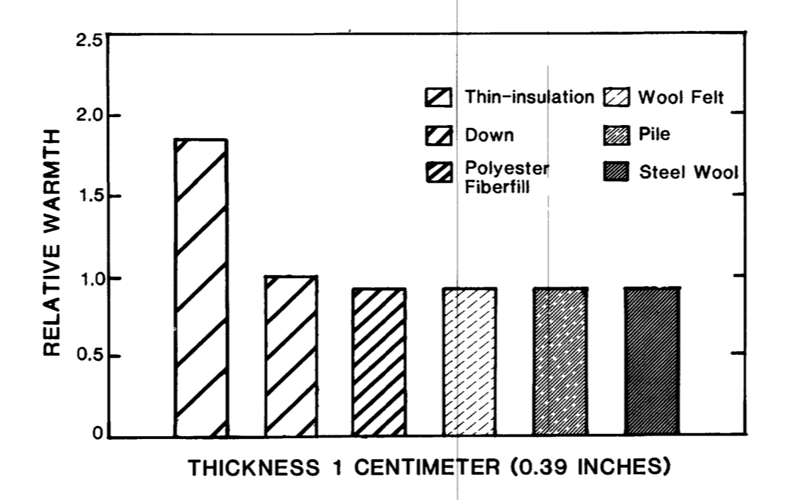
Thin insulation, such as Thinsulate, has much, much thinner fibers than down, polyester, and most other “high-loft” insulation. Thus, it is called “thin-loft insulation.” The problem with Thinsulate is it is much heavier in weight compared to the common insulation used today in backpacking clothes. So you rarely will see it in backpacking clothing. You will see it in gloves, boots, and even shoe insoles.

Earlier, I referred to The Comfort and Function of Clothing (Tech Report 69-74-CE). Using some of the data in that document, we can build this table:
Table 1 (Clothing Insulation)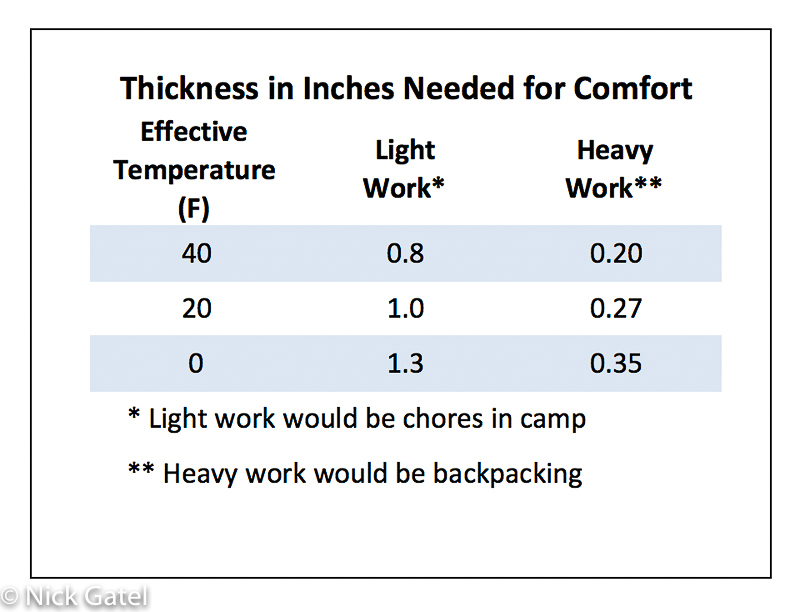
Because this is a rough guesstimate, we can extrapolate that at freezing (32° F), we need around .90 inches of insulation for camp chores and .23 inches while backpacking.
I use similar calculations for sleeping bags, where we are not doing any work, so the insulation needs to be much thicker:
Table 2 (Sleeping Bag Insulation)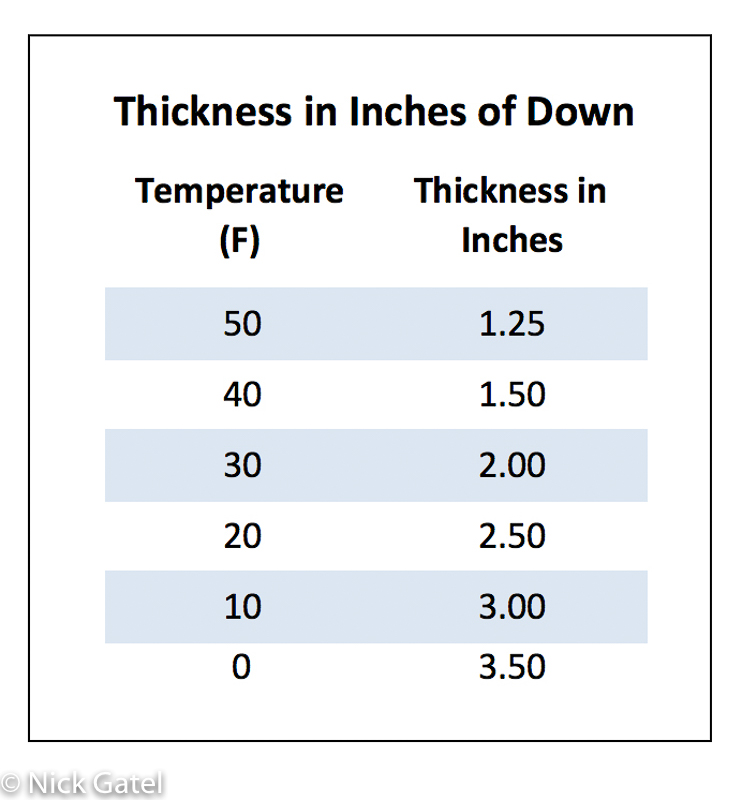
We need more insulation in sleeping bags because our bodies generate less heat. The chart in Table 1 showed inches of insulation needed for light work and heavy work. We need even more insulation is we are just sitting, and even more when lying down (sleeping).
This methodology of inches isn’t very scientific given today’s modern fabrics, but a fusion of some science and a lot of field experience. Through the ‘70s until the late ‘90s, when I was refining my garments and sleeping bags, there wasn’t an Internet to provide the information we can get today.
Clo and MET
No, these aren’t cartoon characters, they’re units of measurement for understanding how garments work. They are the science behind my inches of insulation methodology.
Clo
For an explanation of Clo, see this Wikipedia article on clothing insulation.
1 Clo. . .
. . . is the amount of insulation that allows a person at rest to maintain thermal equilibrium in an environment at 21°C (70°F) in a normally ventilated room (0.1 m/s air movement).
As the temperature drops, more clothing or more Clo is needed to keep the person warm. Back in the ‘80s some mail order catalogs would include a “Clo rating” for a specific rating, using the formula of 1 inch of insulation = 4 Clo.
If we look at the human body, we can see that it is comprised of cylinders. The largest diameter cylinder is the torso. Legs, toes, fingers, arms, neck and the head can all be considered cylinders. The upper torso, neck, and head need the most insulation, because our bodies will sacrifice extremities in order to keep these three cylinders warm.
Other difficulties in calculating require Clo is that clothing efficiency is proportional to the diameter of the cylinder it is protecting. Insulation tends to compress around corners (shoulders, elbows, etc.), and when we are moving the actions of our bodies causes openings in our insulation allowing cooler air to displace the warm in captured by the insulation. For this reason you will almost never see a temperature rating for a garment.
Sleeping bags are a little different. We can place a manikin in a sleeping bag with instruments to measure the temperature and come up with a temperature rating. This article by Recreational Equipment Inc (REI) explains the rating process and temperature standards. Of course it cannot factor in each individual’s metabolism or how much a person will move and cause drafts. Some sleepers toss and turn, some sleep on their sides, while others sleep all night on their backs never moving. These tests are expensive, and many smaller manufacturers just use the thickness of the insulation to calculate a temperature rating, often not knowing where these values come from (see Table 2 above).
MET
The units of exercise intensity are measured in MET. (See this Wikipedia article).
The chart below will be useful for our discussion.
Table 3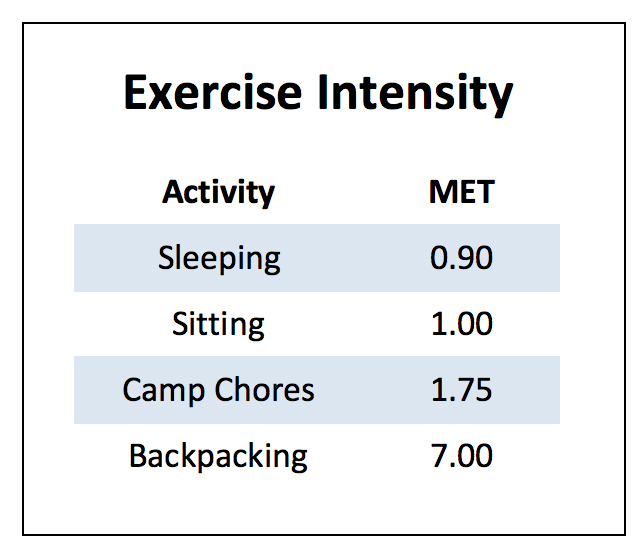
Now let’s take a look at Table 1 again, and then change the activity column to METs.
Table 1
Table 4
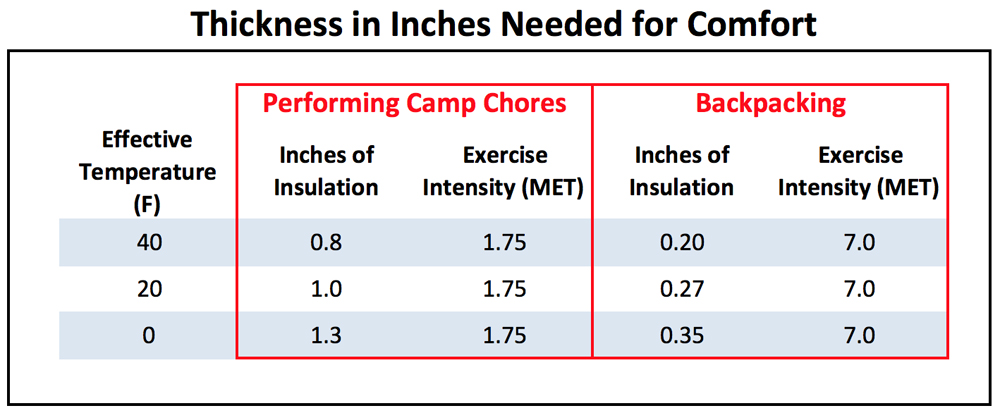
The insulation thickness required at 20° F for camp chores is about four times as much as is needed when backpacking (2.7 ÷ 1.0 = 3.7), while the MET is four times (7.0 ÷ 1.75 = 4.0) as much. Remember though, the actual amount of insulation needed at a given temperature varies by individual.
The Real Science of Clothing Comfort
As mentioned before, the US Army Natick Laboratories conduct scientific research and testing to develop clothing for our soldiers. The science is complicated. In the “backpacking community” there is a gentleman, Richard Nisley, who has conducted a lot of his own research into backpacking clothing and owns some very sophisticated equipment. He provides outstanding information on specific garment items, plus methods for an individual to calculate their specifications. Richard posts often on BackpackingLight.com (BPL). In this post, A Revised Paradigm For Estimating Garment Comfort Limits, he linked to a document he wrote, with the same title, that explains how the measurements for Clo, MET, and other units are calculated. It is somewhat technical. His paper is one of the best resources for the backpacker who wants to take a deeper dive into garment warmth and comfort.
Shells
The third layer is the shell. Wind shells protect the insulation layer from unwanted lost of warm air; rain shells keep your insulation dry. Well, at least that is the theory. Usually it doesn’t work.
The First Problem
Backpackers want one shell to act as a breathable wind shell and as rain gear. Starting in the ‘70s, Gore-Tex tried to fill this niche with their waterproof/breathable fabrics. Only problem is, it isn’t waterproof and it doesn’t breath well, as I wrote in this post, The Search for the Holy Grail: Waterproof Breathable Rain Gear.
The Search for the Holy Grail: Waterproof Breathable Rain Gear
And then other manufacturers created their own versions of waterproof/breathable fabrics, which also weren’t breathable or waterproof. Today, some forty-plus years later, we have improved versions of Gore-Tex, we have improved versions made by competitors, and none of them are really breathable or waterproof.
The Second Problem
Language is the second problem. We call this layer a wind shell. So people think they need a windproof shell and manufacturers oblige with windproof jackets.
The Third Problem
Most backpackers don’t want to carry two garments — one for wind and one for rain.
Wind Shell Breathability
A typical mid-weight fleece garment has a breathability rating of 200 CFM (cubic feet per minute).
A typical windproof shell has a breathability rating around 3 – 4 CFM. If we cover a fleece garment with a windproof shell, our system has gone from a breathability rating of 200 CFM to 3 or 4 CFM. We will overheat because we can no longer dump the excess heat our body produces that flowed through our insulation, before the shell was added. This excess causes to sweat and this moisture cannot pass through our wind shell.
Wind Resistant Shells
The solution to the breathability problems is solved with a wind resistant shell. It has been found that if we use a shell in the 35 – 40 CFM range, we can mitigate most of the breathability issues of windproof shells. In addition, we can use a slightly thinner insulation layer, because the shell creates additional insulation.
Remember, we keep ourselves warm by capturing some of the warm heat our bodies generate in the air spaces of our insulation. Look at this diagram.

The wind shell is capturing and retaining some of the heat between the insulation layer and the wind shell.
For this reason, a breathable wind-resistant shell is part of my clothing system whenever I need more insulation than my hiking shirt provides. I will do one of the following:
- Shirt or baselayer only
- Shirt of baselayer + wind shell
- Shirt or baselayer + insulation layer
- Shirt or baselayer + insulation layer + wind shell
- Shirt or baselayer + wind shell + insulation

Rain Shell
Since a breathable wind-resistant shell is necessary, it isn’t going to be waterproof. You need a separate rain shell. This doesn’t go well with the ultra light fans, because most truly breathable shells weigh around 4 ounces. They don’t want to carry an extra four ounces, because it will make their gear spreadsheets look bad as the pursue some arbitrary “base weight.”
At the same time, a rain shell needs to be very breathable to avoid overheating and becoming drenched in your own sweat. As mentioned earlier, a truly waterproof and sufficiently breathable garment doesn’t exist.
I find a poncho achieves the needed breathability, not through the material but by ample ventilation points. But you won’t find many poncho advocates.
Outer Insulation Garment
When you are hiking and need to stop in cold weather, your layer system isn’t going to keep you warm. You need an outer insulation layer for stops, and during the time you spend in a much less active campsite environment. This fourth layer should be warm enough to handle the coldest temperature and environment you expect to encounter on your trip.
With the fourth layer in place, you might have to move your wind or rain shell on top of the outer insulation.
Using Patagonia Layers as a Guide
Baselayers
When Patagonia released their Capilene® baselayers in 1985, they had four weights, Capilene 1, 2, 3, and 4. Capilene® 4 was a hybrid. Meant to be a wicking baselayer, it had some insulating properties. Today, Patagonia has aligned their baselayers with the more common three levels: lightweight, mid-weight, and thermal. Because so much information on the Web refers to Patagonia’s 1, 2, 3, 4 line-up, it is useful to know what the current line-up is compared to the old.

Patagonia makes a lighter version, Capilene® Air, which is a polyester/Merino wool. The Capilene® Air and Cool Daily also are great shirts for hot weather and worn alone will move sweat quickly to help you stay cooler.
My inventory of baselayers is:
- Capilene 1 short sleeve T (size large)
- Capilene 1 long sleeve crew (size medium)
- Capilene Midweight long sleeve ¼ zip (size large)
- Capilene 3 long sleeve crew (size medium)
- Capilene Thermal Hoody (size large)
The Capilene 1 short sleeve is only used as a hiking shirt in hot weather and I prefer a large. A medium would wick better, but having lived in the desert for over 40 years, sweat doesn’t bother me.
The Capilene 1 long sleeve crew is a medium for a close contact fit.
The Capilene Midweight long sleeve crew ¼ zip is a size large. It is made from a “stretchy” material, so it does have a nice contact fit.
The Capilene 3 long sleeve crew is a medium. It does fit over the Capilene 1 long sleeve crew nicely. I use it as both a baselayer and an insulation layer.
The Capilene Thermal Hoody is a large to fit over my Capilene 1. I only use the thermal Hoody as an insulation layer, because I don’t hike in extreme cold.
Looking at all of these, you can see I mix and match them to the conditions. The Capilene 3, is thicker than the Capilene Midweight and it is the only one I use as both a baselayer or an insulation layer.
Where to buy Capilene®
| Backcountry | Patagonia |
Insulation Layers
As with the Capilene layers, Patagonia used to have 4 weights of fleece. And used the following designations: R1, R2, R3, which were closely similar to Polartec’s 100, 200, 300, indicating weights of 100 grams per square meter of fabric, 200 grams per square meter of fabric, and 300 grams per square meter of fabric. Patagonia also made a R4 version, which was a blend of fleece and Polartec’s WindBlock material. Both the R3 and the R4 were really to bulky and heavy for backpacking use.
Patagonia sells a line of R1 and R2 products called, TechFace. The TechFace is supposed to be more abrasion resistant that regular R1, and has a water resistant coating. I suspect TechFace might be less breathable, but have nothing to back up that suspicion.
A size M R1 TechFace Pullover Hoody weighs almost 3 ounces more than the regular R1 Pullover Hoody in a size M. I have never even seen one, so I can’t comment about this newer product.
Today, Patagonia’s R1 line consists of:
- R1 pullover with a ¼ zip
- R1 pullover hoody with a ¼ zip
- R1 jacket with a hood
Patagonia’s R2 line consists only of a:
- R2 jacket
- Classic Synchilla® Fleece Vest**
** The Classic Synchilla® Fleece Vest, is a retro version of the original Patagonia fleece line, which is a mid-weight garment. I find this 200 weight class fleece in a vest, combined with a breathable wind shell, to give the widest temperature range for backpacking (MET 7 activity). For me, it is a good combo from around 32° F all the way to 55° F or so. I may have to adjust these layers while on the move. The vest has a full zipper. The Houdini has a bottom hem cord, full zipper, and hoody. Between the adjustable features on both, I can quickly adjust ventilation for both by opening and closing zippers, adjusting the shell’s hem cord, wearing or not wearing the hood. All of this without have to stop to remove or add layers.
I need to point out that most fleece insulation is fairly similar. You can buy some good product for substantially less than the price Patagonia gets (although their products can often be found on sale with substantial savings). For me, Patagonia’s construction, location of seams, durability, etc. are worth the extra cost. But, really, any comparable weight fleece will work just about as well, if you are on a budget.
For backpacking, I own a R1 Hoody and a 200 weight Synchilla vest.
I do have several other fleece garments that I use for camping, day hiking, and around town. Most of these are REI brand, plus a Patagonia R2 jacket, which is my go to garment when I need light insulation.
Where to buy Patagonia fleece
| Backcountry | Patagonia |
Wind “Resistant” Shells
This has always been the most misunderstood layer, as presented earlier. Although, in the ‘80s I understood the concept, I didn’t have the information about CFM. In those days, most winds shells (called windbreakers) were made of nylon and didn’t breathe much. I tried running shells with dismal results. Finally by trial and error, I found a couple thin nylon shirts that didn’t overheat me. These became my wind layers.
Patagonia, finally, in 2002 came out with a wind shell that worked. I can’t verify how breathable that year model was, but by the mid 2000s the Houdini jackets was rated around 35 CFM. In 2013, Patagonia changed the material and the CFM was down below 10 CFM. So today you don’t want the current model Houdini as your wind shell.
The HUGE problem for backpackers is:
Manufacturers don’t publish CFM figures.
Given all this, you can do a breath test to estimated breathability. Richard Nisley, in this BPL thread wrote:
I invented a $.01 windshirt tester (paper coffee filter air permeability reference) that is MUCH more accurate than just blowing through fabric to determine if it is easy or hard. For those who believe in science, a double layer paper coffee filter will provide the near optimal 35 CFM air permeability to compare windshirt fabrics. For those who prefer intuition (more breathability is always a good thing), a single layer paper coffee filter will provide ~70 CFM.
I have read that the Black Diamond Alpine Start hoody has a CFM of around 35, which is perfect. Of course, I don’t know if the current model uses the same material as earlier ones.
It sounds like the BD Alpine Start hoody is a good choice, if the material hasn’t changed recently. If you find one in a store, you can do the “Nisley” breath test. Many online vendors will allow you to return a garment for no extra charge, other than you have to pay return postage.
You can find the Alpine Start Hoody at these retailers:
| Amazon | Backcountry | Camp Saver |
Yes, these garments aren’t inexpensive, but they are specialized gear.
Another option is the Patagonia Houdini Airshed, which has a rating in the 70 CFM area. For me it would be too breathable. Use the coffee filter test to verify current models breathability. These have an athletic cut, so you want to get one large enough so the jacket doesn’t compress your insulation layer.
Check Airshed Hoody at: | Patagonia | Backcountry|
Another option is to buy a used 2012 model Houdini from Patagonia’s Worn Wear website. Each item posted on the site shows what year model it is and an approximation of its condition.
Rain Shells
Sorry, there is no rain shell on the market, made by any manufacturer, that is breathable enough for MET 7 backpacking. A poncho will do the job, not because it breathes, but because it is so highly vented.
Of course you can just wear a thick enough fleece jacket with a wind shell and just be wet all day. With the right combination you can stay somewhat warm, but feel wet.
Outer Insulation
Outer insulation, in combination with all your layers, should provide you comfort at the lowest temperature you expect to wear it, while sitting. This usually is at night in your campsite or first thing in the morning if you are an early riser.
For years I have been using a Patagonia Down Sweater. With 3.4 ounces of 800 fill down, it is about .90 inches thick and weighs around 13 ounces. It is heavier than many competitors with the same insulation value, but the shell material is much more durable. I have used some similar temperature value garments, but they have fragile shells, which I have had to be repaired. For me, this works for me in conjunction with my layer system to about 32° F.
Patagonia Down Sweater at | Backcountry | Patagonia |
For temperatures below 32° F Patagonia doesn’t have anything that would work for me, so I can’t make a recommendation. As the weather gets colder, I need a little more insulation than most folks. For this reason I usually bring a super light down vest to add to my outer insulation layers. It packs down to almost nothing and provides a large range of flexibility.
The thickness of the total insulation shells (inner and outer layer) is just a bit less than the sleeping bag I would take. If I get too cold sitting in camp, I can simply move around a bit to warm up. Also a hot meal and hot chocolate help fuel my internal engine.
As the temperatures drop below 32° F, I need outer insulation that is warmer than the Patagonia Down Sweater.What you do want is a higher loft “fill power” of 800 or more. Some companies sell “water-resistant” treated down (usually at a premium). I would question if this even works as advertised, and some of the most reputable manufacturers of down clothing and sleeping bags, such as Western Mountaineering, seem to share my thoughts on the subject.
I can’t really recommend a particular down jacket. All of mine are models that have been discontinued, which is very common. I can tell you that my jackets are usually a little thinner that the thickness of my sleeping bag or quilt. So if my quilt has 2″ of loft, I’m usually bringing a down jacket with 1.5 – 2.0 inches of loft. This may or may not work for you.
However, let’s take a look at how I might assemble all my layers for a trip with these anticipated temperatures.
The Layering System in Action


In summary, understanding how layers work and assembling the pieces needed for specific conditions can keep the backpacker warm and dry.
For me, the critical piece is the breathable wind resistant shell, which presents many layering options.
Using inches of insulation is a very, very rough guide. But it can be a starting point to begin a search. Should you have the time to review many of the links I shared, especially those by Richard Nisley, you can use a scientific methodology to build your ideal system.
But there is no perfect system, as each of has a different metabolism and physiology. Over the last few years I have taken trips with many experienced hikers and it is rare to find anyone who has one exact same garment item as another, let alone a complete system. At the same they all layer clothing keeping them warm and dry.
This website may be compensated for linking to other sites or for sales of products. As an Amazon Associate I earn a small fee from qualifying purchases at no additional cost to the purchaser.