
It has been almost 10 years since I received my McHale LBP 36 (Little Big Pack) and almost 9 years for my McHale Bump 32. Over the years I have used either the LBP or the Bump on over 90% of my backpacking trips. Enough time and use has passed to objectively review both for function and durability.
Years ago, I reviewed each pack a bit after I first got them. These were really first impressions, and at the time, I was impressed. So have my opinions changed any over the past 9 – 10 years? Yes. The packs are even better than I thought they would be.
Over the past ten years I haven’t paid much attention to the current state of the market when it comes to backpacks. The McHale packs have fulfilled my needs perfectly.
Many backpackers, mostly those who haven’t used a McHale, say the only advantage offered by one of these packs is a custom fit, which of course in and of itself, is probably the most important thing to consider in a backpack. After nearly a decade using my two packs, I have to passionately disagree that this is the only real advantage. There are so many seemingly small design elements, when added together, makes a McHale pack so unique and useful.
Current State of Affairs
Over the past 10 years or so, many well known backpacking personalities have decried the lack of innovation in pack design, and some have tried to indict Dan McHale of the crime of “old school” technology. When in fact, he has steadily refined good design elements over the decades. Some folks, who really do have expertise, have tried their own hand at improving backpack design and failed. Some of these experienced people have given up trying to design something better, and just started using a McHale pack. Also during the past 10 years, I have seen several well known and now popular backpack manufacturers come into existence using much of the design elements found in McHale products.
Doing a review of both packs at the same time will provide an opportunity to compare similar features and at the same time to discuss differences. I’ll try to do that in this post. At the same time, I’ll try to discuss how a backpack should work because that has been a discussion that has been lost today due to a continuing focus on how much a backpack itself should weigh, especially in the Ultra Light community — whatever that is, if it really exists.
I Am Not an Expert
I am not a gear expert, nor will I try to position myself as one. On the flip side, I have been backpacking for over 50 years and have experience with several different packs, and have seen the popular transition from external frame packs to internal frames, non-framed iterations, and new materials.
Who are Dan McHale and McHale & Company?
Dan McHale, the owner of McHale & Company, has been building packs for almost 50 years. Although not a recognized name for those who only patronize the large outdoor equipment conglomerates, he is well known in some segments of this sport (or hobby), especially to serious mountaineers — the people who climb the tallest mountains on the planet. Dan also makes relatively light backpacks that work exceptionally well.
As far as I know, Dan doesn’t advertise. I’ve never seen an ad for McHale packs. He doesn’t have a social media presence and doesn’t have ambassadors — that recent phenomenon where companies pay or give free gear to people who will advocate for the company. See my post on The Business of Backpacking for additional thoughts on this.
Dan does have a lot of loyal customers. Many of his customers, myself included, own more than one McHale. If one searches the Internet and forums, most owners of his packs talk about how well they work. They are satisfied customers who, without being paid or compensated “ambassadors,” are advocates of his products — a function of high levels of product and customer satisfaction. So we have a company that seems to be successful only through “word of mouth.” This seems to be a highly unlikely position is this world of mass marketing and social media presence.
McHale & Company Website
Unlike almost every backpack company on the planet, you cannot buy a new McHale pack on the Internet. A McHale pack is not an off-the-shelf product. Buying a pack from Dan is comparable to a series of consultation sessions with an expert. My first contact with Dan led to a lengthy phone conversation. Even at that point, there was no decision on which of his pack models would be perfect for me. I first had to fill out a form with a bunch of measurements.
If you buy a backpack from anyone except Dan McHale, you will need to measure your torso length (plenty of information on this on the Internet if you wish to search) and maybe a waist measurement for a hip belt.
The information Dan needed included 10 different body measurements. Some of these are used to build the pack and others are used to validate the fitting of the demo pack when the new customer sends pictures or videos of the demo pack to Dan in a virtual fitting session. Apparently Dan is an innovator in the remote learning world, along with backpack making.
Most people, myself included, want to surf a company’s website. Dan’s website wouldn’t be called “innovative” to navigate, especially on a first visit. But Dan isn’t trying to sell backpacks on the Internet. Dan sells packs by talking and listening to his customers. When one talks to Dan and he walks you through the website and explains each pack and its features and benefits, the website makes sense. In my case, Dan and I reviewed different models as part of a conversation to determine which backpack would meet my wants and needs. Dan asked me a lot of probing questions about how I backpack. All of this is part of the fitting process.
Here is the link to the McHale website you would want to visit the first time. If you scroll down the page, you will see links to several backpack models, probably close to 10 different ones.
Sizing a Backpack
Dan constructs and sells packs based on circumference. For an particular model, aside from the exact torso size, you can choose several volumes based on the circumference of the pack itself. For example, if you want a Little Big Pack, you can choose at least 6 difference volumes without choosing a different height extension collar.
Most backpacking manufacturers offer a couple different volumes of a particular model and often three or four choices for size: small, medium, large, or tall.
One popular company offers:
- Small Torso: 15” – 18”
- Medium Torso: 18” – 21”
- Large Torso: 21” – 24”
- Extra Large Torso: 24” and above
Each of these sizes covers a large range of torso heights. A medium will supposedly fit anyone with a torso of 18, 19, 20, or 21 inches. That is four inches of variance.
Another fairly large company also offers four choices:
- Small Torso: 15” – 17”
- Medium Torso: 17” – 19”
- Large Torso: 19” – 21”
- Extra Large Torso: 21” and above
Here a medium supposedly fits anyone with a torso of 17, 18, or 19 inches, a variance of three inches.
To Dan, a variance of even one inch isn’t acceptable.
Putting this into perspective, what if you wanted to buy an off-the-shelf suit. If your choice for the trousers was a 32” waist, and the inseam supposedly would fit anyone whose measurement was 30” – 33” one wouldn’t want to buy it. It wouldn’t fit correctly. Of course you could cut and sew the length to fit. What if your inseam is 35 inches? You can’t lengthen that.
Popular McHale Backpacks
I’ll point out the most popular models sold by McHale & Company, from the lightest and smallest, to the largest and heaviest. Keep in mind I am not commenting on every single pack Dan makes. I only have experience with two of his packs. Also the list below does not include all the different models that Dan builds for his customers. These are just the four that seem most popular. Dan sells other models that work better for some customers.
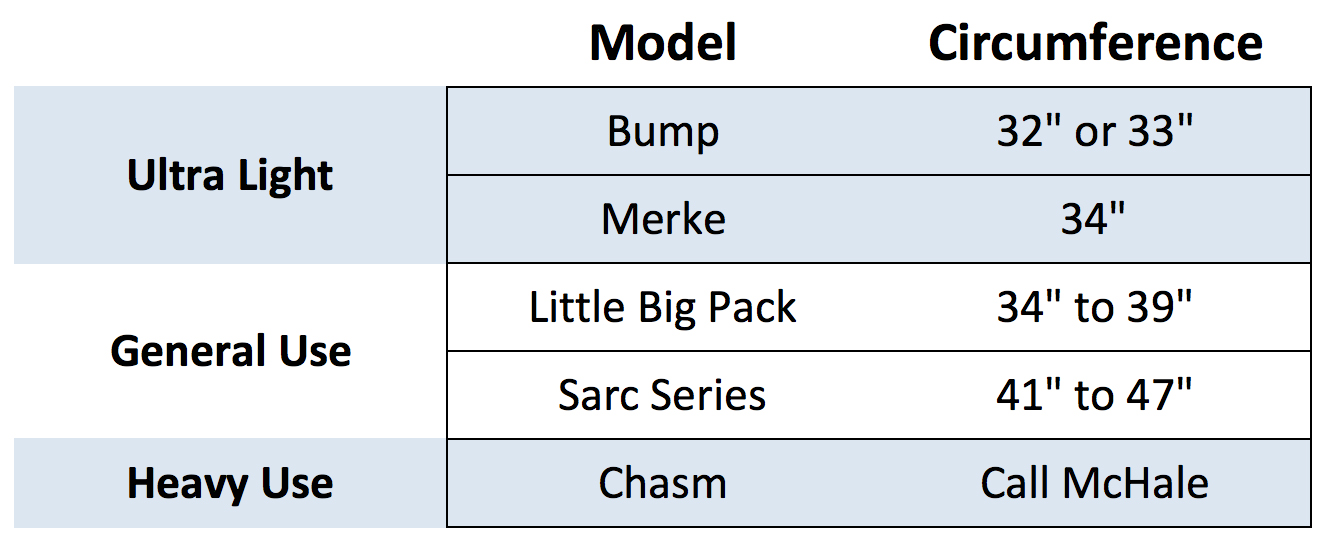
The two ultralight packs (Bump and Merke) do not have the full-featured suspension options of other models. I’ll show these differences when I do an in depth comparison between the Bump and the Little Big Pack (LBP).
Dan adds the circumference of the pack bag to the model name. So I have a
- Bump 32
- LBP 36
As the circumference and height of a backpack increase, the volume increases, and as volume increases a pack must be constructed to carry heavier loads. Dan does have a page that explains how to measure pack volume:
The circumference of my Bump’s main bag is 32 inches. The Little Big Pack is 36 inches in circumference. Both of my packs have extension collars. And both have optional pockets that can quickly and easily be removed.
McHale Pack Options
These are the options that came with my packs. Some were standard items that come with the pack, some were upgrades.
Bump Options
- Top Lid
- Two hip belt pocket
- Two side water bottle pockets
- One shoulder strap pocket
Little Big Pack Options
- Top Lid
- Two hip belt pockets
- Two side water bottle pockets
- One shoulder strap pocket
- One non-removable kangaroo pocket
There are many, many other options available for every McHale pack, but I won’t discuss these, because I haven’t used them.
Pack Volume
Below are the approximate volumes in liters and cubic inches of my two packs:

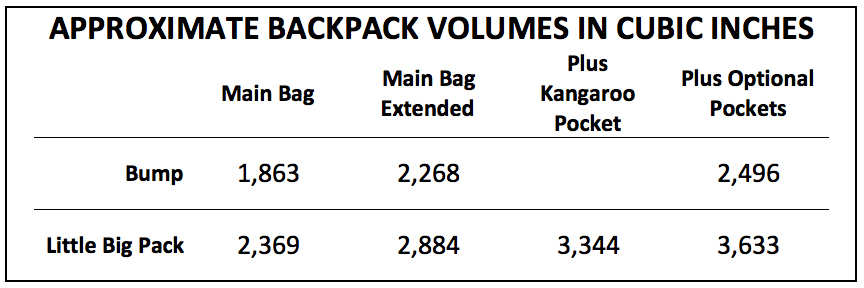
As you can see, having two packs provides flexibility.
Why I Have Two McHale Packs
When I bought the LBP, my plan was to have one pack I could use on any trip, and one pack that would last for decades. Nice theory, but in practice, I found the pack a little too large in volume for most short overnight trips. It worked, but a smaller pack would work better.
However, I really didn’t need a new smaller backpack. I would have been fine with just the LBP. At the time, Christmas was a few months away and my wife was asking what I wanted for a Christmas present. This is an annual ritual in our house, since I rarely need or want anything, so I thought I might as well get a new smaller pack and “kill two birds with one stone.” She agreed, and I called Dan again.
I am glad I got the smaller pack and have to thank my wife for pushing me to make this decision. Looking back, knowing what I know now, I would have ordered exactly both of the McHale packs I own now, they have worked out so well.
Dan said that he had been thinking about adding a smaller light pack to his model line and already had something in mind, a version of the Speed Bump he had sold many years earlier.
He put together a prototype in my size (he already had the dimensions from the LBP) and sent it to me as a demo. It turned out to be perfect and a few weeks later I received the final product in the material and options I wanted. He called it the Bump, and apparently is now a popular pack for his company.
The Demo Process
If one decides to buy a McHale pack, it includes a receipt of a demo pack to ensure fit and feasibility. The reason for this is Dan will build a custom fit backpack for the customer, not some off-the-shelf product supposedly designed to fit many different sized people. Sometimes the demo pack doesn’t fit right and Dan will send another one. That was not the case for me, as the measurements I sent were accurate.
The demo isn’t just a matter of trying it on. You have to load the pack and go for a hike. Then you have to take pictures or videos of you wearing the pack from several views and email them. Dan reviews the pictures or videos and then calls you for another discussion and advice as needed. Maybe he’ll ask for more hiking and more pictures. He wants to get your pack right. For my LBP I had to do this three times, mostly because I wasn’t listening to him.
I was a bit of a problem for Dan because I wasn’t listening to his explanation on how the frame stays work. Finally, one day he made me take the stays out, turn the pack inside out, and while I followed his step-by-step directions, he taught me how a backpack should work. That call alone was worth a bunch of money, in my opinion. Although I had been using backpacks for over 40 years, Dan taught me more in a few weeks of phone calls than I had learned through decades of experience.
When Dan knows your new pack will fit, the final decisions on accessories, pack materials, and even colors can be finalized. Depending upon how busy his company is, there will be a few weeks of wait time.
The process is somewhat lengthy and involved to ensure the perfect pack for the customer.
Cost
Prices will vary upon the material chosen and any options. When I ordered my LBP, I chose fully woven Dyneema as my fabric choice. This fabric is virtually indestructible and more than doubled the cost of the pack. At the time, many people I know criticized the cost factor.
Fast forward 10 years later, and several of those critics have bought several new packs during that timeframe, at a cost that now exceeds my original investment, and they still do not have a pack that fits perfectly.
None of those packs would have survived the conditions I’ve used the LBP, such as dragging it over huge granite boulders, sliding through narrow slot canyons, bushwhacking through hostile deserts, and so forth. And yet, my LBP still looks new, other than some fading in color due to constant exposure to the elements and a couple of stains here and there.
How to Think About Cost
A similar example would be automotive repair tools, since a backpack is just a tool. If you bought a cheap set of imported sockets and used them often, they would soon fail. On the other hand, I bought a set of Snap-On brand sockets and used them daily for 30 years, abused them at times exceeding the manufacturer’s guidelines, and today they are still as good as new. Buying a McHale pack is like the auto technician buying a set of Snap-On brand tools.
Cost is just a matter of return on investment. A McHale pack will provide outstanding return on the initial investment.
Pack Materials
Dan stocks over a dozen different materials, some in various colors. Packs can be made in just one material (as my LBP is) or materials can be combined (like my Bump). Dan can also color fully woven Dyneema and fully woven Spectra. No one else can do this (it’s is his secret sauce). So just looking at pack models and pack bag materials, there are over 100 options. This is why you will see so many colorful packs on his website — customers decide what colors they want and some customers are quite creative. I prefer packs that blend into my surroundings.
Most of the fabrics (maybe all, I don’t know for sure) are waterproof. Of course, over time, the waterproof coatings may degrade, since these packs last for decades. Also, Dan tests all his fabrics. Other companies may not be as particular. Dan even tests fully woven Dyneema and Spectra with sandpaper to ensure the abrasion resistance of the material.
Woven Dyneema and Woven Spectra
I want to delve into these fabrics, because the fabric is so good, although expensive. Over the years, with a lot of use, the fabric has been just wonderful. With use, it has become softer to the touch but still tough as nails. Not many companies build packs out of full Dyneema or Spectra, and why would you want such an expensive fabric in a pack that may not fit perfectly? Of course, with a McHale pack a perfect fit is standard. Dan has been building packs out of Dyneema and Spectra longer than anyone I know and he has refined that to an art.
Both materials are woven from Ultra-High Molecular Weight Polyethylene (UHMWPE). Dyneema and Spectra are brand names. Dan always has Spectra in stock, while the supply of Dyneema often fluctuates in the marketplace. These materials are also used in the construction of bulletproof vests and body armor, so you can see they are the perfect material for a backpack. However, the material is expensive and using either will more than double to cost of a pack. The only reason I didn’t get a fully woven UHMWPE Bump is because Joyce would figure out how much I paid for the Little Big Pack 🙂 plus I didn’t need as durable a pack for short trips that would be used less often than my full Dyneema pack.
If you can afford it, I highly recommend full Spectra or full Dyneema as a backpack material.
Note: DSM, which makes Dyneema, bought Cuben Tech (the makers of Cuben Fiber). That material is now called Dyneema Composite Material and is not to be confused with fully woven Dyneema. For a more detailed explanation, see this article I wrote a few years ago, Cuben Fiber, Dyneema, and Economics.
Webbing
Here again, you have the choice of over a dozen different colors.
Thoughts on Pack Suspensions
Backpacking is a hobby. There are no rules, except we should strive to stay warm, dry, and safe. There is no “right” way to hike. My opinions are mine and not everyone will agree. So here goes . . .
Here is a common question I often see on the Internet, “I need a pack that weighs X ounces that can carry Y pounds.” Sometimes that “Y” weight is the base weight of gear. Base weight is the weight of the pack and contents excluding consumables such as food, water, and fuel.
I’m sorry folks, no one can backpack with just their base weight. You need to carry food, water, and usually fuel for a stove. This concept of base weight is just crazy. What matters is how much everything weighs when you put on your pack. I can go on, but I’ll just link to another post on the subject, It’s Time to Shit-can the LW, UL,SUL and XUL Labels.
One of the reasons I first contacted Dan was due to the miserable experience I had in just three years with several popular ultralight backpacks. I had destroyed a couple just from hiking off trail, two others had major seam failures because they couldn’t handle the weight carried (even though the weight did not exceed the manufacturer’s specifications), and none of them were convenient to live out of.
Bottom line was these packs limited where and how many days I could hike on any given trip.
All of these packs were frameless or had flimsy inefficient frames. The frameless packs were all uncomfortable with weights over 15 lbs., the light frames uncomfortable over 20 lbs.
Dan has a reputation for making packs that carry comfortably. His model line is graduated from small light loads to the largest and heaviest loads.
Dan does not make frameless backpacks. It would be more accurate to say he makes internal frame packs whose internal frames can easily be removed, should one want to do that. There are some facts to be considered:
- A McHale pack with a frame carries a 15 lb. load much more comfortably than a frameless pack.
- A McHale pack with a frame carries a 25 lb. load much more comfortably than a frameless pack.
- A McHale pack with a frame carries a 35 lb. load much more comfortably than a frameless pack.
Our bodies are not designed to carry much weight on our shoulders, weight that is transferred to our spine. To be more exact, our spines are not designed to carry a lot of weight. Weight belongs on the hips where it can be supported by the large muscles in our legs.
Some folks will argue they are UL hikers and don’t need a good frame, or a frame at all. Well, sure, if you only hike on weekends or just a few days at a time. How about a 10, 14, or even a 21-day trip without resupply? Those are the best kinds of trips. If one carries 1.5 lbs. food per day, the food alone will weigh anywhere from about 15–30 lbs. Carry 2 lbs. per day your looking at a possible range of 20-40 lbs. of food alone, depending on the length of the trip. Add some water, fuel, and gear; it becomes easy to need a pack that can carry close to 50 lbs.
Of course, many people just refuse to have a total pack weight over 20 lbs. and simply limit themselves to where they can go and for how long.
I touched on this subject in this post, Backpacks: less is not more.
If we forget about base weight, and we should, it isn’t unreasonable to have a pack that can comfortably carry over 30 lbs. It will expand the options for backpacking trips.
Thoughts on Total Pack Weight
No matter how much a pack weighs, the large muscles in our legs have to carry all the weight of our body and our pack. That is a simple concept.
Some people will point that out, and argue that a total pack weight of 30 lbs. is superior to 34 lbs. But let’s look at a more comprehensive picture: if a hiker weighs 185 lbs. then the total weight our body must support is 205 lbs. versus 209 lbs. The heavier backpack will increase the total weight by less than 2 percent. Will our body notice a difference of 2 percent? Hardly.
I have found, and many agree with me, that a total pack weight of 20 lbs. in a frameless pack causes some discomfort during the day on a long hike. I get soreness in my neck, shoulders, and even my lower back. Discomfort is a sign that the body isn’t designed to do this. If instead I carry 23 lbs. with a well-designed internal frame pack, I feel no discomfort and my legs don’t feel any more tired with the extra three pounds.
The Spreadsheet or Backpacking Weight App
The only downside to my philosophy and experience is the extra weight of a good pack will destroy a spreadsheet where one wishes to define themselves as a light weight, ultra light weight, super ultra light weight, or even extra super ultra light backpacker. In this age of social media, it seems important to present one’s self as a proponent or member of an elite group of hikers, instead of just going out and enjoying a nice trip.
Using a spreadsheet isn’t necessarily a bad thing. I use one and explained how and why in How to Excel in Backpacking. Okay, back to McHale packs.
Frames
McHale uses 7075-T6 aluminum for backpack frame stays. Not many companies use the stuff because they are trying to cut corners to save weight. The metal is tough. I had to bend mine quite a bit to fit the extreme curvature of my back and that took some effort. It will flex a little bit under a heavy load, but it will pop back to its former shape when the load is lightened. McHale stocks quite a few different dimensions (thickness and width) so he can match each frame to the load needs of different packs and perhaps more important, he cuts and finishes each stay to match each customer’s individual torso length fit.
Pack Durability
I’ve own these packs for 9-10 years. They last. I can think of no better testimony than this guy, a member of a Search and Rescue team, whose McHale pack, which weighed about 75 lbs. with specialized gear, tumbled down a mountain 1,000 feet and the only damage was a tear in the material from the impact of his ICE AXE, which was attached to the pack. Here is his story.
If you read the above link, you’ll probably agree with me that it’s impressive. Part of the reason that pack was able to survive the fall is because, along with quality components, main seams run between 5/8 to ¾ of an inch, which is more than double any pack I have ever owned. The stitching is impeccable, and probably has way more stitching than is needed — certainly more than I have seen in any other pack. But Dan doesn’t want any of his packs to fail — ever.
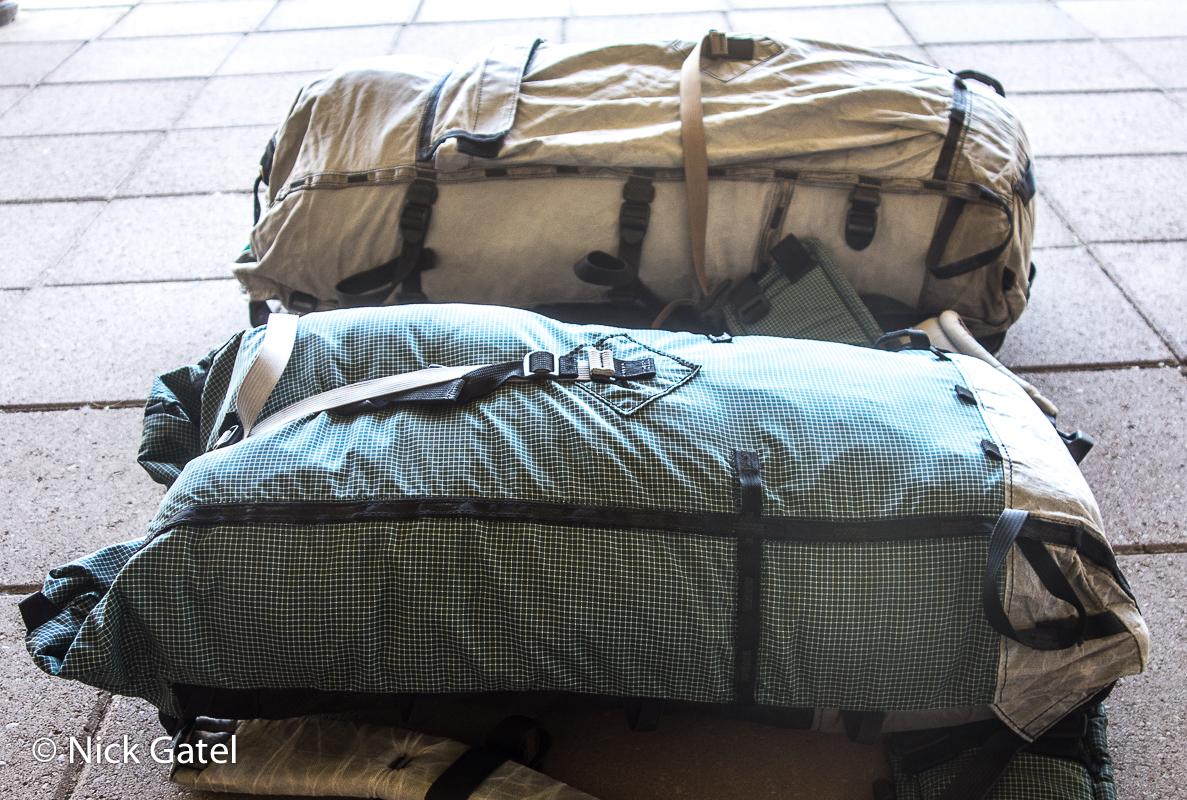
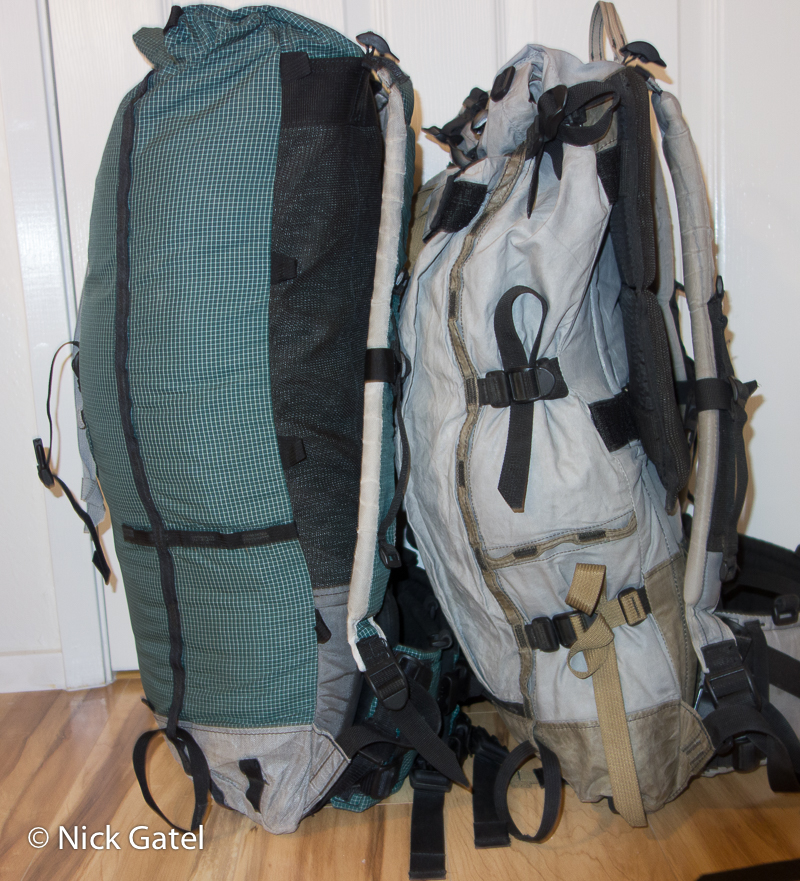
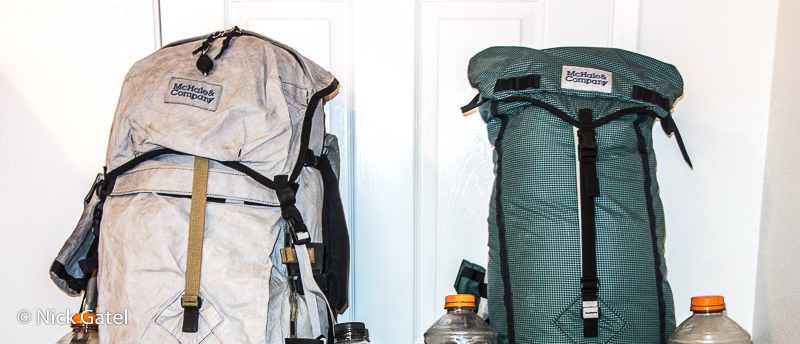
The Little Big Pack and the Bump

As you can see, both packs are the same height.
Both have a drawstring closure at the top and are rolled closed for use.
You can also order panel-loading packs for many models.
The LBP main bag, with a sewn exterior kangaroo pocket, is completely made from fully woven Dyneema. The bottom of the pack is constructed from a heavier denier fully woven Spectra.
The Bump main bag is made from Dyneema X Grid. The white grid in the material is Dyneema thread and the green is made from rip-stop nylon and has a waterproof backing. I think Dan is now using X Grid with Spectra thread. The bottom of the pack is constructed from fully woven Dyneema for durability.
The drawstring closure on both packs is made with heavy-duty materials and is double-stitched.

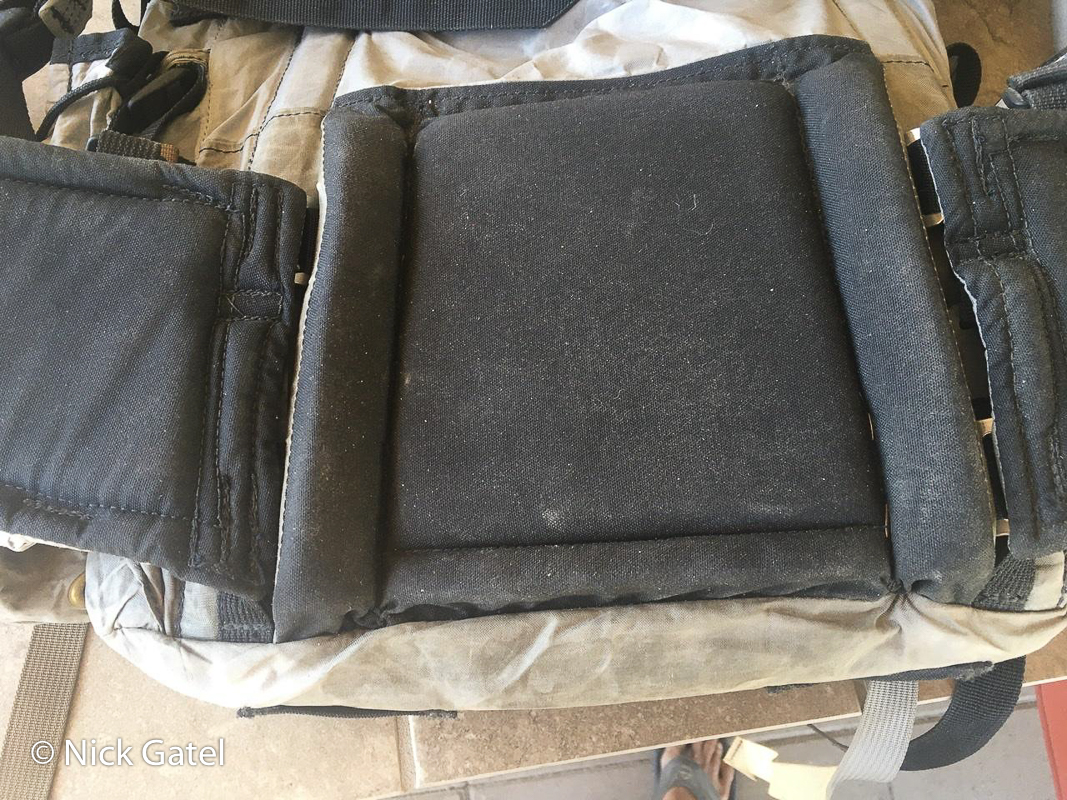
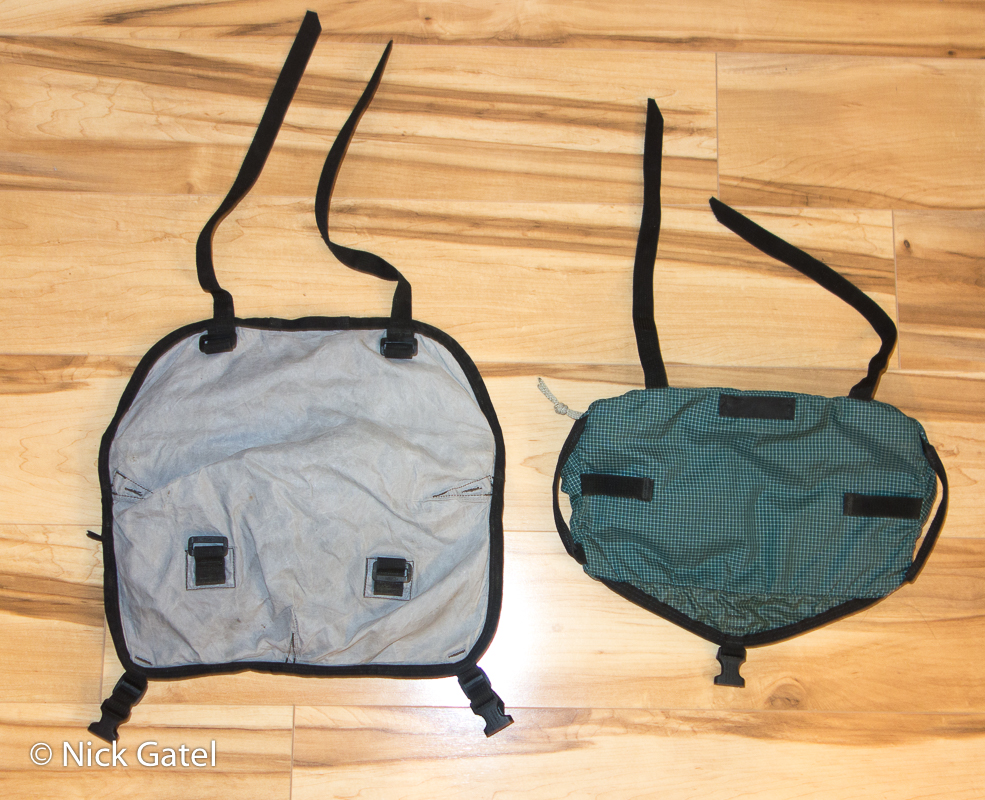
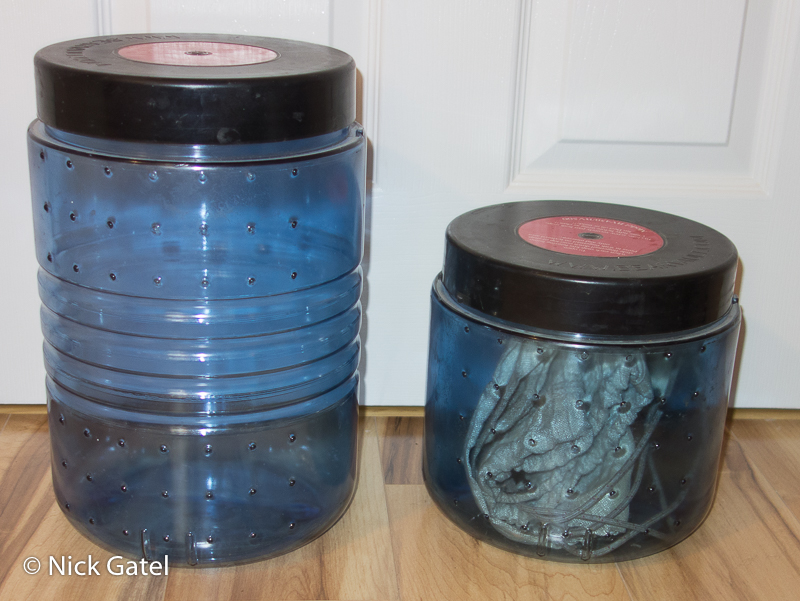
Foam Padding

The LBP foam pad is mounted on the outside of the pack with wide Velcro strips, allowing the pad to be removed from the pack and used as a sit pad.
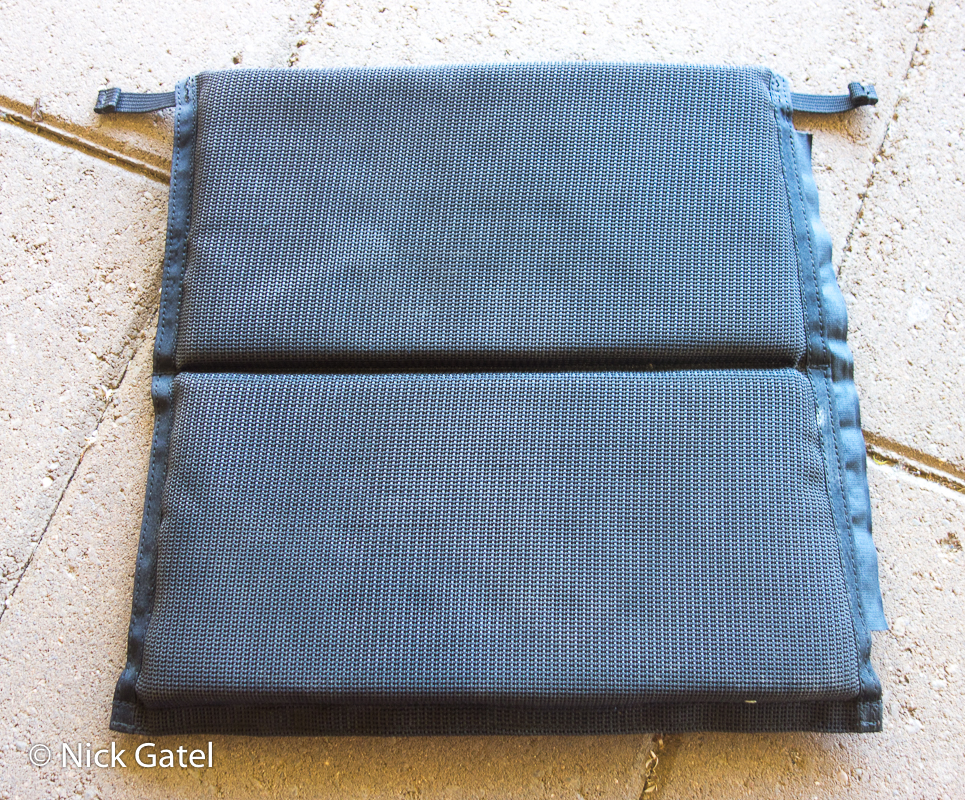
Above, you can see the fine mesh that rests against the hiker’s back. I don’t know what kind of material it is made from, but it is extremely bomber and tough!
McHale uses Evazote closed-cell foam for the Little Big Pack’s padding. It’s expensive stuff. The pads can be easily removed if for some reason one wants to do that (see below).

There are two nylon-webbing strips at the top that can secure the pad in a couple compression strap buckles, as shown in the center of the picture below.
I never attach the webbing to the buckle, making it easier to remove the pad to sit on. I never have problems with the pad staying in place.
The Bump (below) has an integrated foam pad, which fits into the inside of the pack, and the pad is removable. It also uses Evazote foam. I suspect the reason Dan designs his smaller packs this way is because the curvature of the pack’s structure (internal packs are really cylinders), works better. The outside of the pack is Dyneema X Grid, and covers the foam padding inside the pack, The same durable mesh material used in the LBP is sewn to the pack and covers the X Grid.

Below is a picture of the Bump turned inside out. This part of the foam pad sleeve is made from Cuben Fiber (aka Dyneema Composite Fabric). The long black stripes are the sleeves that hold the aluminum stays. The Bump’s foam pad is made from a thinner piece of Evazote foam than the LBP.
McHale Guide Harness
The bump has smaller dimensional (thickness and width) internal frame stays than the LBP, because the LBP can carry much more weight (all are the same length). I have comfortably carried over 30 lbs. in the Bump, and have no idea how much the LBP can carry, but it’s a lot! Both use the Guide Harness.

The shoulder straps are attached to the same spot as the top of the frame. So the top of the frame is almost even with the top of my shoulders, which pulls the top of the frame against my back. That is what we want. Dan calls this the “Guide Harness.”
As weight and volume are increased in a backpack, the top of the pack tends to start leaning away from the body. At the same time, there is “compression” and/or movement of the pack causing the connection point of the shoulder straps to the pack to slide down, putting more weight on the shoulders. This “compression” or movement can be one or more of: compression of frame stays or structure, slippage of hip belt, compression of foam in the hip belt, compression of material where a hip belt connects to the pack or lumbar pad, etc. Even an inch of compression can make a pack become very uncomfortable over the course of a day.
McHale P&G (Plug & Go) System
On larger packs like my Little Big Pack, one can get a full featured system that converts the Guide Harness to a P&G system using these three components:
- Q-Bayonet Main Frame Stays
- P&G By-Pass Harness
- P&G Bayonet frame extensions
I will go through each of these in the following sections. Dan does include an instructional DVD with his packs, demonstrating how to use the system.
On my LBP, the frame can be extended for heavier loads, which leads to a detailed conversation on backpack suspension. As stated at the beginning of this post, I’ll try to discuss how a backpack should work because that is a discussion that seems to have been lost today due to a continuing focus on how much a backpack itself should weigh, especially in the “Ultra Light community.”
With a pack that does not have “load lifters” the pack straps should be just below level with the top of the shoulders, level is usually okay. If straps are above the level of the shoulders, the back is too tall. The goal is to place around 80% (or more) of the pack’s weight on your hips. The little bit of weight supported by shoulders is mostly to keep the pack stable.
Stabilizer Straps or Load Lifters
To relieve the added shoulder strap weight and return the pack to its original postion against the body’s back, we use stabilizer straps. If the stabilizer strap is at a 45-degree angle from the shoulder strap to the frame, then it can lift the shoulder straps up if we loosen the shoulder straps a bit and at the same time pull the pack towards our body with the Load Lifters. We’re not really “lifting the load.” If the angle of the stabilizer straps is much less than 45 degrees, it won’t lift the shoulder straps, which normally means the frame is too small.
For load lifters to work, the frame must extend far enough above the shoulder straps.
Whether or not a pack can truly benefit from stabilizer straps is dependent on bag size, weight of gear, quality of a frame, frame height, hip belt construction and attachment, etc.
The Bump does not have load lifters. I don’t think Dan offers load lifters or an extended frame for his ultra light packs: the Bump or the Merke. They are not needed.
In the picture above, where I showed the proper fit of shoulder straps on my Little Big Pack, the pack does not have load lifters and the frame does not extend above the shoulder straps.So we need to change that for heavier loads, and this is where McHale’s P&G system comes into play.
What follows are the sections that describe the components of the optional P&G suspension system when heavier loads are carried.
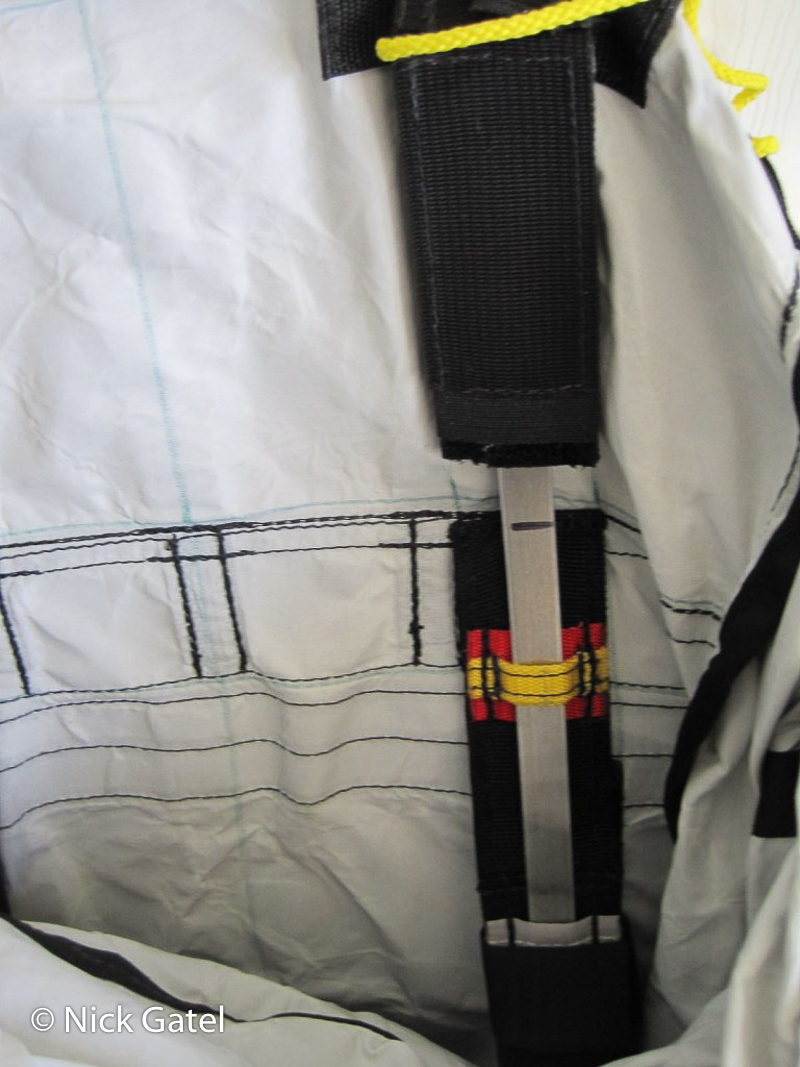
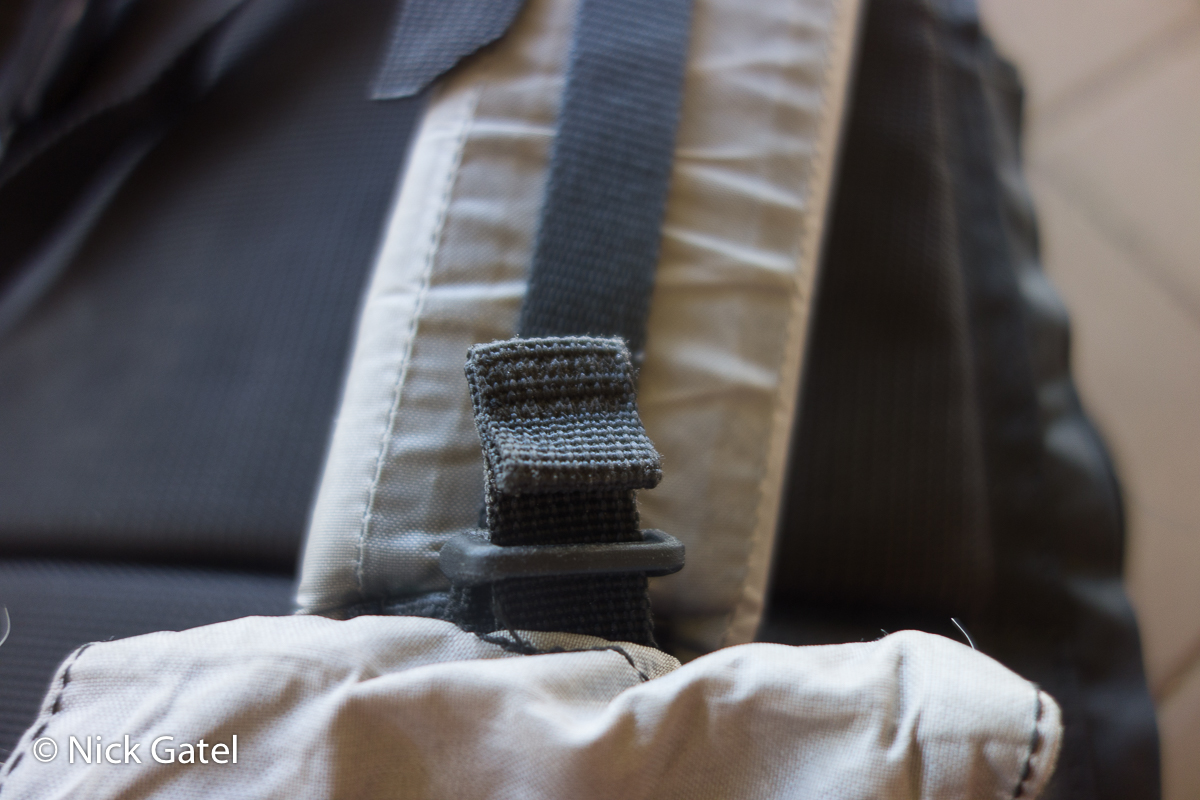
1. Q-Bayonet Internal Main Frame Stays

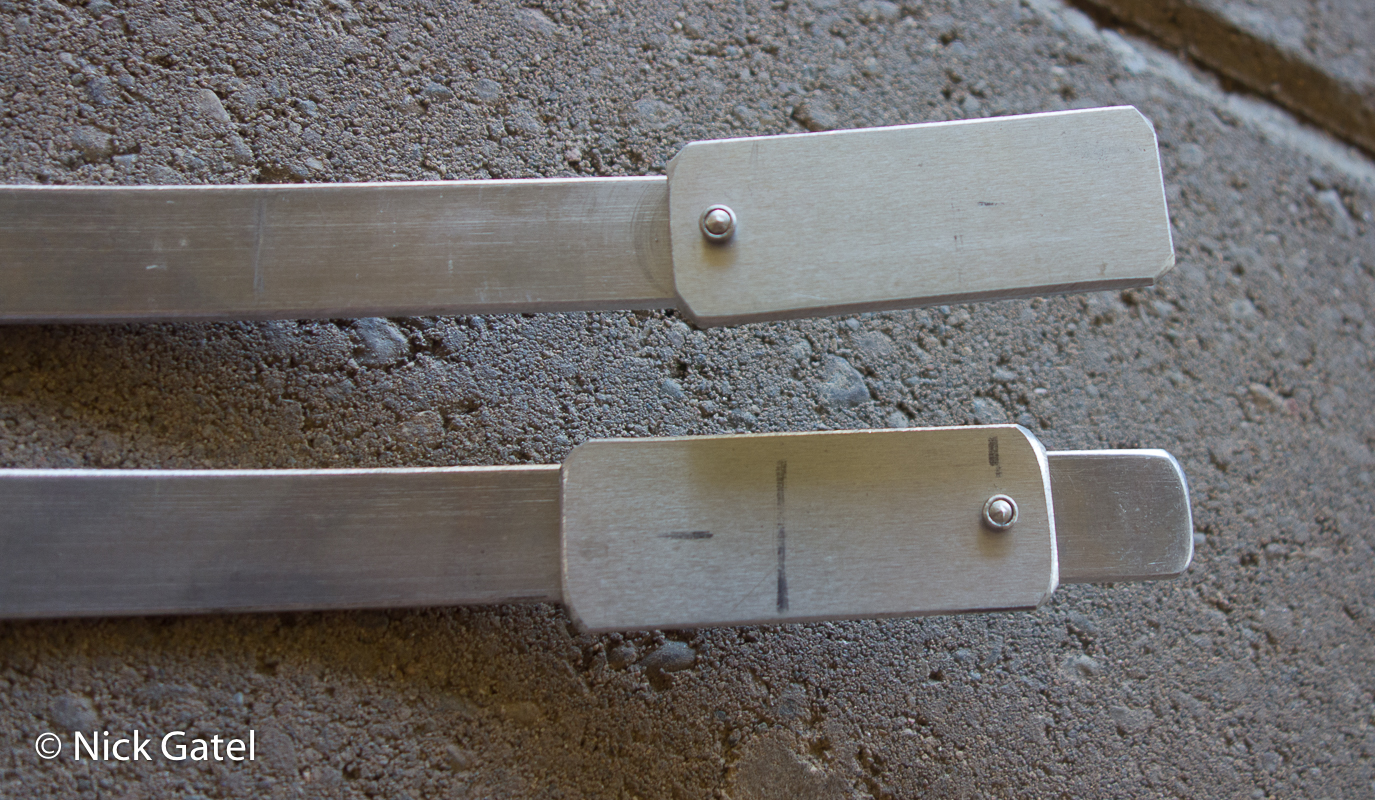
Earlier I stated that internal frames can compress with heavier loads. Should this happen, the torso length decreases and the pack cannot fit properly. Dan anticipates this, and sizes the width and thickness of the main frame stay for an inch of compression using what he calls a Q-Bayonet main frame stay. One could use super strong stays that could not compress, but they would be much heavier and could not be easily bent to conform the the hiker’s back.
The Q-Bayonet internal frame stay allows the frame to be increased in length by 1 inch. With a heavier load when a pack undergoes compression, the stay can be made longer so the torso length of the pack remains at its custom fitted design.
Below are the stays from the LBP. The top stay is longer than the bottom, to demonstrate the difference. Notice the exaggerated “S” shape of the frame stays. The curvature of my back is more pronounced than the average person. I have bent the stays to conform perfectly to my body’s shape. The top stay is one inch longer than the bottom one.

The picture below shows the Q mechanism. The top stay has been extend to lengthen it, and the bottom one is set for lighter loads without load lifters.
Pack Adjustment to Match the Stays
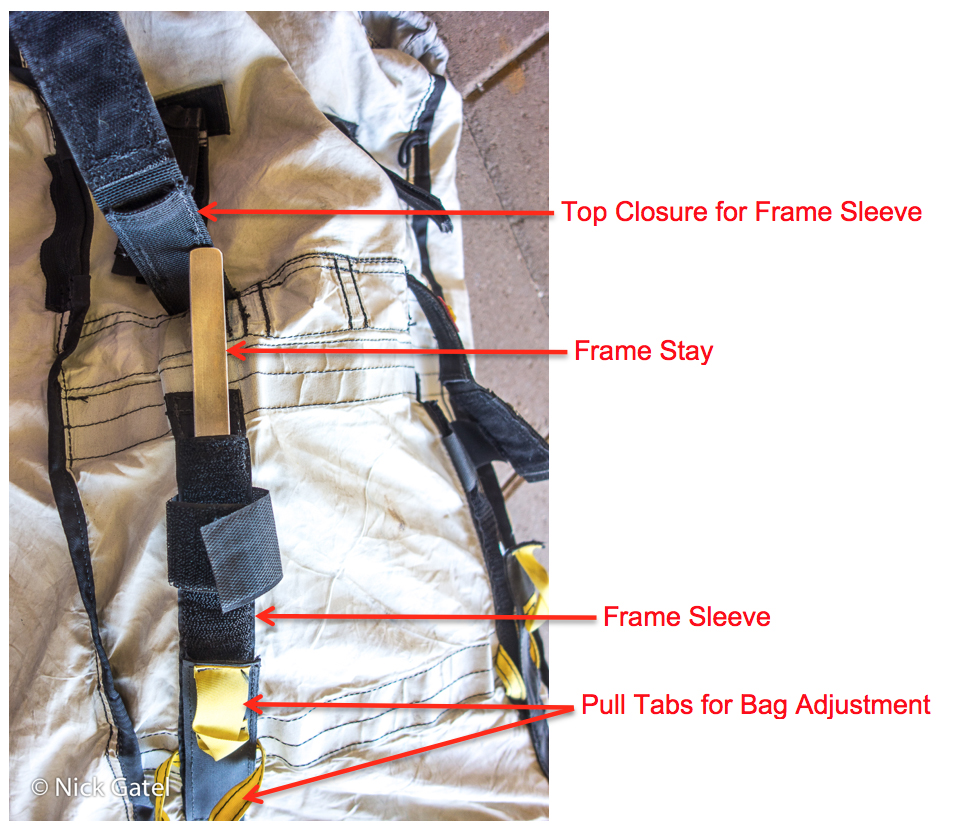
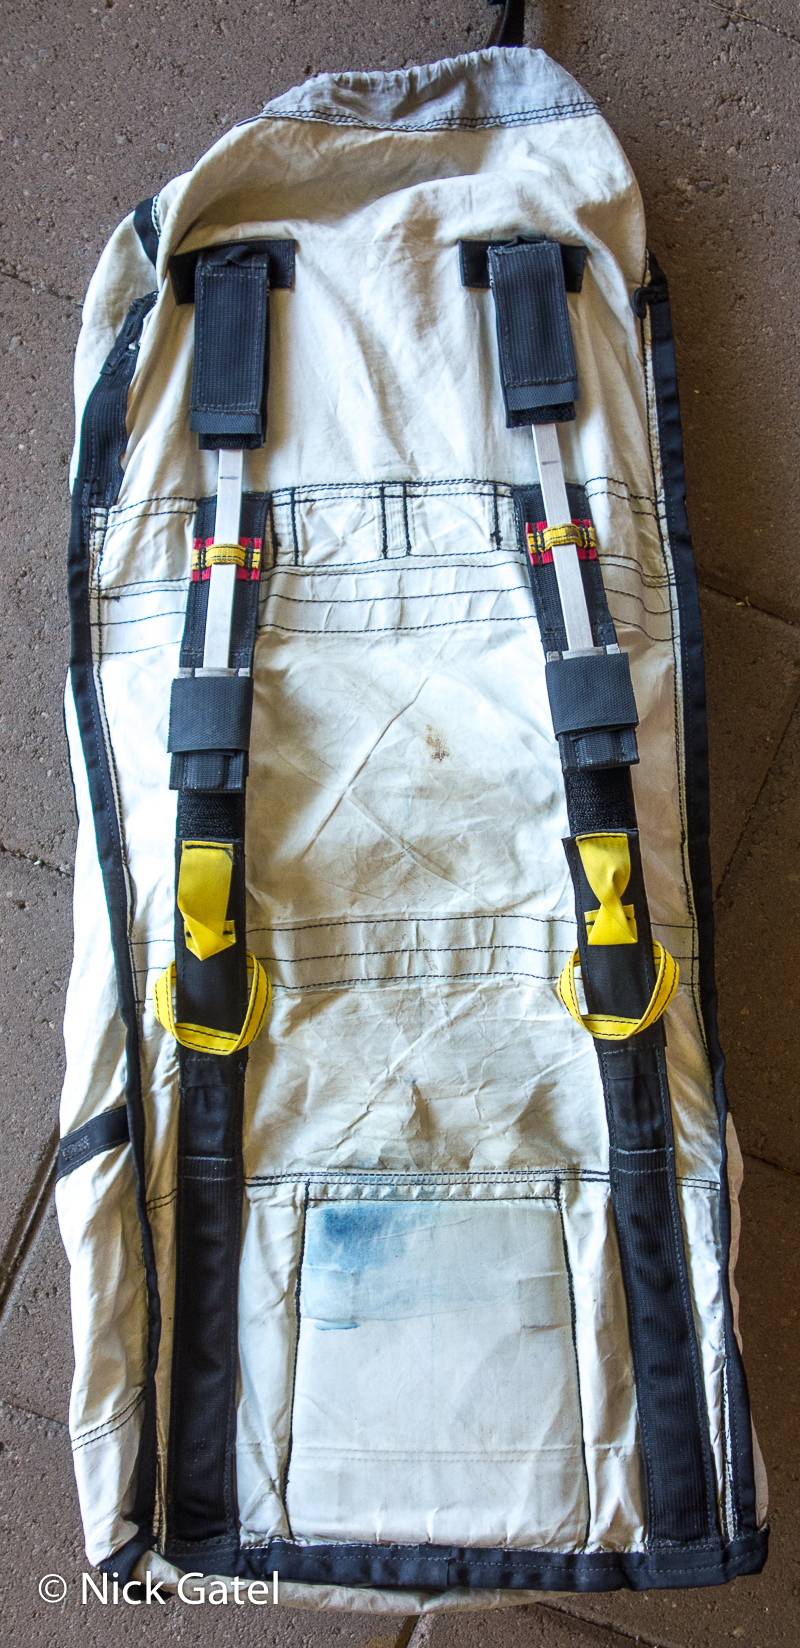
Because the stays have one inch of adjustment, the pack’s bag needs the ability to be adjusted – that is, the ability to shorten or lengthen the pack bag height. And of course, Dan has a system for that.
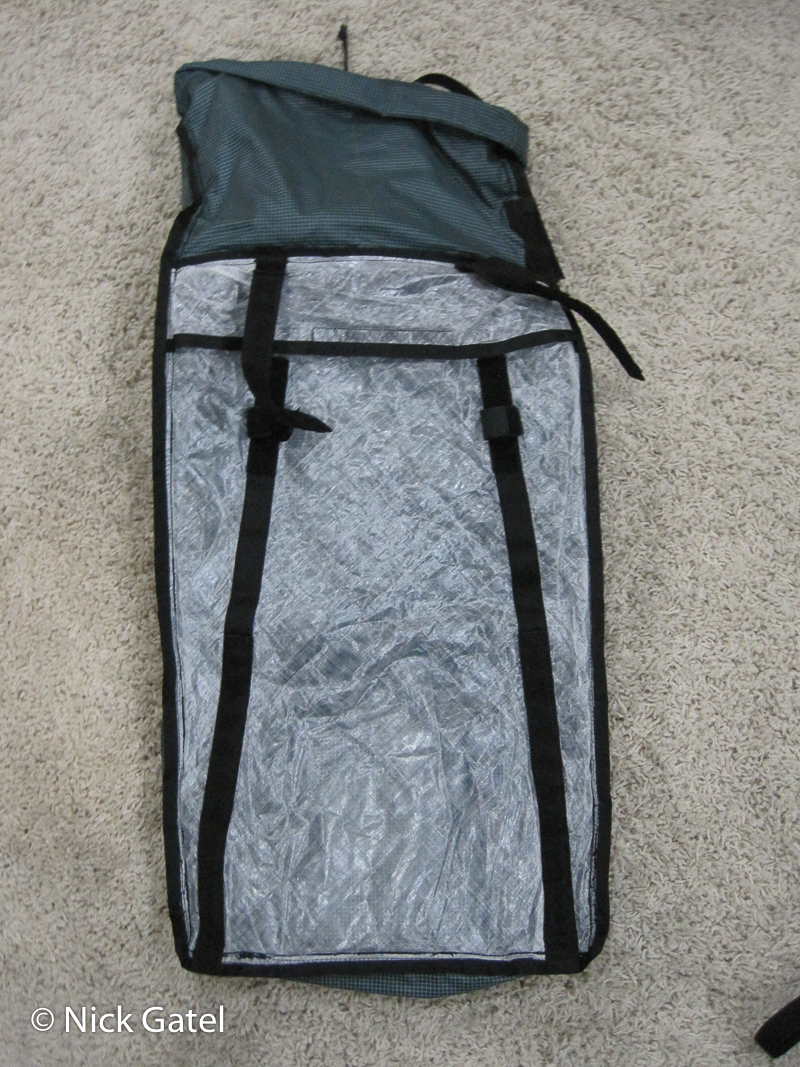
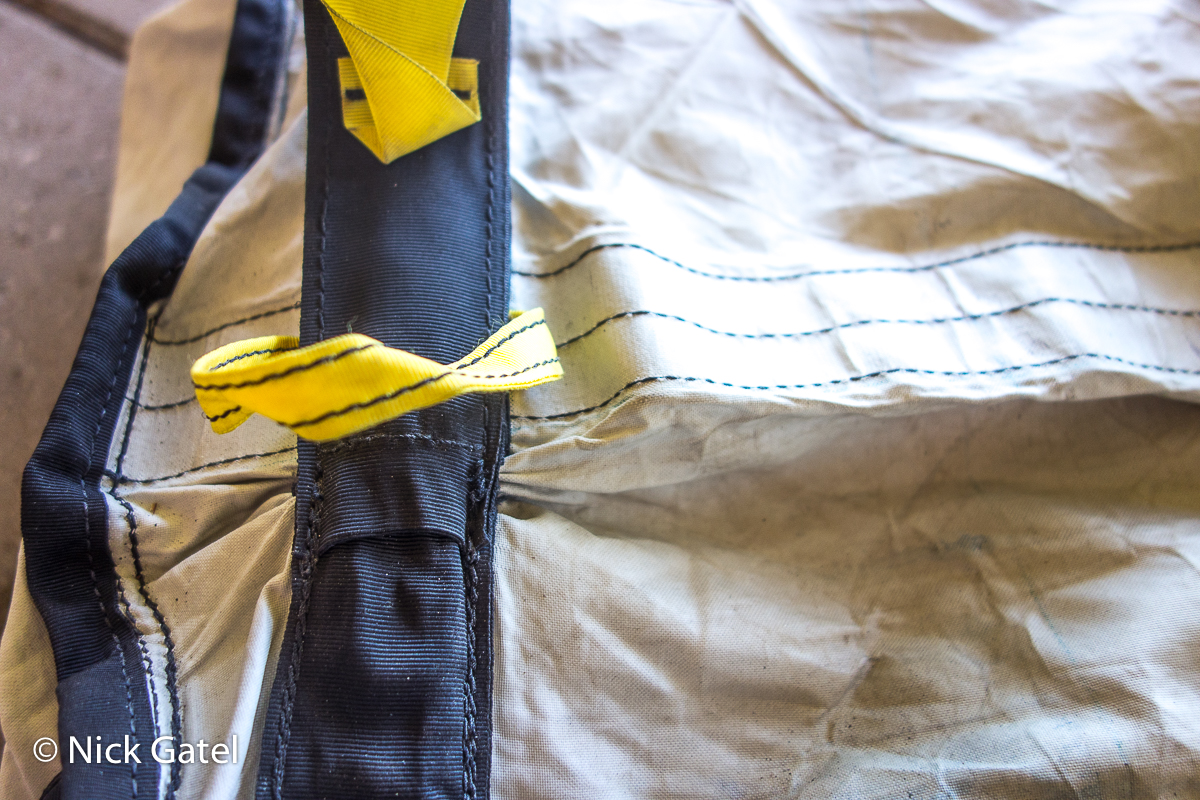
In the picture below, the pack bag has been turned inside out to show the internal frame system. At the bottom of the picture are two yellow “pull tabs.” By pulling the yellow tabs together, the backpack bag can be shortened by approximately one inch. Velcro is used to keep this adjustment in place.
This is the mode used with lighter loads without the frame extensions installed. Most of the time I use the pack in this mode.
The bag adjustment tabs have been placed above the location of the lower Velcro strip for the removable backpack foam pad. When the bag is shortened, the seams for the Velcro strip fold the bag at this point. Ingenious design and it doesn’t affect the padding on the pack of the pack. When I adjust this height, I don’t have to remove the back pad.
2. By-Pass Harness (Load Lifters or Stabilizer Straps)
Before the frame extensions are added, it is best to install the By-Pass Harness because one of the frame extensions can be used to insert the harness straps through the Guide Harness.
The picture below, from the McHale website shows how the harness looks.

The blue strap on top of the shoulder strap is the By-Pass Harness, or what most people call a load lifter or stabilizer strap. Unlike other packs that have the load lifter sewn directly to the shoulder strap, the By-Pass Harness is much easier to adjust.
The typical backpack requires the shoulder strap to be loosened, then the load lifter adjusted, then the shoulder strap adjusted, then the lifter strap adjusted. Often this requires the user to take the pack off each time adjustments are made to try and dial in the fit. With the McHale system, adjustments can be easily made without the need to remove the backpack for fine-tuning the fit.
An added bonus is the P&G Bayonet frame extensions and By-Pass Harness can be removed when not used.
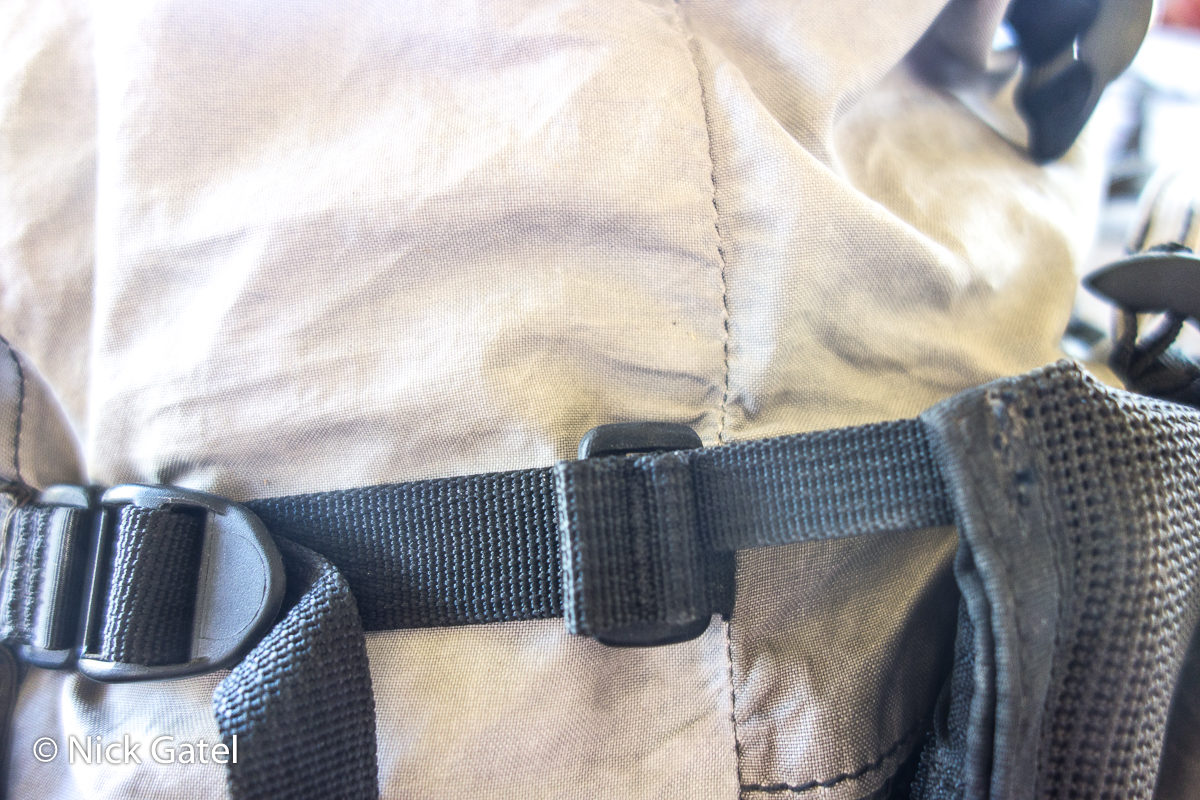
Installing the By-Pass Harness
This doesn’t take long. At the bottom of the pack, where the shoulder strap attaches to the pack, there is an additional hardware loop. The By-Pass Harness is routed through this piece of hardware.
The only “modification” I have made to this pack is to use a “sleeping bag strap” or lashing strap instead of the original By-Pass Harness. This way, I have two lashing straps should I need something like them in an emergency.

The buckle of the lashing strap fits snuggly against the hardware loop (see below) and the strap doesn’t change the function of the By-Pass System at all.
The By-Pass harness is routed through the back of the adjustable sternum strap assembly, then up to a buckle sewn to the pack at the top where it meets the location of the upper limit of the extension frame.


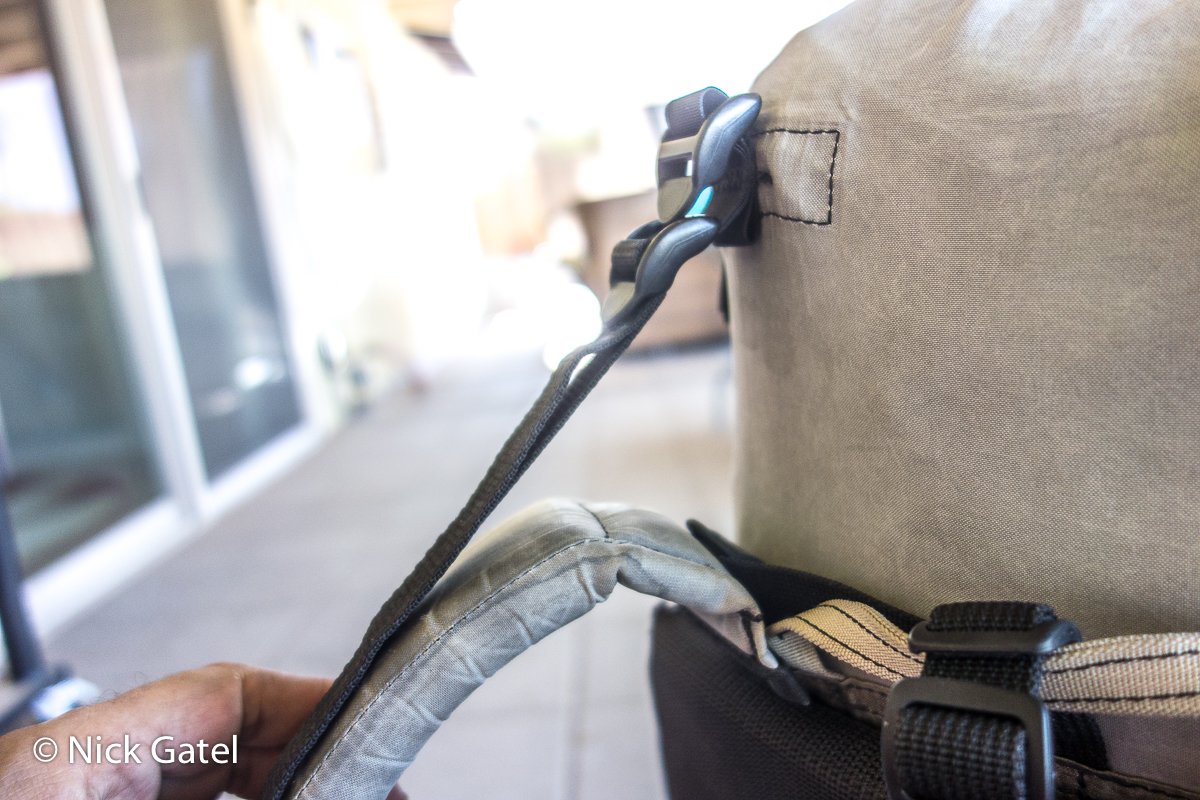
An important note here. If the By-Pass Harness is not ordered, it cannot be easily added later. The standard Guide Harness does not come with a sleeve to insert the By-Pass Harness. Below is a picture of my LBP shoulder strap with the sleeve (left) and the Bump shoulder strap (right) that just has webbing to adjust the sternum strap.

P&G Bayonet Frame Extension
The “Plug & Go” frame extensions allow the user to quickly extend the frame by about 5 inches. The extension bayonets are almost 12 inches long, which allows them to be securely inserted into frame sleeves without bending or shifting.
The pictures below show the steps to convert the pack into the P&G option, which only takes seconds to do.

The picture below shows the LBP inside out, with the Q-Bayonets and P&G Bayonets installed.
Finally fitting and adjustment.
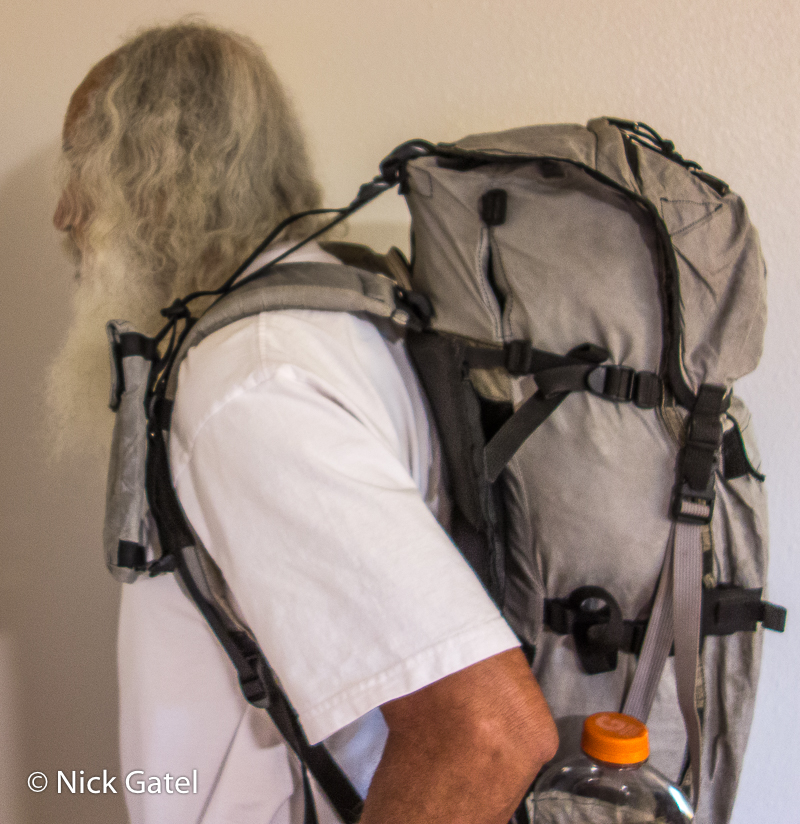
The frame has been extended by about 5 inches and the stabilizer strap (or load lifter) is at a 45-degree angle from the connecting point on the shoulder strap to the top of the frame. Also the shoulder strap has wrapped a little more around my shoulder with the weight, this is what it should do . . . but not too much.
To be honest, I don’t use the P&G system very often, except on winter snow trips when I am bringing my heaviest tent and snow equipment, or on long desert trips where I may need to carry 2 to 3 gallons of water between water sources. If you are buying a LBP or larger pack, I would suggest getting the P&G system because it extends versatility.
Daisy Chains
Lashing gear to the outside of a pack isn’t ideal. Doing this moves the center of gravity away from the hiker’s body, and external gear can get caught on shrubs and other obstacles, especially when walking cross country off trail. On the other hand, you can’t fit snow shoes inside most packs.
If you scroll through the 100+ backpacks on REI’s website, you will see very few packs with daisy chains. Same for most small cottage companies that build and sell backpacks. What you will see is a lot of packs with flyweight mesh pockets. I’ve had a couple of these and after a couple of years of use frequent they rip apart and fail. A better option, in my opinion, are daisy chains.
Daisy chains are long strips of webbing or other material that are sewn to the front of the pack creating loops for attaching gear. Usually the daisy chain is sewn every inch or so, creating a series of vertical loops.


Both of my packs came standard with daisy chains to attach accessories and gear. If you look closely, you can see the LBP in the back of the picture has compression straps on the side. I asked Dan not to put compression straps on the Bump.
However, one could use cord to make a compression system on the Bump, as there are three loops on the seam at the back of the pack. A sample is shown below, but I have never done this on a trip.

There is a horizontal daisy chain used to attach a water bottle holder on both packs. The LBP is different from the Bump, because the horizontal daisy chain also connects to the adjustment strap for the top lid of the pack. Below is the bottom side of my LBP, with all the attachment points.
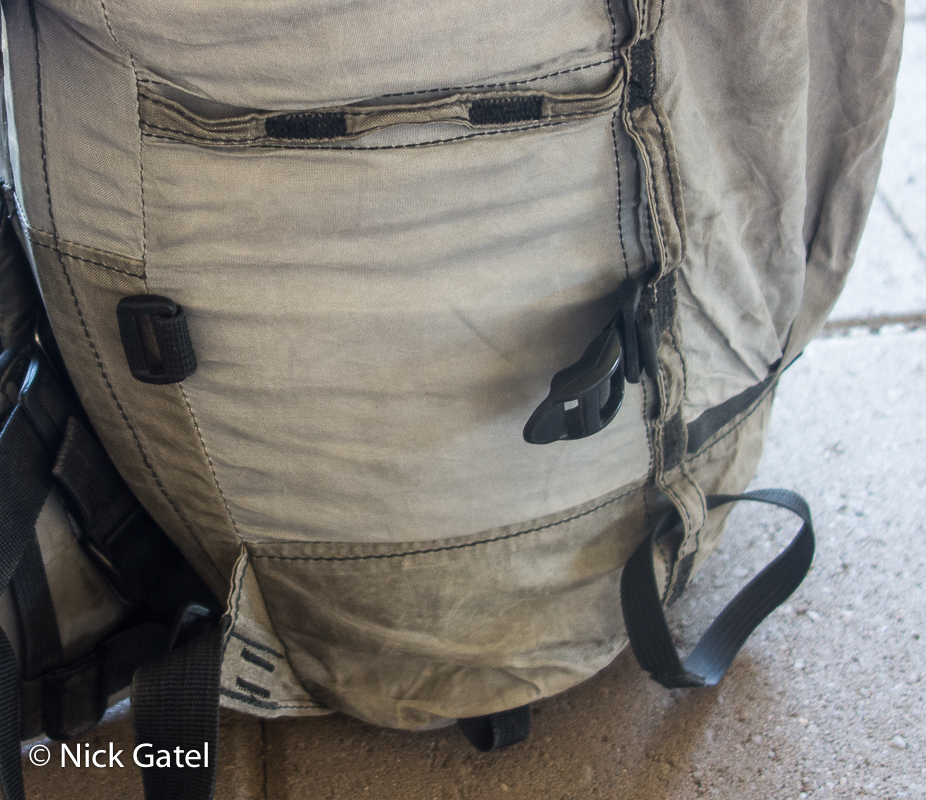
In the picture below, the light colored webbing is for the top lid. On each side of that strap the two water bottle straps are connected to the horizontal daisy chain.

At the bottom of the pack is a brown colored compression strap
The brown compression strap can be routed around the outside of the water bottle holder, should there be need to secure something else in the pocket (see below).
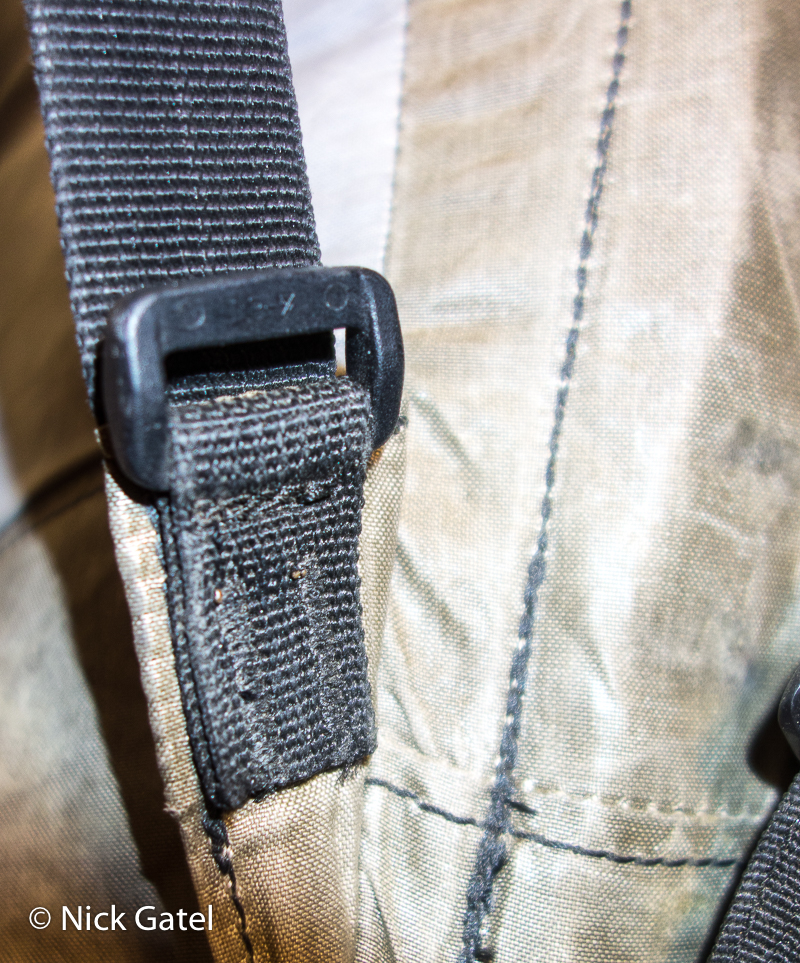
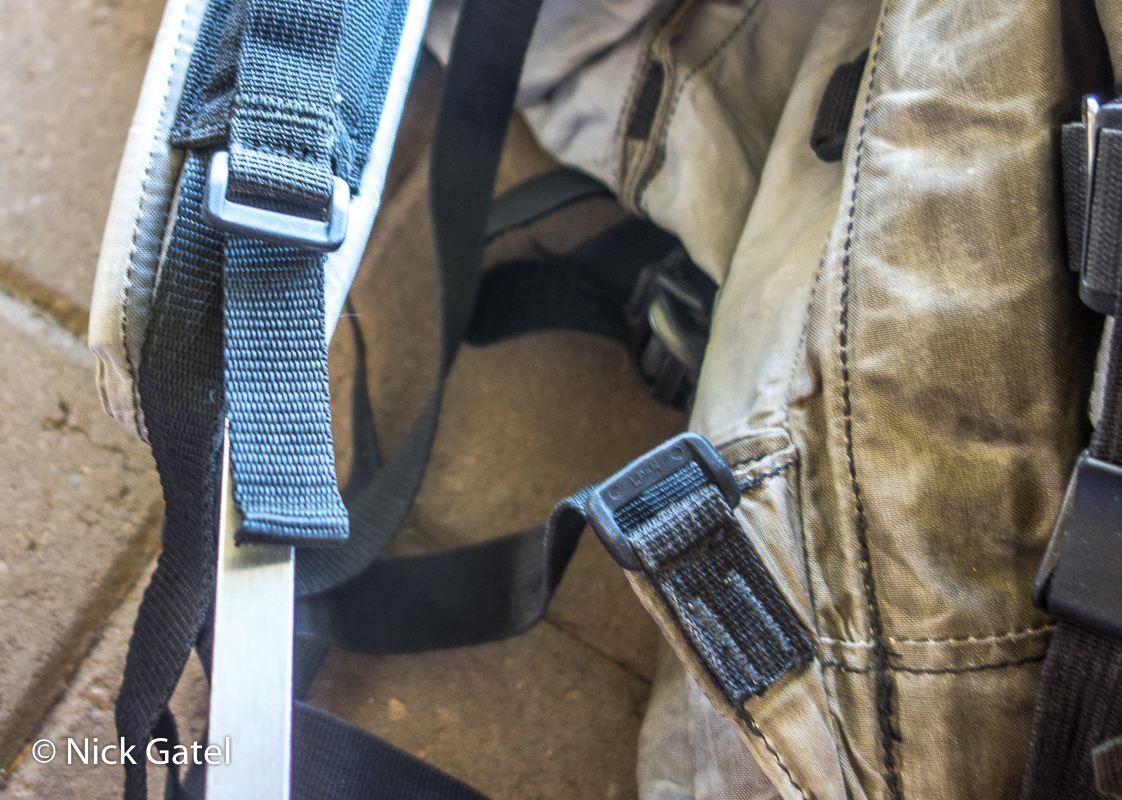
Daisy Chain Attachment Straps
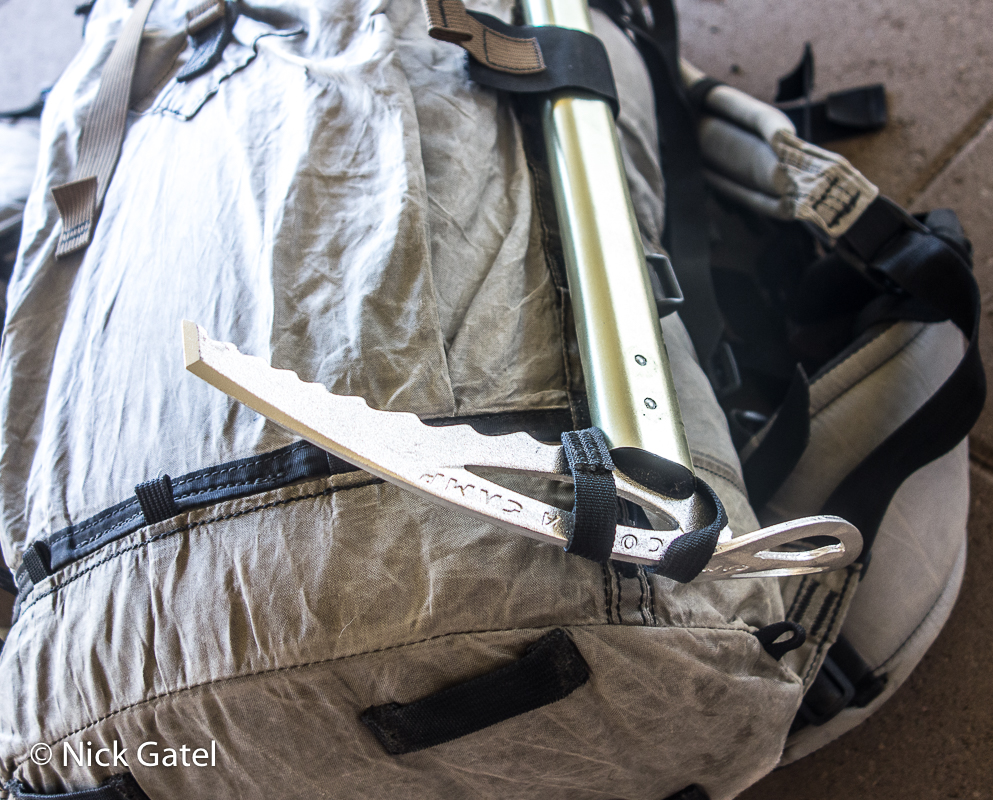
Both of my packs came with nifty attachment straps that are sized to fit snugly into the daisy chain openings.
The strap slides through the daisy chain, and a Velcro strap locks it into position. Then the strap can be wrapped around an item like an ice axe (both packs came with ice axe loops on each side of the pack).
These pictures demonstrate how the attachment straps work.


Loops and Attachment Points
Here there are many little attachment points. Both packs have three loops on the front of the pack where the bottom section is sewn to the top section of the pack.

On the Bump (below) the daisy chain continues from the top of the pack all the way across the bottom of the pack, if something needs to be lashed to the bottom. The LBP has four large webbing lash points.

“Clam Shell” Mode
The LBP came with attachment webbing on the bottom of the pack. The bottom of the pack can be folded over, with the straps adjacent to each other, then using a strap, they can be snugged up to help compress a small volume load. Dan calls this “clam shell” mode.

Kangaroo Pocket
I think these are standard on most packs, but I might be wrong. I specifically asked not to have one on my Bump, as I wanted a more minimalist pack.
The pocket on the Little Big Pack is approximately 11 inches wide, 17 inches long, and maybe an average of 2.5 inches deep.
It also has a draw string at the top in addition to the Velcro closure flap.

Shoulder Straps
The LBP is made of fully woven Spectra and Dyneema. The back of the Bump is made from fully woven Spectra with X Grid on the front.
Both are padded with Evazote foam, the Little Big Pack using a thicker foam.

Strap Connection to the Top of the Pack
On both packs, where the top of the shoulder strap attaches to the back, a heavy duty piece of webbing is used for the connection, and the end of the shoulder strap, where it attaches to the webbing, is reinforced with a piece of metal inside the strap construction to keep the strap itself flat.

Spacing of Shoulder Straps
The spacing is different on each pack: about 6.5 inches center to center on the LBP and an inch wider on the Bump. This is because of the difference in pack widths and works out well.
Connection of Shoulder Straps to the Bottom of the Packs
Most modern packs I see these days connect the bottom strap to a pack seam, mostl likely, because it is just easier and cheaper to sew. I have seen some sewn to the top of the hip belt to keep the sides of hip belt from interfering with the shoulder straps.
If we think about this, the best place would be to attach the shoulder strap where the bottom of the frame terminates at the bottom of the pack. But some pack builders don’t put their frames at the outside edge of the pack, as does McHale. Some use a single stay in the middle and others just use a “frame sheet” instead of stays.
Both of my packs attach the shoulder straps at the bottom of the pack at the outside edge of the stays, and the construction of the hip belt, plus any hip belt pocket will not interfere or rub on the shoulder strap.

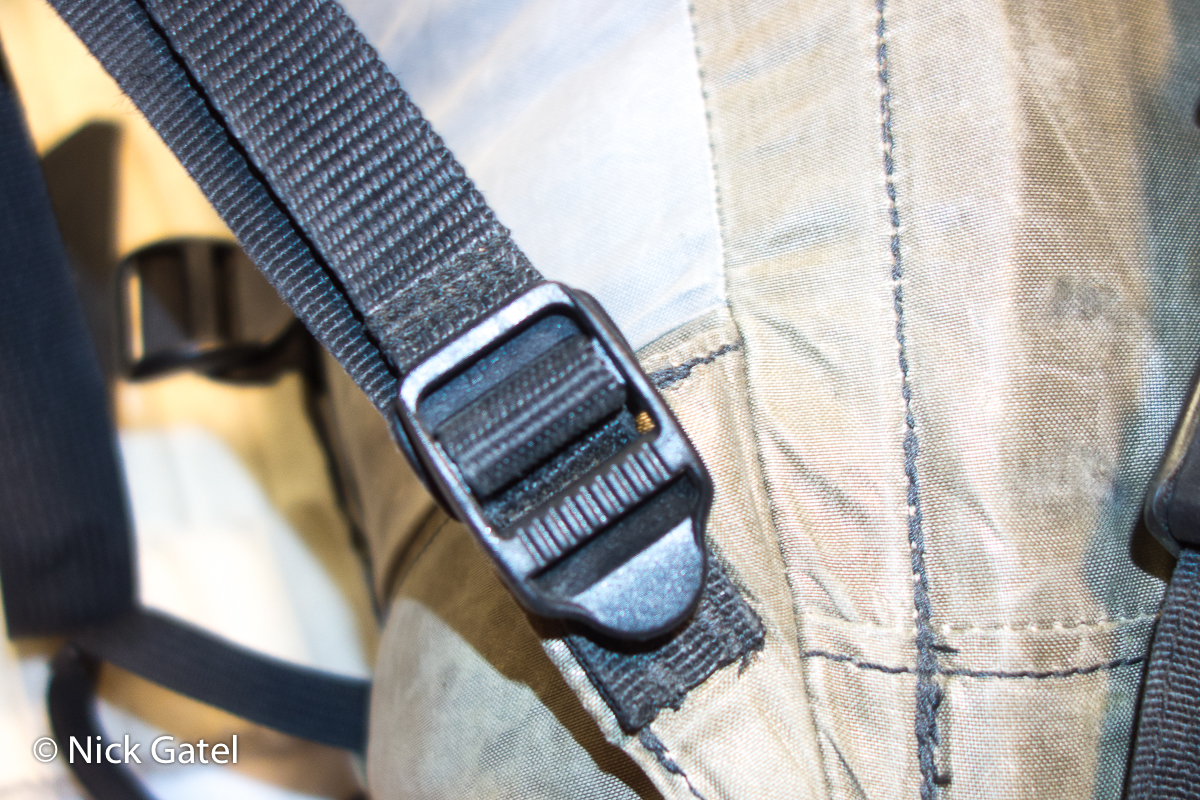
Sternum Straps
These were standard on both packs and use a sliding ladder lock buckle to keep them from moving.

Hip Belts
McHale pack owners rave about the hip belt. Knowledgeable backpackers, who have never seen a McHale backpack, know there is something special about it.
When I first received my demo pack, I loaded it with 30 pounds of gear and went on a strenuous 16-mile hike, one of my favorite loops. This hike traverses high desert, ascends to conifer forest, descends along a ridgeline down to desert requiring a long section of off trail walking. When I got back to my vehicle, I knew the belt was special. Even though I had not yet got the frame stays adjusted correctly to match my back, I had zero discomfort or soreness on my hips.
The belt design is only as good as the rest of the pack. Sewing a McHale hip belt on a poorly designed backpack won’t overcome all the deficiencies of a pack.
A hip belt should carry almost all the load, it should fit snug with little or no slippage, it should be comfortable and not too thick to interfere with shoulder straps, and it should not cause any pain, soreness, or bruises. The McHale double-buckle belts meet all these criteria.
Below is a belt on one of my external frame packs.
The belt is too thick and the lumbar pad is rather small. I would prefer a wider lumbar pad, but then the hip belt might interfere with the shoulder straps. There is too much open space between the back of the belt and the pack frame.
The top of the lumbar pad is 4 inches wide and tapers to 5 inches at the bottom. The lumbar pad is 5 inches tall. This isn’t going to provide much lower back comfort or support (it tends to slip down with heavier loads).
Also, the padding is rather thick. Lastly, the inside of the belt is made from a mesh material that is not going to last 40 years like the original did. But the belt fit an obsolete pack and only cost about $20. You can read about these Kelty upgrades in this post.
Overall, the Kelty belt works “okay” and is an improvement over the original belt in comfort, but probably not in longevity.
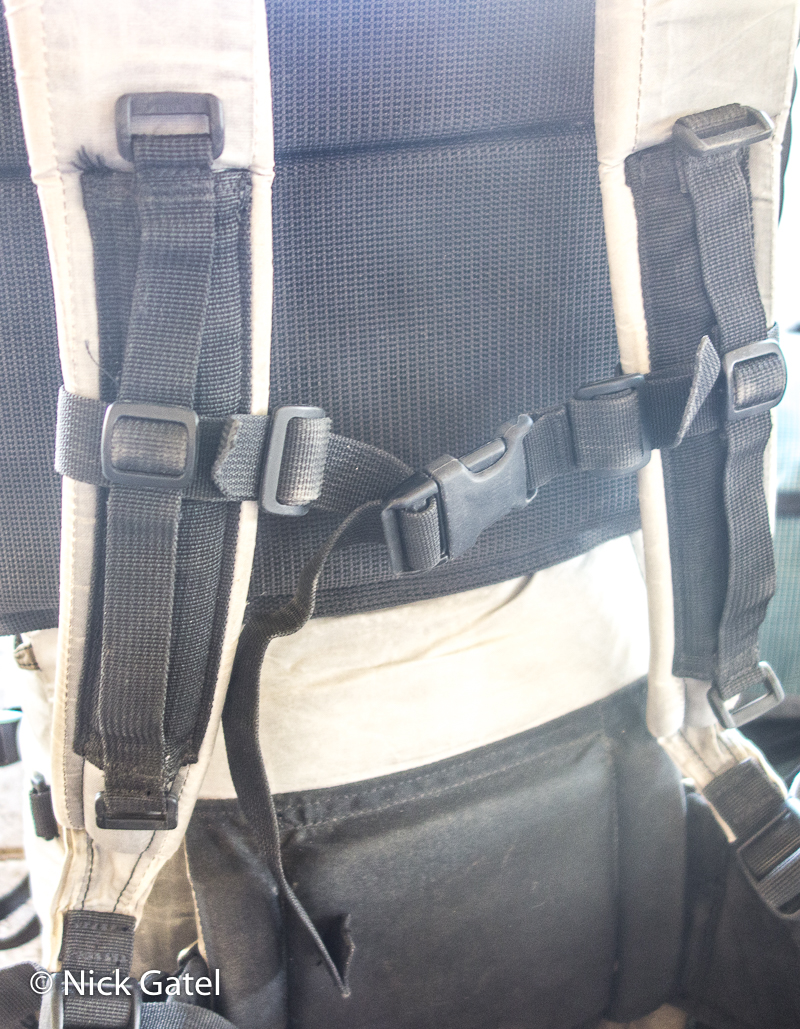
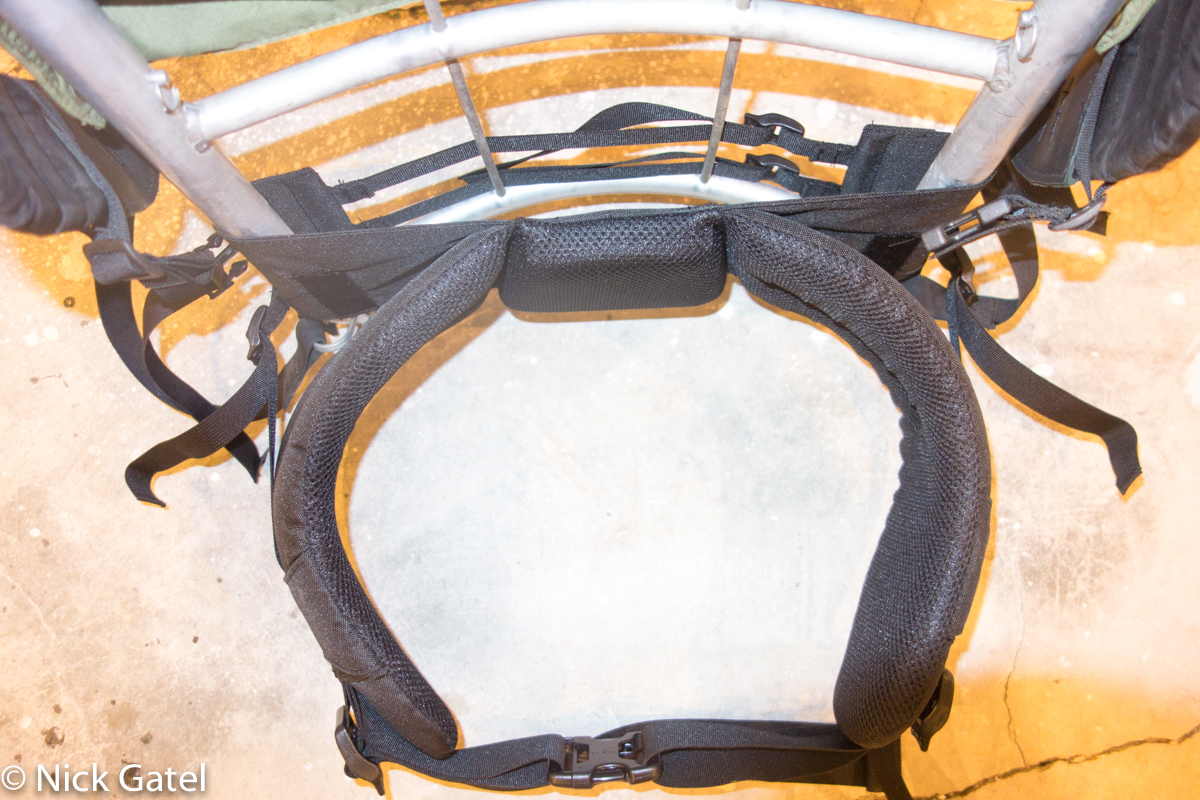
Both of the belts on my two McHale pack are the same size. The lumbar pad is 8 inches wide and 7.5 inches tall. Where the belt connects to the lumbar pad, sturdy metal hardware and strong webbing is used.
Because McHale use expensive Evazote foam, the belts can be thinner and more comfortable at the same time. Evazote makes foam from various polymers and density. It is not just a matter of selecting this brand of foam, but selecting the proper material, density, and thickness for the application. Including the fabric covering of my hip belts, the Bump is ½” thick and the LBP ¾” thick. As a comparison, the belt on the Kelty pack (picture above) is 1 and 5/16 inches thick.
The material covering the lumbar pad and the inside of the McHale hip belts is extremely strong, non-abrasive to the body, and has enough friction to keep the belt from slipping.
The back of the belt, where it attaches to the lumbar pad, is 5 inches tall, tapering to 4 inches in the front where the buckle webbing is sewn to the belt. The use of double buckles helps adjust the top and bottom belt tension independently to ensure the belt cups the hipbone.
The connection at the lumbar pad allows the belt to wrap easier around the hips, plus the thin foam helps the belt to hug the hips. And lastly, as mentioned earlier, the location of the hip belt does not interfere with the shoulder straps, even if a hip belt pocket is added.
The McHale belt is intricate in design, complex to assemble and sew, and expensive to manufacture. Over the past few years I’ve seen competitors imitate some of Dan’s belt design and even the attachment of the lower shoulder strap. But they all just take bits and pieces of the designs, use lower quality materials, and simply don’t accomplish what a hip belt should do.
The Bump’s and the LBP’s hip belts are almost identical, except the Bump uses thinner foam and smaller webbing and buckles than the LBP. This makes sense because the LBP can carry a lot more weight. When I wear either pack, I don’t notice any difference, because each belt was designed for the size and load carry capacity of each pack. Hopefully, I’ve done a decent job of explaining the McHale belts. If so, the pictures below should be self-explanatory.


Hip Belt Stabilizer Strap
This is something that isn’t well understood.
Below is a picture from one of my external frame packs, which poses an extreme example of why a hip belt stabilizer strap is needed on many packs.

Because this belt has such a small lumbar pad and the belt is sewn to the lumbar pad, there is a huge gap between the belt and the plane of pack’s frame. The stabilizer strap is needed to try and keep the pack from moving side to side and the hip belt from twisting.
Depending on pack and hip belt design, stabilizer straps do one or more of the following: limit the pack from swaying side to side, pull the bottom of the pack closer to the body, stop the hip belts from twisting, and help weight transfer from the pack’s frame to the belt.
For the most part, my McHale packs don’t need any of these kinds of assistance, because everything else is so well designed. However, the belts do have a small stabilizer strap, and unlike all packs that have stabilizers perpendicular to the frame and parallel to the belt, like the picture above, my McHale stabilizer strap is parallel to the frame and perpendicular to the hip belt.
First of all, the lumbar pad is almost as wide as the distance to the inside of each internal frame stay, and the pad is sewn directly to the pack material.
The bottom of the stabilizer strap is sewn directly to the bottom of the frame sleeve, where most of the weight for the pack is. This strap connects to the middle of the hip belt at the very back, where the hip belt is next to the pack itself.
In the picture below, I have removed the strap from the adjustable buckle just to show how it works. This strap never needs to be adjusted. It is there so the hip belt can easily be removed, should the owner need to remove it for some reason or replace the belt.


Optional Accessories
Many optional items are available. For both my packs I opted for just a few, and I often don’t use any of them.
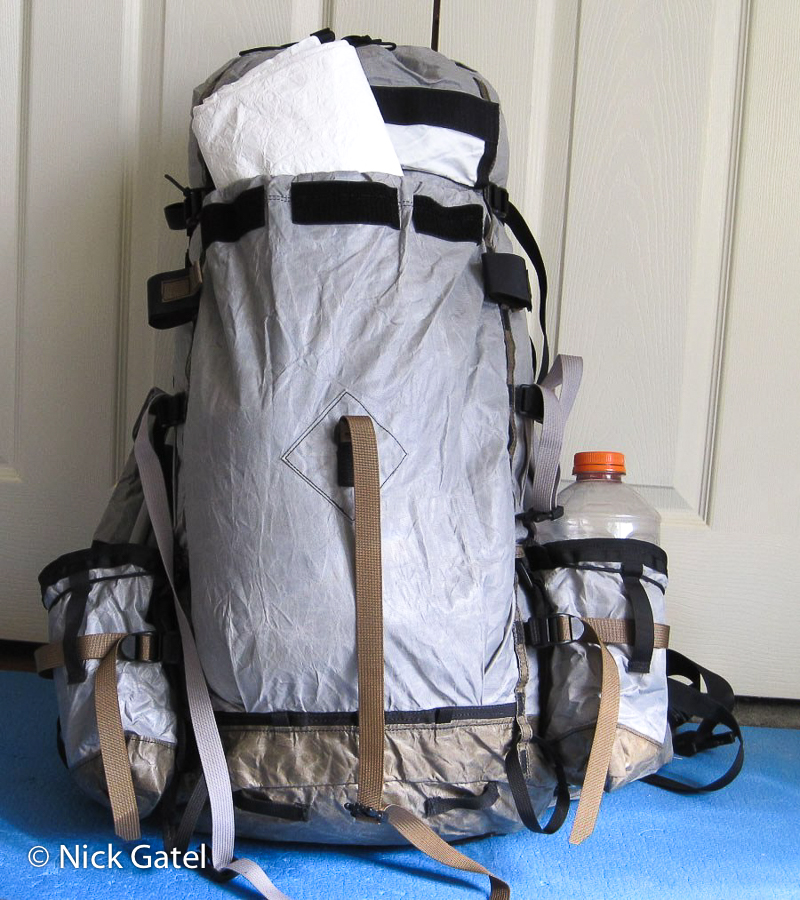
- Large Water Bottle Holders
- Hip Belt Pockets
- Shoulder Strap Pocket
- Top Lid
Some of the above come standard and some are extra. For example, I bought a larger top lid for the LBP and extra large Water Bottle holders.
Top Lids
Both have water proof zippers.

The LBP top lid has four attachment points to the pack, the Bump has three.

Both pockets turned inside out (above). The LBP has two tabs for attaching things, such as a car key. I added mini-biners. The Bump lid has an extra internal zippered pouch.
Shoulder Pocket
These can be ordered in several sizes and can even accommodate some small binoculars.
The pockets have rather large strips of Velcro to hold the flap down, so the contents stay secure. Below (left) is the pocket with the flap open.
The backside has web tabs to quickly attach to the shoulder strap hardware (the hip pockets use the same kind of sewn tabs).


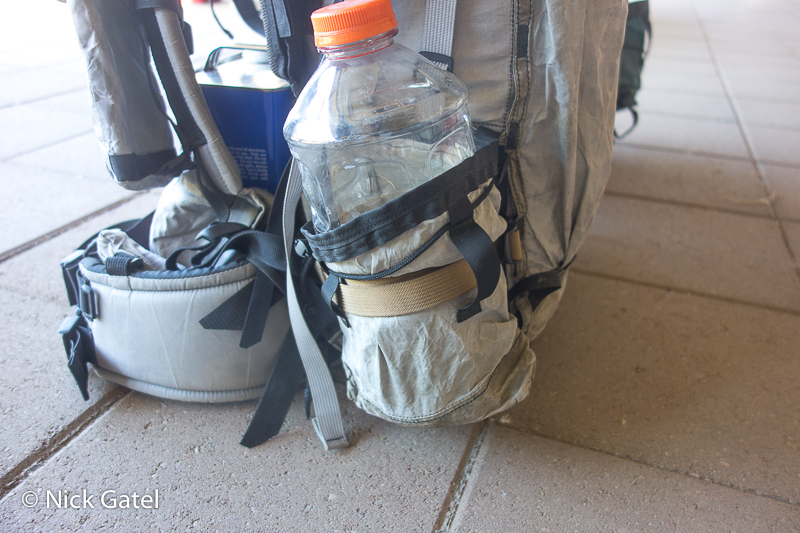
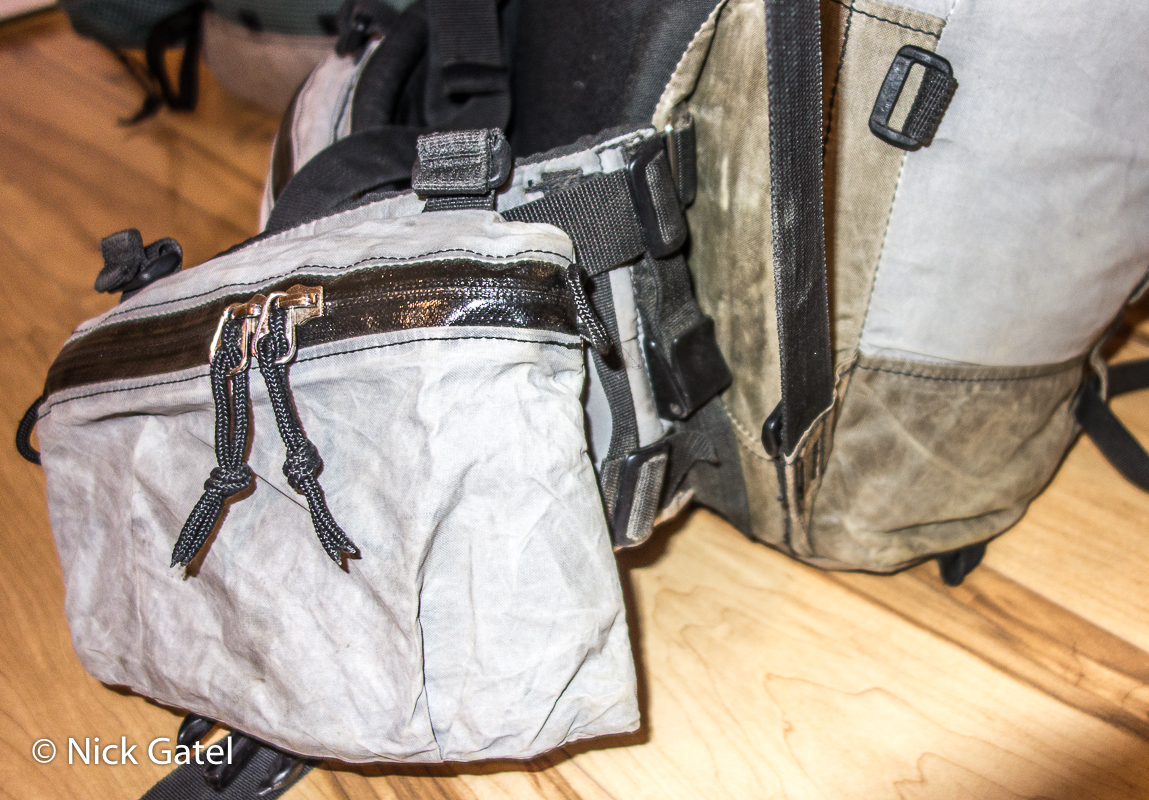
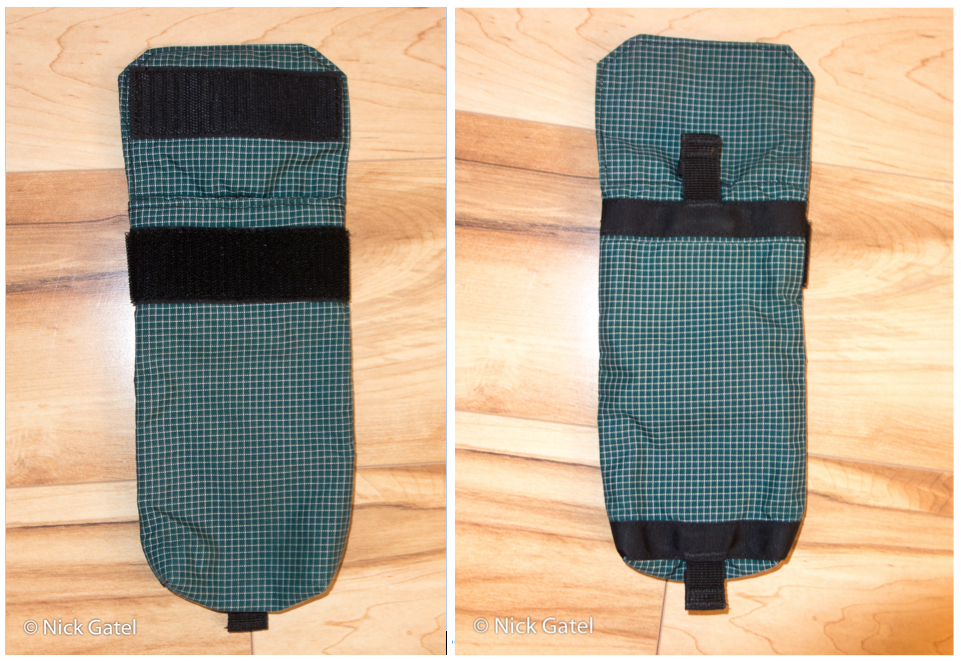
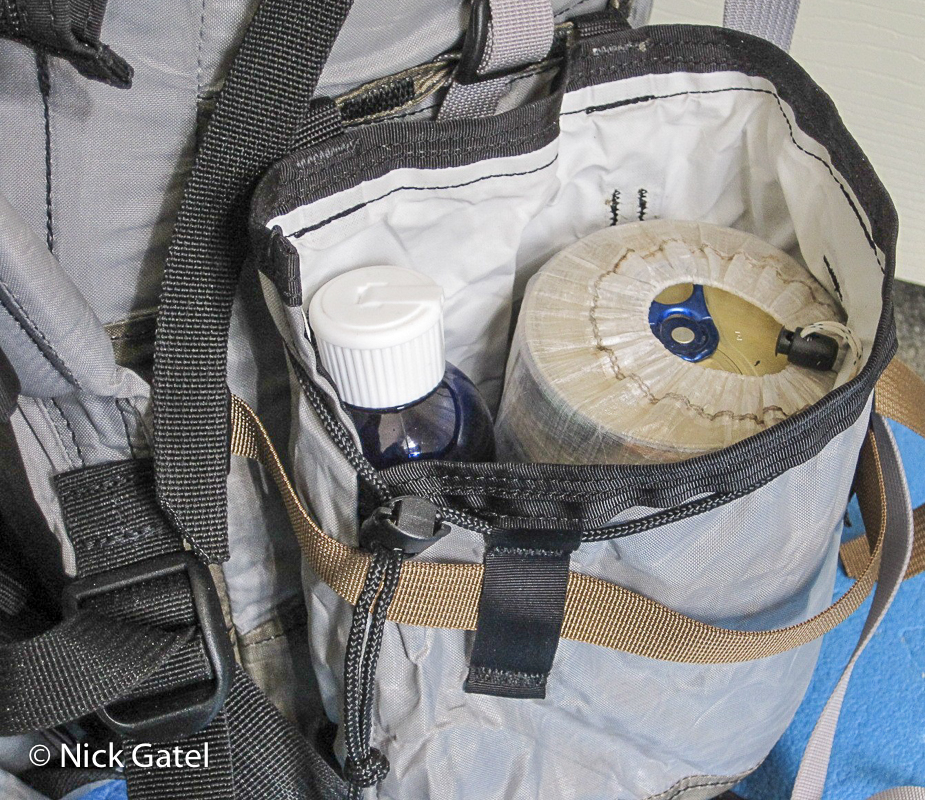
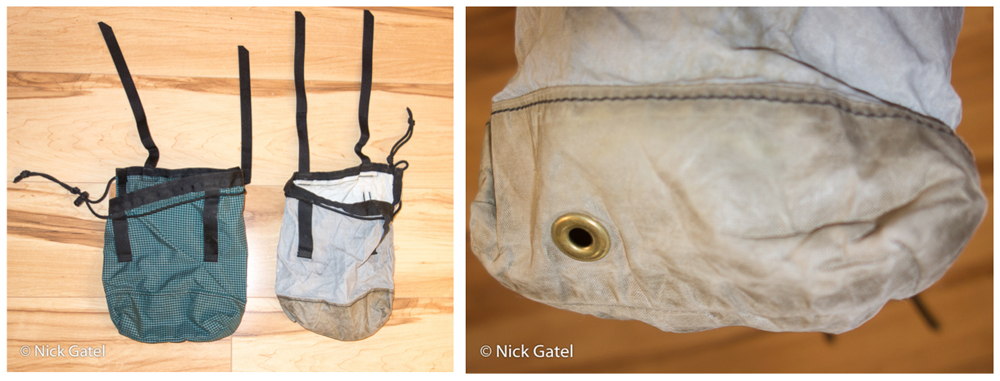
Water Bottle Pockets
For both packs, I bought optional large pockets that are intentionally sized to hold a 64-ounce Gatorade (or similar) bottle. I hike in deserts often and carrying copious amounts of water is often necessary. I can carry a total of one gallon of water, close to my hip belt.
Other items can be stored in the pockets, like stoves and fuel bottles, tent poles, rolled up air or foam mattresses.
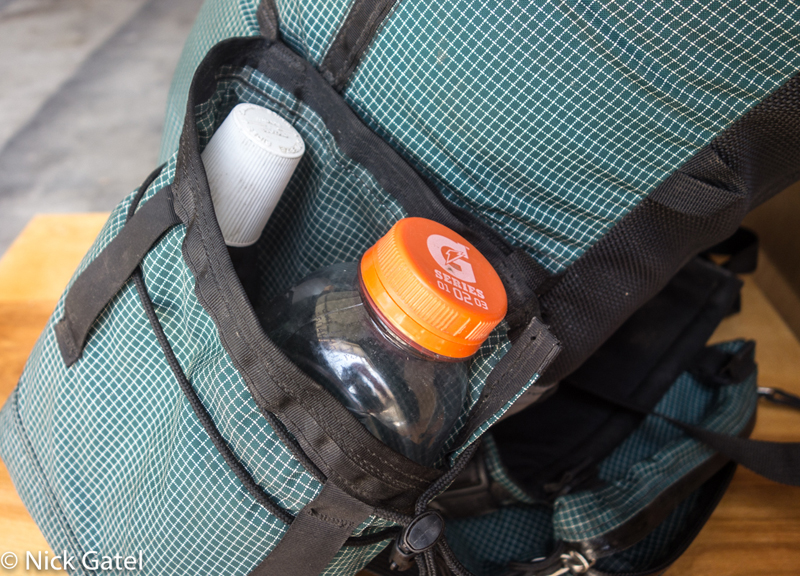
Looking at the picture above, there is a drawstring around the top of the pocket to help keep items in place. It this case, I have routed the compression strap around the outside of the pocket, through the two webbing attachments.
The back of the pocket that is against the pack body is higher than the front, making it easier to remove items.
Each water bottle pocket has two straps at the top that attach to the horizontal daisy chain on the side of the pack. The length of each can be adjusted for those who want their water bottle to be tilted towards the body to enable removal while walking.
The bottom of each pocket has a brass grommet that allows any leaking water to drain. The grommet serves a second purpose. A cord is passed through a loop at the bottom of the pack, up through the grommet and is secured with a cord toggle, allowing the tension to be adjusted.


Bear Canisters
More and more, bear canisters are becoming required in many of our wilderness areas. When possible, I will use a Spectra Ursak, but often have to carry a canister.
A well-designed internal frame pack will be narrower and taller than a similar volume external frame pack. That’s the advantage of internal frame packs: they hug the body and a narrower width helps distribute the load better.
I see a lot of internal and frameless packs that are made so a tall bear canister, like the Bear Vault 500, can be placed into the pack horizontally. Thus, a short and wide pack results. Of course, with a McHale you can order a pack circumference to accommodate a tall canister to be stored horizontally. But there is a better way.
Both Bear Vault canisters (BV500 and BV450) have a circumference of 27 1/3 inches. My Bump has a circumference of 32 inches, so I can carry the large canister vertically. It is easy to insert or remove the canister, and if I need to fill the space around the canister, I can surround it with smaller items or clothing.
Below, the taller BV500, which is 12.7 inches tall, has been inserted into the Bump vertically.

A small canister (BV450) can be carried in my Little Big Pack horizontally, the larger BV500 cannot. However, I can do this:
I just placed the canister under the top lid as a demonstration and didn’t balance it from side to side.
But Dan has an even better solution. He sells special straps to fit some of his top lids to secure a bear canister.

Below I have attached a Garcia brand bear canister (circumference = 27.65 inches, height = 12.0 inches)


Pack Weights
I value function and comfort over cost and weight. In spite of owning these packs for so many years, I haven’t bothered to cut off any excessive lengths of straps or done anything to make the packs lighter. Most of my gear is very light, and sometimes fragile, that even with the larger LBP, my base weight is usually less than 10 lbs. anyway, if one wants a comparison baseline.
Keep in mind that the LBP is constructed from fully woven Dyneema, a somewhat heavy material, but the most durable material available for backpacks. Also, Dan has some lighter materials than those used in both of my packs. Again, I want to emphasize my goals of durability and comfort, over cost and weight.

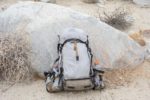
Photo Gallery
I don’t take a lot of pictures on many trips. Sometimes I forget to take any. Most pictures are for sharing with my family. Here are a few from over the years in diverse places such as deserts, the San Jacinto Mountains, Ohio’s Buckeye Trail, and the Appalachian Trail in Pennsylvania.


Disclosures: Both packs were purchased at full retail price. I used my money to buy the Little Big Pack. My wife, Joyce, used her money to buy the Bump as a Christmas present to me.