
Yes, this site is supposed to be focused on backpacking and camping. When camping I often bring a telescope and nowadays I image deep sky objects with it. You may not be interested in telescopes, but this post is really about finding solutions to a “problem,” researching, planning, and the final product.
This website may be compensated for linking to other sites for sales of products. As an Amazon Associate I earn a small fee from qualifying purchases at no additional cost to the purchaser.
Electronic gadgets such as personal locator beacons, GPS units, cameras, and water purifiers are now popular with many backpackers. So is the need for a battery bank to recharge these devices when in the backcountry. This post might help folks find a solution to determine which battery bank will suit their needs. Same goes with campers. I see more and more electronic devices in campgrounds. I will also discuss, from a high level, the pieces of equipment and software I use in conjunction with my telescope.
Whenever we are in a campground and the telescope is set up, people stop to ask questions. Some just want to look through the scope, others have telescopes and want to know how to take images, and a few are already amateur astrophotographers and may have questions about what equipment/software I am using and gauge my satisfaction with the kit.
Why Do I Need All This Stuff to Take a Picture?
To take deep sky images, especially very long exposures (think 5 minutes each), the telescope mount needs to slowly rotate in sync with the earth’s rotation. To make this possible, a guide scope with camera is mounted on top of the main telescope. The goal is to take images without star trails. One 5 minute exposure won’t result in much detail. A single 5 hour exposure can be ruined by clouds, wind, an airplane, etc. Thus, five hours worth of 5-minute frames, stacked one on top of another will capture as much detail as one long exposure, and any single bad 5-minute image can be discarded.
Equipment
For long exposure deep sky images several pieces of equipment need to be controlled with a computer. 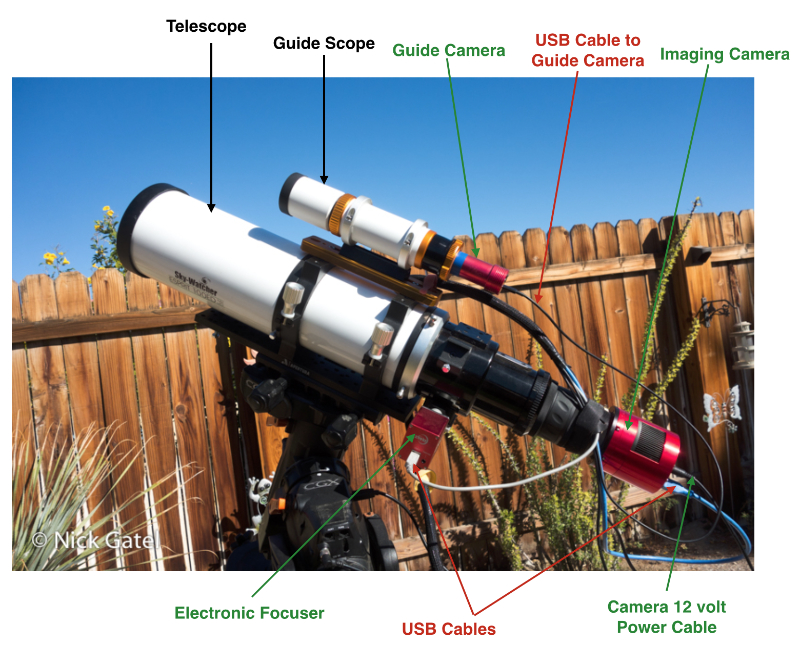
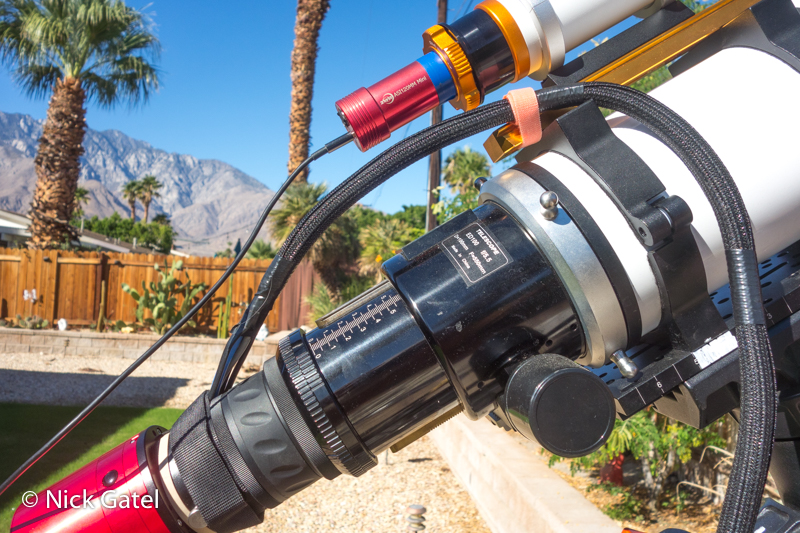
Guide Scope & Camera
The guide scope camera is connected to a computer running a guiding program. This program locks onto a single (or multiple stars) star. If that star drifts in the camera view, the guide program sends commands to the telescope mount to make adjustments to keep the star centered. The software is not looking at the star per se, but the minute pixels in the center of the star. If the center pixels move, the software can have the mount make pixel-sized corrections. These movements are so small, they will keep the final image sharp and centered. The guide camera is connected to the computer via a USB cable.
Telescope & Camera
Another program captures the images taken by a second camera, which is connected to the main telescope via a USB cable. The camera also has a separate 12 volt power cable to run an internal cooler inside the camera. This cooler keeps the camera sensor at a constant temperature, which reduces noise. Noise is the “graininess” we can see if a picture is enlarged.
Electronic Auto Focuser
As the nighttime temperature cools, the main telescope’s focus often changes, requiring periodic re-focusing. Since I often image 8 – 12 hours per night, I am not willing to stay up all night to monitor and manually adjust the telescope focus. An Electronic Auto Focuser (EAF) solves this. The EAF is also connected to the computer. Software can be set up to check and adjust the focus based on an elapsed period of time, a number of images taken, a predetermined change in the focus of stars as analyzed by the software, and other parameters that are dependent on the software used.
The auto focus software looks at the radii of the stars as it moves the focuser in and out. Once it finds the focus position with the smallest radius, it keeps the focuser at that position.
I wanted an auto focuser that would also run on 12 volts, plus I knew I would need to connect it to a USB port on the computer. As it turned out, I found a focuser that communicates via USB and the USB also supplies the required voltage to power the focuser’s motor.
Telescope Mount
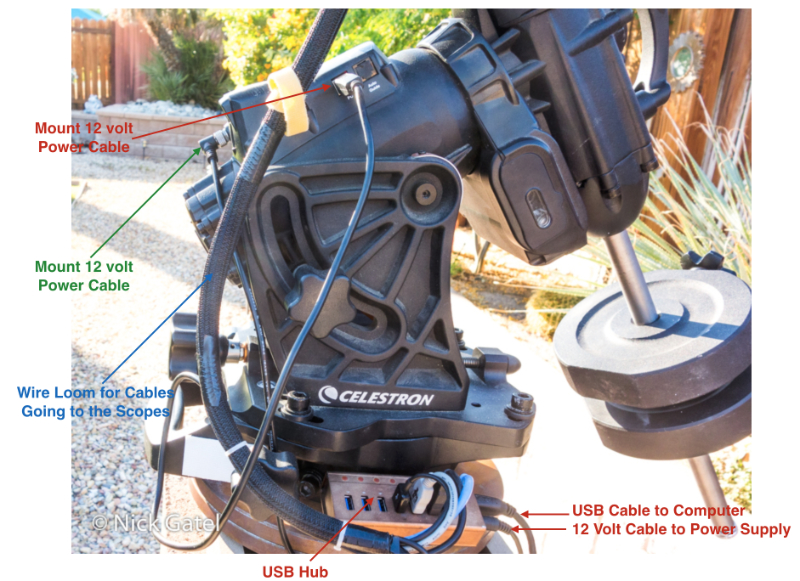
My mount needs a 12 volt power source to operate the two internal motors. There are also control boards inside the mount that are connected to a computer with a single USB cable.
Computer
To accomplish all the above, a computer must be connected to all the equipment, meaning a computer needs to be at the scope. Many of the most popular astrophotography programs run on Windows computers only, although there are programs that run on MacOS, Linux, and other platforms.
I started out by using my Apple MacBook Pro laptop running Microsoft Windows. Using a virtual machine program, Parallels Desktop, I can run both the Mac operating system and Windows. This required leaving the MacBook outside with the telescope, something I wasn’t keen about.
I own just one computer, so connecting the computer outside to the scope, meant I had no access to another computer each night. The solution for me would be another computer just for the telescope, software that would allow me to connect my MacBook Pro to the scope-side computer should I want to monitor the imaging progress, and a desire to use a 12 volt power source, since everything else at the scope runs on 12 volts or USB power.
Power Source
Since I use all the equipment at home, where there is 120 volts AC (I have adapters for the equipment) and I use the equipment when camping where there is no electricity, I needed a remote power source. A large enough capacity 12 volt battery would be the logical choice, should I be able to get a 12 volt powered computer. With a remote power source (battery) I wouldn’t need to run a household power cord to the mount and use a bunch of wall-wart adapters. I could connect all the equipment to the battery and then recharge the battery with household electricity.
Measuring Power Consumption
A battery’s capacity can be measured in amp-hours or watt-hours. For this post I will mostly use amp-hours for capacity.
Amp Draw and Amp Hours
If several pieces of equipment are connected to a battery and together consume a constant 5 amp draw, in one hour they will consume 5 amp-hours of energy.
Amp Hours Measurement for Battery Capacity
If the battery has a total capacity of 100 amp-hours, in one hour these devices will use 5% of the battery’s total capacity. Usually amp-hours are designated as “AH” or “Ah.” Most lead-acid batteries drop to about 12.0 volts when 50% of the AH are used. Lithium iron phosphate batteries (LiFePO4) have different voltage specifications.
Research & Planning
With a project like this, planning is the important first step, which requires a lot of research.
I wanted to buy all the materials and equipment so it would work right the first time, eliminating the need to buy something and later replace it because it doesn’t do the job. As is it turned out, everything worked out-of-the-box except a compact travel router to create a wireless network and a powered USB hub. Both were fairly inexpensive as I was trying to save a little bit of money.
So it goes — we often only get what we pay for — less quality for less money.
Locating the Equipment Controls
Many amateur astrophotographers mount the controls on top of the main telescope, consisting of:
- a computer
- 12 volt power distribution center with several power ports
- a USB hub
The advantage of this method is shorter cables (USB and 12 volt power) can be used to minimize power and USB communication problems. Also, since the cables don’t drop below the mount, there is almost no chance of a cable getting wrapped around the mount and disconnecting. With this way of doing it, there is only one power cord that needs to go to a power supply source away from the telescope and mount.
Since I use three different telescopes, I would need three mounting solutions, one for each scope. So I opted to mount the power supply distribution center, the USB hub, and the computer away from the telescope. This has the potential for disconnects during the night, especially when the computer commands the telescope to slew. I would need the following longer cables:
- 4 USB cables to the hub
- 1 USB cable to the computer
- 3 power cables to the power distribution center
Fortunately, a disconnect or cable snag hasn’t happened.
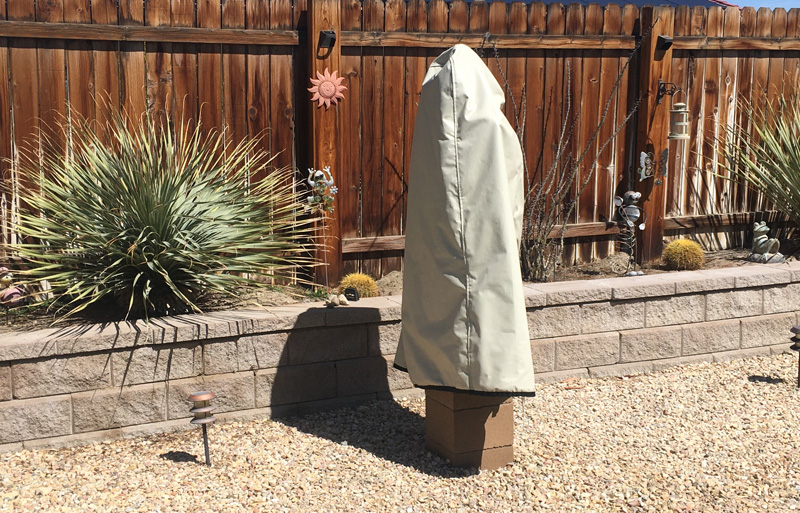
I use “cord wraps” and velcro to secure and organize the cables. I leave my telescope outside for weeks at a time at home. When camping, I also leave the scope outside for the duration of our camping trip. A waterproof cover protects the telescope and mount when weather threatens and during the day protects it from the hot sun and dust. The advantage of this configuration, for me, when changing telescopes, is I only need to disconnect the cable ends at the scope’s accessories, slide a different scope onto the mount, transfer cameras, then quickly plug in the cables. 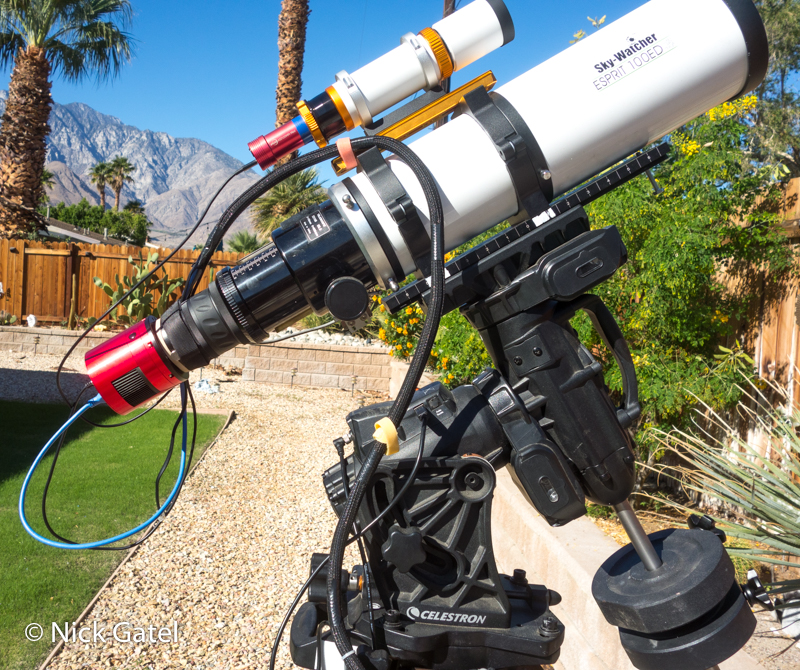
Update July 2022: After 6 months, all those cables running up to the telescope became a hassle. I eventually put together a system where all the components (USB power supply, router, and computer are mounted on the telescope and can easily be switched between any of my three telescopes.
Computer for the Telescope
There were several options to suit my needs. A proprietary telescope computer, a small laptop, or a mini PC. The proprietary choices were interesting. Either they were expensive or the operating system and software were limited.
I ended up with a computer that could run on 12 volts and was Windows based, since Windows computers have the largest selection of specialized astronomy and astrophotography software.
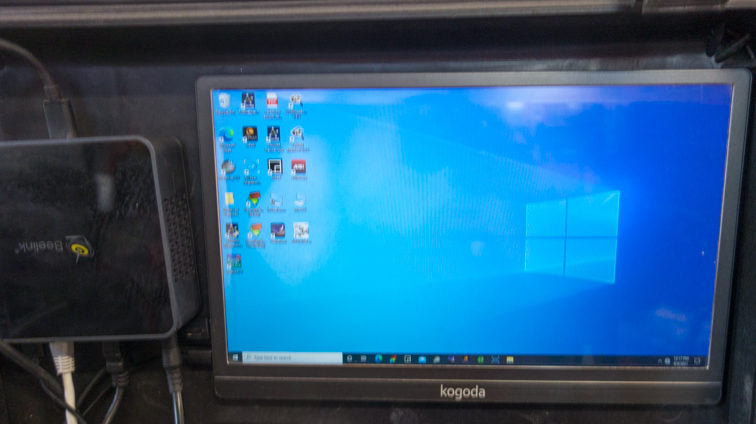
BeeLink GK55
This is the mini PC I bought on Amazon. A powerful computer is not needed for controlling the typical amateur telescope and cameras, and capturing images. 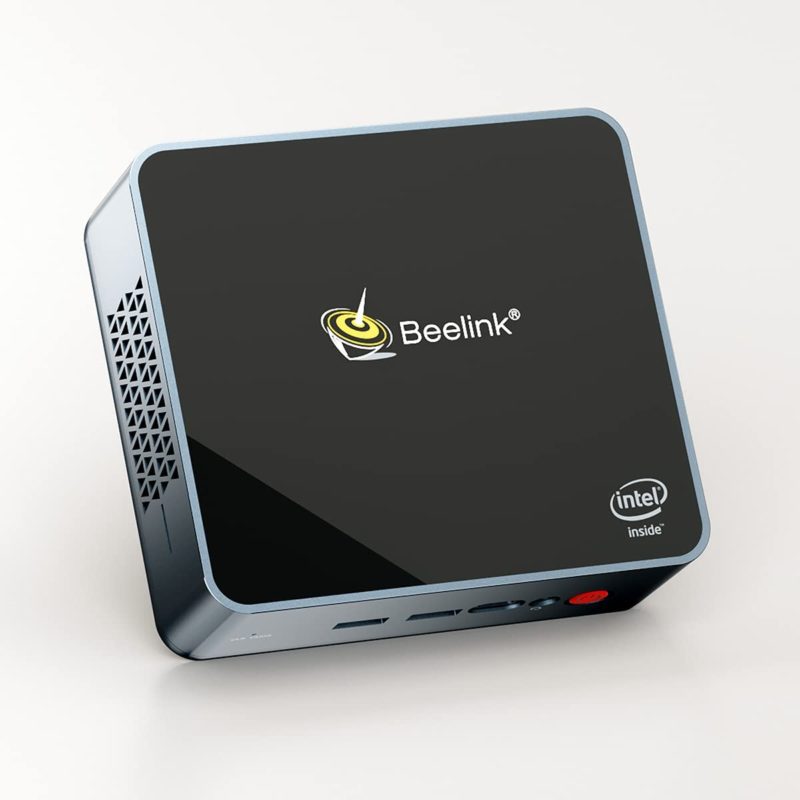 I opted to get a mini PC with a cooling fan, which uses a tiny bit more power than units without fans. Reason being that it is not unusual for ambient temperatures to be in triple digits until midnight in the lower desert where we live.
I decided to buy the PC first, before the other things I would need, to determine the power needs of the computer. It runs on 12 volts DC, however if the power goes much over 13 volts, the computer will shut down (by design). That would become an important factor when I set up my battery power supply.
The computer comes with a “wall wart” to power it. The power cord is a standard plug with a positive center tip and plug is 2.5mm X 5mm. All my other 12 volt equipment is also center positive, but all the tips are 2.1mm X 5mm. This required me to buy a power cord with a 2.5mm tip that would be connected to my 12 volt power distribution system, that I would later design and build. Not a big deal, these kinds of cords are inexpensive and readily available.
BeeLink GK55 Specifications
- Windows 10 Pro
- Intel J4125 CPU
- 8GB DDR4 RAM
- 256GB SSD
- 4K@30Hz Dual HDMI Ports
- 2.4G/5G WiFi
- Dual Gigabit Ethernet Ports
- Supports Auto Power On
- 1 X Type C Port
- 2 X USB 2.0 Ports
- 2 X USB 3.0 Ports
With Windows 10 Pro (not the Home edition), the GK55 can be remotely controlled with another PC (even an Apple Mac), iPad or iPhone. Not sure if it is compatible with Android devices. The Microsoft Remote software is free and works extremely well.
Since computers become obsolete in months to replaced by newer technology, I have included a link to the BeeLink Store on Amazon. BeeLink has an excellent reputation and their computers are among the most popular Windows-based computers used in the amateur astrophotography community.
This website may be compensated for linking to other sites for sales of products. As an Amazon Associate I earn a small fee from qualifying purchases at no additional cost to the purchaser.
Mini PC Software
The only software I installed on the mini PC are astrophotography applications. All of these programs are free except one (SharpCap Pro).
Keep in mind that a lot of people are working on these free programs in their spare time. If you download and like any of them, please consider donating to the website so they can continue to be developed and supported.
Below are the programs I installed on the mini PC. The image capture program, Nighttime Imaging ’N’ Astronomy (N.I.N.A.), communicates with all the other programs and controls all the equipment.
- N.I.N.A.
- Stellarium
- SharpCap Pro
- PHD2 Guiding
- ASTAP Plate Solver
- Celestron CPWI
- ASCOM and ZWO drivers
Stellarium
This is the planetarium program I use to locate deep sky objects I want to image. By searching for a deep sky object, the program will tell me where it is located (coordinates), when it rises and sets on the horizon, what time it will cross the meridian, and what altitude it is at anytime during the night.
The program will also frame the target to show how well it will fit into the field of view of any telescope and camera combination I want to use.
Once I pick an image in Stellarium, the coordinates can be transferred to N.I.N.A, so N.I.N.A. can slew to the objected and track it as it moves during the course of a night. Stellarium is a free program and can be downloaded here.
SharpCap Pro
I mostly use this program to quickly align the telescope mount to the celestial north pole, which is an important requirement for accurately tracking deep sky objects. It also can be used to calculate optimum exposures times, focus stars, and many other tools. The Pro version costs (as of 2021) $18 per year, but a free less comprehensive version is available, but it won’t do polar alignments. I also use this program to capture images of planets, as N.I.N.A.’s forte is deep sky images, not planets. Click here to learn more about SharpCap and SharpCap Pro.
PHD2 Guiding
Locks onto a single star and ensures the mount follows that single star all night. Link to the PHD2 program.
ASTAP Plate Solver
This is an incredible piece of software!
When the computer commands the mount to slew to a deep sky object, it is often a tiny bit off center. ASTAP takes a picture and confirms the image is indeed the selected target. Once confirmed, it checks to see if is perfectly centered in the camera’s frame. If it is not centered, it commands the mount to move to what it thinks should be the center. After the mount makes correction moves, ASTAP takes another image to confirm. Most of the time, this first move of the mount centers the object. Occasionally, it requires a second slew. ASTAP software.
Celestron PWI (CPWI)
The software allows N.I.N.A. and PHD2 to communicate and control the mount. I also use it to quickly align the mount to the stars each night at the beginning of each imaging session. Celestron PWI Telescope Control Software download.
Drivers
Various drivers allow the software packages to communicate with each other and at the same time communicate with the various pieces of equipment (mount, cameras, focuser).
BeeLink GK55 Accessories
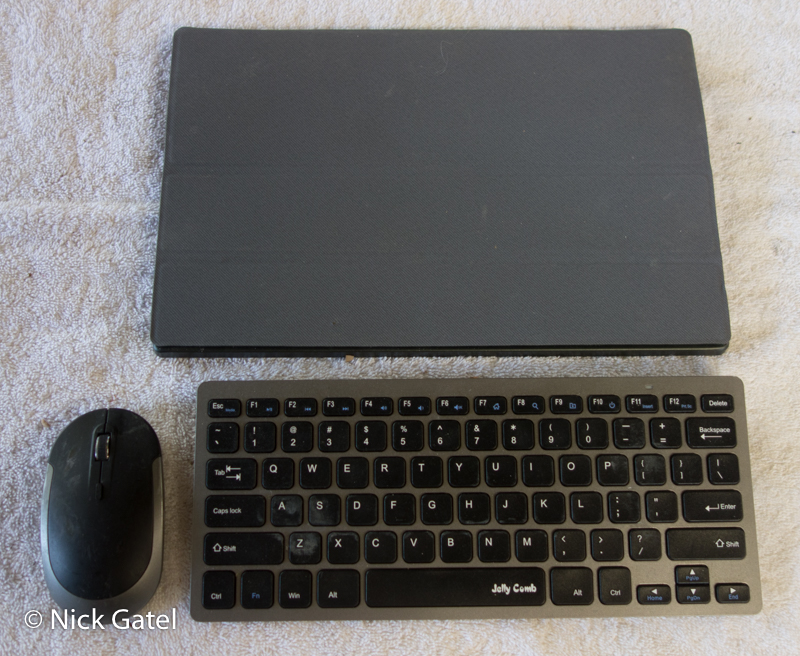
I use the mini PC at the scope headless, meaning there is no monitor, keyboard, or mouse connected to it. However, to set up a new Windows computer you need Internet access and the computer needs to be connected to a monitor, keyboard, and mouse.
I did not own a monitor that can connect to a PC. I have two 27” Apple Thunderbolt 2 displays, but it is impossible to connect them to anything except an Apple product. Also, once the computer was set up, I felt it would be a good idea to have some sort of monitor and input devices in case I need to troubleshoot something, the most likely problem being the computer might change the default wireless address.
I wouldn’t want to drive 400 miles to a remote site and have troubles with the mini PC. So a small monitor, keyboard and mouse was a requirement for me. Even though I always bring my MacBook Pro, which can be connected to my system, since I am also running Windows on this laptop.
I bought a small portable monitor and a bluetooth keyboard & mouse set. Over the past 8 months I have not needed to use any of these additional accessories.

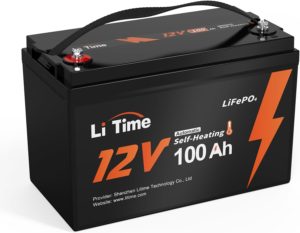
Lithium (LiFePo4) Battery
Update: November 26, 2023
The original post showed three Miady 16AH LiFePo4 batteries wired in parallel for a battery bank of 48AH. After two years of use I cannot recommend this battery or other brands sold on Amazon as they appear to be manufactured by the same company. My suggestion is to buy a quality LiTime 50AH or 100AH LifePo4 (if the capacity meets your needs). However it won’t fit into the battery box described later in this post.
The reason fo this criticism can be found in this post about why I built an improved remote power system for my telescope kits.
LiTime LiFePo4 Deep Cycle Lithium Battery
![]()
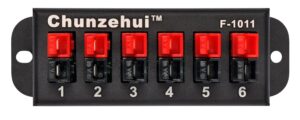
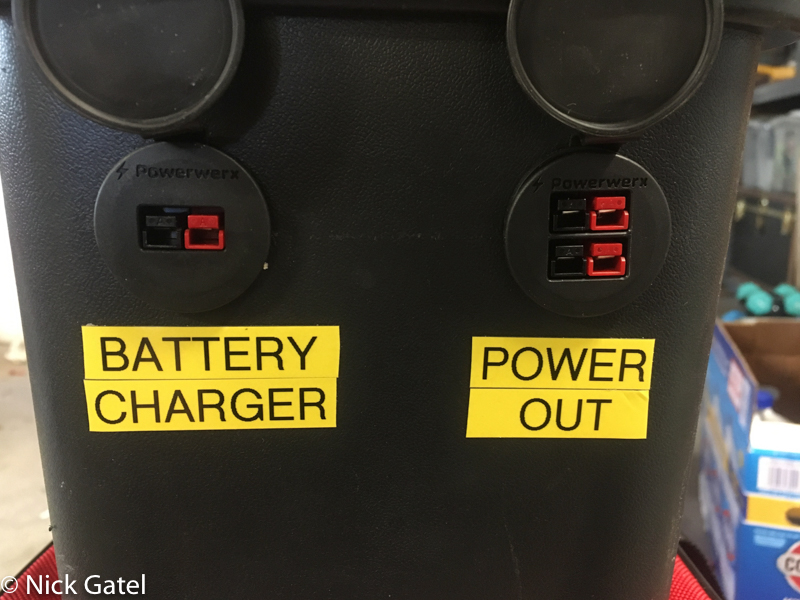
12 Volt Power Distribution Center
I needed a central spot to plug in all the 12 volt equipment. I decided to build my own wire harnesses using the proper gauge wire and Anderson Powerpole connectors.
The power distribution center has some redundancy.
6-Position 45A Power Pole Distribution Block Module
![]()
Anderson Powerpole Connectors
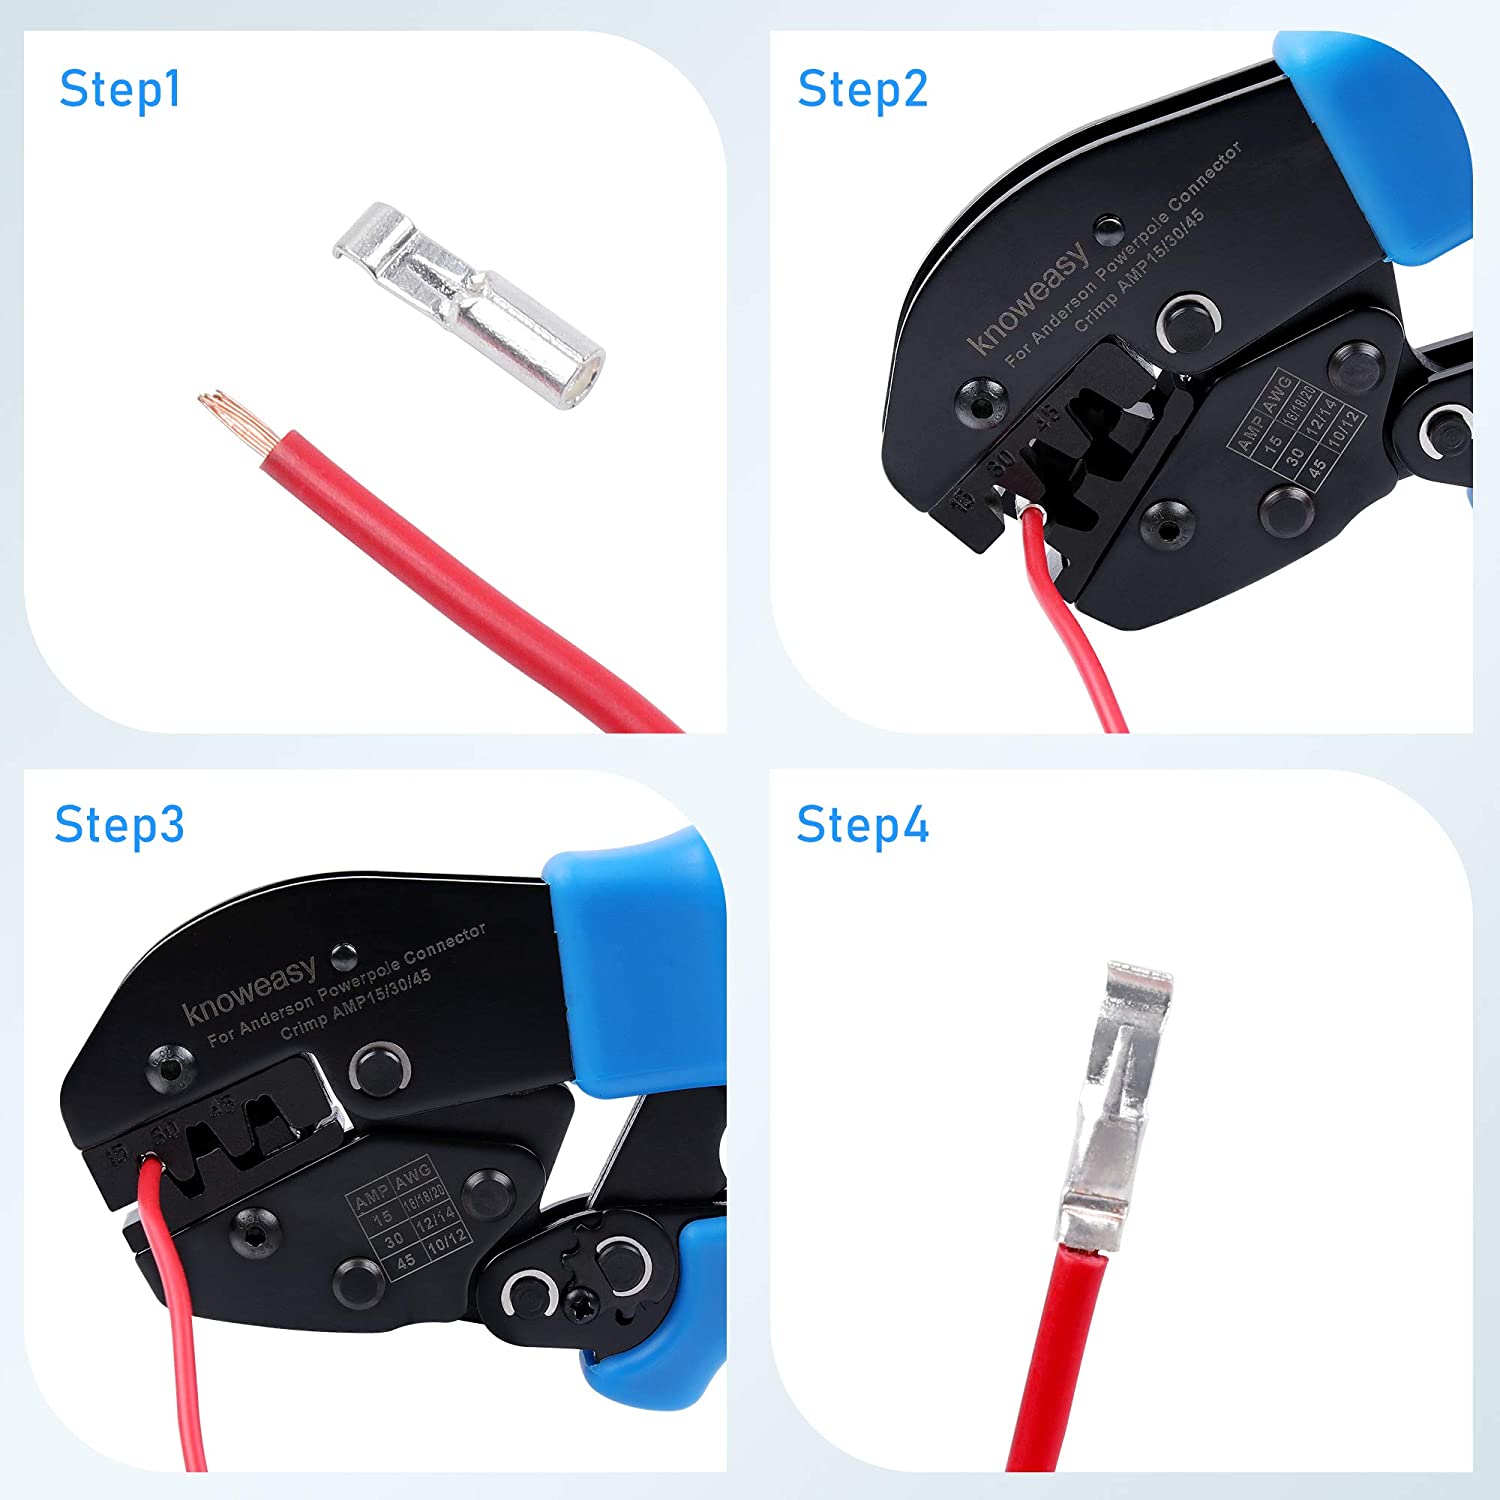
I needed wiring connectors that can hold up to constant connecting and disconnecting and could be connected in the dark without the risk of reversing the polarity. These fit the bill. They have to be assembled using a special crimping tool. The housings can accommodate 15, 30, or 45 amp contacts.
The contact is attached to a wire using the special crimping tool, then the contact is inserted into the housing. Several colors are available, with red and black being the most common. One nice thing is a black connector cannot be inserted into a red connector.
Anderson sells a crimping tool, but I purchased a cheaper brand on Amazon.
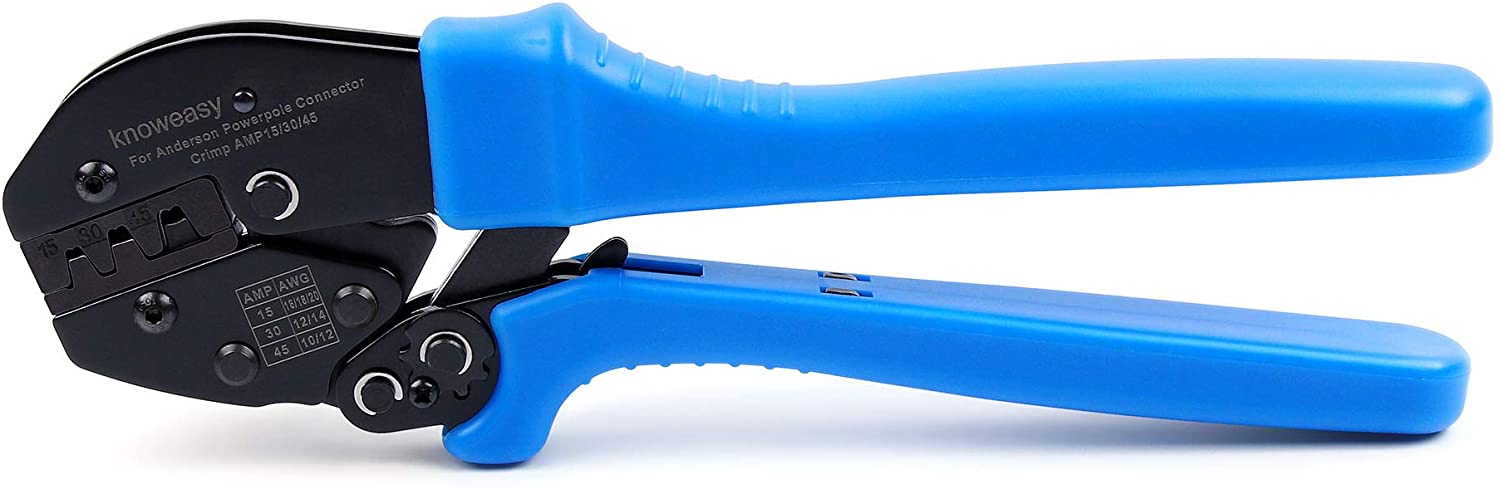
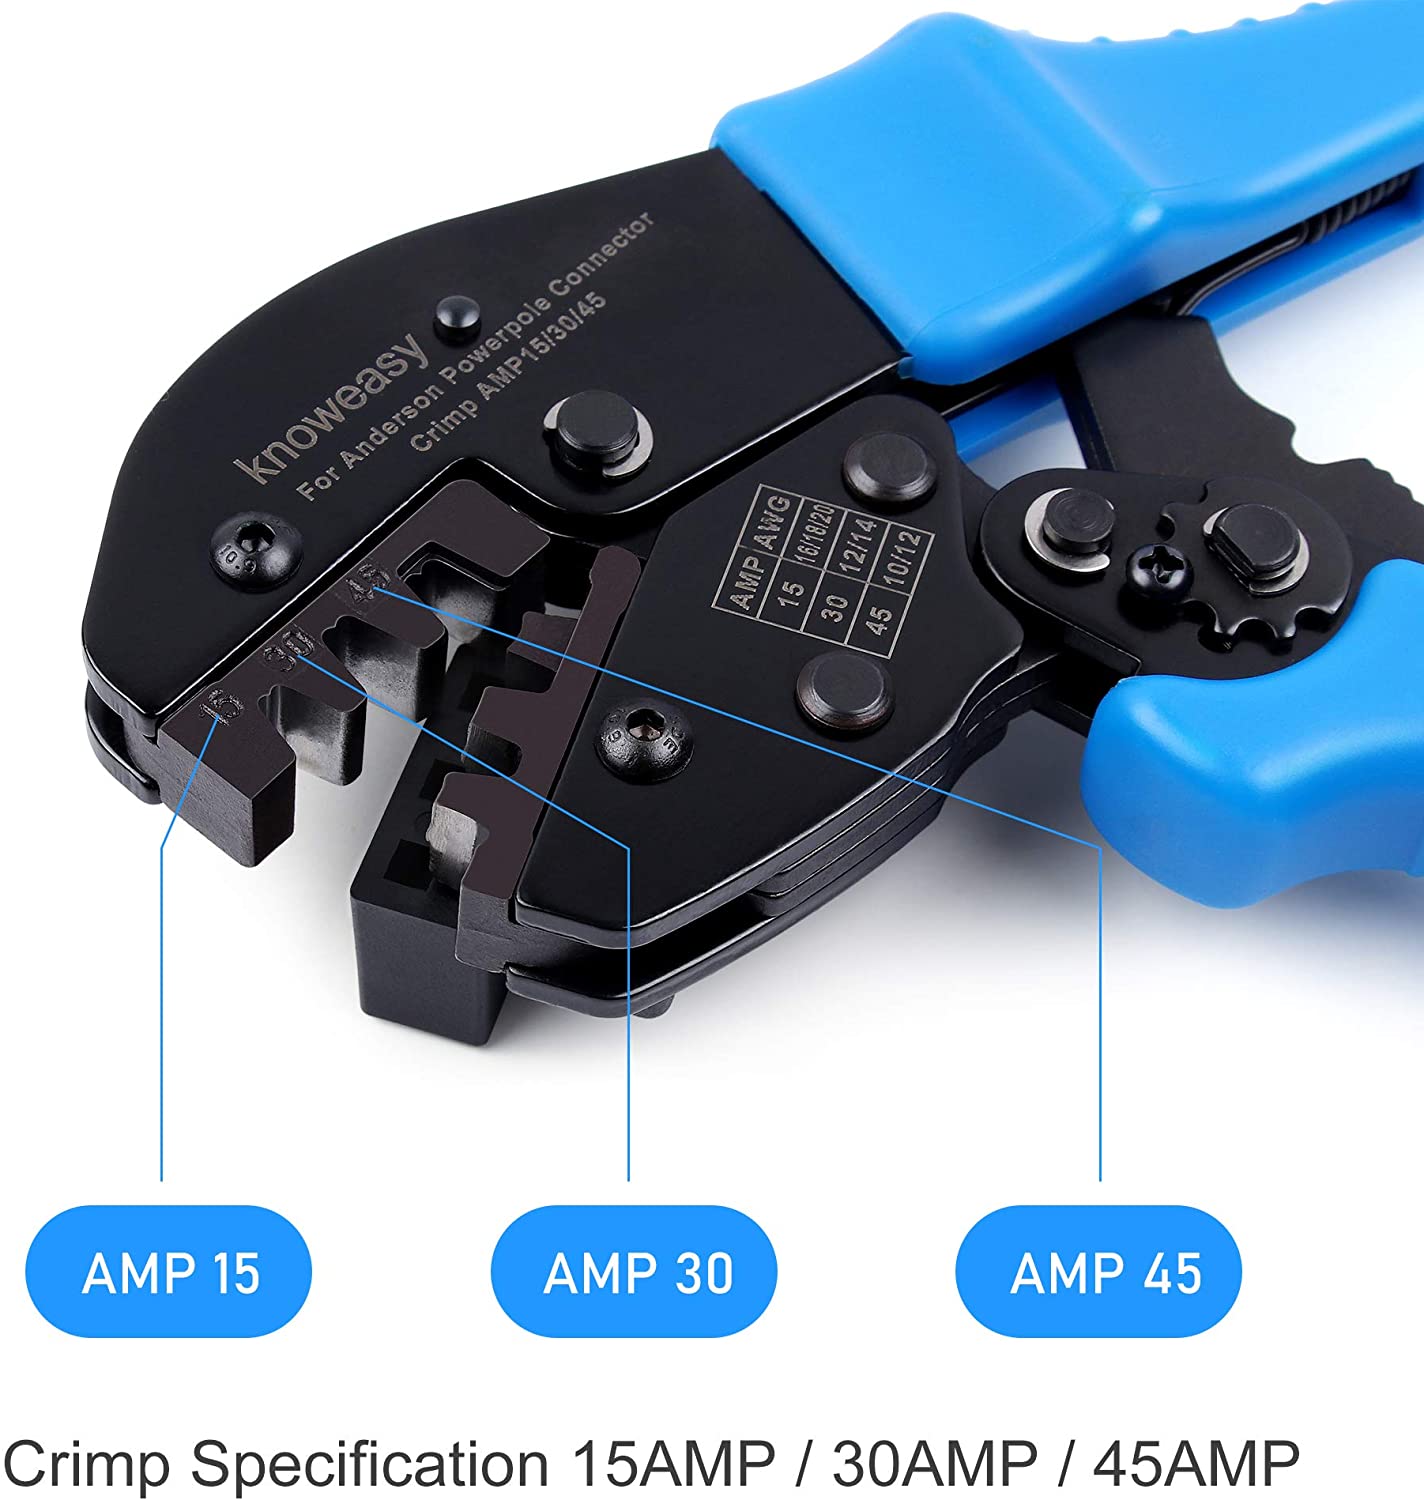

Standard wire crimpers don’t work well, and often the wire will become loose in the contact or even disconnected. This won’t happen with the special crimper.
The crimp is so secure with these crimpers, that Anderson also sells a nifty little tool that can remove a contact from the housing in case you make a mistake. The tool can also be used to insert the contact into the plastic housing. I find the tool not necessary to insert the contact, but makes removal a quick job. They can be ordered directly from Anderson or Amazon.
Knoweasy PowerPole Crimper

![]()
Anderson is the vendor in most of the Amazon Powerpole listings. I did find that a clone of the Anderson connector would not mate with an actual Anderson connector. Don’t know if this was a one-off and other brands will work.
Wirelessly Connecting the Mini PC to My MacBook Pro
As mentioned earlier, Microsoft Remote Desktop works great to connect my MacBook Pro to the Mini PC. I can also connected my iPhone and iPad to the mini PC. The software is free. One caveat: the mini PC must have Windows Pro installed. I am using Windows 10 Pro on the mini PC.
When we go camping we seek out places that have no cell phone service, no WiFi, nor any kind of Internet connectivity. This tends to limit the crowds. It also means I had to come up with a networking solution. A router at the scope is a pretty simple solution, and I don’t want to run long USB or CAT cables between my laptop and the mini PC, especially at dark campgrounds where the potential of tripping or accidentally disconnecting a cable increases exponentially.
TP-Link AC750 Wireless Portable Nano Travel Router
My first purchase was the highly rated TP-Link AC750 Wireless Portable Nano Travel Router. I know of several astrophotographers who use this and most are pleased with its performance. The router can be powered via a USB cable or the included 120 volt AC wall adapter. It also comes with a RJ45 Ethernet Cable to connect it directly to a computer or other device. 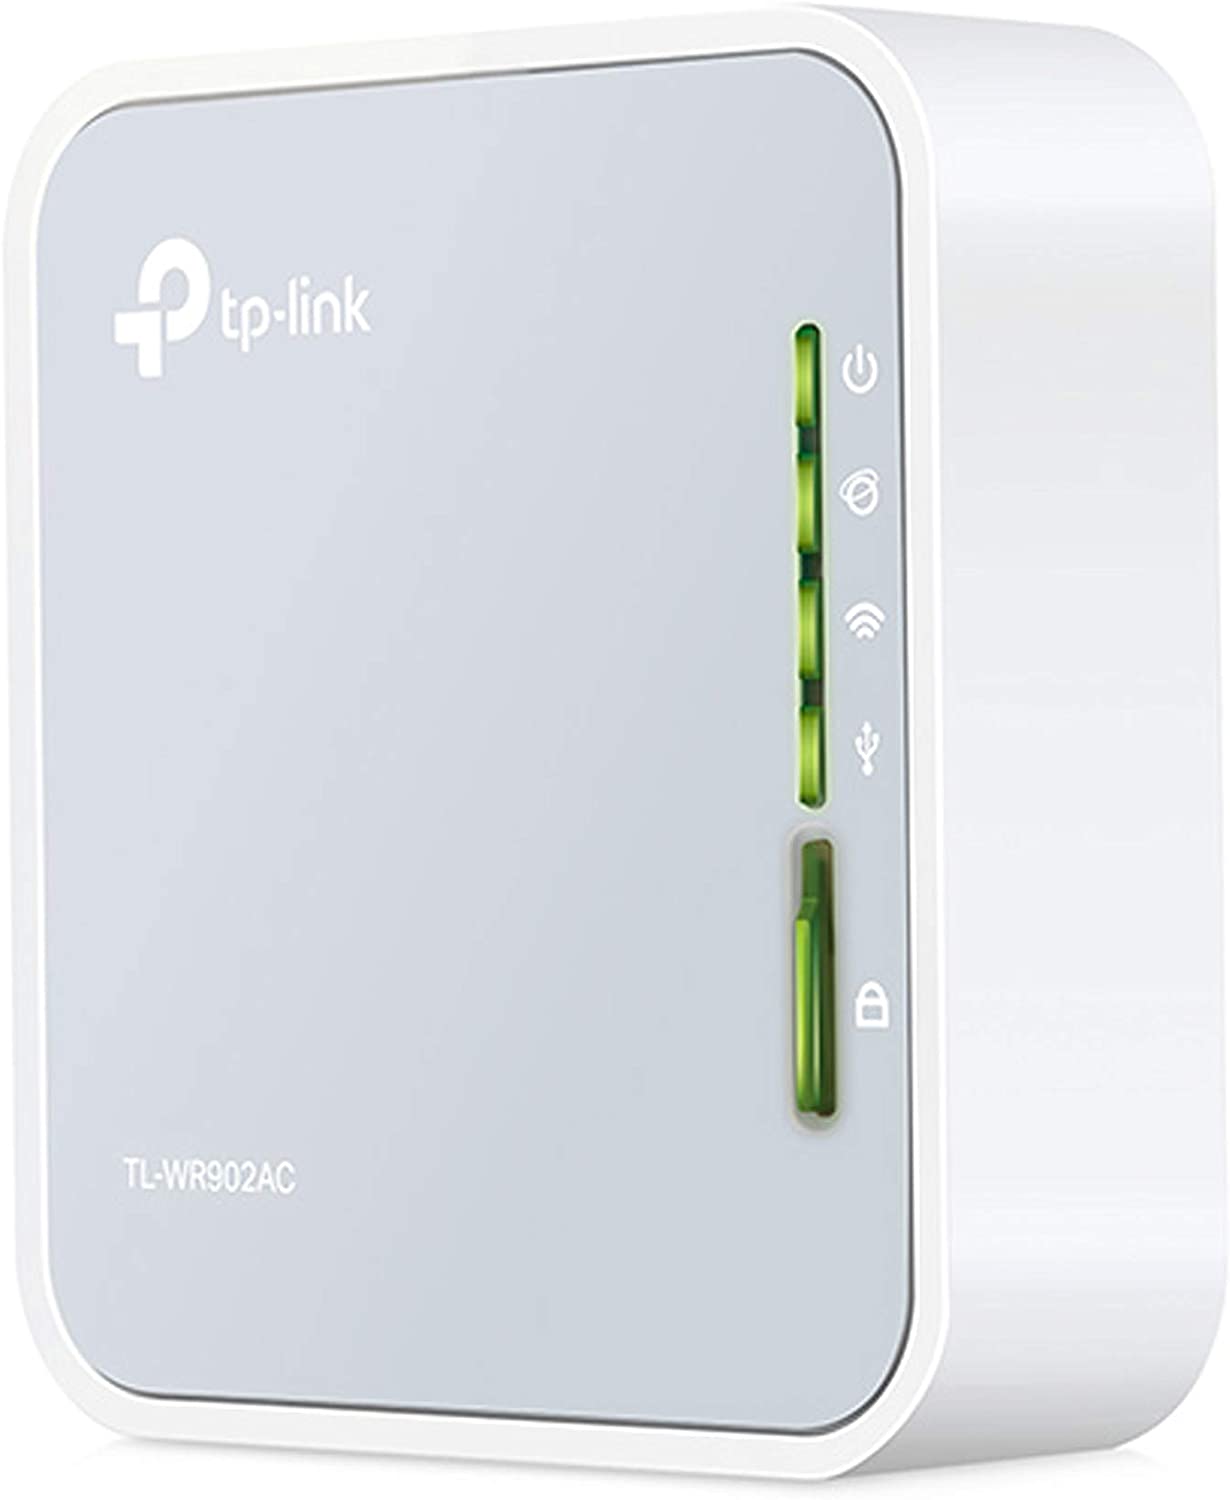 Right off the bat, I found the USB connection interfered with the 2.4 GHz channel. So I switched to the 5 GHz channel, which was a little better. But it kept dropping the connection to my laptop intermittently. Even though I have a direct line of sight to the telescope from my living room, which is about 50 feet away. The only “obstruction” is a sliding glass patio door.
Next I connected the router using the wall wart, connected the router to the mini PC with the ethernet cable, and tried both channels. Still had intermittent connectivity issues. I bought a WiFi extender and placed it in between the laptop and the mini PC.
Connectivity issues continued. Time to search Amazon . . .
TP-Link AC1750 Smart WiFi Router (Archer A7)
This is the kind of router you would place in your home or small office. It’s kind big, but weighs very little. Researching a little bit, I found it also comes with a wall wart AC adapter, and the adapter output is 12 volts DC. 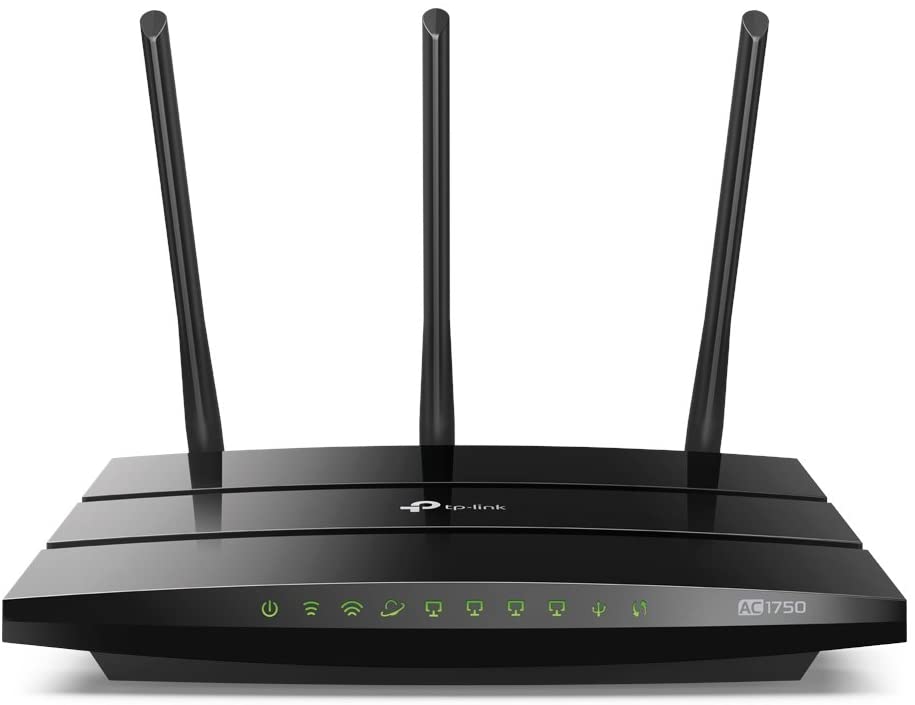 Testing was stellar. Not a single problem. So I cut off the wall wart adapter and connected a couple Anderson Powerpole connectors so it can be plugged into my power distribution center. I have used this almost daily since February at home and in campgrounds. It is one of those things that work so well, you never have to think about it.
One nice thing about the wireless extender I bought is it works well with the Archer 7. At home I usually connect to the extender with my MacBook, and I don’t have to worry about disconnects if I move to another part of the house.
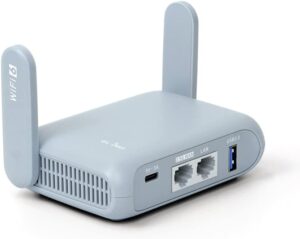
GL.iNet-MT1300 (Beryl) Travel Router
Eventually I found TP-Link Archer to be kinda big and bulky and my final and reliable router is the GL.iNet Beryl.
![]()
Windows and the Internet
The router WiFi network is not connected to the Internet (on purpose). All the software on the mini PC works great and I want to avoid doing Windows updates that might create problems.
Determining Actual Power Requirements
Before buying a battery for any kind of remote system, one needs to determine the power requirements.
I have done this for the solar systems on the three camping trailers we have owned. First determine how much power is consumed on average each day, calculate how much battery storage is needed in amp hours, with a reserve for whatever number of days that won’t be sunny for the solar system to charge, and lastly how much power needs to be generated by the solar array. The telescope remote system was the same.
I wanted enough battery capacity to run the scope for two full nights, although I planned on charging the telescope battery bank daily. I also wanted a LiFePo4 battery bank, not because I think it is inherently better that other types of batteries, but mostly because I wanted to use and test these kind of batteries. Also, LiFePo4 batteries are light compared to lead-acid batteries and I need to carry the remote system battery daily to and from the scope for recharging.
There are all kinds of power meters on Amazon starting at around $20 or so. If you want to built a battery bank box, do yourself a favor and measure your consumption with a meter first and then buy a battery to match your needs.
LiFePo4 Batteries vs. Flooded Lead-Acid Batteries
Which is best for a small battery bank such as what one would use with a telescope imaging system? Seems LiFePo4 batteries are the darling of the internet minions.
First things first: Not all batteries are created equal. For deep cycle lead-acid batteries the Trojan and Crown brand batteries are industry leaders. I really don’t have enough experience with LiFePo4 batteries to know which are the best brands. However, the Battle Born brand looks like it might be a good one, and I’ll use this as a reference.
This gets complicated because we often are bombarded with marketing data vs. real data. The data presented by the LiFePo4 marketing departments are not the way most people use batteries, and the advertising people are going to cut and paste data to make their product look like the second coming of Christ. For most people a small LiFePo4 battery bank probably makes the most sense for powering a telescope imaging kit. The batteries are much lighter, have a smaller footprint, and require less maintenance. But let’s take a look at some numbers.
Charging Strategies (numbers are your friend)
Our camper’s lead-acid battery bank has a total capacity of 225 amp-hours. Typically we will use 10%-20% (23 – 45 amp-hours) each day. Because we have ample capacity, we don’t pay attention to usage. Most of the time we use around 10%. In normal weather, even if we use more than 20% of our capacity, the solar system usually fully charges the battery bank before noon. The one exception is if it rains several days in a row. On a rainy day, our solar system cannot re-charge the battery bank. When this happens, we keep an eye on consumption.
So let’s say we use 15% of capacity each day for 5 consecutive days without any battery charging. We will use 175 amp-hours, or 80% of our 225 amp-hour capacity. If it is going to rain more than 5 days in a row, we’re going home because sitting in a camper all day isn’t camping.
The bottom line is that I sized my travel trailer’s battery bank so it would last at least 5 days without re-charging if needed. So with the above scenarios, let’s just assume we use 20% of our capacity everyday, which is overstating what we really do. Looking at the table below, published by the Trojan Battery Company, discharging a flooded lead-acid battery 20%, will result in a battery life of about 3,000 cycles. Some of the LiFePo4 marketing I have seen state lead-acid batteries only last a couple years. Mine always last 5 to 6 years when I usually replace them, even though they are still serviceable.
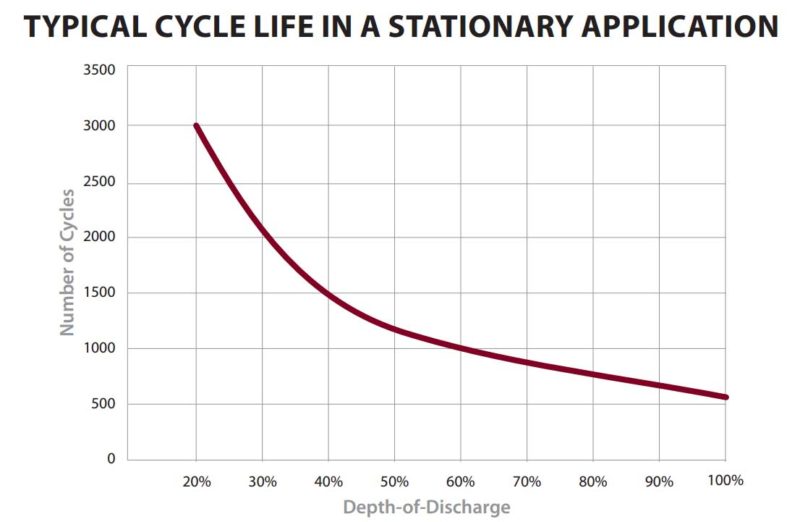
I have seen all kinds of life cycle statistics/specifications for LiFePo4 batteries. A couple state a LiFePo4 battery that is discharged only 20% will have a life span of at least 10,000 charge cycles, so let’s use that number.
Which is more economical? Forget the marketing that often says a LiFePo4 battery will last 20 years vs. 2 years for a lead acid battery. If I were to buy LiFePo4 batteries for the camper, I would need around 200 amp-hour capacity — remember I need 175 amp-hours if it rains for 5 days. I will assume the battery bank if discharged every at 20% of it’s capacity with a life cycle of 10,000 charge cycles will last about 3.33 times longer than my lead-acid battery bank.
I bought my bought the camper’s lead-acid batteries (two 6-volt golf cart batteries wired in series to make 12-volts) three years ago for $315 including tax. Assuming the cost has gone up to $400, if I multiply that cost by 3.33 (from above), it comes out to $1320.
Two Battle Born 100AH 6-volt batteries wired in series would be a 12-volt battery bank with a 200 AH capacity. Cost is $1718 plus tax.
A note of caution: some LiFePo4 battery manufacturers state their batteries cannot be wired in series. Battle Born says you can wire up to four of their batteries in series. The determining factor is apparently how the internal LiFePo4 Battery Management System (is set up).
One last thing — a deep cycle lead-acid battery requires a 4-stage battery charger matched to the battery manufacturer’s specifications. You will be hard pressed to find a reasonably priced charger that ticks all the battery manufacturer’s specs.
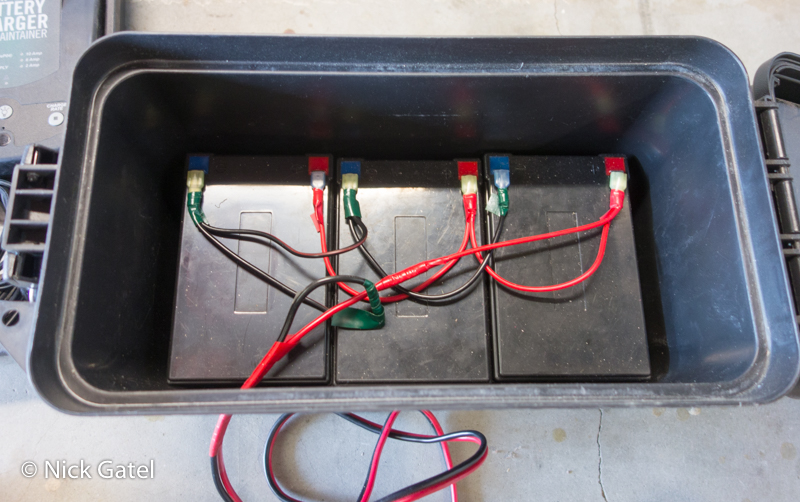
Building a 12 Volt LiFePo4 Battery Bank
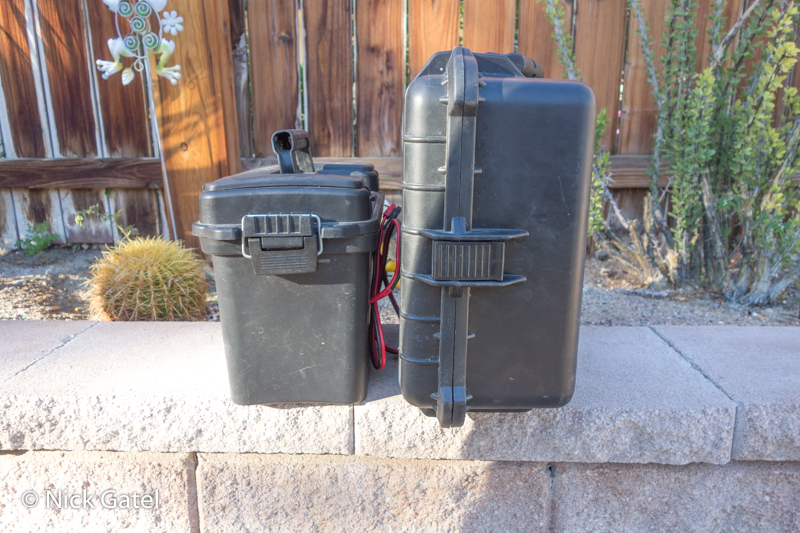
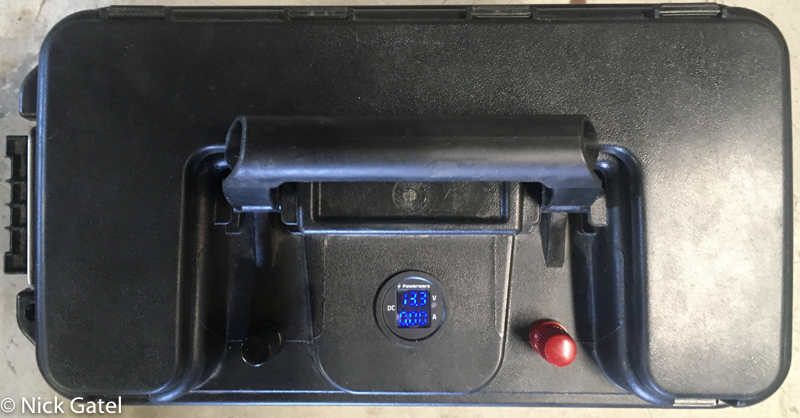
I had two requirements. (1) Around 48 amp-hours and (2) I wanted it to fit in a small but portable case, ideally a plastic “ammunition/utility box.” I found this box at Harbor Freight that worked perfectly. It has a tray inside that also stores my dedicated LiFePo4 battery charger and some additional wiring looms.
Miady 16AH LiFePo4 Battery Bank
I bought three of these from Amazon, but they are not available at this point in time. Shouldn’t be difficult to find something similar to fit a specific box. 
To house the three batteries (battery bank) I bought an inexpensive ammo box at Harbor Freight. It was large enough to house the batteries with extra space for all my electrical connections. What is nice about this box is the top of the lid opens up to reveal a small storage compartment. I was able to use the interior storage for some additional components and keep it closed during operation.
When 12 Volts Isn’t 12 Volts
A fully charged 12 volt lead acid battery, like the starting battery in a car, has a voltage of 12.6 volts.
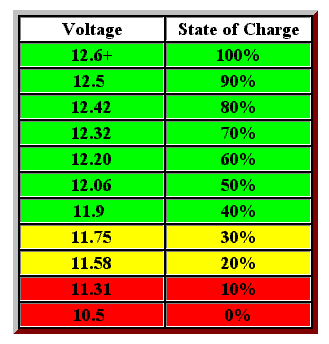
I haven’t done much testing on the LiFePo4 battery bank yet, but the “nominal” voltage is 12.8 volts, just as the stated voltage of a lead-acid battery is 12 volts, but fully charged is actually higher. My measurements of the LiFePo4 battery bank voltage, when the battery bank is fully charged and has sat for a few hours, is usually around 14.2 or 14.3 volts. I found this LiFePo4 battery state of charge chart on the Internet.

With a lead acid battery at 12 volts it is at around 50% of capacity. Plus repeated discharges below 50% of capacity will shorten the battery life. A LiFePo4 battery doesn’t drop to 12.0 volts until the capacity only has 9% left.
12 volt Buck-Boost Converter
If you recall, earlier I mentioned the mini PC will shut down if the voltage exceeds 13.5 volts or so. This is a design feature to protect the computer. If I wanted to use a LiFePo4 battery bank, I would have step down the voltage. Stepping it down to 12 volts would be fine, as all the other equipment will work reliably. I found a buck converter that steps down to 12 volts. If reality, it actually steps down to 12.3 volts. I have too of them and both step down to 12.3 volts. Perfect.
https://www.amazon.com/gp/product/B08KZPXK63/ref=ppx_yo_dt_b_search_asin_title?ie=UTF8&th=1
Assembling the Battery Box
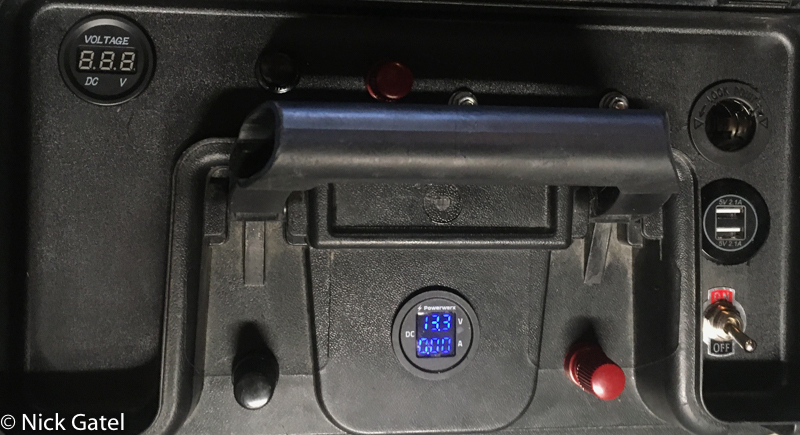

Without the buck-booster, my solar system would sent 14.6 volts to the mini computer. Most nights everything runs without me monitoring anything. If I sleep in and the battery bank is connected to a solar array, it could damage the computer.

USB Solutions
There are four USB cables that need to be connected to the mini PC.
- Telescope Mount
- Main Imaging Camera
- Guide Scope Camera
- Electronic Auto Focuser
Most problems with remote imaging are usually issues with USB cables. The longer the cable, the more likely problems can occur. Some people solve this my mounting the mini PC on top of the telescope, which is something I did not want to do because I image with three different telescopes.
Three scopes would require three different mounting solutions. I also did not want to run extremely long USB cables to the mini PC, because the longer the cable, the greater the chance for USB communication issues.
Lastly, the mini PC only has four USB ports. Sometimes I connect an external SSD drive to the mini PC, and sometimes other accessories, such as a light panel that is used to create calibration frames with the imaging camera.
The best solution for me was a 12 volt powered USB hub. I wanted a 7 or 8 port hub that would run on 12 volt power. This way, a single USB cable would run to the mini PC, and all other equipment would plug into the powered hub.
It would be easy to mount the USB hub on the mount, with fairly short cables to the telescope equipment, along with enough slack for the telescope to move during the night without pulling or catching on the cables.
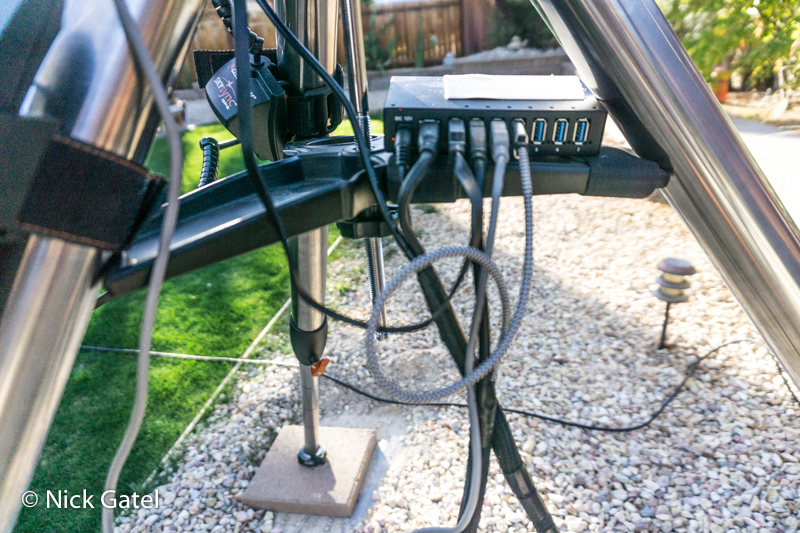
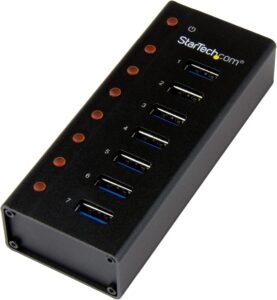
There were several available on Amazon and I purchased a popular and highly rated unit. Unfortunately it caused intermittent connectivity problems. Eventually I bought a more expensive StarTech “industrial” powered hub, one that was recommended by several amateur astrophotographers. It has never given me a problem over the several months it has been in use.
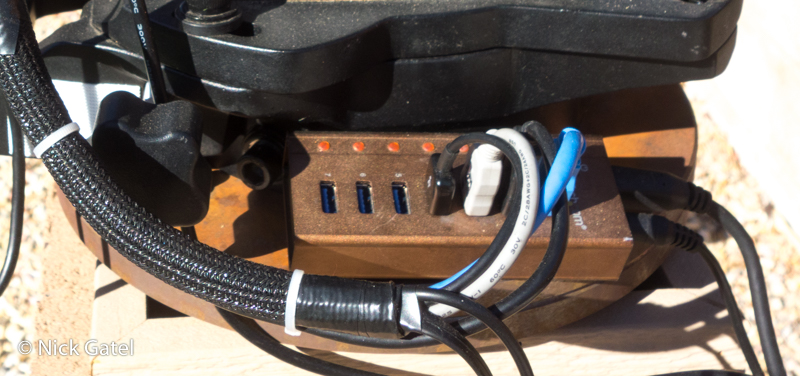
StarTech.com 7 Port USB 3.0 Hub
![]()
Imaging Deep Sky Objects
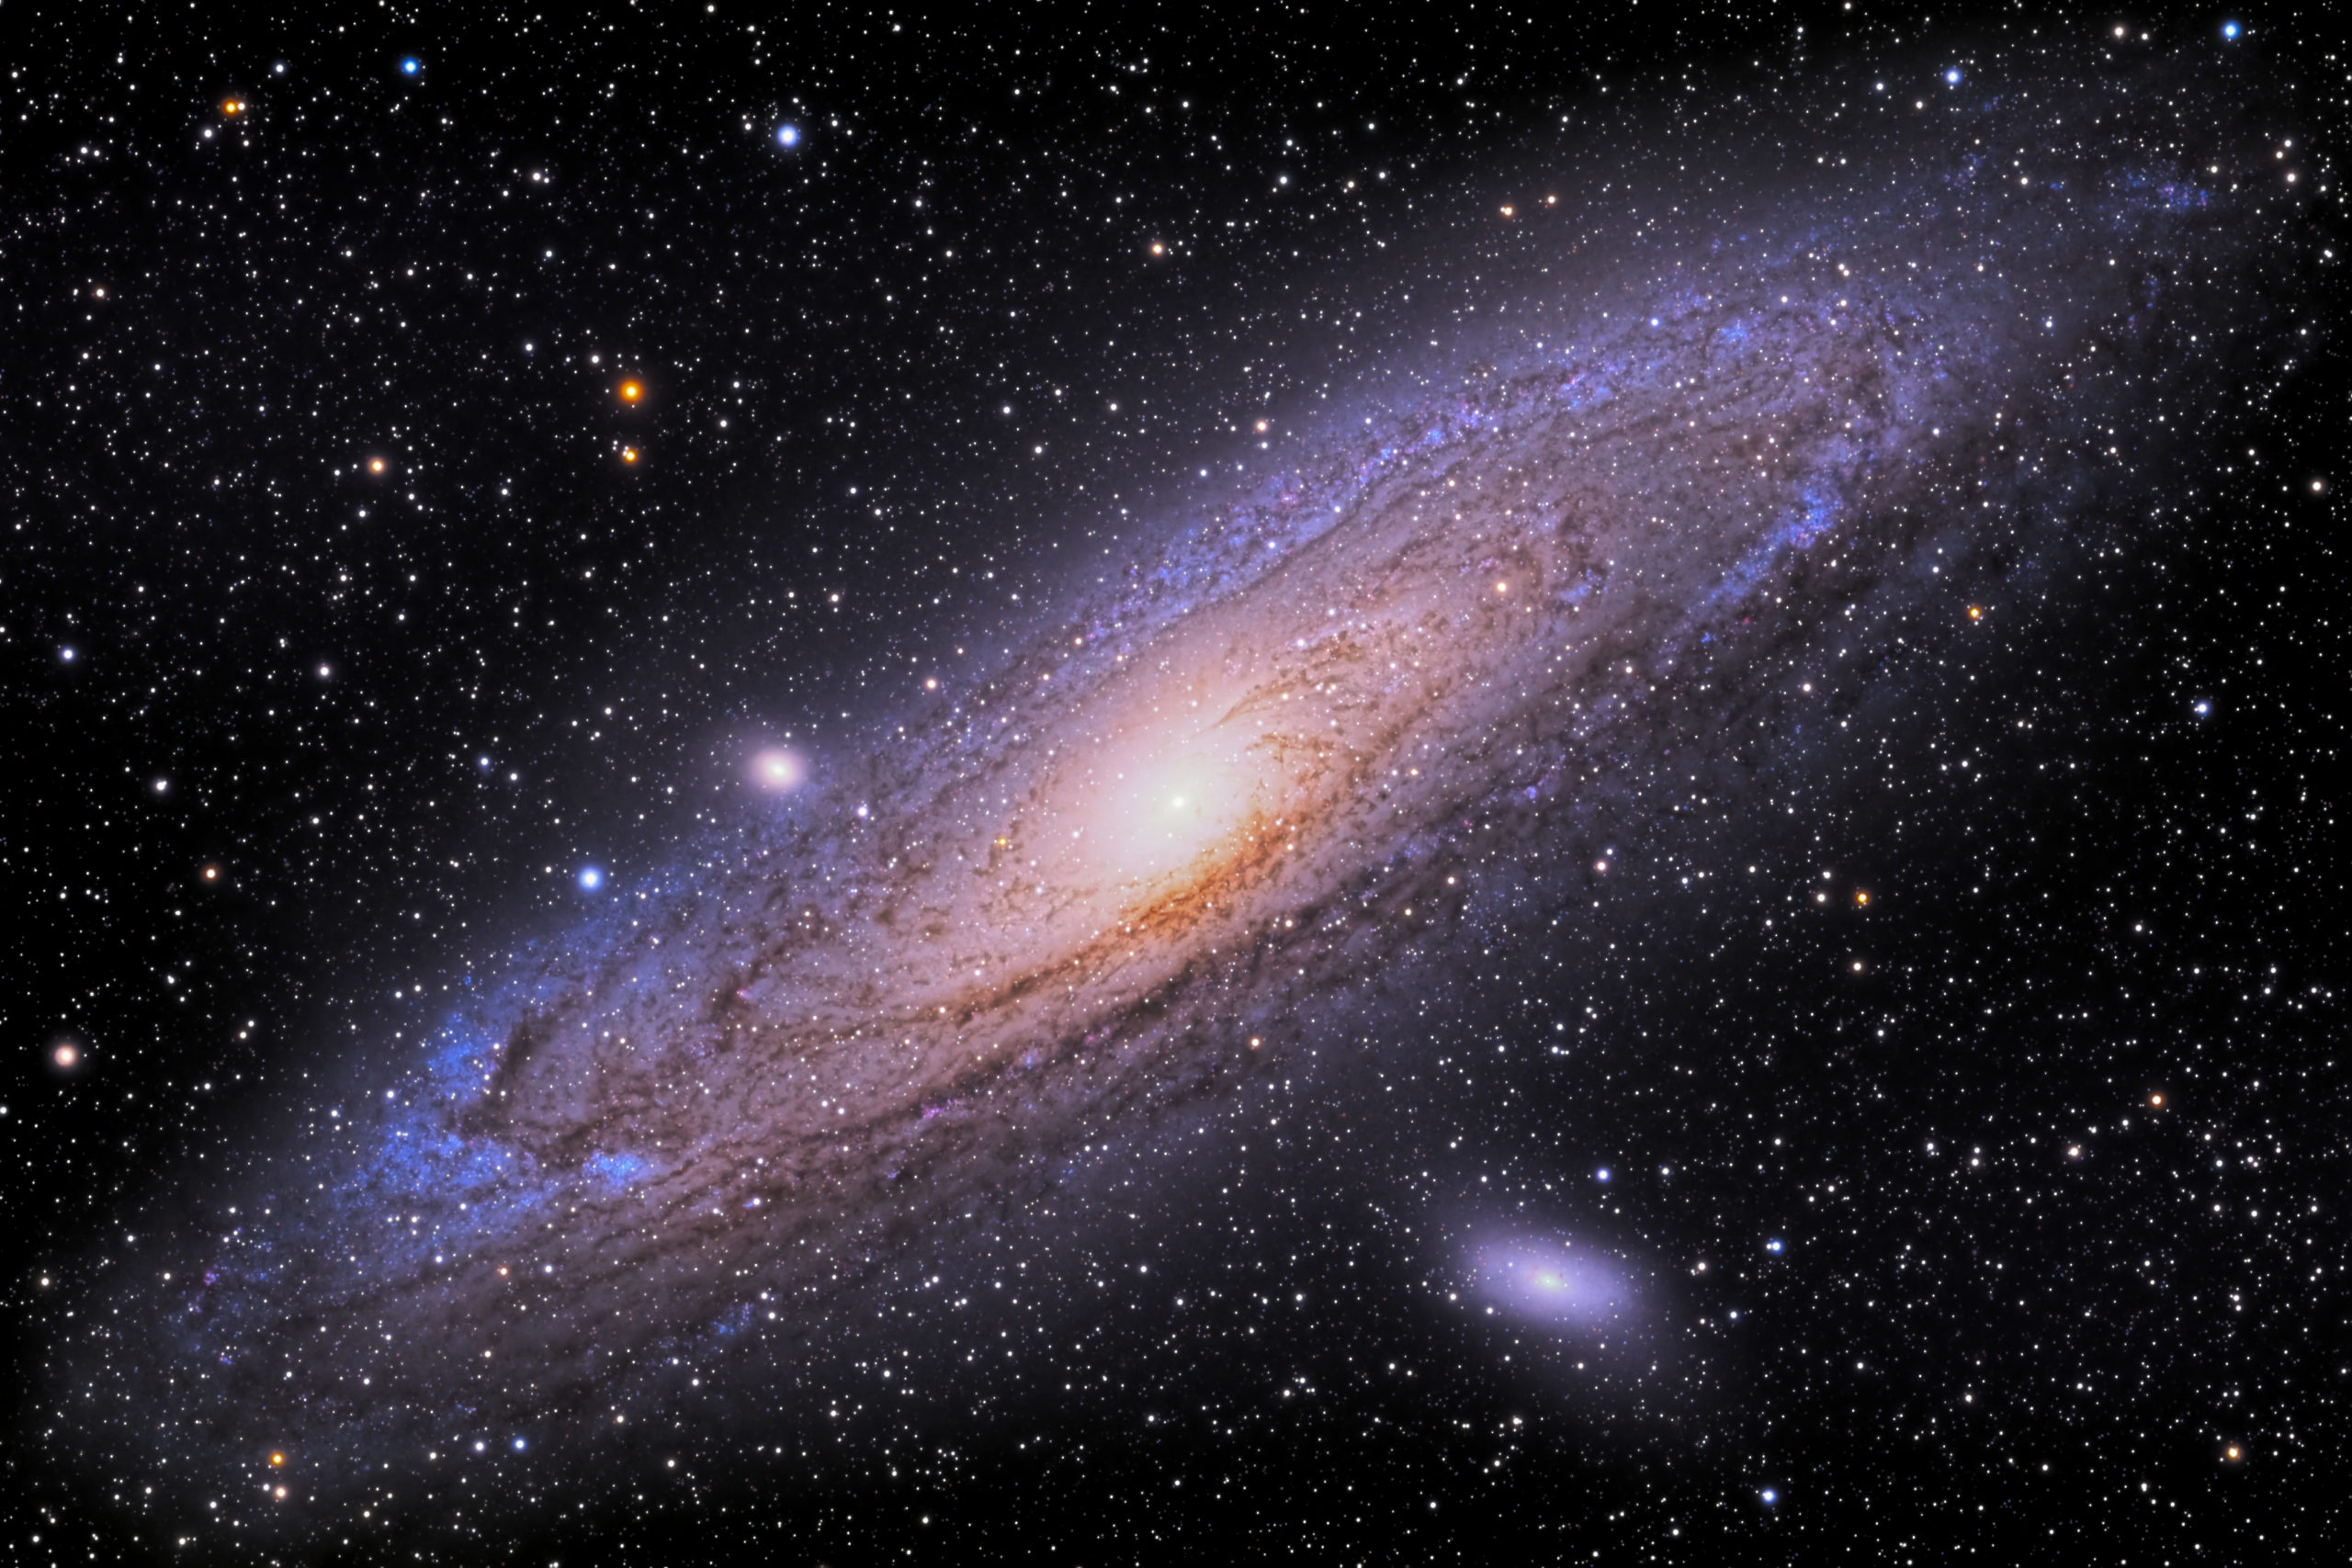
Most deep sky objects are very dim. Even with a fairly powerful telescope they can’t been seen. For example, the image below of the Andromeda Galaxy is just a small blur in my largest scope, with only the very center visible. But a camera can capture objects we cannot see. The above image of the Andromeda Galaxy has over 15 hours of total imaging time over two nights. If I were to take a single 8 hour image, a strong gust of wind or a large cloud would ruin it. Instead I took 446 two-minute exposures. The computer kept each frame centered in the frame. Then using special software, all the images were stacked on top of each other, with all the stars aligned, to create a single 15+ hour image. This is what I do every night when the skies are clear. What follows are the steps I take on successive nights of imaging the same object. I have, at times, collected 30 hours of images on a single object.
- Take the cover off the telescope.
- Remove the lens cap from the main and guide scopes.
- Plug the battery bank into the power distribution center.
- The mini PC automatically powers on.
- Go inside the house (or the camper).
- Open my MacBook Pro and connect to the mini PC.
- Command the mini PC to open the software applications and connect to the equipment.
- Open up the previous night’s imaging target file.
- Click the Start button. That’s it.
This is what happens when it hit the Start button:
- N.I.N.A. commands the mount to slew to the target.
- ASTAP plate solves and moves the mount to center the target.
- N.I.N.A. tells PHD2 to pick a guide star and start guiding.
- N.I.N.A. focuses the telescope.
- N.I.N.A. starts taking images.
- When the number of requested images are taken N.I.N.A. stops the camera and parks the telescope.
Instead of staying outside all night and monitoring the telescope, I can spend the time with Joyce while the computer runs everything. Sometimes I’ll go outside and visually look at things with my other telescope. The next morning, when I get up, I turn off the computer and cover the telescope.
Miscellaneous Components
There are a lot of other things I bought on Amazon to complete the project. This entailed a lot of searching. Below are links that might be useful should you want to put something like this together.
- LiTime 50AH LiFePo4 Battery — note: it may not fit Ammo Box below (Amazon)
- Ammo Box (Harbor Freight)
- Buck-booster (Amazon)
- 12V Power Pole distribution block (Amazon)
- StarTech Powered USB hub (Amazon)
- Power Pole connectors (Amazon)
- Power Pole panel mount – single (Amazon)
- Power Pole panel mount – double (Amazon)
- Volt/Amp panel mount meter (Amazon)
- USB power outlet (Amazon)
- 12 Volt digital meter (Amazon)
- 12V power port (Amazon)
- Power Pole crimper (Amazon)
- A proper wire terminal crimper (Amazon)
- Battery terminal posts (Amazon)
- Female spade connectors for batteries (Amazon)
- Wire terminal crimp ring connectors (Amazon)
- WAGO lever nuts (Amazon)
- 16AWG Wire (Amazon)