
I upgraded our travel trailer’s 225AH (amp hour) battery bank with a 300AH lithium iron phosphate (LiFePo4) battery. This post will share why I made this decision, what I have learned about lithium batteries, some challenges of installation (it wasn’t a simple battery replacement), the significant differences between lithium and flooded lead-acid batteries, and the changes one may have to make to their own systems to maximize their installation.
The conversation is about large batteries (capacity greater than 100 amp hours) that are appropriate for RV use.
Definitions
First, let’s set some definitions.
House Batteries
Our focus is on the batteries that are used to power the accessories and appliances in a motorhome, travel trailer, 5th wheel, and campers. These batteries are much different than a battery used to start a vehicle. With motorhomes, which are self-contained, the living space is also part of the vehicle itself and requires two battery systems. One battery system starts the vehicle’s engine and the other powers the living space. The lithium batteries used to power the living space are not appropriate for starting the engine.
Lead-Acid Batteries (common types)
The simple lead-acid battery has been around for over 150 years. Plates inside the battery are suspended in a liquid electrolyte (“acid”).
FLA (flooded lead-acid)
The simplest is the flooded-lead acid (FLA) battery, which is vented to the atmosphere allowing the gases created during charging to escape. These gases are almost entirely water. Because gases escape, the amount of water in the electrolyte in the battery decreases over a period of time, requiring periodic maintenance, which mostly involves adding distilled water to ensure the to top of the interior plates remained covered with liquid.
SLA (sealed lead-acid)
Same construction as the FLA, except the battery is not vented. There is enough space inside the battery to allow the gases to expand and then contract.
AGM (absorbent glass mat)
Instead of a large pool of electrolyte, the electrolyte is soaked into a sponge like material between the plates.
Which is Best?
There are times a SLA or AGM may better fit an application, the lifetime and characteristics are similar. FLA are the cheapest and provide a minimal advantage in capacity and the number of times it can be recharged.
For this discussion, from this point forward, I will simply refer to all lead-acid batteries as FLA.
LFP Batteries
There are many kinds of lithium batteries. For an RV application, you probably want a lithium iron phosphate (LiFePo4) battery. It is classified as a lithium-ion type of battery. Not all lithium-ion batteries are LiFePo4 batteries. If you are in the market to upgrade your battery bank, read the specifications of any battery you are considering.
To avoid typing too many letters repetitiously, from this point forward I will refer to LiFePo4 batteries as simply, LFP batteries.
LFP batteries are not the batteries we read about when a battery bursts into flames and burns down a house or an electric vehicle. LFP batteries are safe if they are not abused or used in a manner that is contrary to the manufacturer’s instructions.
They are also well suited for use as a RV battery, where the battery is used to power the living space of the RV.
Why Did I Change?
The batteries I replaced were only 3.5 years old and working fine. Probably had another 3 years of life left in them. But I was looking towards the future.
Convenience of LFP Batteries
Weight
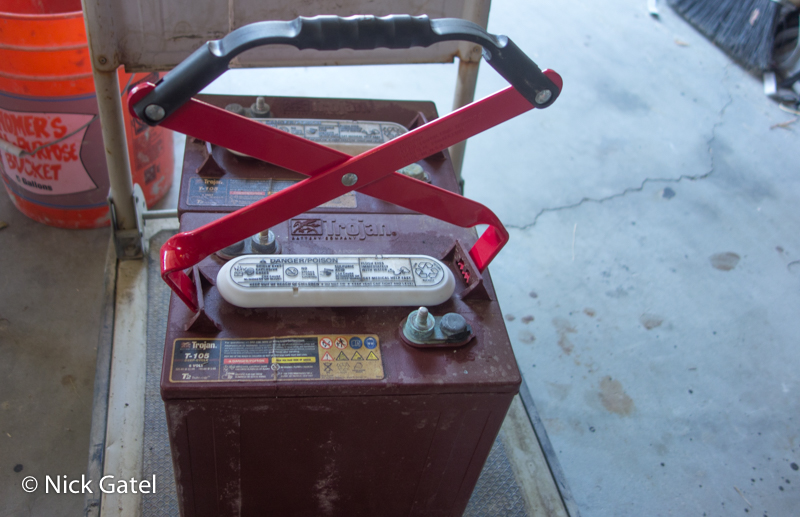
I have been running two 6volt FLA batteries wired in series in our campers for many years. Wired in series, these batteries created a large 12volt battery bank, designed for many discharge/recharge cycles.
Unfortunately these batteries are heavy. Each one of our Trojan T-105 batteries weigh 62 pounds.
I did not relish the idea, that in three years of so, I would have to lift a couple of 62 pound batteries. Keep in mind, assuming I am still alive, I will be 74 years old in three years. Plus, when things go bad, they usually happen at the most inopportune time.
Not only are these batteries heavy, they were stored in a somewhat difficult to reach location behind our propane tanks. To gain access, the propane tanks must be removed first to gain access. Removing the tanks isn’t a big deal for me, but even with the tanks removed, the load distribution hitch jacks are an obstacle to easy access. These jacks are meant to be left in place permanently.
Lastly, the battery storage area is in a recessed area of the trailer’s A-frame and the front wall of the trailer angles over the battery location.
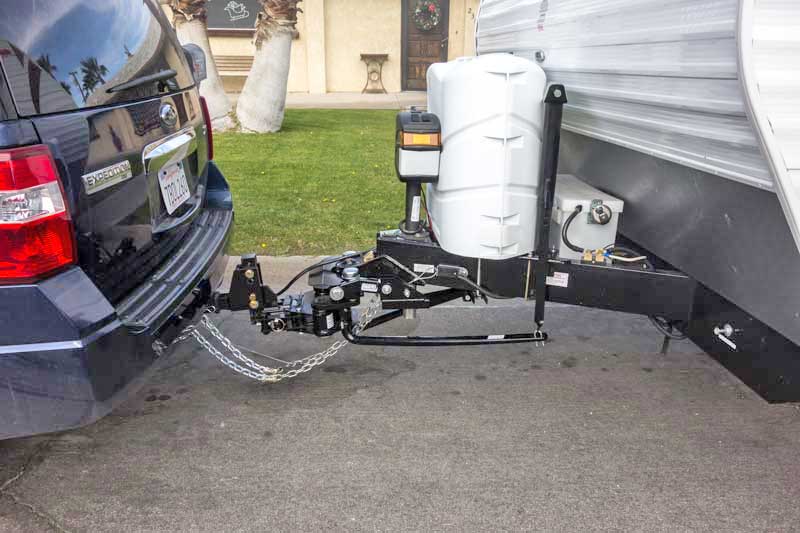 This picture shows the location of the battery box located behind the propane tanks and the trailer hitch jacks.
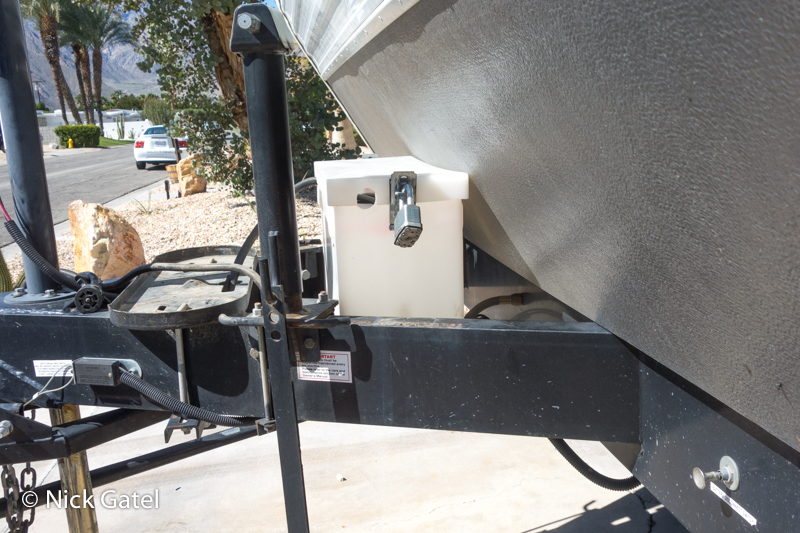
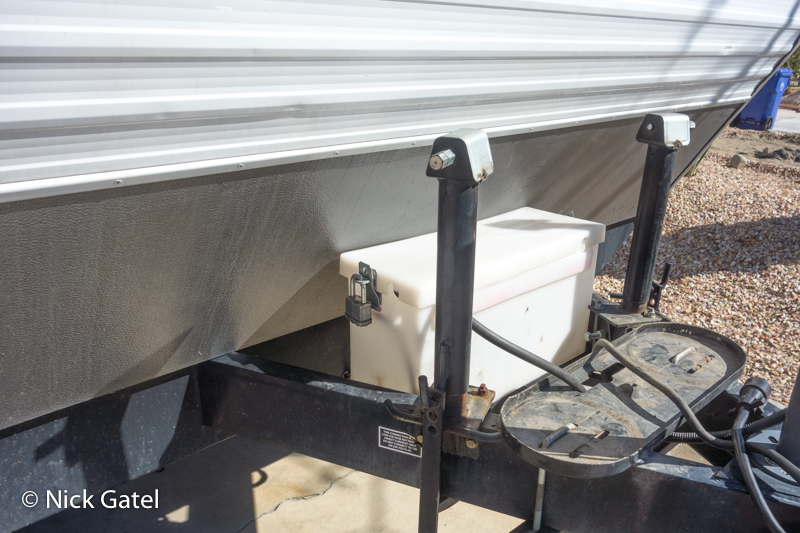
As you can see, removing the batteries isn’t a simple task. To clear the front of the trailer, the batteries have to be tilted as they are lifted up. In addition, the batteries fit snug into the battery box leaving no extra space to maneuver the battery as it is lifted.
Using a step ladder and standing on the trailer frame I was able to lift each battery, one at a time, and place it on the propane tank tray. Then, using the step ladder, I stepped down onto the ground and lifted the battery off the propane tray.
It would have been next to impossible for me to do without the aid of a battery carrier.
This website may be compensated for linking to other sites for sales of products. As an Amazon Associate I earn a small fee from qualifying purchases at no additional cost to the purchaser.
https://www.amazon.com/Lisle-57850-Battery-Carrier/dp/B0002SRD0U?th=1
Options
Because these batteries are vented, one would not want to put them into the front storage compartment in the front of our trailer, the gases could permeate into the living area.
An option would be to put a couple SLA or AGM batteries in this storage compartment. It would be easier to replace batteries stored there, especially if I added a sliding platform that could pull the batteries out of the interior. This adds complication, cost, and weight.
Installing a LFP battery in this compartment would be a lighter option. Plus, LFP batteries last much longer than FLA batteries. The downside is LFP batteries are significantly more expensive.
The Good News
I replaced our two 62 pound batteries (136 lb total) that have a capacity of 225 amp hours with a single 12volt 300 amp hour battery that only weighs 59.5 lb!! Not only is it lighter than just one of the 6volt batteries, it has carrying straps built in, and I wouldn’t have to tilt it to install it.
Oh, I forgot . . . the new battery doesn’t require adding water to it periodically.
Location, Location, Location
With the flooded lead-acid batteries my only real option for battery location was the factory installed platform behind the propane tanks.
I could install a LFP battery anywhere I wanted, as long as there was enough space.
Before we move on to the installation, a discussion of how and why I made this particular battery choice is in order. Part of that choice was trying to separate BS from true facts.
Lithium Battery Hype
It is difficult to get solid factual data about LFP batteries because there is so much wrong information being feed to the public. For one thing, they are a fairly new technology. Flooded lead-acid batteries are a different story. They’ve been around for over 150 years. Manufacturers such as Trojan Battery Company and Crown Battery Corporation publish much accurate data. Plus we have the experience of millions of users.
I have found that many sellers (and manufacturers) of LFP batteries are disseminating a lot of false information. So we need to have a discussion on how we can sift through all the claims and come to an understanding of how a FLA and LFP battery of the same amp hour capacity really compare. Studying the depth of discharge of each and the expected number of recharges over a battery’s lifetime is what we need to examine first.
Charge Cycles and Depth of Discharge
Depth of Discharge (DOD) is the amount of capacity used before recharging, usually expressed as a percentage of the total capacity.
The higher the depth of discharge, the fewer charge cycle life it has. The chart from Trojan Battery, which is accurate explains it well visually.

The chart is for a FLA battery. Looking at the chart we can see that
- If the battery is discharged 100% every time, it can be recharged about 500 times
- If it is discharged about 50% every time, it can be recharged about 1,200 times
- If it is discharged about 80% every time, it can be recharged about 3,000 times
The 50% DOD seems to be a nice median for cost, capacity and charge cycles. Well, at least for something you can recharge each day, like a golf cart. With a RV that is solar powered, weather often dictates when and how often you can charge a battery. It is a “real world” problem. In any case, the chart can be useful even when trying to size a battery bank to an individual application. We’ll talk about that later in more detail.
Below is a LFP table from Victron Energy, a highly regarded company in the Netherlands. Victron states a 50% Depth of Discharge will result in a battery cycle life of 5,000 recharge cycles. This seems reasonable to me based on all my research, but it doesn’t match up with what a lot of the marketing folks preach.

Trojan FLA is around 1,200 cycles at 50% discharge. I suspect the 5,000 cycle life cycles of a LFP battery at 50% DOD is accurate.
Battle Born Batteries states that their LFP batteries, which they heavily market to RV owners, will deliver 3,000-5,000 cycles.
Let me preface this by stating, based on my research, Battle Born Batteries are among the best in the market. If their batteries fit your budget, I highly recommend them. But let’s look at what they say in the FAQ page.
“The upfront cost of our lithium deep cycle battery is higher than a lead acid equivalent. But, when you divide that cost by the life of the battery, our LiFePO4 battery is already cheaper than a lead acid battery.
When cost and time associated with changing the batteries is factored in, you really save a bundle when you decide to install a Battle Born battery bank. Able to run 3,000 cycles, most people will have these batteries for 10 to 15 years.”
And in another FAQ, they state that,
“Most lead acid batteries experience a significantly reduced cycle life if they are discharged more than 50%. That can result in less than 300 total cycles.
I challenge this. Based on the Trojan Battery chart shared earlier, which is accurate and verified by tens of thousands of users, even discharging 100% will result in a cycle life of over 500 cycles, and approximately 1,200 cycles at 50% DoD. Here we are assuming the battery bank is recharged right after each discharge cycle.
Later, they approximate 3,000 to 5,000 cycles at 100% DoD.
“Conversely, LiFePO4 (Lithium Iron Phosphate) batteries can be continually discharged to 100% and there is no long-term effect. You can expect to easily get 3000 – 5000 cycles at this depth of discharge.”
I doubt this too. Certainly Victron Energy disagrees, in their table shared previously. It must be pointed out that almost no one with a RV is going to consistently discharge their battery bank 100%. In fact knowledgeable owners work hard to avoid such a situation and size their battery bank to avoid it. If you are camping in a remote location, relying on solar power, and discharge your battery 100% with a full day of rain in the forecast — well, I think you can figure out what would happen.
In all fairness to Battle Born, they guarantee their batteries for 10 years. They also state that their batteries should easily last 10 years, which is probably very accurate.
My FLA batteries usually last 5 – 6 years. So one should be able to state with some confidence that LFP batteries should last twice as long — maybe even longer. But I must point out that all batteries, no matter what their chemical make up, will lose capacity over time. Trojan Battery warranties their FLA batteries to maintain at least 80% of its original capacity for three years. Many LFP manufacturers warranty their batteries to maintain 80% capacity for 8-10 years. Here we see LFP warranties of around 3X as long as FLA batteries.
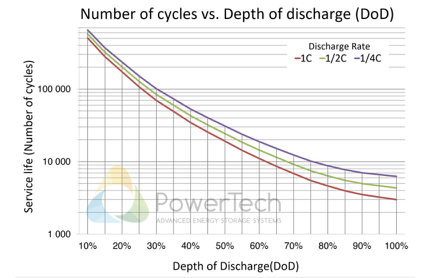
Then we have PowerTech. Their batteries are awesome, almost omnipotent 🙂
They are claiming over 10,000 charge cycles at 50% DOD, more than double Victron Energy’s table above. Even more amazing, they are claiming more than 100,000 charge cycles at a DoD of 25% !!!!
Look for yourself (below).
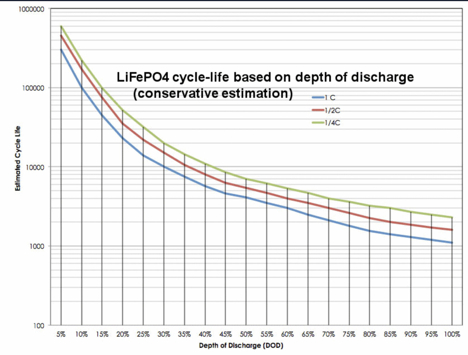
Here is another one. I forgot where I found it. Not only are the numbers outrageous, the chart states the data is a conservative estimation.
Another “Argument”
Many LFP sellers state that,
“Lead-acid batteries need to maintain at least a 50% charge level to deliver sufficient voltage . . .”
This is not-true. a flooded lead acid battery will be at around 12volts when 50% discharged. If properly charged to the manufacturer’s specifications, as I wrote in this post:
State of Charge: Your Camper/RV May Be Killing Your Battery Bank
Our battery bank is at 11.96 volts when the DOD hits 60%. But here’s the thing . . . 12 volt appliances and gadgets will continue to work when the voltage drops below 12volts. The inverter in our camper will provide around 120volts of AC household power when the battery voltage is anywhere from 10.7 – 16.5 volts DC!
Can You Really Discharge a LFP Battery 100%
Another thing, is you can’t really run some LFP batteries down to a 100% DOD, as all the charts claim.
If you do, some cannot be recharged with a battery charger or solar controller.
Here’s a an answer to a question I found from a LFP battery company.
Question:
How do you reactivate the battery once the BMS kicks in when the battery is over discharged?
Answer:
If the BMS has cut-off the battery for protection, you need to cut off the load of the battery and put the battery aside for 30mins. Then the battery will automatically recover itself to normal voltage and can be used after fully charged.
If the battery is unable to recover itself and its voltage is too low to hold a charge, you can activate it in below two ways.
- Use the charger with 0V charging function (it can charge the battery starting from 0V) to charge the battery. After fully charged, the battery can be used normally.
- Use another 12V lithium battery to connect in parallel with the battery for a minute to activate the battery (lead-acid battery with voltage more than/equal to 12V and less than/equal to 14.6V will also work). After that, fully charge the battery and it can be used normally.
This is some good information. First, you will be hard pressed to find a battery charger with a 0volt charging function. Most battery chargers immediately go into boost mode when connected, which is usually 14.2 to 14.4 volts.
Secondly, I experienced this problem with the LFP battery bank used to power my telescope system. I forgot to recharge the battery bank and one night I ran the system all the way down to 100%. I could not charge the battery bank with any of my chargers or my trailer’s solar system. What I did, was connect the LFP bank to my truck’s battery with the engine off. 30 minutes later I was able to charge the battery.
This discharge problem I just shared is not generic to all LFP batteries, and it is not a battery charger problem. From what I have read, it is the circuit board in the battery, called the Battery Management System (BMS) that is the culprit. Quality batteries, such as Battle Born, should not have this happen.
But tuck the solution away in your mind. Should you be camping in a remote places and your LFP battery discharges 100% and won’t take a charge, you’ll remember how to get the BMS working again.
The Truth
I know people who have gotten 8 or 10 years out of their FLA batteries on a solar powered RV. I don’t know the specifics of their daily charge or discharge rates.
I don’t get that kind of life from my batteries. But I often operate the batteries beyond the manufacturer’s specification of a maximum operating temperature of 113° F. There are so many factors that affect the life of a battery, and laboratory testing (manufacturer’s specifications) are not going to always align with real world use.
Typically I get 5-6 years out of my FLA batteries. This doesn’t mean they fail in 5-6 years. What is means is the battery capacity has dropped below 80% and I opt to replace them, although I could get much more use out of them. In other words, a 225AH battery bank, would have a capacity of 180AH at 80% degradation and 157.5AH at 70%.
I don’t think there is enough long-term, real world, user data to validate or dispute all the LiFePo4 claims. I’m nearing the goalpost of life (my time on the planet is running short), so I don’t need a battery bank that can deliver 100K discharge cycles, should such an animal exist.
Who Can You Trust?
I like what I have read about Victron Batteries. They are headquartered in the Netherlands and their batteries are not as widely available as other brands.
I have found through all my research that Battle Born Batteries seem to be the most honest about their products. But even they are nebulous at times, as discussed earlier. I have seen 3rd party videos that disassembled the brand’s batteries and they are absolutely well made.
At the end of the day, you need to trust your own research and judgement. Perhaps the following methodology might help you to make a decision if you are considering a LFP battery.
I can put together a 225AH Trojan FLA Battery bank for around $400. (Trojan batteries along with Crown are top of the line). They are rated at 1,200 charge cycles at a DOD of 50%.
I can also put together a 200AH Battle Born Battery bank for $1,600. That is 25 fewer AH than the Trojans at 4 times the cost. However, the charge cycles at 50% DoD is probably around 5,000 cycles — per the data I have presented. This is a little over 4 times as many charge cycles as the Trojan FLA at four times the cost. Plus the Trojan batteries have about 12.5% more capacity. So it is probably close to an even trade-off, cost-wise.
I have to admit that all my recent research on LFP batteries has been a real eye opener. Just 2 or 3 years ago the prices of LFP battery did not made sense as far as a “return on investment.” Today, changing to LFP has plenty of advantages and no downside, other than the upfront cost to buy a battery bank that will probably last 10+ years.
Relating to the above scenario of Trojan FLA batteries versus Battle Born LFP batteries, you can also buy a generic brand 200AH LFP battery on Amazon for as low as $700 as of today, which would be less than half the cost of a couple Trojans over the lifetime of both — assuming the generic brand can deliver similar charge cycles to the Battle Born. But, you can trust the Trojan and Battle Born batteries. Maybe not some of these generic Chinese batteries.
Of course one can do all kinds or cutting and pasting of data and use formulas to generate a cost per watt-hour that really doesn’t reflect real-world use.
Another thing I must point out about FLA batteries, and I wrote about it in State of Charge: Your Camper/RV May Be Killing Your Battery Bank, is most battery chargers do not charge deep cycle batteries at the rates specified by battery manufacturers, nor do most solar charge controllers if the default values are used. Add in a bit of poor battery maintenance, and many people are experiencing a shorter battery life than should be expected.
In a sense, we can take all of these specifications with a grain of salt, so to speak. Batteries are tested under ideal laboratory conditions. In the real world, we RV owners operate in constantly changing environments and needs.
One thing we should consider, aside from price, is whether one type of construction vs another offers other significant benefits. LFP batteries are superior to FLA batteries on many points. So there is more than just cost, whether it be initial investment or dollar cost average over a period of time.
There is no doubt a LFP battery will deliver many, many charge cycles, but to be honest — I don’t care.
What I care about is Battery Capacity and Convenience.
Battery Capacity
Battery capacity is measured in Amp Hours (AH). a 12 volt light that consumes 2 amps will, in one hour, consume 2AH.
Our old battery bank had a capacity of 225AH. On a daily basis we used around 10% of our capacity, or 22.5AH. Of course most of the time we are not in our camper. We are out doing fun things. But there are days when the weather turns really bad, and we hang out at our campsite. We are using more AHs than normal. But rarely more than 20%, or around 45AH per day.
If we experience several days of rain, our solar system cannot recharge the battery bank and we almost never camp where there are electrical hook-ups (like maybe once every 5 years). These are the times I pay attention to our electrical consumption. Over the course of those multi-day periods, by monitoring the system, my goal is to not consume more than 80% of our capacity, which still gives us a bit of cushion. 80% of 225AH is 180AH. 180AH over 5 days is an average of 36AH per day, which is easy to do, if we simply watch what we are doing — this is something we do in these conditions.
Should the weather be so bad, for more than 5 days, with zero solar production, we are going to pack up and go home, or find a better place to tow our trailer to.
By the way, we have been using solar on our campers since 2003, — almost 20 years — and we have never had a dead battery!!
So, 225AH is about the minimum capacity I am willing to limit ourselves to. Nothing else really matters.
Battery Dimensions and Weight
Most larger LFP batteries (capacity of 100AH or more) are sized to standard battery group sizes. For example our Trojan 6volt Golf Cart Batteries are size GC2. Wired in series, they provide a 12volt battery bank with a 225AH capacity.
Battle Born sells 12volt GC2 size LFP batteries with a 100AH capacity. Two of these batteries, wired in parallel, would give us a 200AH capacity and would fit perfectly into the existing battery box. It was an option option to continue using the battery box behind the propane tanks.
These GC2 Battle Born batteries weigh 31 pounds each, and would be much easier to deal with weight-wise. Forget the claims of some LFP sellers that their batteries weigh 1/3 of conventional batteries. The Battle Born GC2 weigh exactly 1/2 of our FLA batteries. But, 200AH is less than my minimum target of 225AH. Not a viable solution for me.
Here is an interesting table:
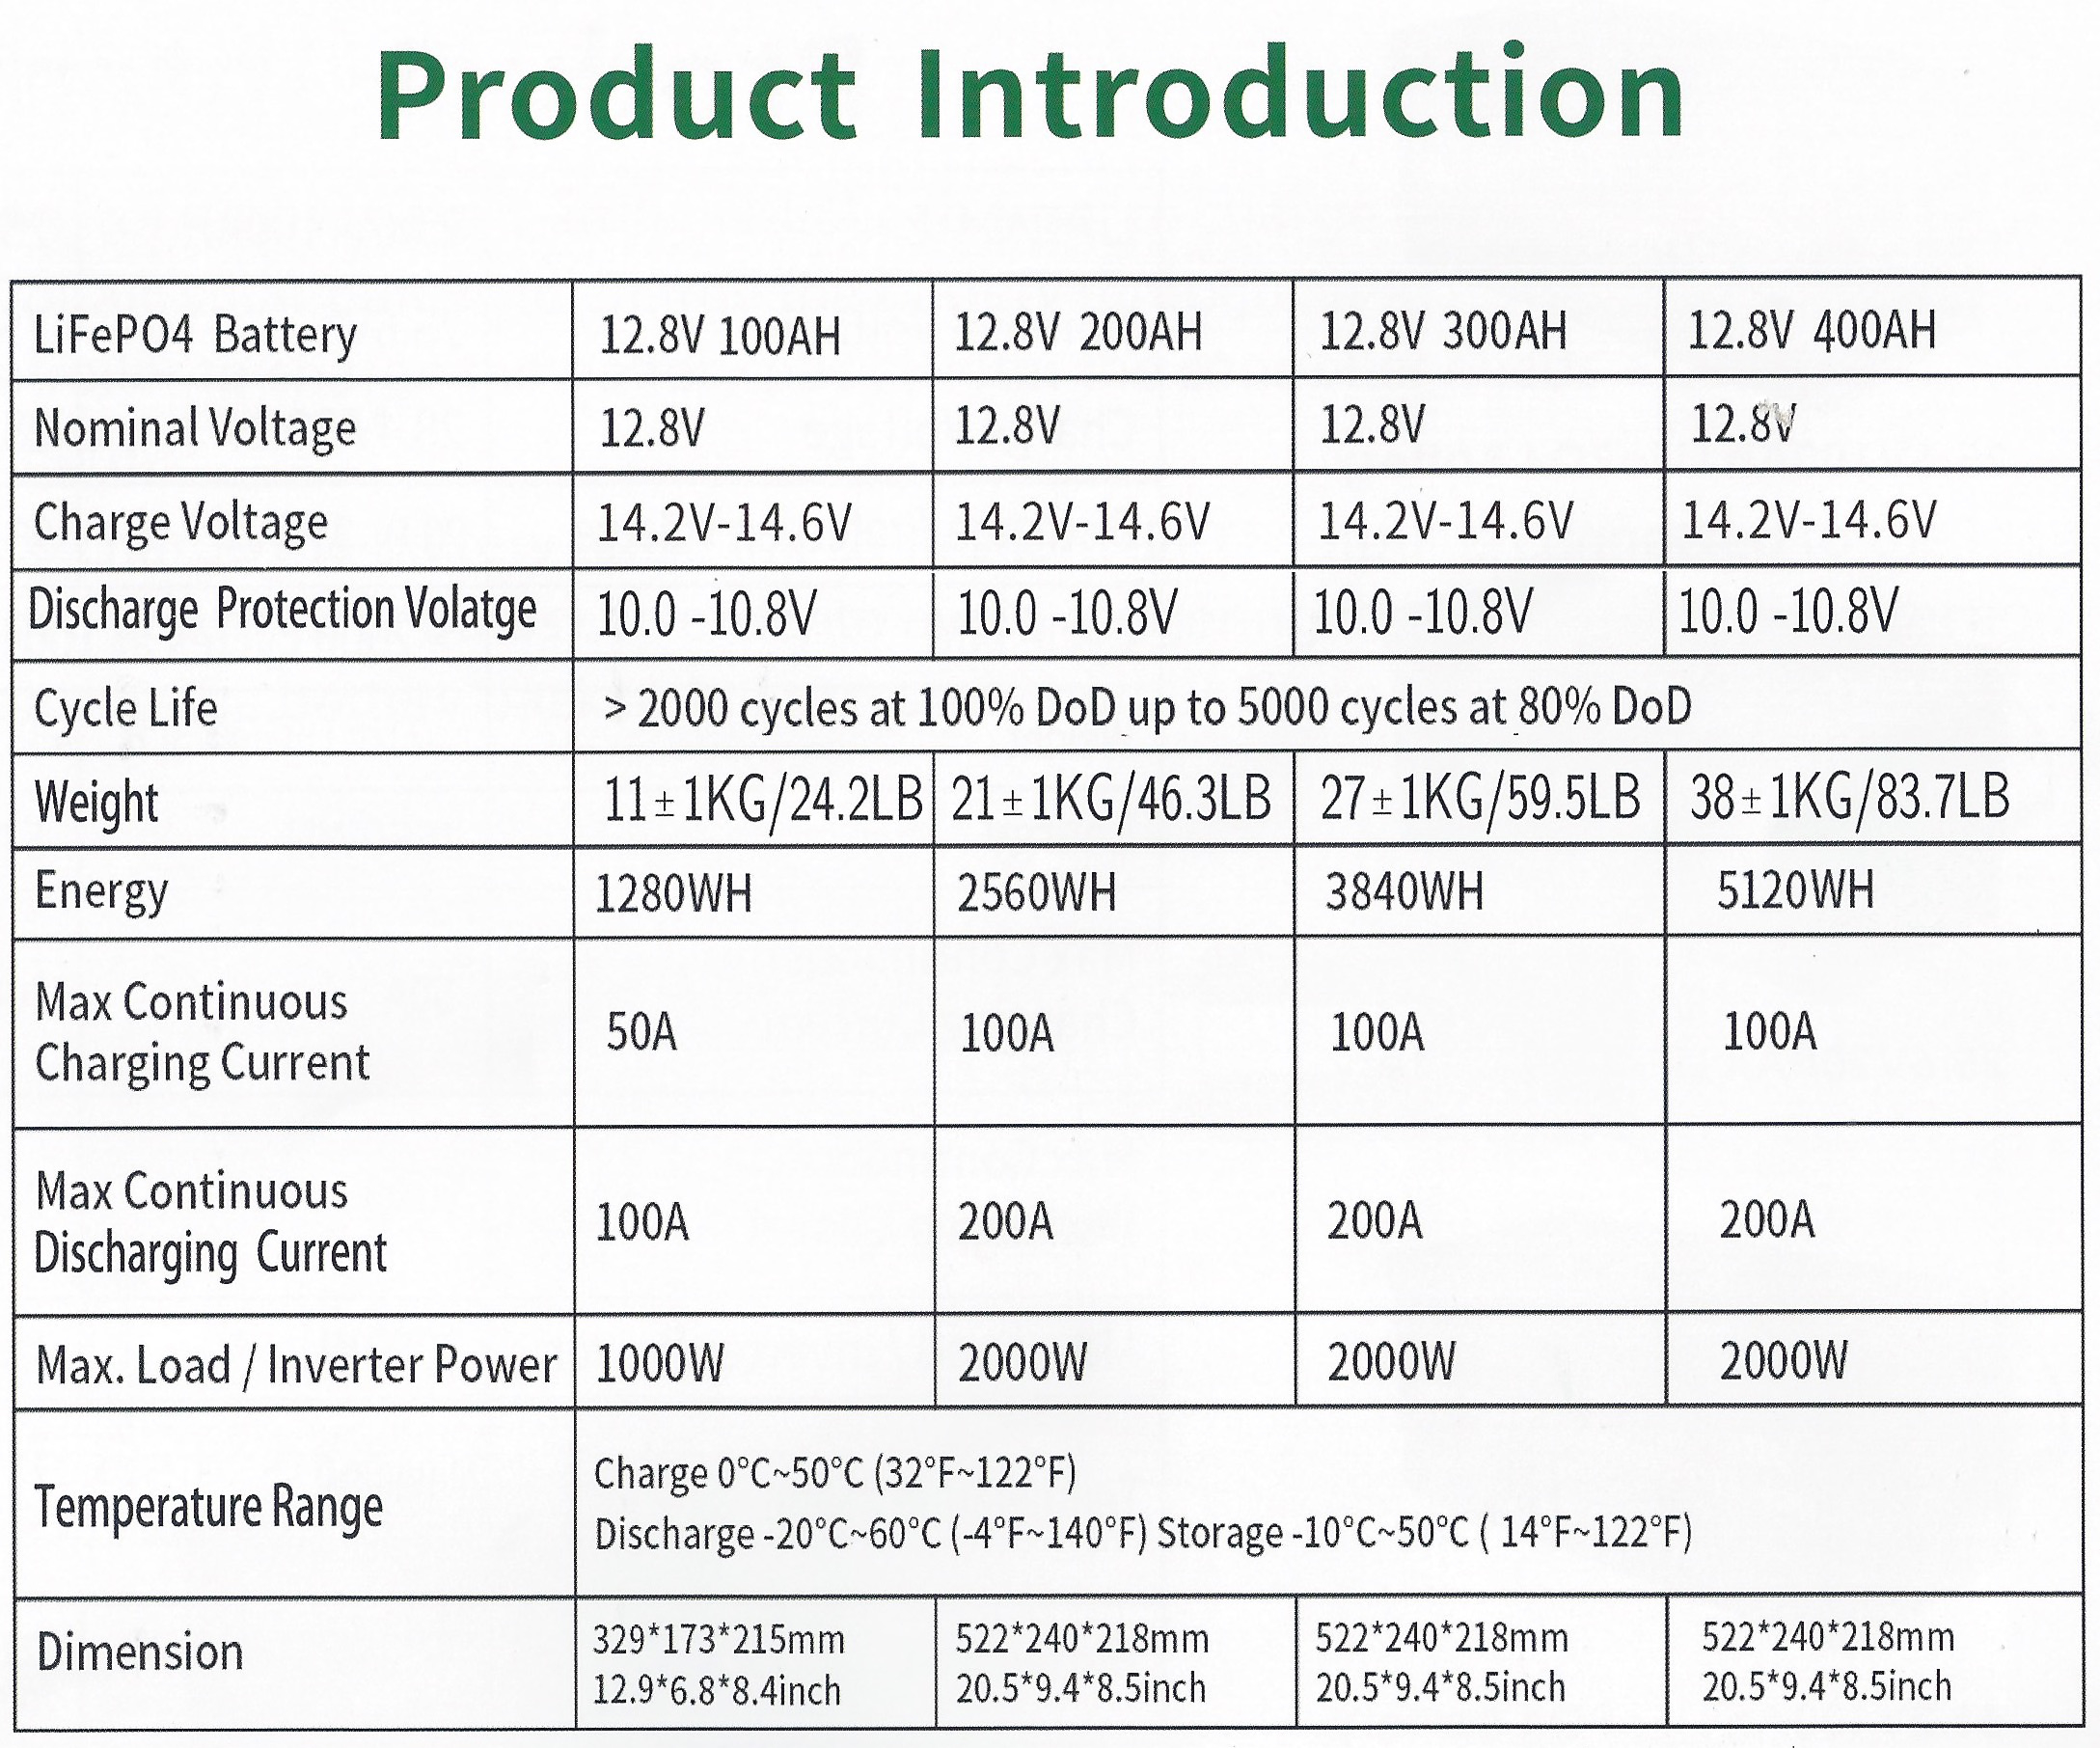
Notice that the three batteries on the right; 200AH, 300AH and 400AH all have the same dimensions of 20.5 inches X 9.4 inches X 8.5 inches. This is a Group 4D battery. The dimensions determine the size.
Also note the weights of 46.3LB, 59.5LB and 83.7LB as the capacity increases.
To compare, the typical FLA 4D Group Size battery will weigh between 100-150 pounds and have a capacity from 150-220 amp hours. Now we are beginning to see some other advantages of LFP batteries.
The reason LFP batteries can have such higher capacity and significant weight savings is because the energy in the LFP cells is much denser. A 200AH Group 4D LFP battery is going to have a lot of empty space inside the case.
Battery Capacity Options
Flooded Lead-Acid batteries are a mature product. They’ve been around for over 150 years. Thus, there are many more options for getting the capacity needed.
Plus batteries can be connected to increase voltage or capacity.
Two 225AH 6volt batteries connected in series creates a 12volt 225AH battery bank. Two batteries in series doubles the voltage while the capacity remains the same.
Two 100AH 12volt batteries connected in parallel creates a 12volt 200AH battery bank. Two batteries in parallel doubles the capacity while the voltage remains the same.
I point this out because most large LFP batteries have been limited to 100AH. But that is changing. Today you can find 200AH, 275AH, 300AH, 400AH and other capacities.
A Word of Caution
When connecting LFP batteries, especially in series, consult the manufacturer’s specifications. There may be limits to how many batteries can be connected. Also capacity should be the same for each battery and old batteries shouldn’t be mixed new ones. Lastly, the batteries should be fully charged and tested separately before combining to make a larger battery bank.
The State of the Market
The majority of LFP batteries suitable for RV use are 100AH. Most owners buy more than one and connect them in parallel. I have seen pictures of RVs with 7 or more 100AH batteries in use.
There are far fewer 200AH or higher capacity options for LFP batteries . . . but they are out there and increasing daily.
Since I already had a 225AH bank, and had determined it was the minimum capacity for us, my options were pretty much limited to 3 100AH batteries or perhaps a 300AH battery if I could find one for a reasonable price.
Three 100AH Battle Born Batteries would cost $2,397. Ouch!! Plus three batteries would take up a lot of space.
Battle Born also makes a 275AH Group 8D 12 volt battery for $2,259 that would take up much less space that the three 100AH. But damn! I could buy a new Sky-Watcher EGR-6 Pro computerized telescope mount for less money than that battery!
Quality
When spending this kind of money, one should look for quality. But in this day and age, how can we figure out who truly makes the best product, while balancing our budgets?
Battle Born Batteries (again)
I am fairly confident that Battle Born LFP batteries are probably among the best in the market.
Their batteries are assembled in the US.
Oops . . . that assembled thing. More than likely the battery cells are made in China and the final product is assembled here in the US. However, my research indicates that Battle Born uses proprietary cells built to their specifications, and there is high quality and testing during the assembly process. I also found out that Battle Born Batteries have a higher capacity that the stated specifications.
I don’t know who designs and builds Battle Born’s Battery Management System circuitboards. Even if Battle Born does not, they have selected quality units that meet all the parameters that a top of the line LFP will included.
So I give a big plus to Battle Born from all I have read.
The Challenge
The biggest challenge for consumers is most LFP batteries are made in China and obtaining accurate, reliable information about any of these batteries is next to impossible. Finding out who actually made them is often even more difficult.
Smart Batteries vs Dumb Batteries
Flooded Lead-Acid batteries are dumb. LFP batteries are smart.
LFP batteries need a Battery Management System (BMS) to monitor the battery and control battery charging. Inside the battery case is a circuit board that does this. And of course, all BMS are not created equal.
BMS Functions
- Prevents charging above a programmed voltage
- Prevents discharge below a programed voltage
- Keeps individual cells balanced
- Prevents charging above a specified temperature
- Prevents charging below a specified temperature
- Prevent excessive current draw
- Shuts down the battery if a short circuit is detected
The BMS is probably the weak point of LFP batteries for longevity. It is a circuit board. If it fails the battery fails or might become dangerous to use.
Most 12volt LFP batteries cannot be charged if the battery temperature exceeds 122F or falls below 32F. If one plans to use the battery in low temperature conditions, batteries with internal heaters can be purchased (at additional cost of course).
Heated Batteries
If the BMS detects charging voltage and the battery temperature is below 32F, it will turn on the heater until the battery temperature is above 32F, when it will allow charging to continue. Often batteries with internal heaters will have a lower maximum current draw specification than non-heated models.
Some Other Possible LFP Problems
One of the problems with inexpensive LFP batteries is some of them do not cut off the battery if the battery’s internal temperature exceeds the upper limit of 122° F, nor cut it off if the internal temperature drops below 32° F. And some do not cut off the battery if the charge voltage exceeds the specification of 14.6 volts or if the discharge voltage dips below the 10volt minimum.
Service & Warranty
At the top of the heap is Battle Born, who gets very high marks from their customers. It appears their customer service is top notch. Plus their factory is in Nevada.
Battery Born has a limited 10 year warranty for defects in material and workmanship. The warranty is not transferable.
Most other LFP manufacturers offer only a 5 year limited warranty. I have read many stories where customer service wasn’t poor — it was non-existent. Caveat emptor.
If the manufacturer is in China, which is very likely for most brands, warranty service might be difficult. For example, last year I had to send a mini PC to China for warranty repairs. It took 2 months and cost me $21 to ship it. All-in-all it wasn’t that bad. But shipping a 60 lb. battery that is considered a hazardous material might entail some serious difficulties. Also, will the Chinese company you have never heard of before still be in business in 3 or 5 years?
There are so many things to consider and weigh.
Although I have really built a business case for purchasing a Battle Born product, I bought something else.
Budget Considerations
I wanted to stay around $1,000 if possible — rather I could get approval for this from the Household CEO (my wife) — something around $2,500 would be a no-go. Going in, it was obvious that I would not be purchasing a top of the line product at this price point.
Private Label Batteries
We may see a plethora of battery brands, but in reality, there are only a few companies making batteries. In the US, deep cycle FLA batteries, are manufactured by just a handful of companies. Trojan, Crown, Exide and Johnson Controls build their own batteries. There are others too. I would venture to guess that East Penn makes the most. If you buy a Duracell, Sam’ Club, or some big box auto chain’s brand, it is made by East Penn. Johnson Controls also makes a lot of private label batteries.
Although Trojan or Crown make the best FLA deep cycle batteries, the private label brands are not significantly inferior. With proper maintenance and charging, they will last nearly as long as the top brands.
When we purchased our 2014 Milan Travel Trailer, we planned on a camping trip shortly afterwards, but I needed to upgrade the batteries and install a solar system first. You can read about it here:
Due to time constraints (I was working at the time), I bought a pair of Exide 6volt golf cart batteries because they were readily available. I used those batteries for almost 5 years. They were still working when I replaced them.
Most LFP batteries are going to be private label brands, only there are probably made in China, not the US.
Most LFP battery cells are made in China, and there are many, many manufacturers there. A LFP battery cell is not what we buy directly for our RVs. We buy a LFP battery that contains many of these cells. Companies buy LFP cells from the manufacturers, then assemble a standard sized LFP battery that includes a BMS circuit board.
The odds are, with a few exceptions, you will not be able to find out who actually made the final LFP battery you may want to buy. So it is a crapshoot.
Ignore Amazon (or other Reviews)
I bought a JITA brand 300AH LFP battery. The reviews on Amazon were stellar. 4.8 Stars out of 5, with 225 reviews. Awesome!
I knew, by reading the answered questions on Amazon, that JITA will give you a free battery charger if you leave a 5 Star Review. Is this unethical? By our standards, yes it is. But for many Chinese companies it is a common practice. I have purchased other products with an offer of free gift in exchange for a 5 Star Review. For the record, I never redeem these offers. So I ignored the reviews. On the other hand, unhappy customers, especially those spending a $1,000 are likely to go online and post a very negative review.
In the case of my JITA battery, there wasn’t a single complaint of a defective battery, and the handful of 1-3 Star reviews were complaining about insignificant things.
One possible good thing is JITA has their warehouse close to me in the Los Angles area, and it seemed a return of a defective product might not be too difficult. On the other hand, we need to understand that warehouses today are often run by logistics companies. They store and ship products for many different companies. So thinking a warehouse location might indicate the viability of a vendor is false thinking.
Anyway, I went ahead with my purchase, planning to do a lot of testing immediately to try and validate the quality as best I could.
Update 27Dec2023: A few months ago I built a remote power box for my telescopes using a LiTime 100AH LFP battery, which I detailed in this post:
LiTime (formerly known as AmpereTime) has earned an excellent reputation. Several well known experts have disassembled their batteries for testing and give them high marks. At this time I would recommend a LiTime battery over a JITA. LiTime has a 10 year warranty vs JITA’s 5 year.

Battery Voltage
LFP batteries are much, much different than FLA batteries when it comes to voltages.
Although it is a poor way to judge a battery, there are charts that indicate a batteries state of charge. These charts are useful to understand the relationship between a battery’s state of charge and its standing voltage. I found the chart below on the renogy.com website.
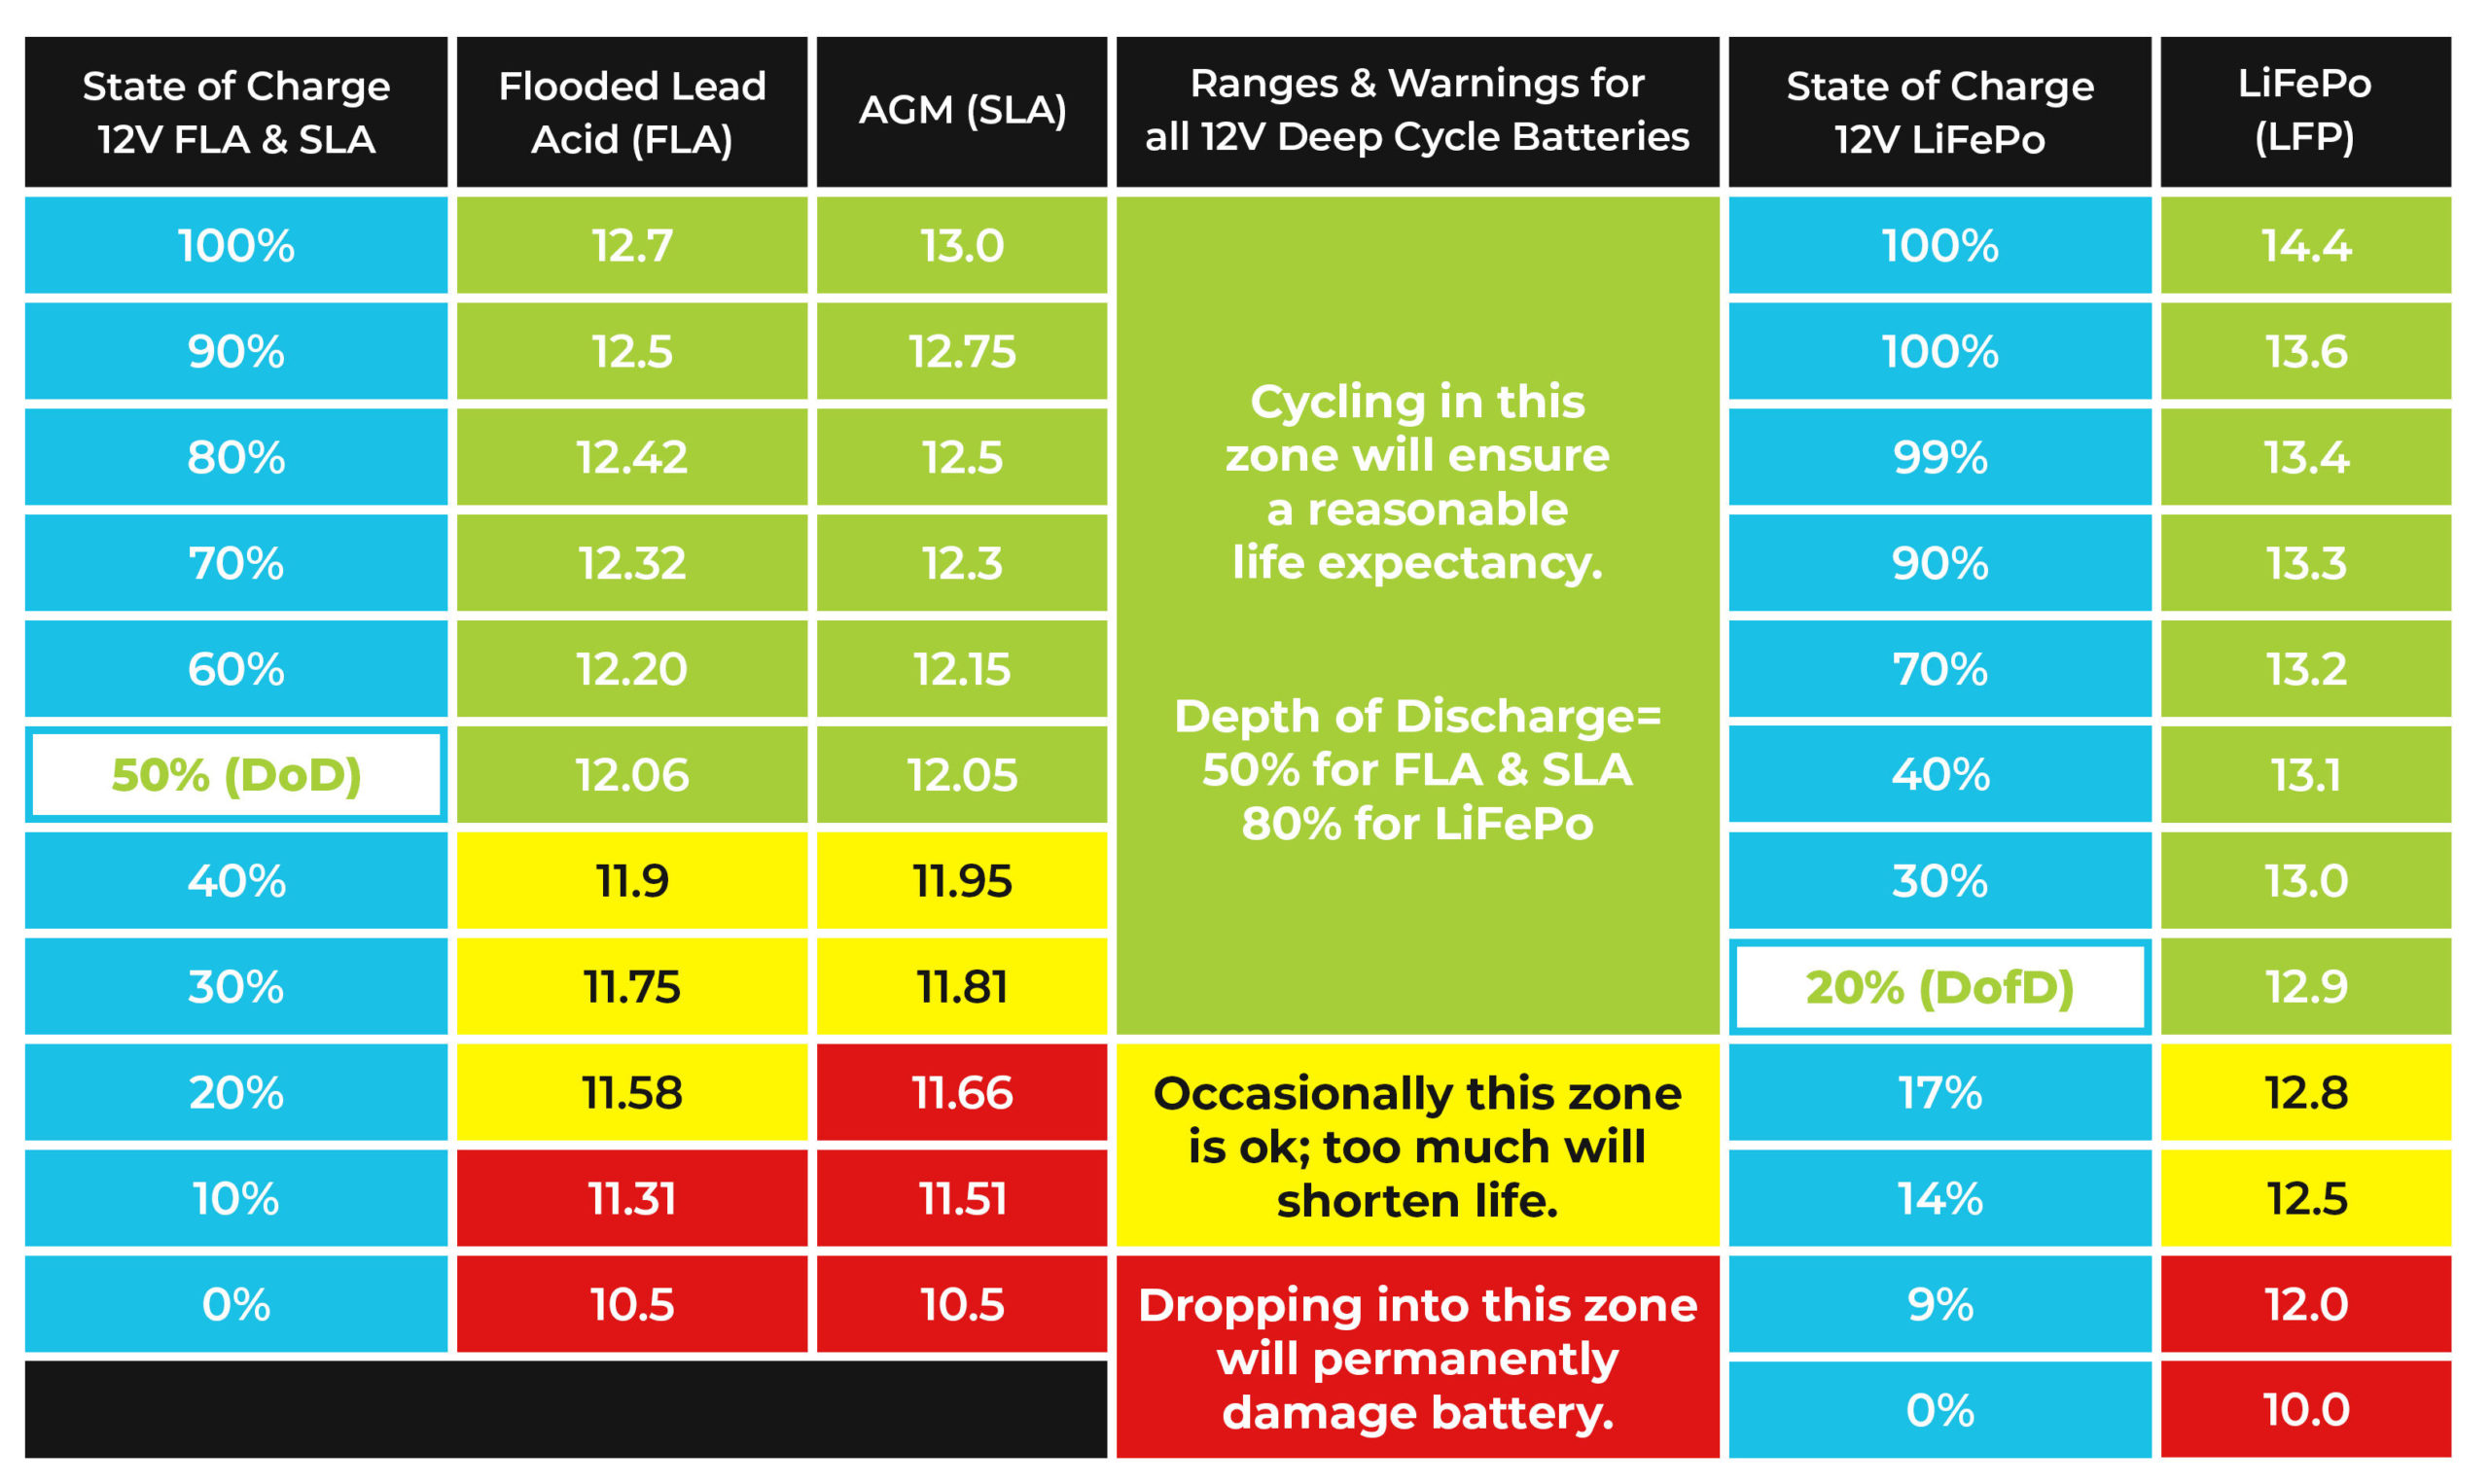
The State of Charge is somewhat linear for FLA and AGM batteries. As the standing voltage drops, the decrease in capacity seems to make sense.
The LFP battery certainly isn’t linear. Also, this chart is a little off. A fully charged LFP after a full charge is usually 14.6 volts. However the other voltages seem to match up with what I observed in testing.
After a full charge, my LFP battery was at 14.6 volts for a few hours, then it fairly quickly dropped down to 13.6 volts. This is expected and is normal. Without any load connected to the battery it stayed at 13.6 volts for several days.
In the chart, if the voltage is 13.2 volts, the State of Charge is 70% and then drops to 40% if the voltage drops by 0.1 volts. Egads!! No, it isn’t a problem.
These standing voltages need to be measured with no load on the battery, and the battery needs to stabilize for a while before taking a voltage reading. It isn’t a practical way to monitor a battery’s state of charge. Better is a battery monitor that measures how much amperage has left the battery, which will show a percent full based on the battery’s capacity. These monitors also measure how many amp hours have been put back into the battery when being charged, so the monitor always provides an accurate State of Charge reading.
Initial Testing
If a new battery is shipped to you it will not be fully charged. Shipping regulations specify that batteries must be charged at 50% or less of their rated capacity. Mine arrived with a voltage of 12.8 (approximately 20% of capacity). I expected this.
LFP batteries are best charged at a constant voltage in the range of 14.2-14.6 volts. JITA, like most companies, recommends 14.6 volts. Also, LFP batteries can be charged at a much higher amperage rate than FLA batteries. A 300AH LFP can happily recharged at 50% of it rated capacity, or 150 amps (check the specifications of your battery first!). That’s a lot and won’t take long for the battery to reach full charge. A 20% rate is probably better. For a 300AH battery that would be 60 amps.
I have a LFP battery charger for the small battery bank I use for my telescope that only charges at 10 amps maximum, and it would have taken over 24 hours to fully charge the new 300AH LFP battery. Instead, I used a regulated power supply that puts out 20 amps. I set the charger at 14.6 volts and connected it to the battery. As a battery approached full charge, the amperage started to decrease. When the power supply amperage dropped down to zero, the battery was fully charged at 14.6 volts.
I let the battery sit for a few days while I prepared the camper for the new battery installation. A few hours after charging the battery dropped to 13.6 volts and stayed there until it was time to install it. I will share the results of further testing, but lets keep things in chronological order and discuss the adaptations I need to make in our trailer.
Battery Installation
The front interior storage area is a perfect location for a LFP batter storage area. I already had put the 2000 watt pure sine inverter there. I would also be easy to reroute all the cables and wires.
With the access door open, which is quite wide, it wouldn’t take much effort to lift the new battery as the floor is waist level. Also, since it is inside the camper, it doesn’t get as cold inside this area as an external installation. Heating the interior of the camper also keeps the storage space somewhat warm.
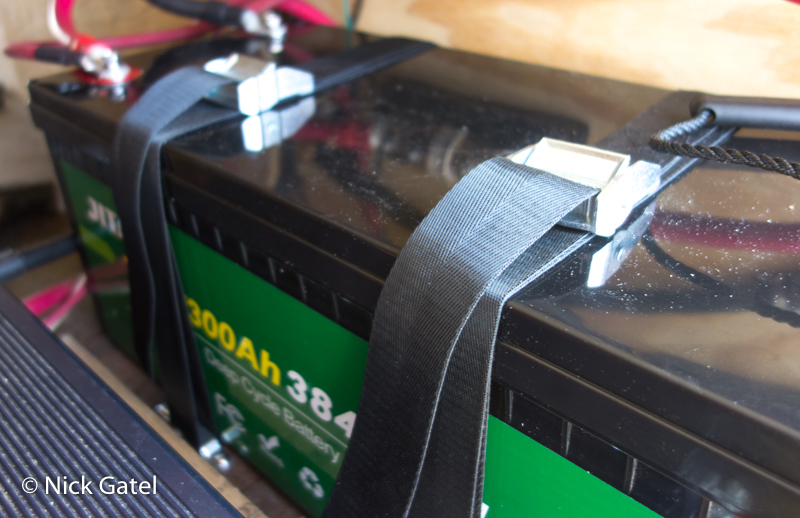
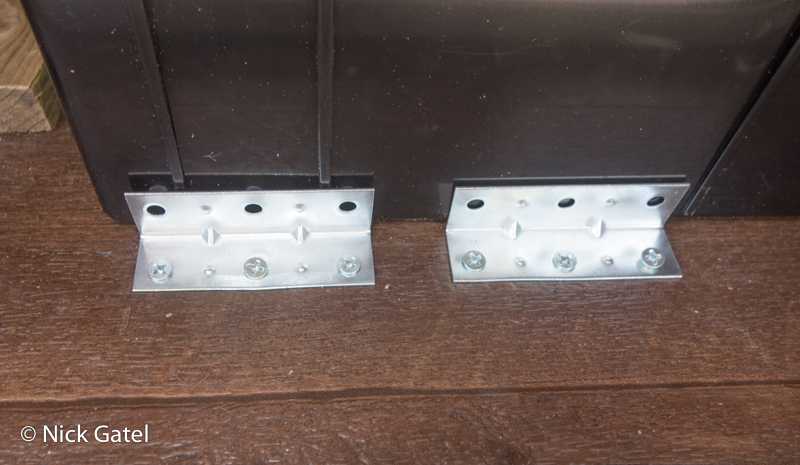
First task was to come up with a solution to secure the battery in place. A battery strap kit from Amazon, along with some small metal brackets to prevent the battery from sliding, was an easy and quick solution.


Cables and Wiring
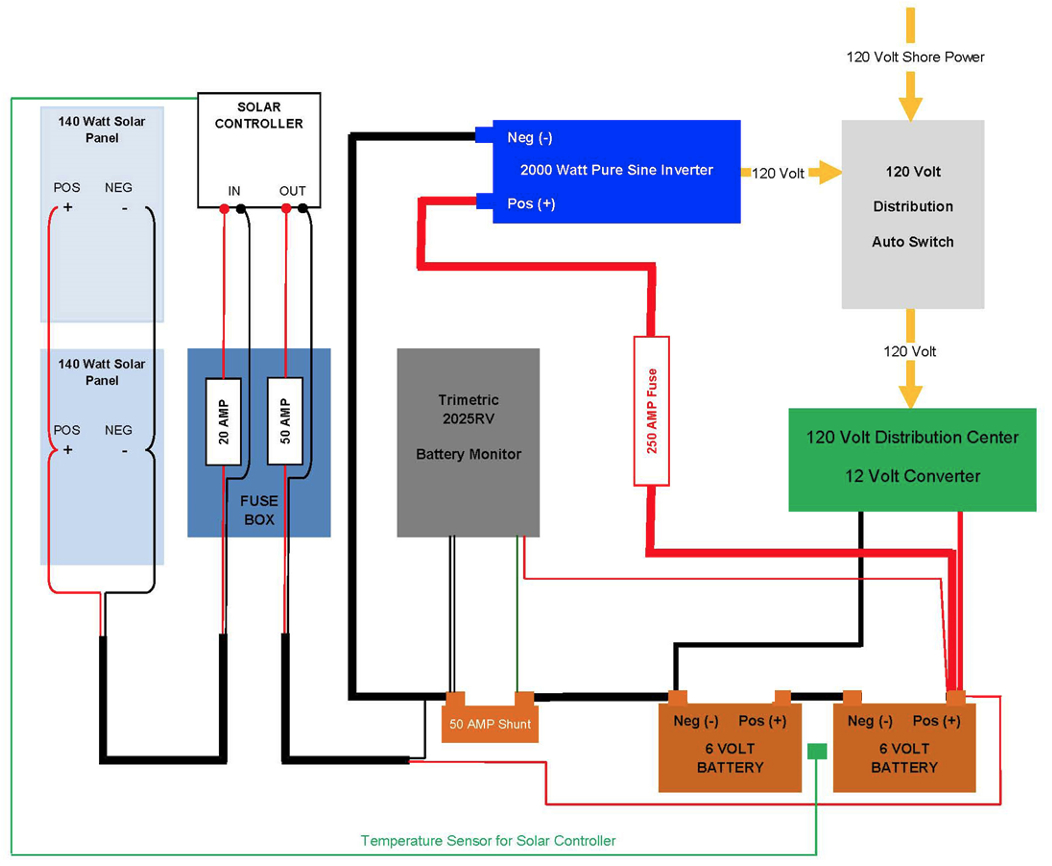
Moving the battery from the front of the trailer into the storage meant I would have to re-route almost all of the wiring and existing battery cables. Fortunately I had created a wiring diagram when I installed the solar panels and other equipment in 2013. I used that diagram to quickly complete the new wiring and was able to shorten most of the wires.
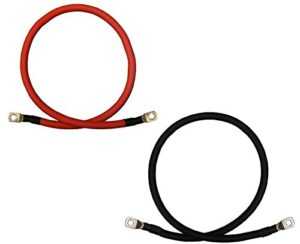
I was able to keep the heavy duty 2/00 gauge battery cables that I installed in 2013.
One thing I have always disliked is how I had connected everything to our battery bank, using the simple method of running wires with connectors that would connect to each battery post (positive and negative). What I had looked like a bunch of spaghetti.

Terminal Blocks
My solution was to install terminal blocks on the wall in the storage compartment. One for positive wires and one for negative. This way I could use a screw connector for for each wire and then a battery cable from each terminal block to the appropriate battery terminal.
I would also need an additional 1/0 AWG cable for each terminal block to connect to the battery.
This would also make adding additional components, if needed in the future, a simple matter to connect.
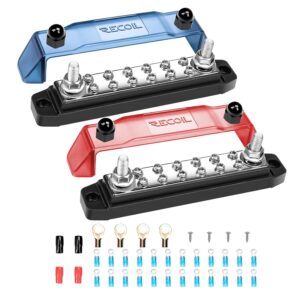
Off to Amazon I went and ordered two terminal blocks and battery cables.
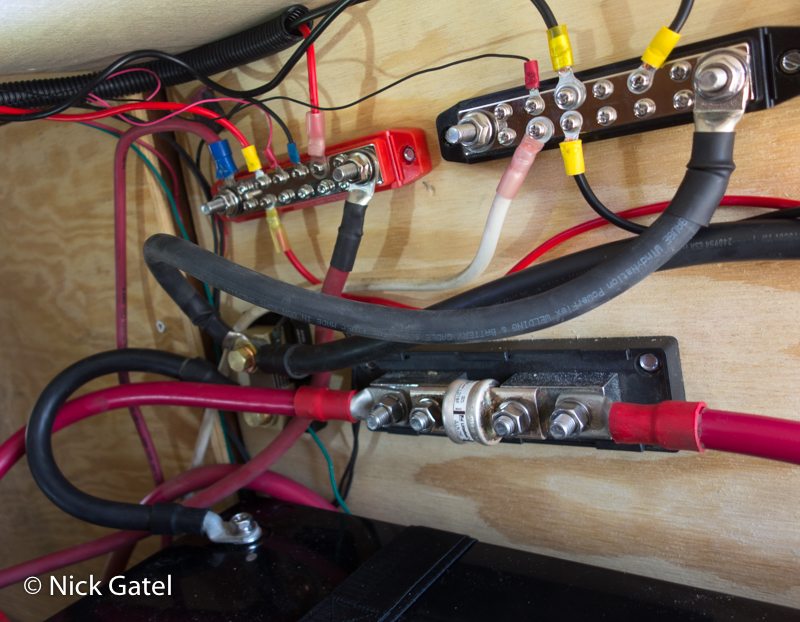
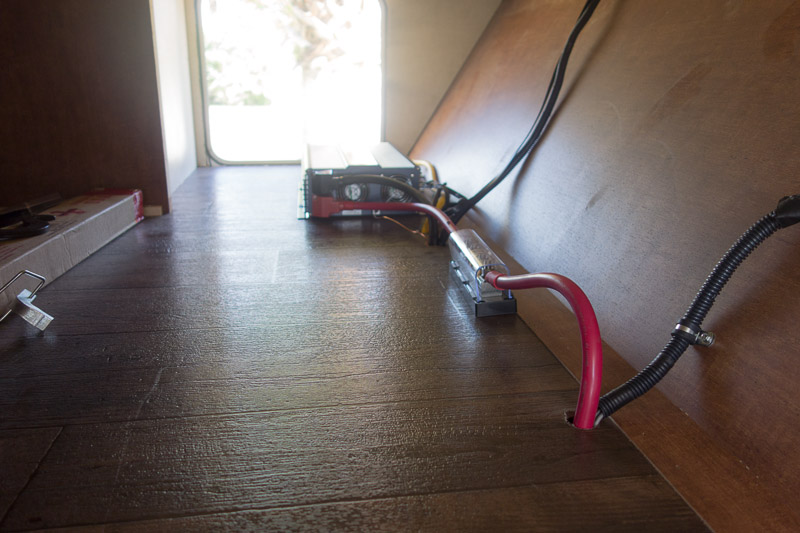
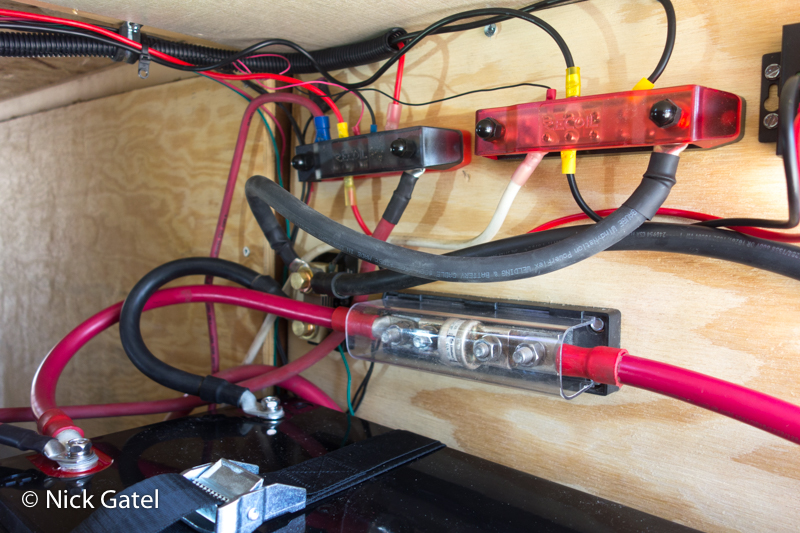
The large block in the center with the thick red cables is a “catastrophic” fuse for the inverter. A requirement per the instructions that came with our inverter. Just to the left of the catastrophic fuse is the amp shut (three huge black cables connected to it).
It is unlikely that anything can come loose and short out any of these connections at the terminal blocks, but I went ahead and installed the covers.
Battery Monitor Current Shunt
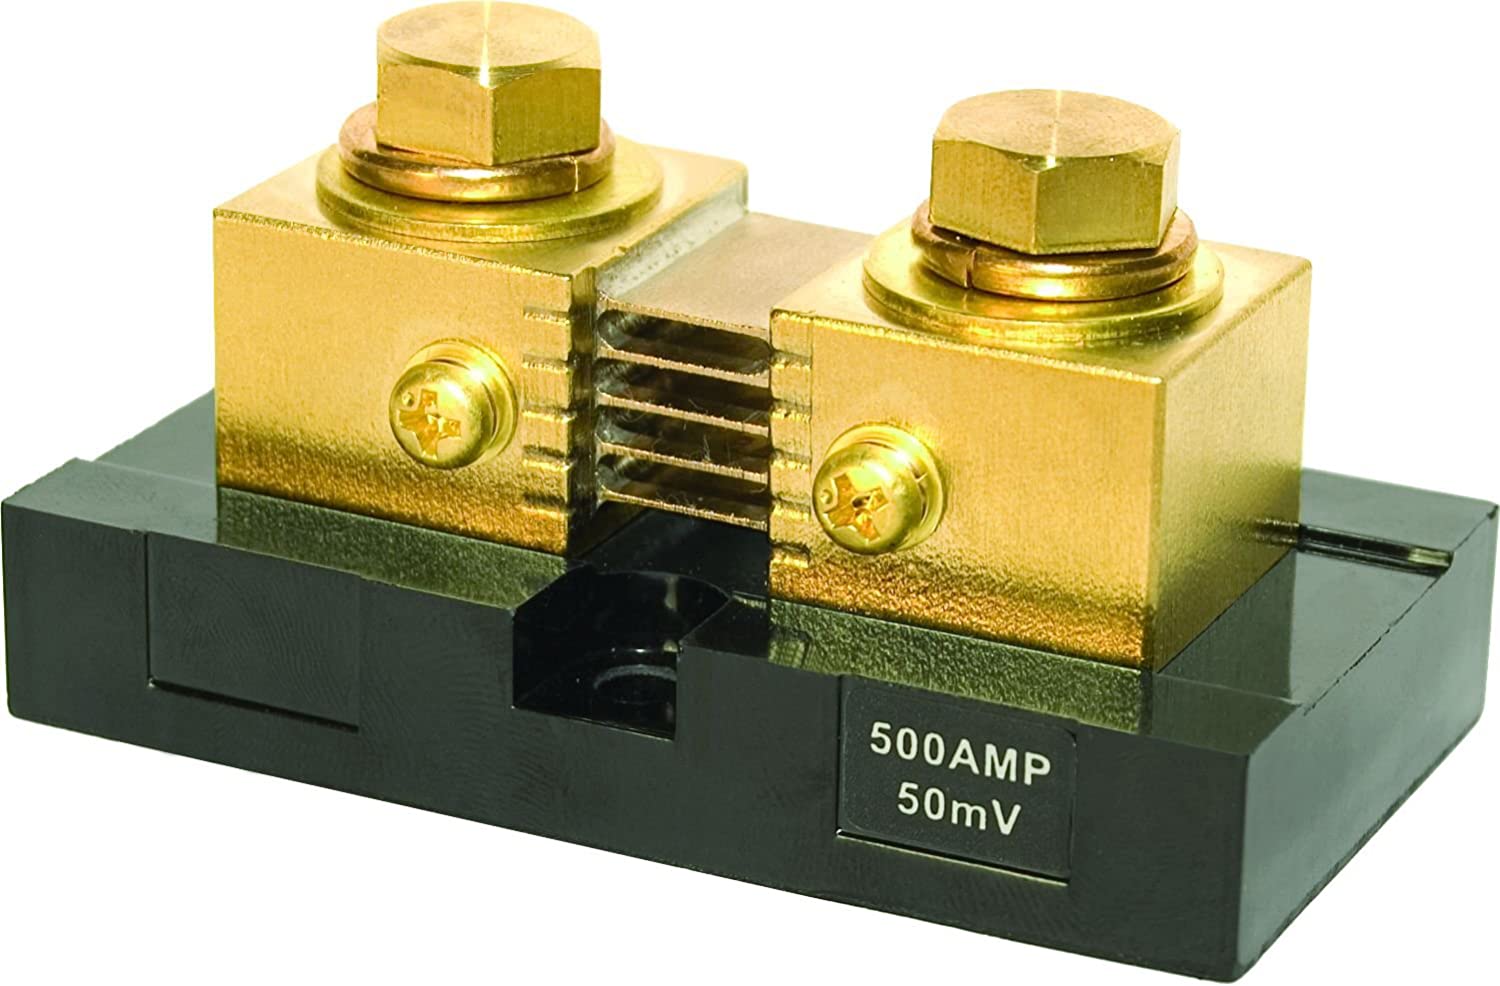
One other thing I replaced was the current shunt because the base of the old one was starting to deteriorate from years of being in the sun and vibrating from over 20,000 miles of towing.
A shunt is placed between two heavy cables that connect to the negative side of the battery. As amps flow in or out of the battery, two small signal wires that communicate the ampere changes send the signal to the battery monitor.
Auxiliary Power Center
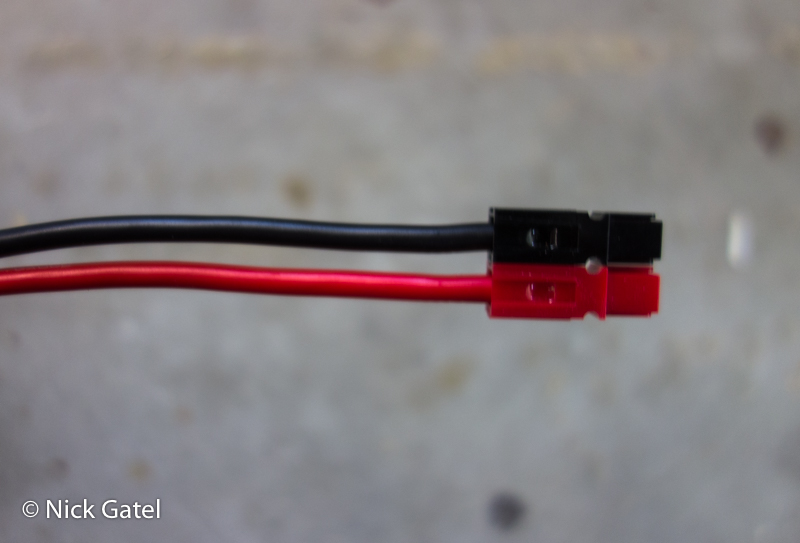
A good add-on for me was a 40 amp Power Distribution Module. It makes it convenient to connect devices that are used temporarily.
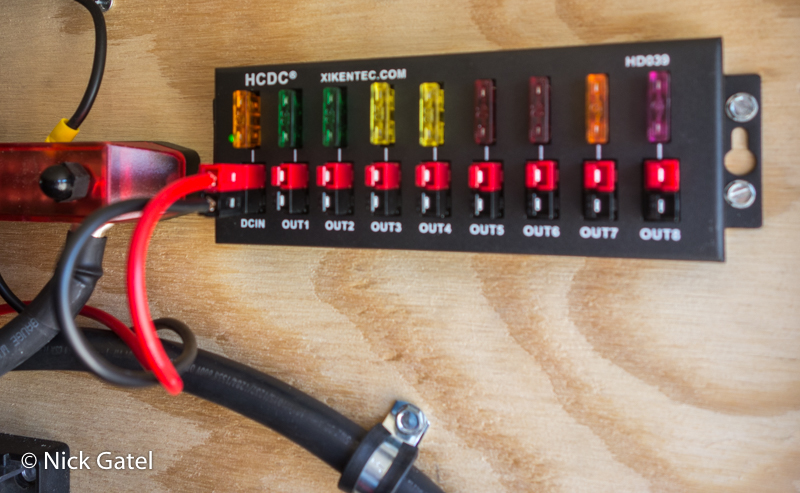
For me that would be our FloJet Poop Canon, and the ability to connect my astrophotography kit to trailer battery bank, eliminated the need for the portable battery I have been using.
The module uses standard Andersen PowerPole connectors.
The wiring and cable work was straight forward, although it took a bit of time to complete.
Now it was time to tackle battery charging and identify any systems that were not set-up to switch to a LFP battery.
Power Converter and Battery Charger
Most RVs have a power distribution center, which has three functions:
- The center distributes 12 volt power to things like the lights, water pump, water heater igniter, or refrigerator
- If the RV is connected to a 120volt AC source (commonly called “shore power”), it will power all the wall receptacles allowing the use of household appliances
- When connected to shore power, it will charge the battery bank
Unless you have a newer RV, you can’t properly charge a LFP battery with this unit because LFP batteries have different requirements.
Furthermore, most RV battery chargers can’t charge a FLA battery properly! Their charging algorithms do not match the charging requirements of the battery manufacturers’s specifications. They are even worse for LFP batteries.
Below are the charging specs for a Trojan FLA deep cycle batter, which is similar to all the other brands I have researched.

Compare those specifications to what our Progressive Dynamics Inteli-Power 4000 center produces:
- Daily Rate = 14.4 volts (initial boost charge)
- Absorption Rate = 13.6 volts (final charge rate to completely charge the battery)
- Float Rate = 13.2 volts
- Equalization Rate = 14.4 volts (every 21 hours for 15 minutes)
I never use this charger to charge our batteries. In fact, I have switched off the circuit breaker that powers it, because it cannot properly charge a deep cycle FLA. Most other brands of OEM RV chargers are just as bad.
A LFP battery is happiest at a continuous 14.6 volt charge rate. Once the battery is fully charged, the BMS will disconnect the battery.
Nowadays many RVs come with a charger that has a switch to choose between FLA or LFP batteries for charging.
If you need to charge your LFP battery with the RV’s charger, it is possible to upgrade some units with a LFP converter/charger section. If not, then a replacement might be the best option. A few years ago I replaced the converter/charger section in our distribution center. It wasn’t difficult. The converter/charger section cost almost as much as a new complete unit.
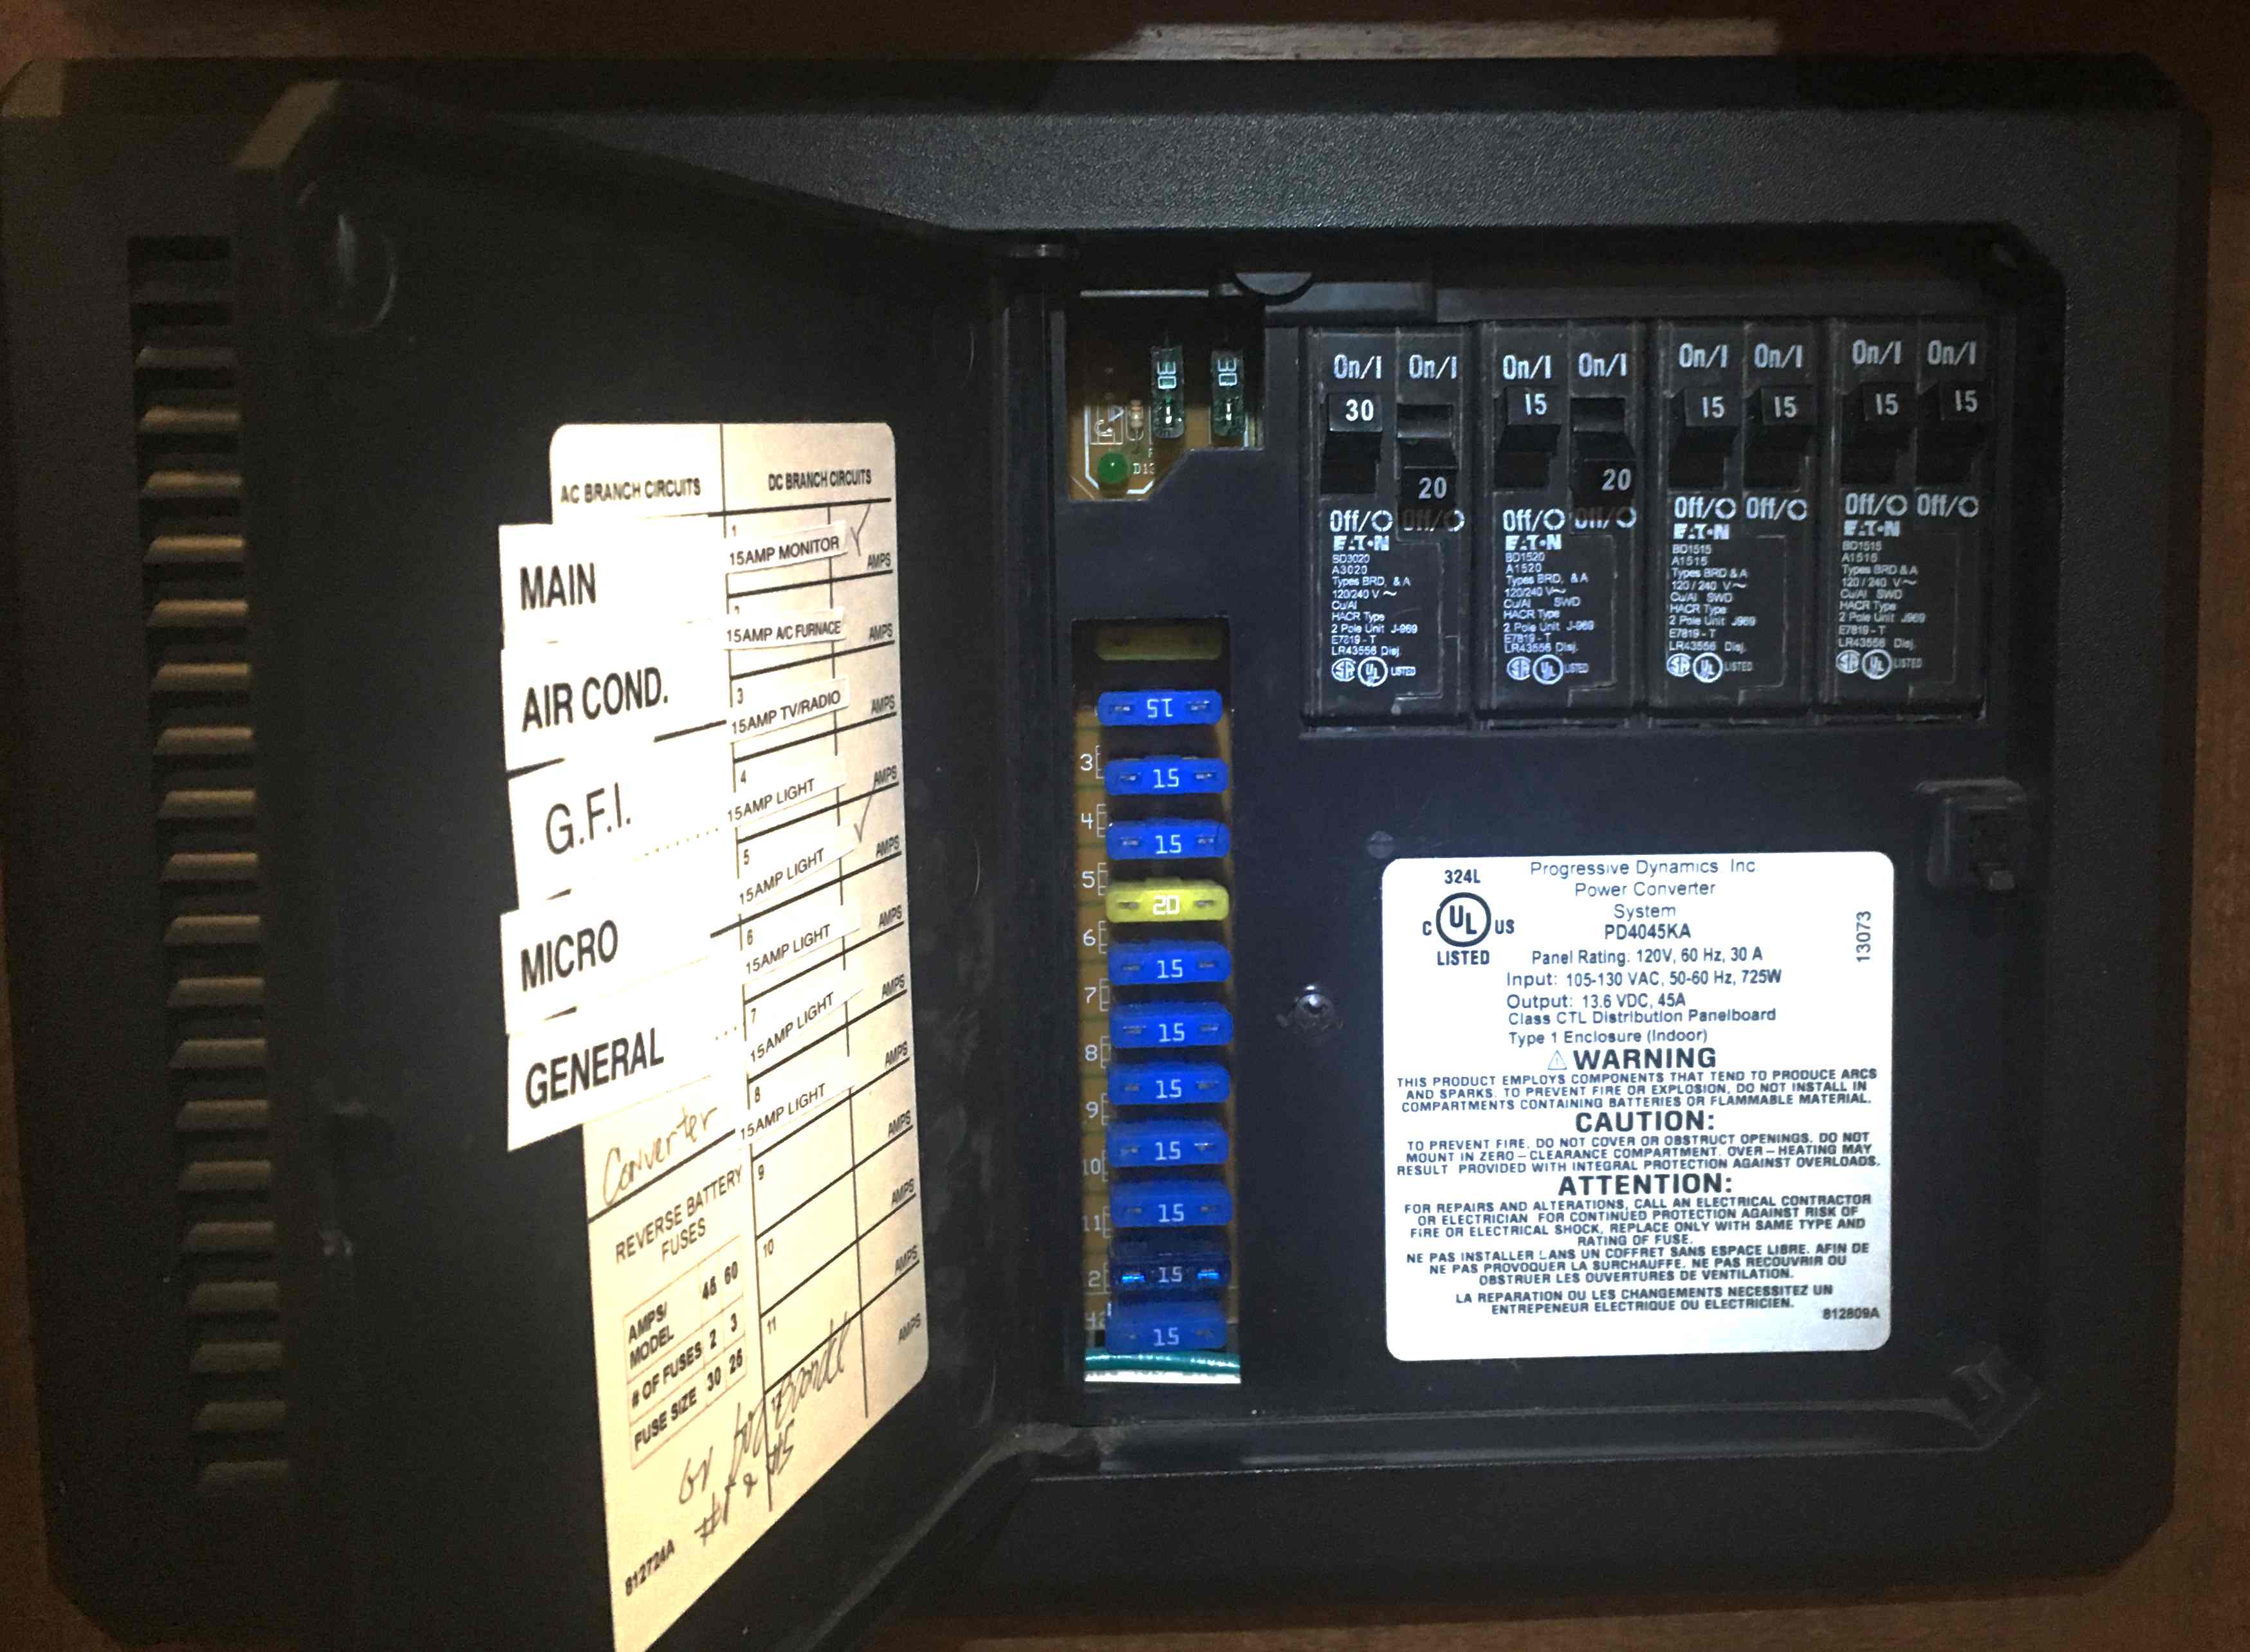
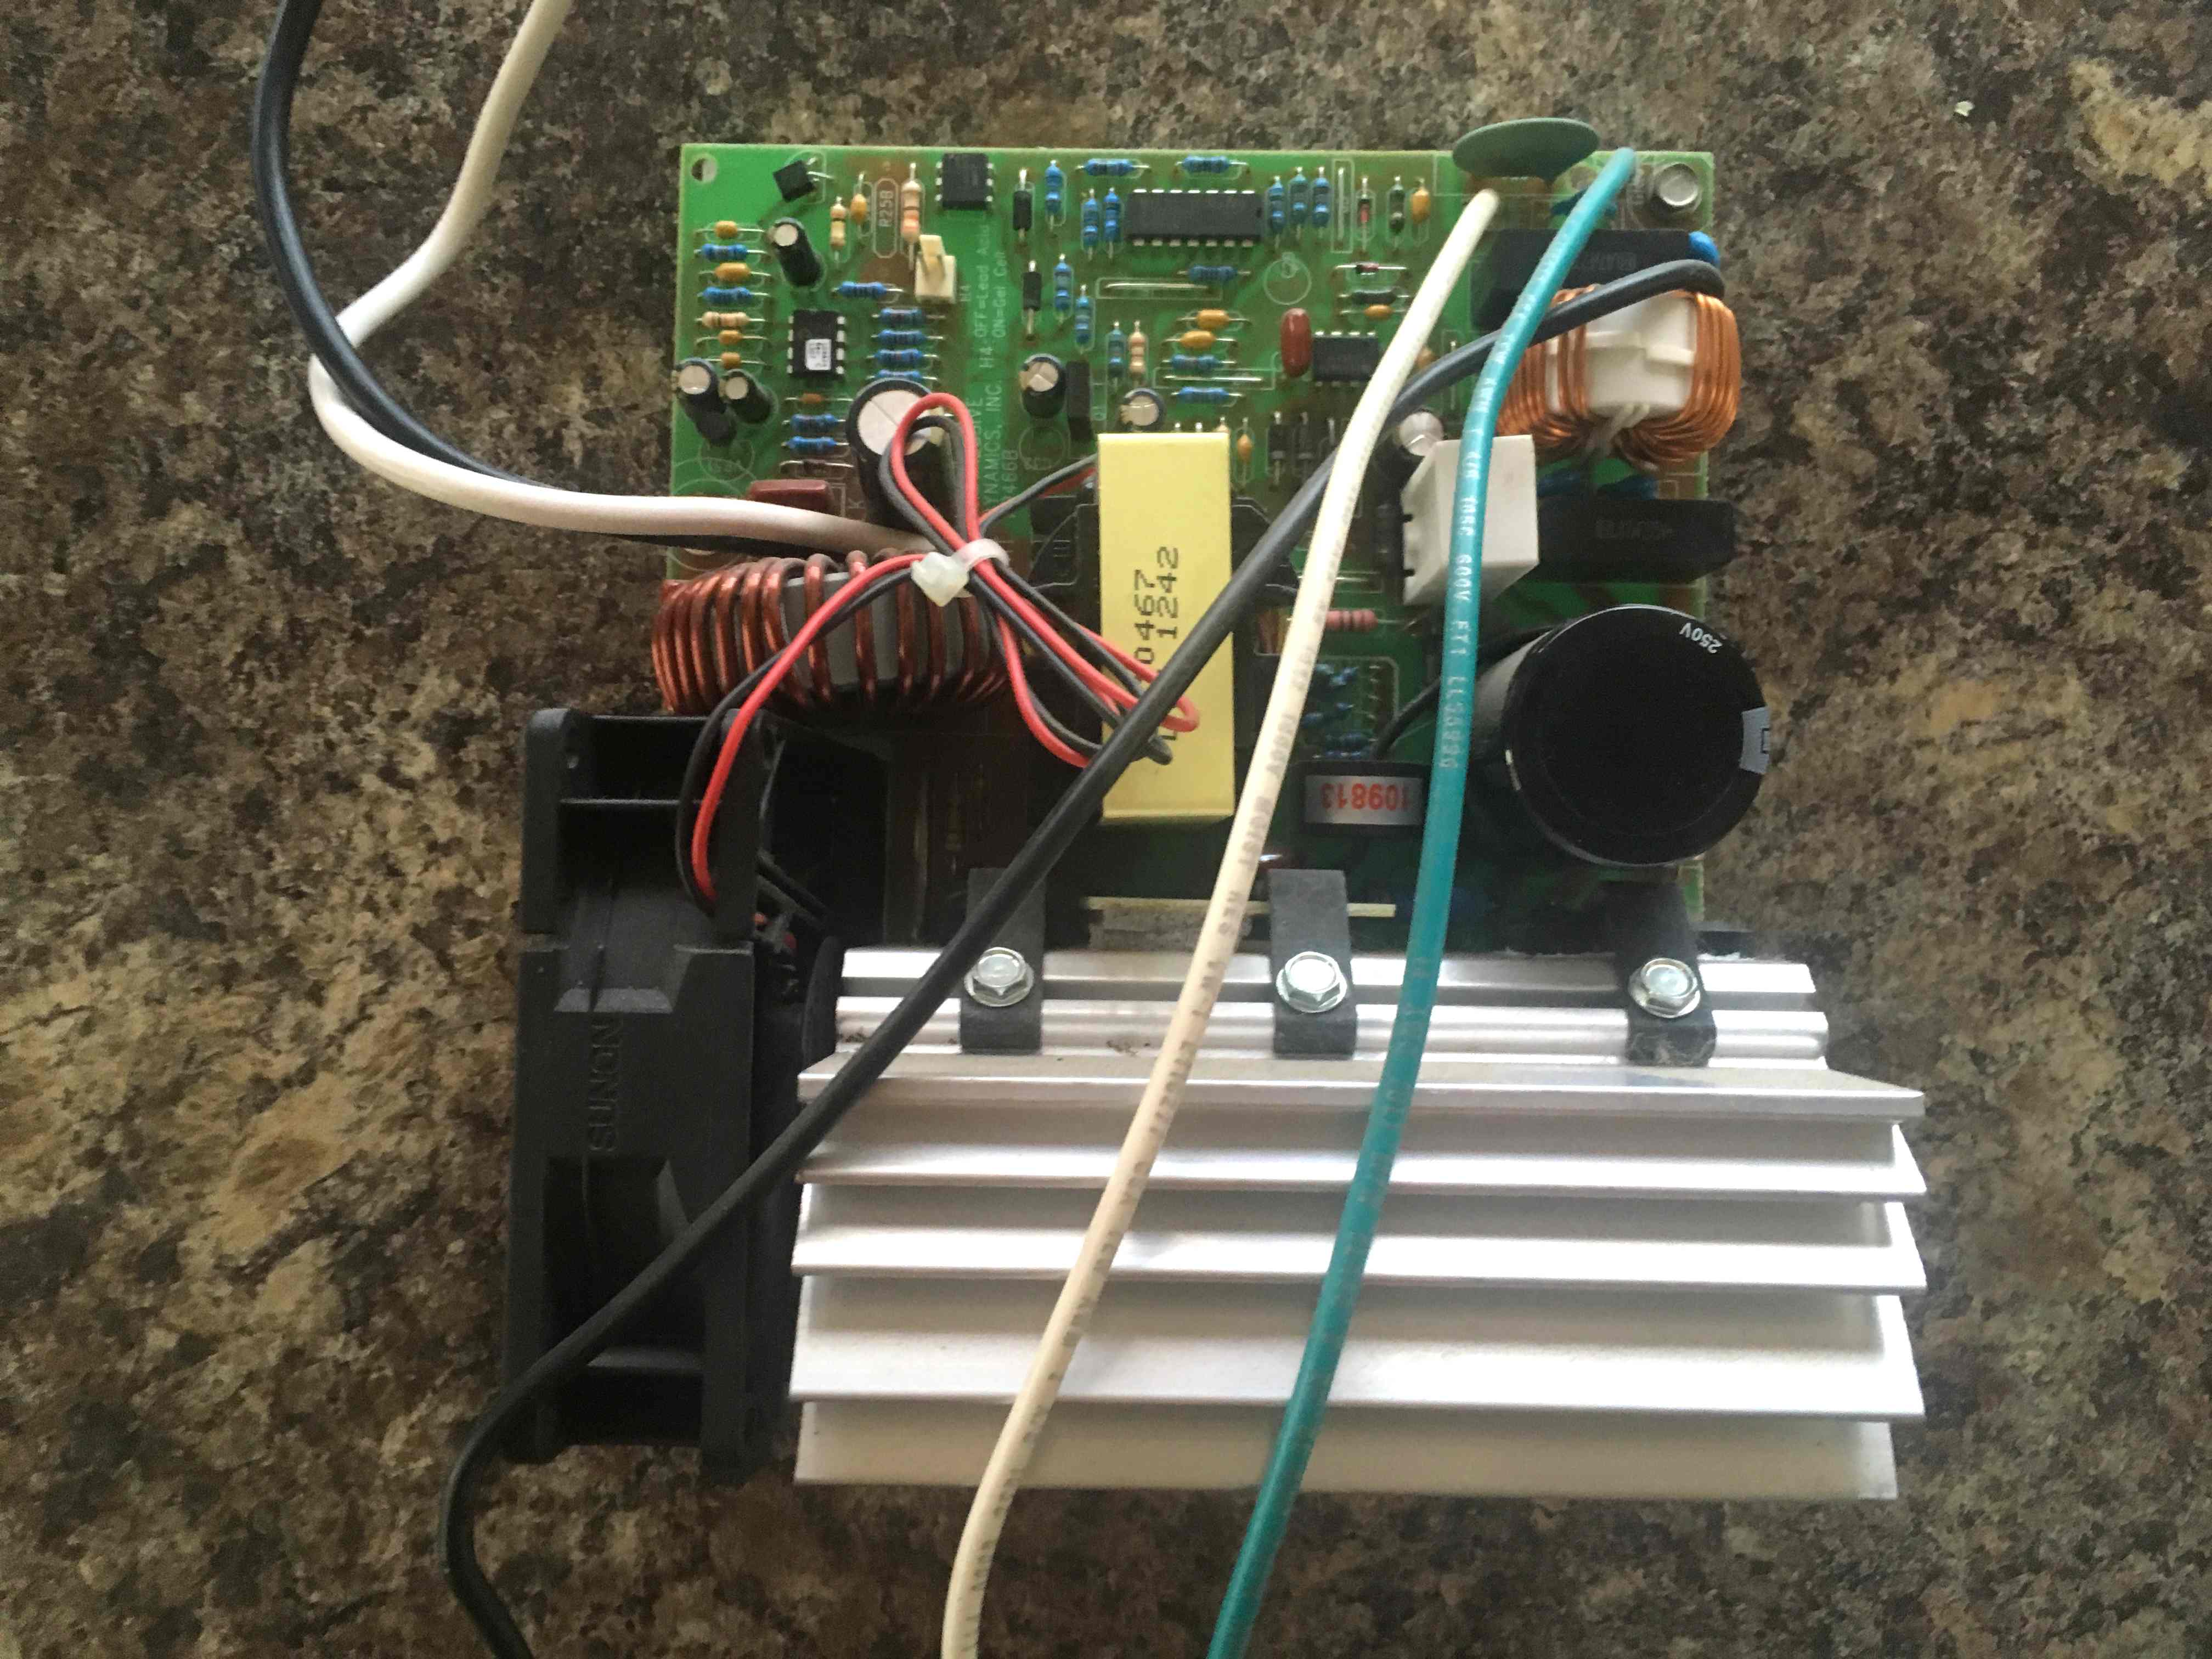
Below is a picture of the center with the faceplate removed. On the right are the 8 circuit breakers for the 120volt shore power circuits.
In the center is the 12volt circuit section with fuses and wiring.
The left section is the converter/charger.
If you look closely, there are a couple dozen wires that would need to be transferred to a new complete unit, making it a big job.
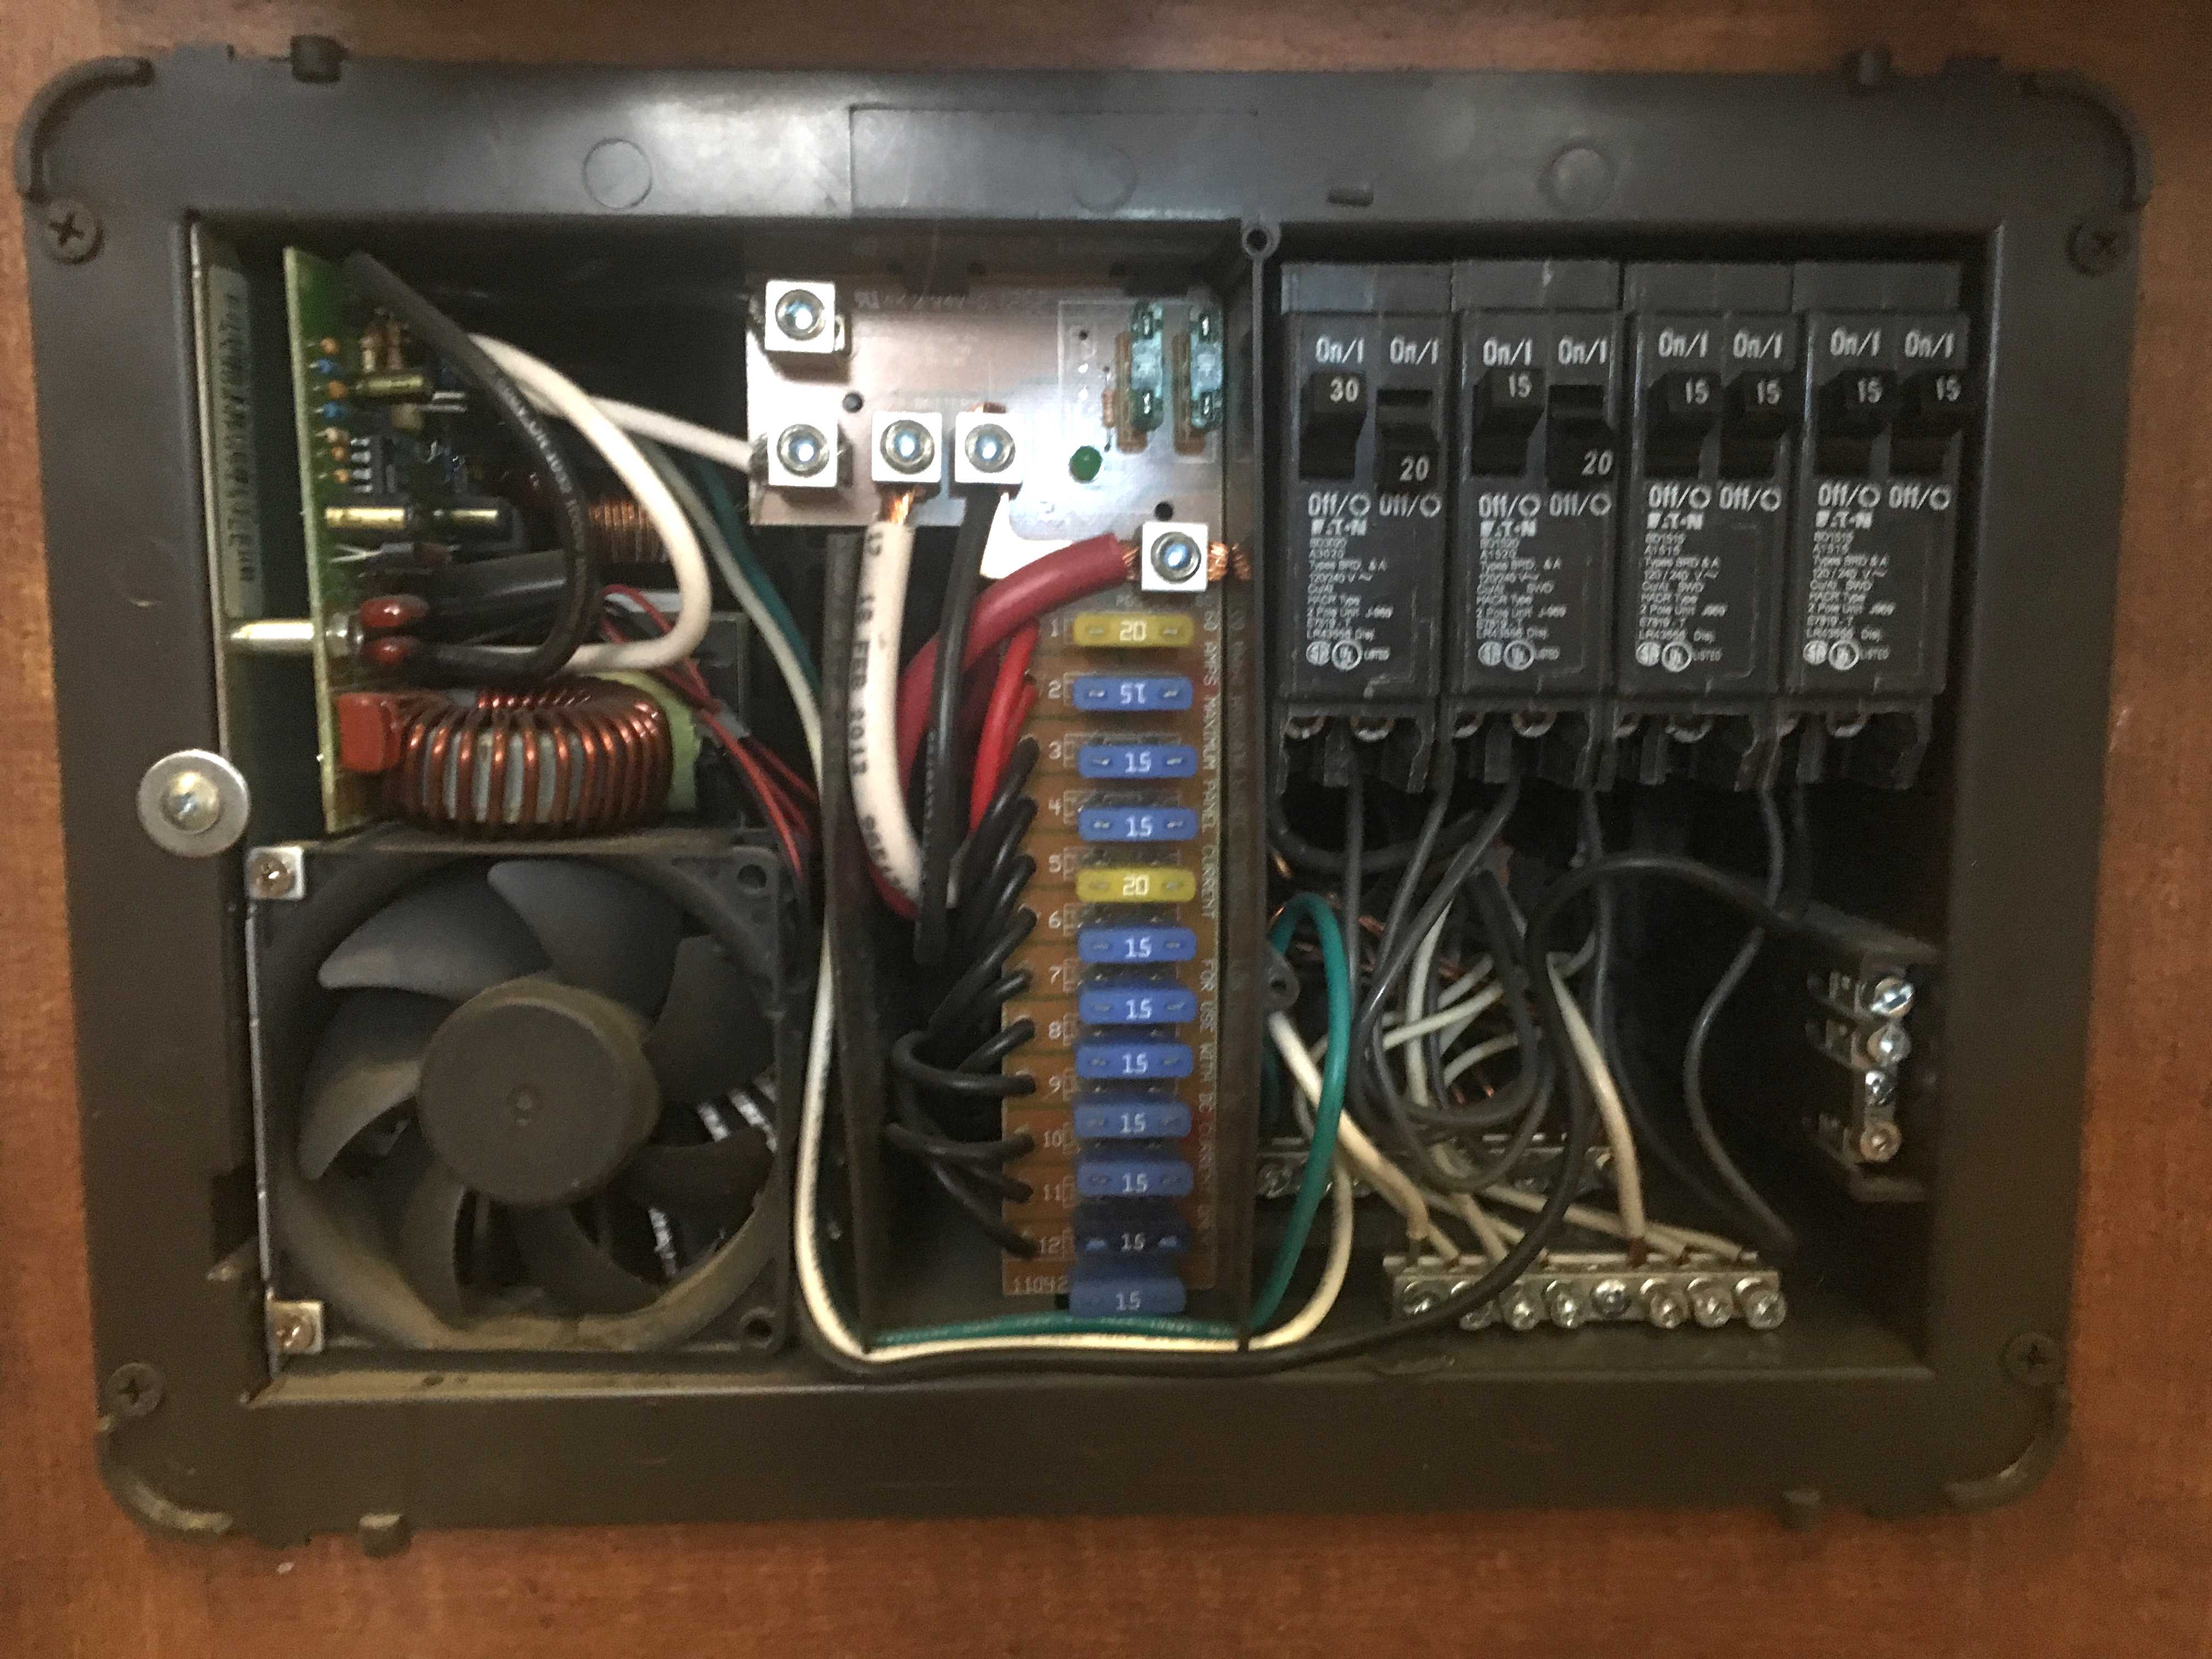
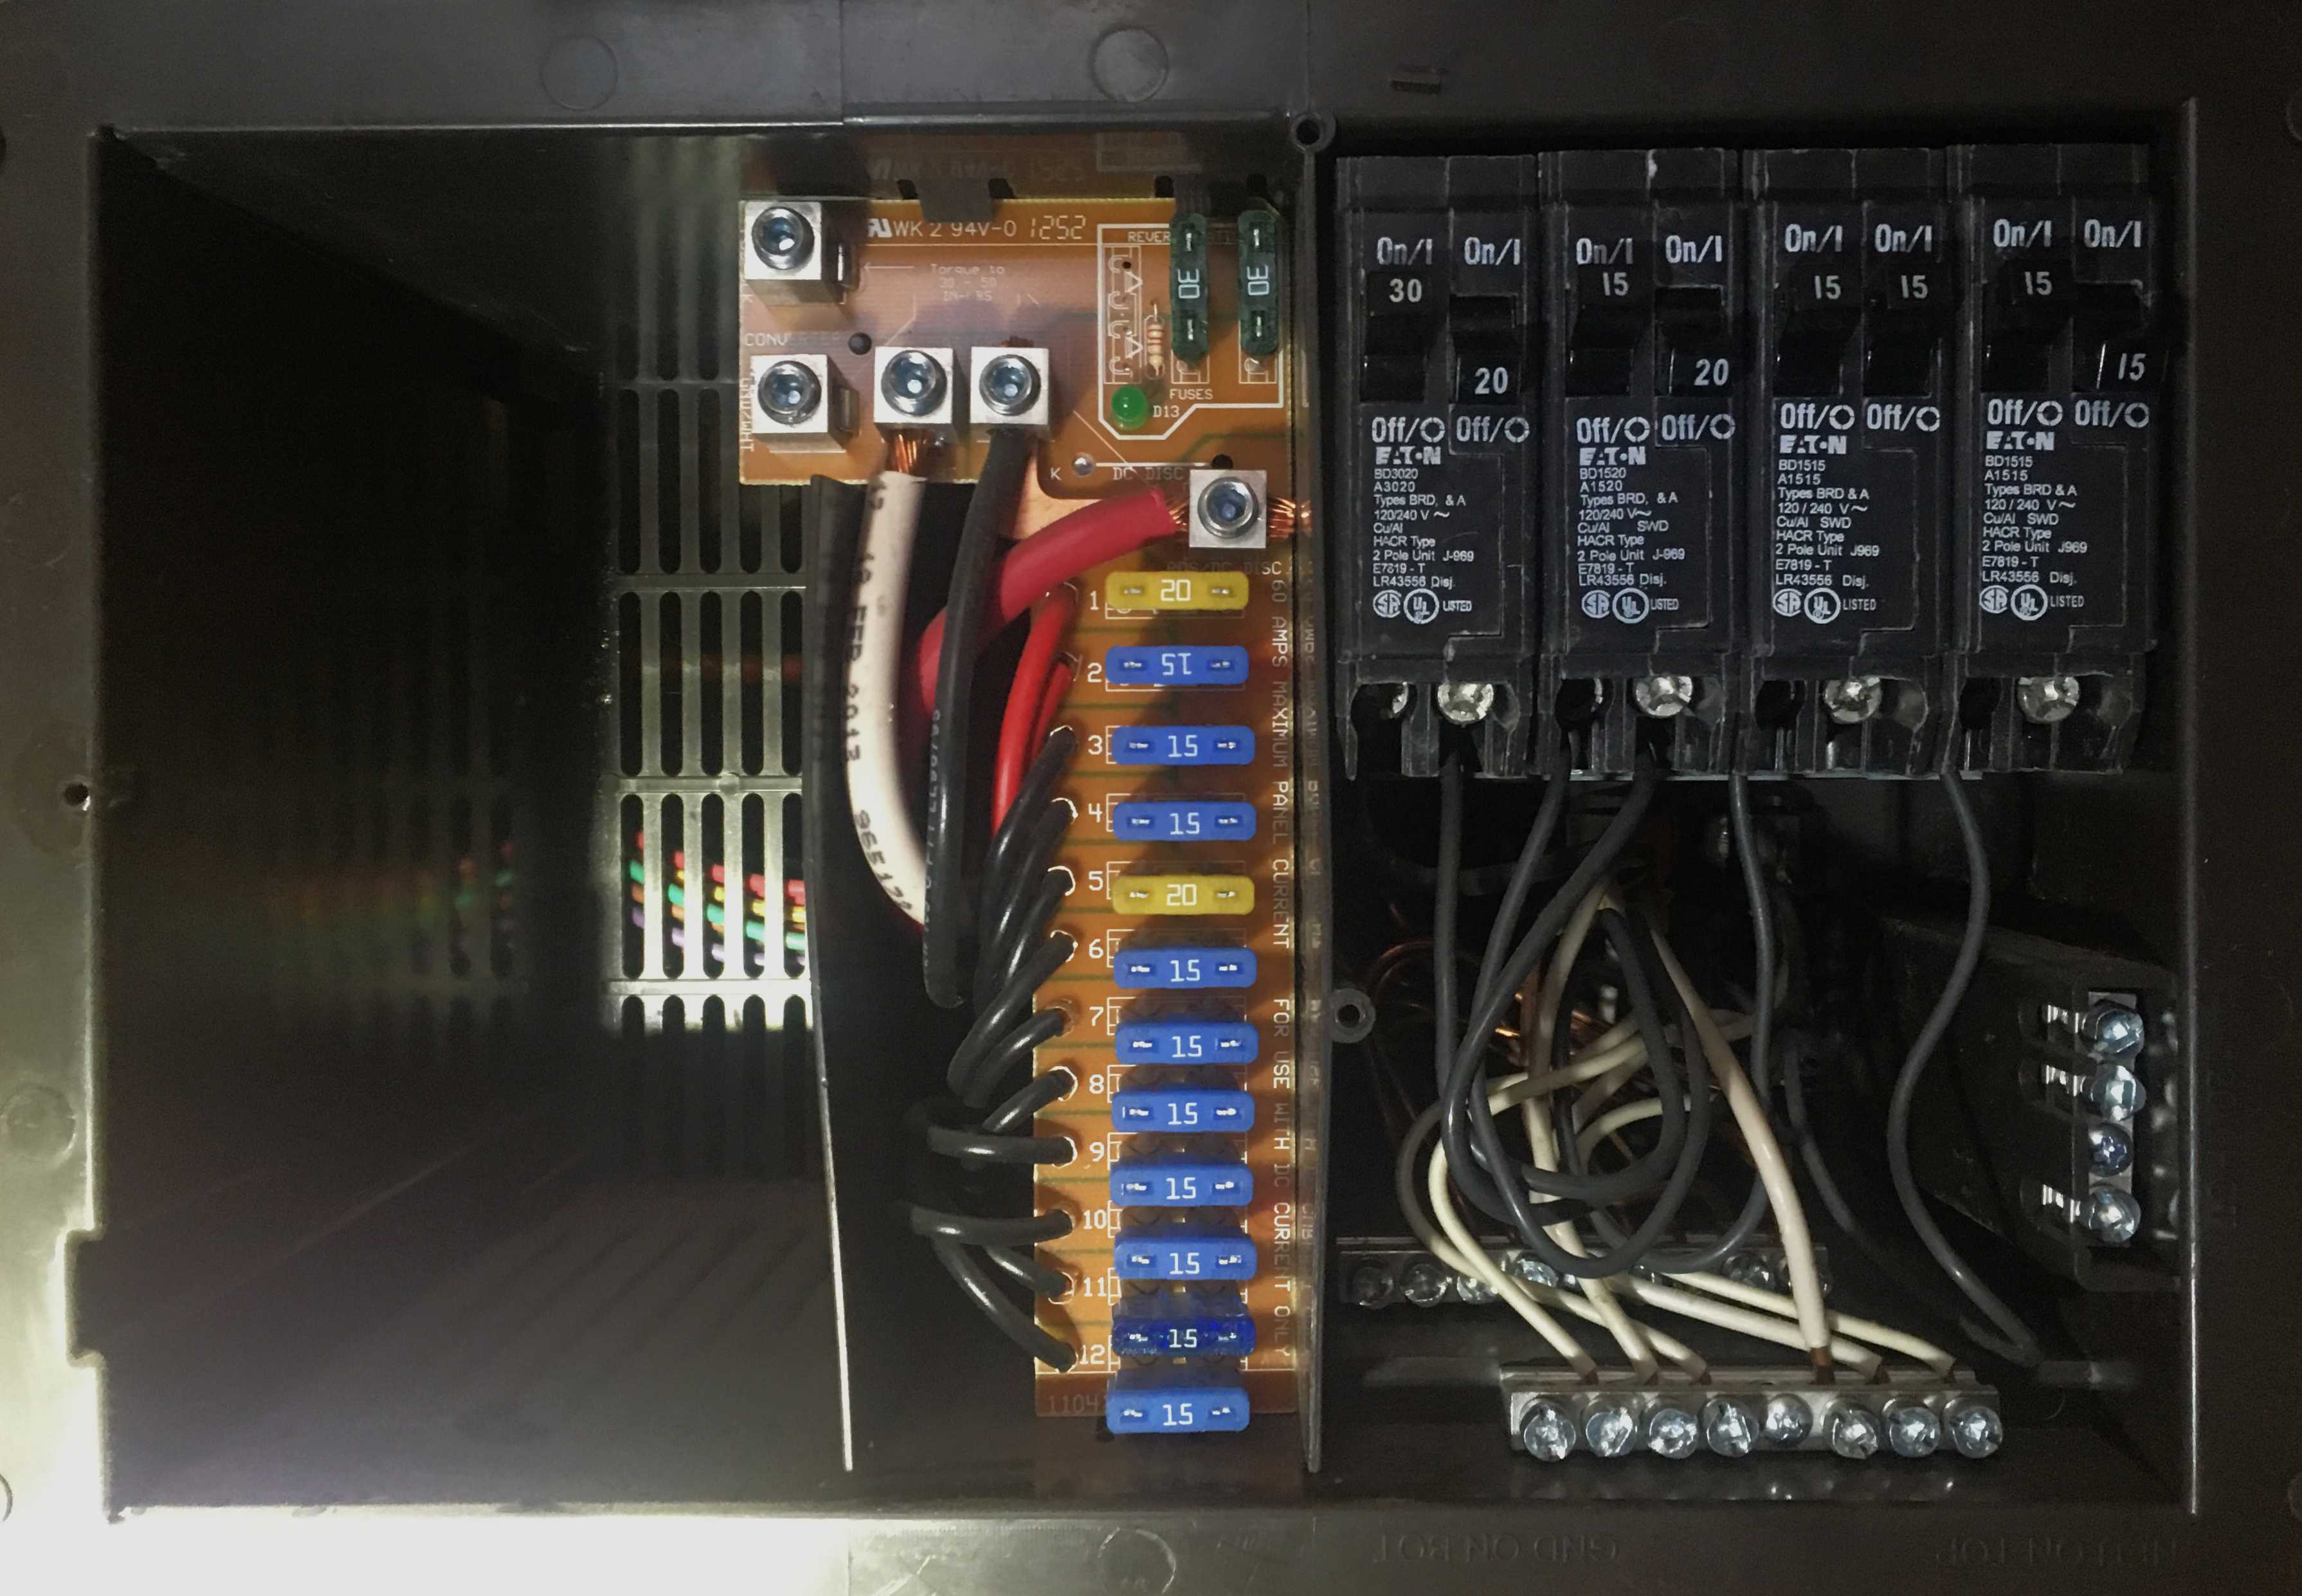
Below is a picture of the entire unit with the converter/charger section removed.
The old converter/charger section (below):
The converter/charger replacement was a 30 minute job.
Solar Controllers
If you have an existing solar system, the solar controller may not work all with a LFP battery. The MorningStar T-45 PWM controller I installed in 2013 is not specifically designed for LFP batteries. However it is highly programable and can be made suitable for charging LFP batteries. To do this, a few steps are required.
What follows are the detailed steps I had to do. MorningStar controllers are very popular, so what follows may be valuable for a lot of my readers. Also, the T-45 MMPT should work just like my T-45 PWM controller.
Unfortunately, a Windows computer is required. I have a MacBook Pro. However, I installed a program years ago called Parallels Desktop that allows me to run Microsoft Windows on the Mac.
Programming My Solar Controller for Use with a LFP Battery
The first step is to configure the DIP switches on the controller.
The image below shows the interior of the controller. In the center, you can see the serial port that has 8 pinholes for a serial connector. To the right of if is a red DIP Switch Panel, with 8 switches. These will need to be configured before using the software.
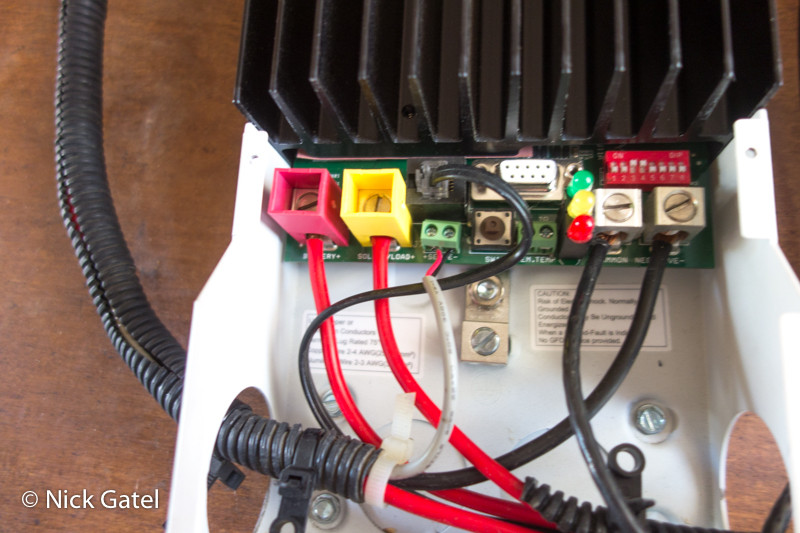
The switches are numbered 1 -8, from left to right. A switch in the “down” position is OFF, and in the “up” position is ON. For my system, my adjustments are:
Switch 1: OFF (Controller Mode)
Since the controller can do other things besides charging a battery withl solar panels, this switch is set to OFF, to tell the controller it is controlling a solar panel array.
Switches 2 and 3: System Voltage
These switches set the system voltage, since the controller can control 12, 24, or 48 volt systems. For 12 volts, the settings are:
Switch 2 = OFF
Switch 3 = ON
Switches 4, 5 and 6 (set the charging voltage)
Per the battery manufacturer, the charge voltage is 14.6 volts. To set the controller to 14.6V, the three switch settings are:
Switch 4 = ON
Switch 5 = OFF
Switch 6 = OFF
Switch 7 = OFF (battery equalization mode)
This turns off the battery equalization mode, which is needed only for lead-acid batteries.
Switch 8 = OFF (electrical noise reduction)
This turns off the noise reduction function. It is recommended to be in the OFF position, unless the system is causing electrical noise.
Temperature Compensation
If you have a remote ambient temperature sensor, it needs to be removed. The LFP BMS will monitor the internal temperature of the battery.
Software Settings
The settings should be in the battery’s manual. For my battery, the three settings in the manual are:
- Charging Limit Voltage = 14.6V
- Overvoltage disconnect voltage = 15V
- Overvoltage reconnection voltage = 14.2
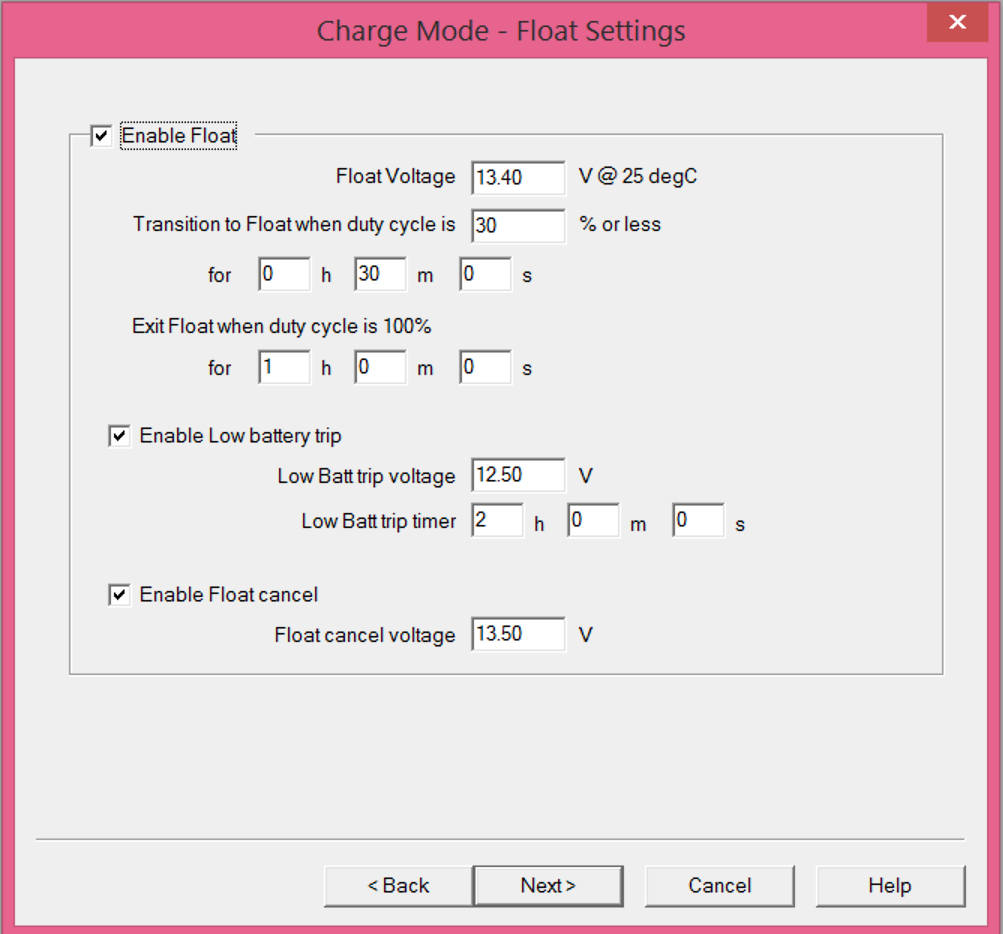
- JITA does not specify a float voltage, however some LFP manufacturers do, usually around 13.8V
Float voltage is the voltage used to maintain a full charge after the battery has been fully charged. The float voltage compensates for a battery’s self-discharge over time. This is usually for batteries that are not discharging/charging daily, such a a back-up power supply. We store our camper in a covered area, so we cannot charge the battery when it is in storage. When we are using the camper, it is discharging/charging every day. So I left it at the previous FLA specification.
What follows are the steps to set up the controller with software.
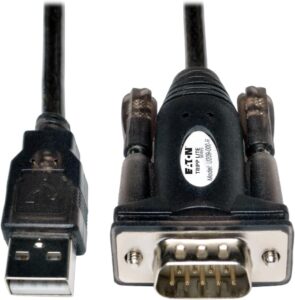
You will need a serial cable connected to a computer. For newer computers, this means a USB to Serial cable.
I bought a TripLite cable, that worked perfectly, but it was a tight fit and I had to wiggle it in to clear one of the controller’s LEDs.
To get the cable to work, you will need to download and install a driver. For MorningStar controllers, there is a link on their website.
What I found weird, is the driver for the cable is in a compressed file and not a ZIP file. It is a RAR file, and neither my MacOS or Windows 8.1.1 could unzip it. I had to download a program, 7-Zip (free) to extract the files, then install the driver.
The serial cable needs to be connected before installing the driver, and the solar system needs to be active — that is, hooked up and working.
Next I had to download a program on the MorningStar website, named MSView to communicate with controller.
All of this information is on the MorningStar Website.
Here are the screenshots of the settings using the MSView Software.
Charge Voltage
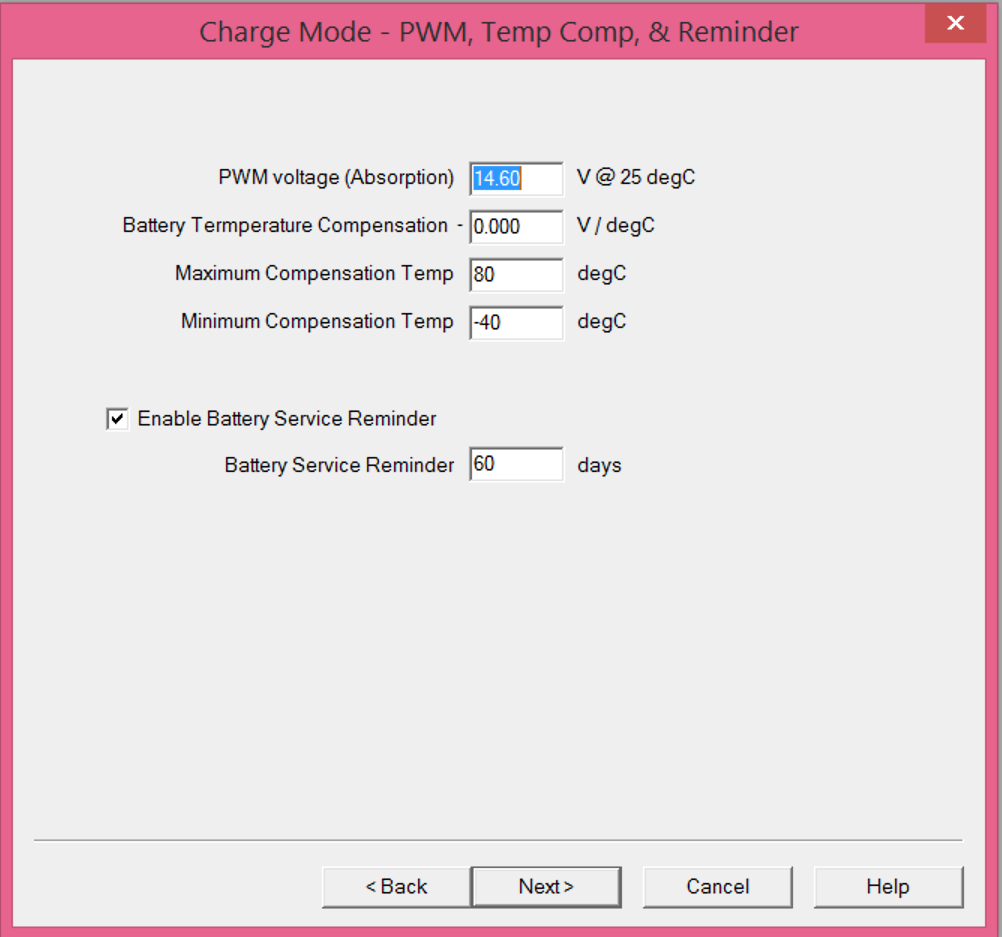
Voltage Disconnect & Reconnect
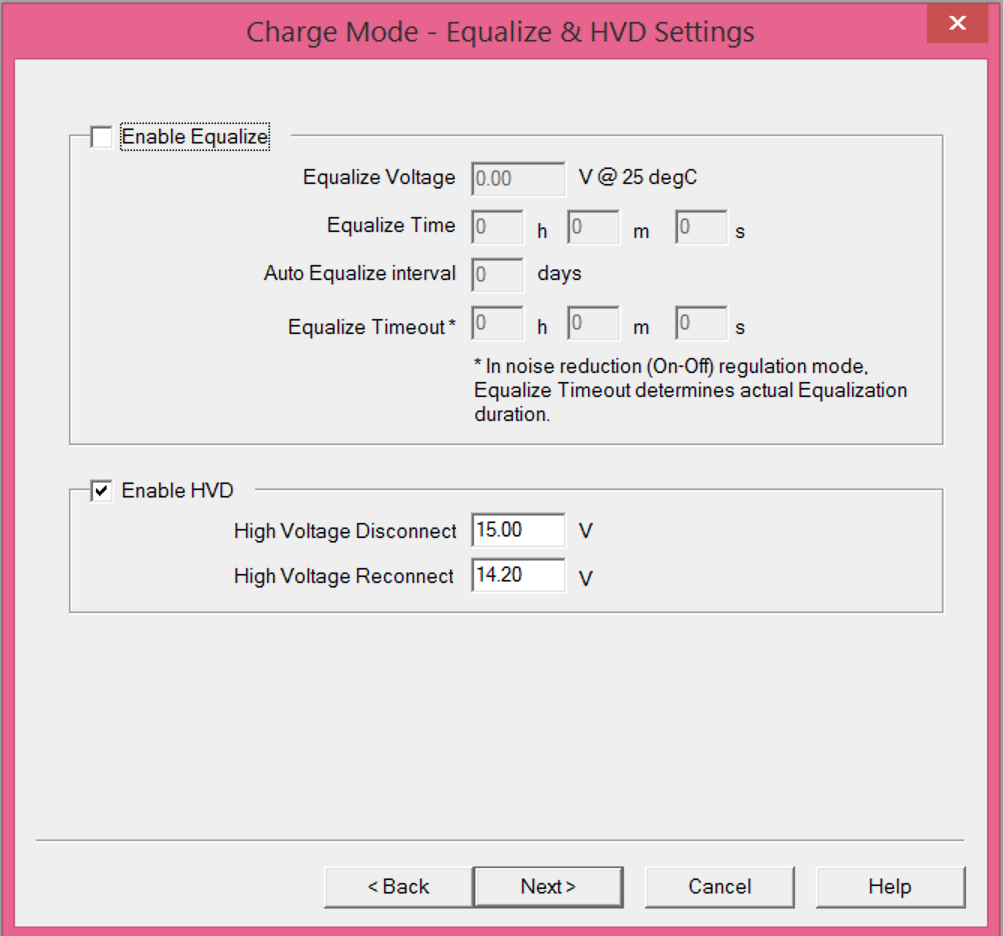
Note that I also disabled Equalization, which I also did with the DIP switches. I don’t know if the software overrides the DIP switch settings, so I just wanted to make sure.
Float Voltage
Final Testing
Over several days, I let the battery sit while disconnected from everything and monitored the voltage. It stayed at 13.6 volts.
Next I made sure everything worked — lights, water pump, propane leak detector, inverter, water heater, radio, refrigerator, etc. All was good.
Capacity Test
I have a sophisticated battery monitor (a Trimetric 2025) that tracks the battery capacity (% Full) and shows the system voltage, along with the amps going in or out. It does a lot of other things that I have never bothered to learn.
With the solar system disconnected, I applied a constant 2.3 amp load on the battery for 24 hours, which was a total of 55.2 amp hours. At the end of this test, the Trimetric showed the battery at 82% full. I let the battery bank stabilize for 60 minutes and checked the voltage. It was 13.3 volts, which our chart says is 90% charge. However, the monitor only shows one decimal point and does round up.
From our chart . . .
13.3 Volts = 90% capacity
13.2 Volts = 70% capacity
For now, this is close enough. Over the next few months I will do more testing and validations.