It’s been a while since my last post. I wish I could tell you I have been on an extended backpacking or camping trip – but that isn’t the case. I’ve been busy with work, family, and other obligations. It seems everything that can distract from the “getting out and play” things I enjoy hit at the same time.

WORK
Work has been crazy. In addition to the project I have been managing for the past three years, I’m launching a new one – meaning I have to hire 6 new people, build software tools, templates, forms and training materials – all within a 1-month time-frame.
Many people would fret and complain about all this extra work that has crept into some of my evenings and weekends. Not me. I find working under pressure to be exciting, creative and satisfying. This is what life is about: productive achievement.
FAMILY
Is there anything more important than family? Not in my book.


My grandson Jimmy’s baptism was a priority.
THE HOUSE

The only Grinch Who Stole Leisure Time from me was our house. But it had to be dealt with. So I thought I’d share with you what happened and how I solved a mystery. It might help someone in a similar predicament.
The Problem
All of a sudden we had no power in one outlet in our guest bathroom, none at all in the master bathroom, no power in the wet bar lights, no power to the living room fans, no hall lights, and one outside outlet had no power.
The circuit breakers “looked” good. None were tripped. Very perplexing.
I am not an electrician. I am a homeowner. As a homeowner it is good to learn about everything in a house from plumbing, electrical, heating and air condition; and anything else that can fail, break, or require maintenance. Do it yourself and you can save lots of money, because often the labor is the most expense component of a repair bill. Years ago I read a couple books on residential electricity and the entire subject is quite simple: if you truly understand it, if you are always cautious and safe, and if you adhere to building codes.
The Troubleshooting Methodology
This applies to electricity, cars, and even our bodies. When something goes wrong, the diagnostician needs to:
- Gather as much information as possible, especially the events prior to, during, and after the problem occurred.
- Perform tests that result in “I can prove this is the problem.” In other words, not replacing stuff because one isn’t sure if they are working properly.
- Repair or replace the bad component and then test it to ensure the repair works.
Joyce was the one who first noticed the power wasn’t working. So I interviewed her. The power went out while she was using a hair drier. This would indicate that a high amperage appliance like this would trip a circuit breaker, or more difficult to find, cause an open circuit.
The first thing I did was test the GFCI (ground fault circuit interrupter) outlet in each bathroom. These are those outlets you probably have seen that have a “Test” and a “Reset” button on them. The purpose of this type of outlet is to sense an unintended current flow, such as through water or your body, and shut off the current flow. Our house was built in 1979 and should have had these type outlets or a GFCI circuit breaker installed as the code was established in 1978. As the original homeowner I know these were not installed per code and I added them myself a few years ago. Resetting did not work.
It was now time to go to the garage and get some test equipment.
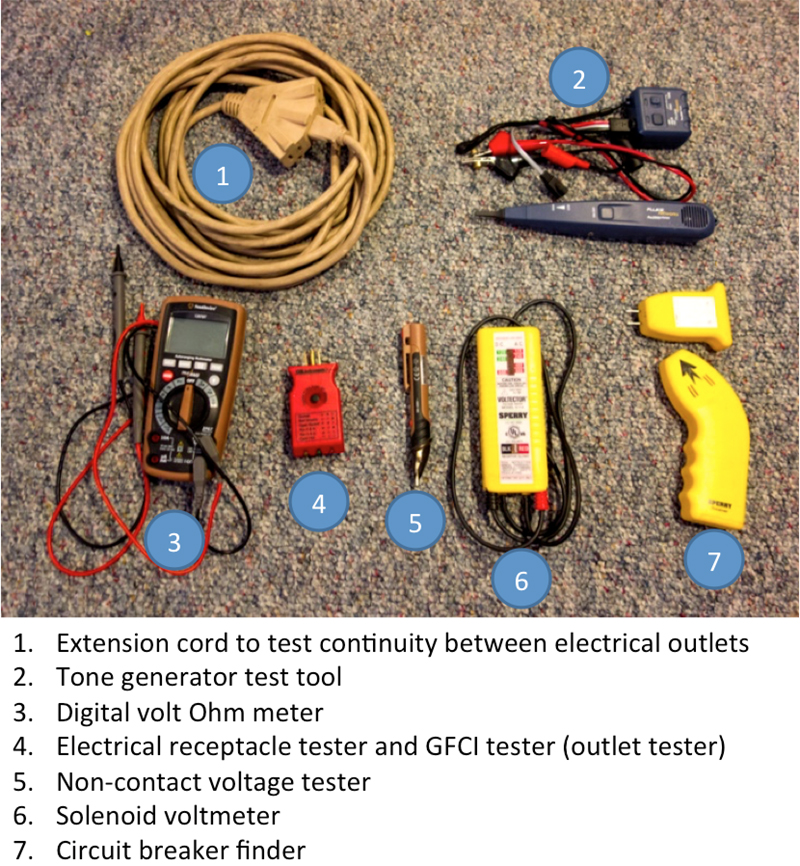
Warning: Some tests require the electricity to be turned off so the test equipment (ohm meter or tone generator) is not damaged, not to mention injury or death to the person doing the troubleshooting.
One thing about GFCI outlets is that all circuits down-stream of a tripped GFCI will not work. The GFCI creates an open circuit when it trips. This means that any test equipment that takes a reading at a GFCI outlet using the hot and common wires, or the hot and ground wires as test points will not work. A non-contact voltage tester (#5 above) will identify a live hot wire, and this is the first thing I used, checking both GFCI outlets. Result: No current at either.
Next step was to check the main panel circuit breaks, which is where all current to the house is supplied. Even though the breakers “looked” good, the only way to verify this was to test each one with a volt meter (#3 above). Result: All breakers were good.
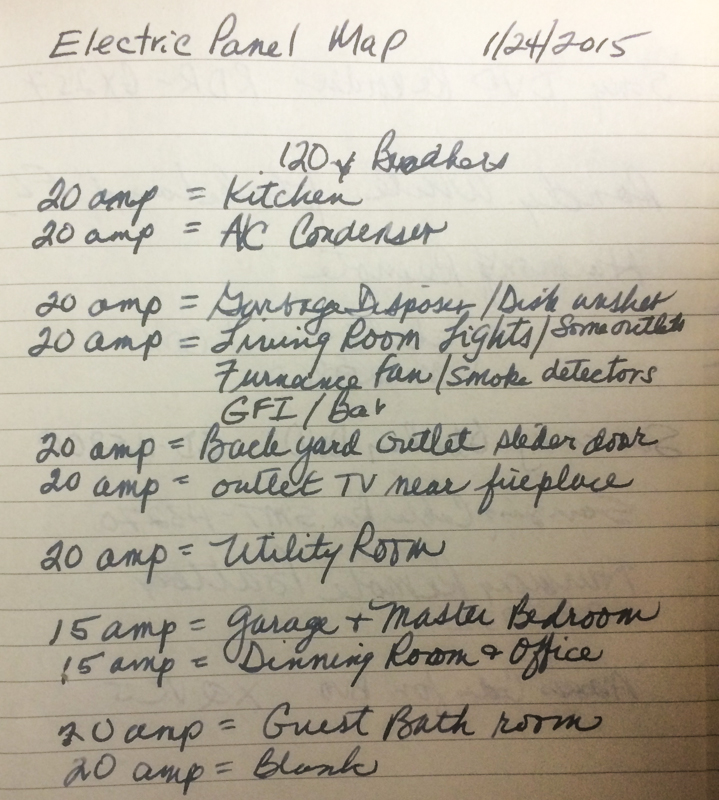
One thing I had never done before was map my electrical circuits. This entailed turning off every circuit breaker. Then turning each one on and then going inside the house and testing each outlet to see which breaker supplied electricity. This took a while to accomplish, but provided useful information for this particular event and for future electrical work. It also would tell me if each breaker was actually supplying current and it might help to identify what circuit was causing my “no power” condition.
There are several tools that can be used to test current at the outlets. A receptacle outlet tester (#4 above) is quick and easy, plus it can identify reversed polarity and even test a GFCI outlet to ensure it trips as designed. A solenoid voltage tester (#6 above) will tell you if there is voltage at an outlet and is a sturdy piece of equipment that requires no battery. I prefer to use a digital volt meter (#3 above) because it tells me how much voltage is present. Result: No clues as to which circuit breaker supplies current to my dead outlets.
At this point I knew I probably had a hard to diagnose problem. But tests need to be performed in a logical step-by-step method. I knew that somewhere in my system I had an open circuit and had no idea which circuit from the main panel supplied the electricity. The most common problem in this scenario is a poor connection at one of the outlets, usually an outlet that has “back-stabbed” connections. Electrical outlets generally provide two methods to connect wires to the outlet. The installer can choose to:
- Connect the wire to a screw on the side of the outlet (best method) or
- Push the wire into the back of the outlet in a hole designed for this
Method 2 is not a good way to do this and often the connections go bad. So my next step was to pull all the dead outlets out of the wall and test each one to see if there was a bad connection. Most of my dead outlets were the original 1978 installed units with back-stabbed connections. In the past I had already replaced a couple with newer outlets and those I had wired to the side screws. So I went to the main panel and turned off the power to the entire house, went inside and pulled all the dead outlets leaving the wires attached. Then I went back to the panel and turned the power back on. I now tested the wires at each outlet for power. Result: No power anywhere. Things were looking more dismal.
At this point I knew there was power to the lights in the guest bathroom and no power at the wall outlet. One would think they would be on the same circuit. So it was back to the panel to turn the power off, because I would need to check for continuity between the guest bathroom lights and the outlet. This is done using the Ohm test function in the Volt-Ohm meter (#3 above). Result: Contrary to what I thought would be logical, it seemed the lights and the outlet are on different circuits. Things were starting to look ugly.
Normally when you want to test an outlet to see what circuit it is on, you use a circuit breaker tester (#7 above), but this requires the outlet to have power to it, and I could not use this tester because I had several outlets without power. Now what?
The next step was to see if any of the dead outlets were wired to a good outlet. Using an extension cord (with the power off) I proceeded to test for continuity between all the outlets close to my dead ones. Result: Nothing, which is what I expected.
I had come to the conclusion that somewhere (probably in the walls) there was a broken wire or something causing an open circuit. I turned on the power and went up into the attic, which is really just a crawl space and tested all the wires with my non-contact tester. Result: All wires had power. I now knew I had a serious and potentially expensive problem. How on earth would I find the open?
I drove to Home Depot and purchased the one piece of test equipment I did not already own, a Fluke Pro 3000 Network Tone Generator. This kind of tester is used to test telephone and network systems. The generator sends an electronic signal over a wire or pair of wires that can travel over miles of wire. It consists of two pieces: the first is the generator that sends the tone and the other is a wireless receiver that audibly sounds when it is close the wire carrying the tone. Any wires tested must have the power turned off. Although this tester is designed for low voltage systems such as telephone or network calbes it can be used for 120 volt wiring. It took some time to get used to the operation of the equipment but I finally got it to work reliably. Result: after testing, checking, double checking, and finally triple checking; I determined that there was an open circuit in the wall behind our wet bar or in the ceiling above the wet bar. At this point I would need to tear out dry wall and inspect.
All of this testing took two weekends. It was now dark and I needed to turn the power back on. The drywall demolition would have to wait until the next weekend. Sigh.
Discovery & Solution
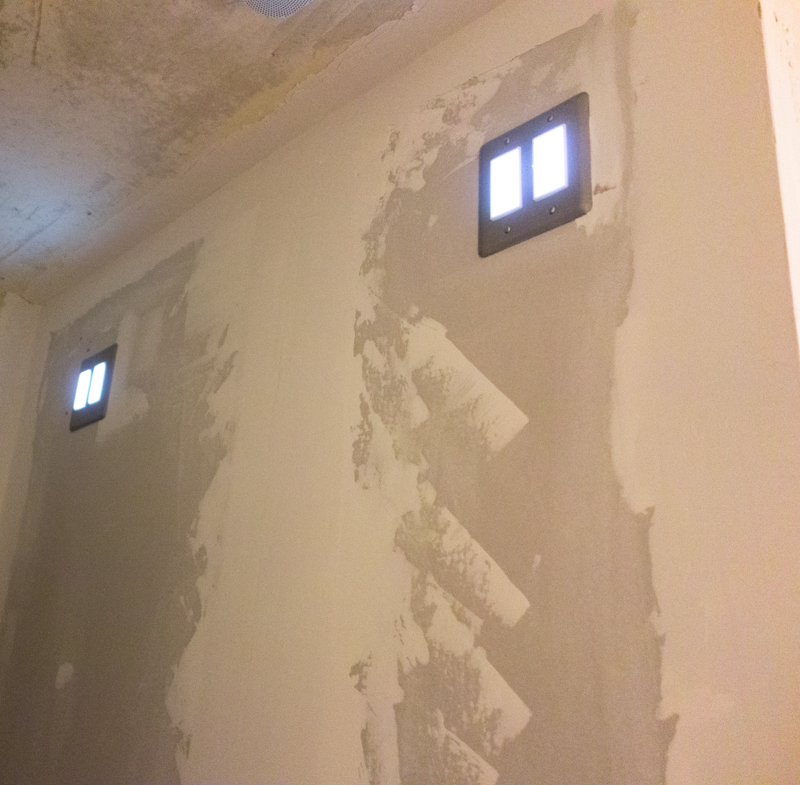
The following weekend I tore out the hallway drywall, which was 51 inches wide. Up in the false ceiling above the bar, I found the wiring had been spliced together using twist connectors – against code. All twist connections are required to be in junction boxes that can be accessed from the outside of a wall or ceiling. Aha! I was sure this was the problem. I found one twist connector was loose, and could see a burn mark in the connector due to a loose connection. I tightened all the connections, went outside, turned on the power and everything worked!
At this point I need to run the wires into a junction box. The easiest way would be to join the wires in the attic in a junction box, and then run a new wire from the junction box to the first outlet in the circuit. Instead, I decided to install a couple night lights in the hallway wall, which would also serve as the required junction box. The hallway is dark at night and automatic night lights would be a nice touch. After I installed them, I put up new drywall…
Over Acheiving
Since I had pulled many of the outlets out of the wall, I decided to go through the entire house, renewing all outlets and light switches with modern Decora style replacements and at the same time get rid of all the back-stabbed connections, connecting everything with screw connections. Years ago Joyce and I had installed 36 recessed lights in the living room, dining room and kitchen area, using dimmer switches to control them. Last year I replaced all 36 light bulbs with LED bulbs (an expensive initial investment) and the dimmer switches no longer worked, so those were also replaced with LED compatible switches. I was on a roll, so I replaced the 3 ceiling fan switches with new units. While I was at it, I replaced our old thermostat and smoke detectors with the popular Nest products.
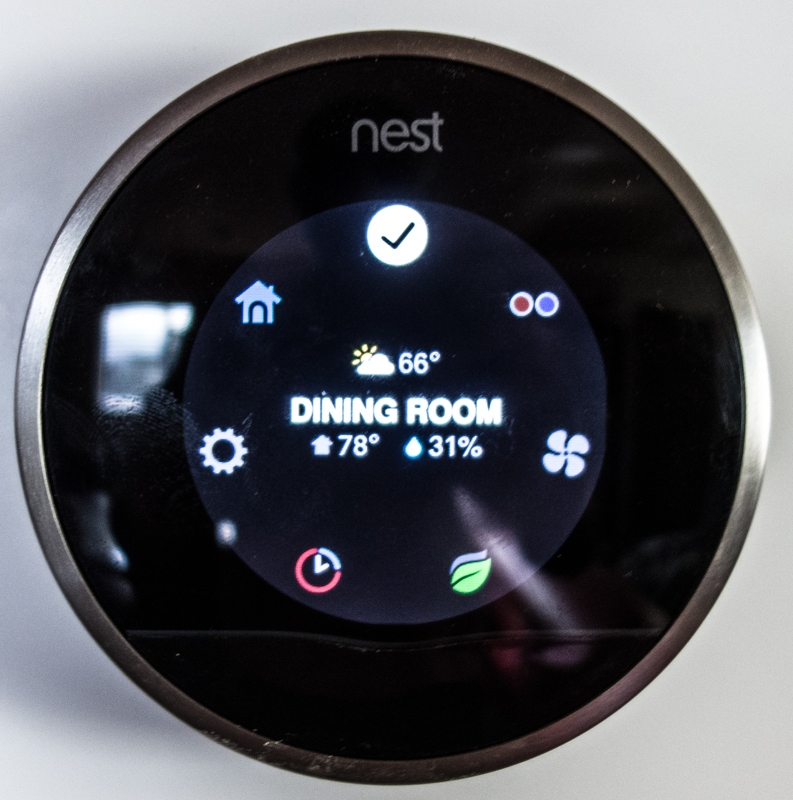
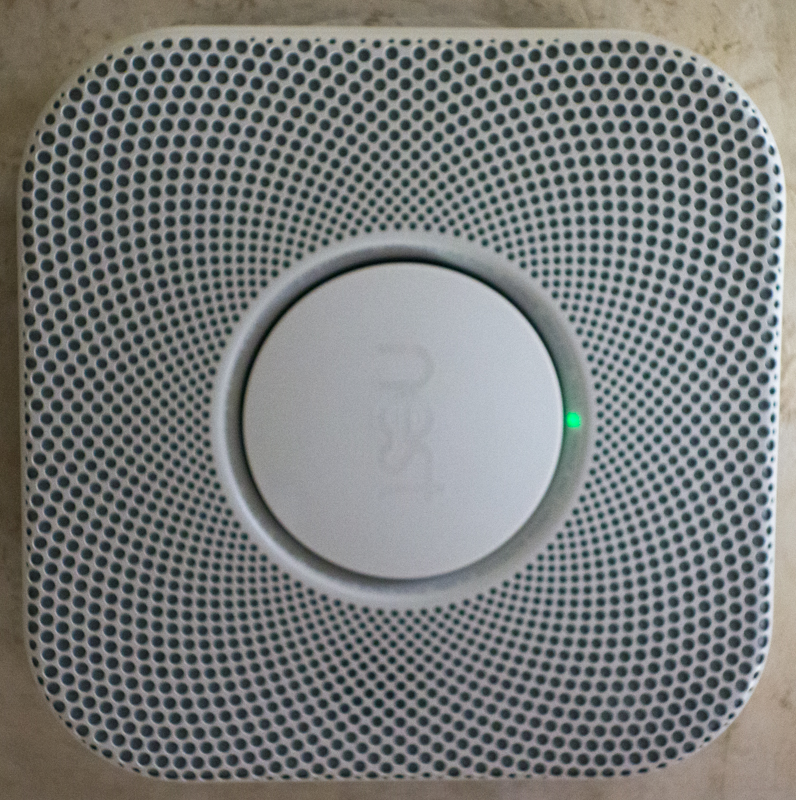
What is really cool about the Nest products are they can be monitored, controlled and receive problem notifications via an iPhone, iPad or computer.
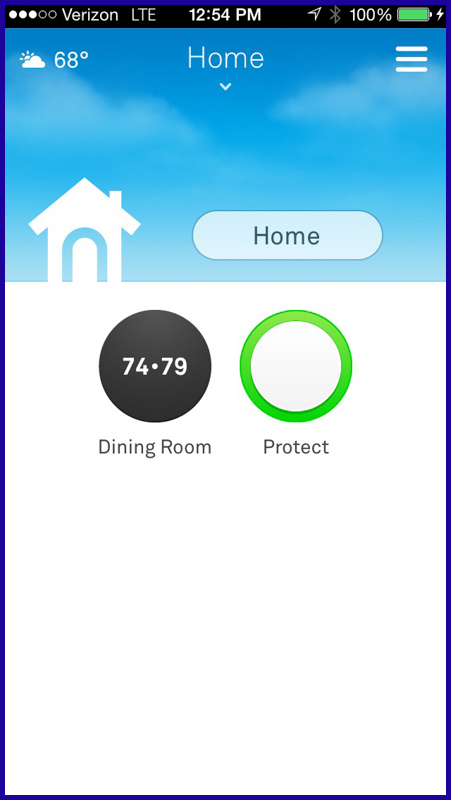
Nest iPhone App showing the status of the thermostat and smoke detectors.
Now you know what I spent 4 weekends doing, when I should have been out backpacking or camping!