I am going to show you how to navigate quicker and more accurately with a map and any compass, by using a map protractor.

Few subjects elicit more debates among hikers and backpackers than the subject of map and compass. Nowadays the subject includes GPS units, smart phones, base plate compass vs. fixed compass vs. lensatic compass, what map to use, etc. Then there is the fact electronic solutions (GPS and smart phones) can fail or end up with a dead battery. Many of the electronic persuasion carry and map and compass as a backup, which means duplicate items to do the same task, meaning unnecessary weight. Some of the backup maps and compasses in use are less than optimal and in a no-shit-need-to-have situation might be poor options (think button sized compass and a large scale general map).
We need to keep in mind that the goal of using a map and compass is to always know where you are, not figure out your location because you are lost. Of course, with practice you can use a map and compass to figure out your location if you do get lost.
Most backpackers bring a map and compass whether or not they know how to really use it. One piece of navigation equipment I rarely see in use by backpackers is a map protractor. In this post the protractor will be presented as a serious tool that backpackers may want to consider, and for those who have used and then abandoned a map protractor, perhaps a re-visit might be worthwhile.
Since my blog doesn’t have the ability to post comments and only handful of people have my email address, there won’t be the typical debate on my blog this subject might generate.
But first, let’s talk about the North Pole, magnetic declination and then look at some common compasses and how they might be used.
Your Compass Probably Doesn’t Point North
There are very few locations in the US that a compass will point to True North. Instead, they point to Magnetic North, which is constantly changing. For example, when I moved to Palm Springs in 1977 my compass pointed 14 degrees east of True North. Today, 40 years later, it points 11.63 degrees east of True North.
The picture below shows how the magnetic north (blue line) has moved since the 1590, and since 1904 it has been steadily moving in a northwesterly direction. The North Pole (true north) is the point where all the lines converge in the upper right of the picture. This difference between True North and Magnetic North is known as magnetic declination.

Magnetic Declination
A few years ago I was in a trolling mood and on a backpacking forum I stated that knowing declination was not needed and proceeded to lay out a procedure on how to navigate without using declination. No one challenged me or questioned the method, which was surprising because if one is expert at map and compass it should have been obvious that the procedure I explained was flawed. Fact is you cannot accurately navigate without compensating for magnetic declination.
Years ago, before the Internet, many people would discard old maps and purchase new ones with current and more accurate declination information. Today one can get the declination of any location in the US at this website www.magnetic-declination.com.
Maps
For decades the “gold standard” for backpacking maps has been the 7.5 minute US Geological Survey (USGS) Topographical Maps. These maps cover 7.5 minutes of longitude and latitude and vary between 49 and 70 square miles in coverage, dependent on the location. (As you go south the distance between longitude degrees increases because the earth is a globe). These 7.5 minute Topo Maps are rather large, which provide very detailed information. The physical size of USGS topo maps north of 31 degrees latitude are 22” X 27” and south of 31 degrees latitude they are 23” X27” in size.
People who are expert in the use of a topographical map rarely need to use their compass; they navigate by associating the terrain with the map. However in thick fog or snow the use of a compass is critical to avoid getting lost.
For years the only way one could get a USGS topo map was to buy them via mail order through the USGS or purchase them from a specialty map store. Today they can be downloaded for free at https://store.usgs.gov/maps. Since most people don’t own a large format printer, you can take the files to places like Staples and have copies printed for a reasonable charge. There are other sources of maps and some software programs that allow you to print your own, but I prefer the USGS maps and will use them as examples as we examine how to use different types of compasses.
USGS topo maps have the declination printed at the bottom of the map as in the example below:
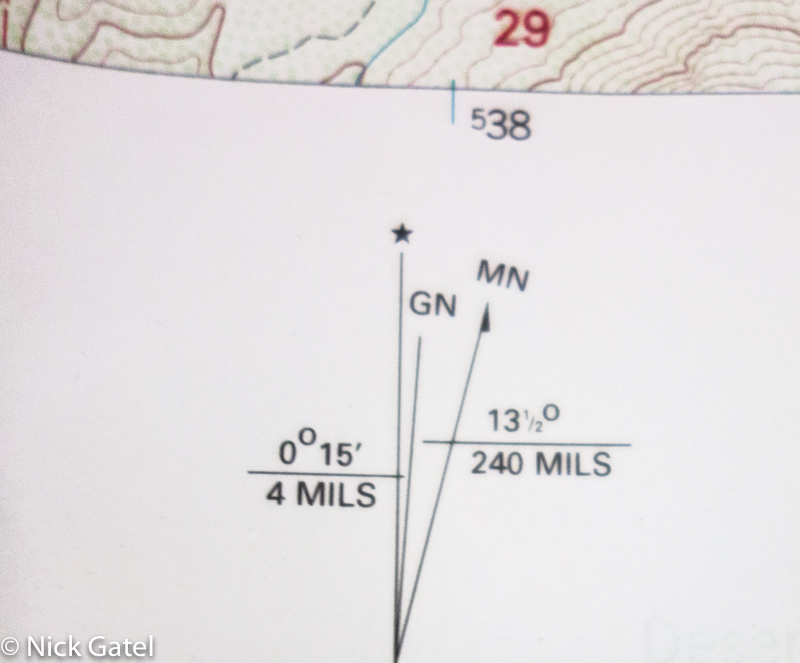
There are 3 lines
- The left line with the star at the top is True North.
- The center line marked GN is Grid North. Grid North are the north-south grid lines on the map. Often Grid North and True North are exactly the same. When they are not, we use the Grid North lines for navigation.
- The right line is Magnetic North. The distance between Grid North and Magnetic North is shown on the map as 13 ½ degrees (which is also 13 degrees 30 minutes) and also shown in mils, which is 240 mils. Since Magnetic North line is to the right of Grid North, it is east. When you orient a map, North is at the top, South at the bottom, right is East and left is West. This measurement is the Magnetic Declination of the map’s location and is 13.5 degrees East.
Degrees vs. Mils
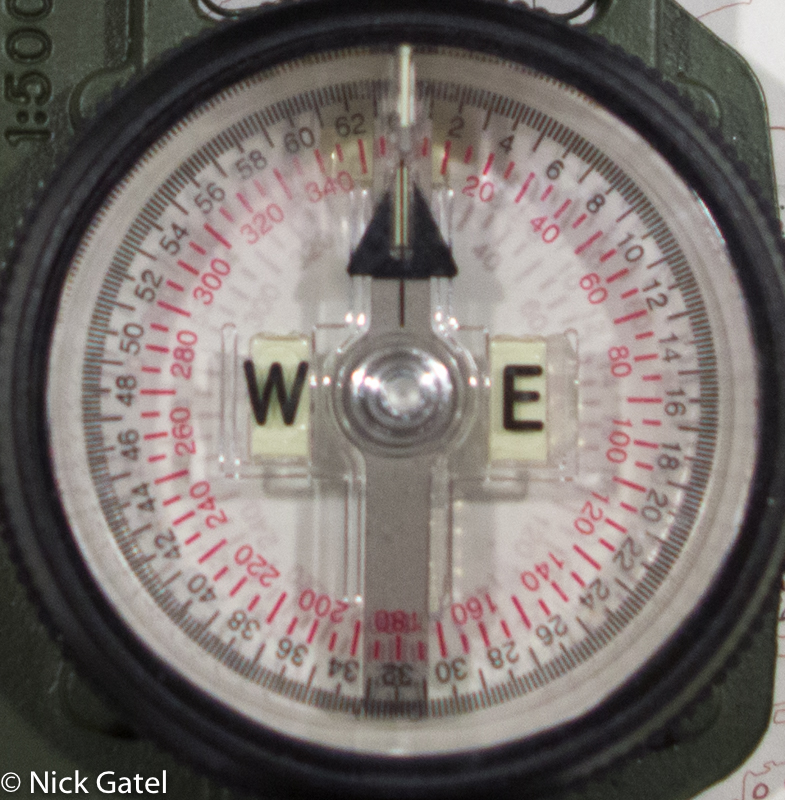
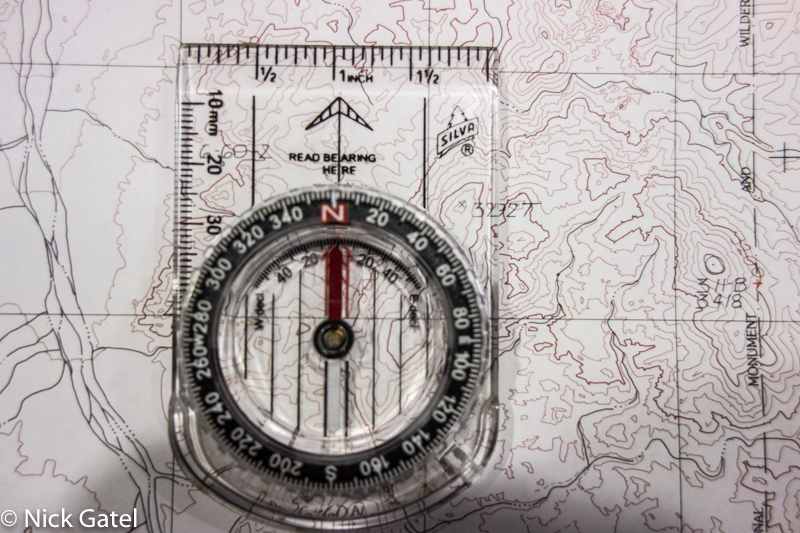
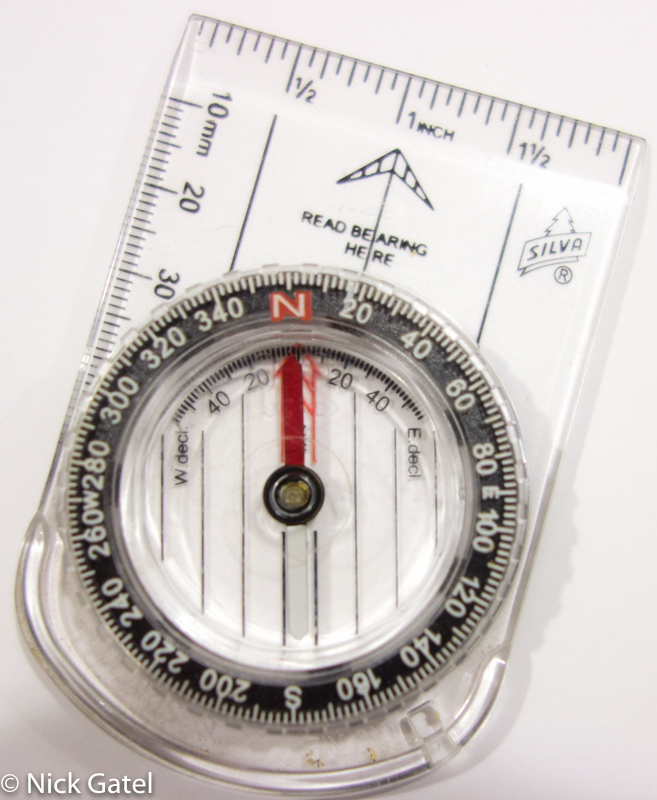
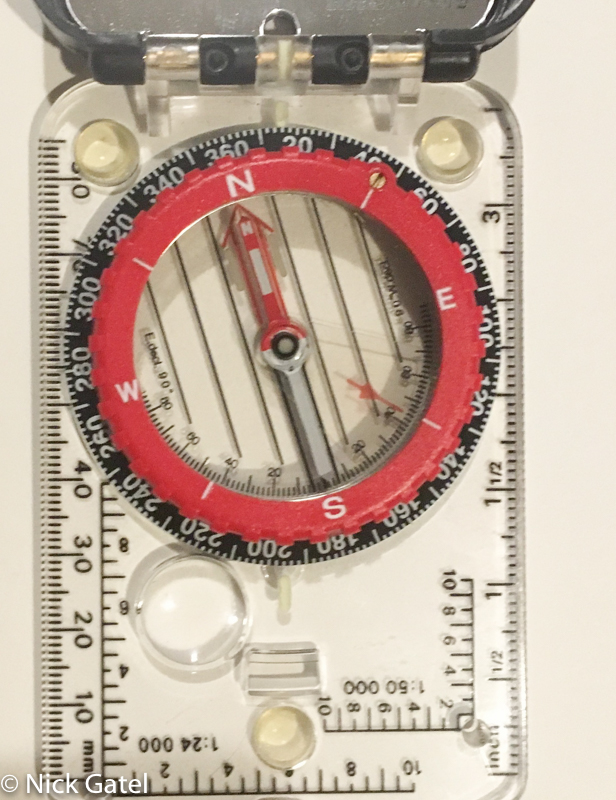
When you look at a typical compass used for backpacking it is divided into 360 degrees and usually in 2 degree increments, as in the picture below.

A military lensatic compass uses both a Mil scale and a Degree Scale. There are 6,400 mils in a circle versus 360 degrees in a circle. The outer black numbers on a military compass are mils and the inner red numbers are degrees. The red marks are in 5 degree increments, not as detailed as the typical backpacking compass. But the black mil markings are in 20 mil increments, which is equal to 1.125 degrees. So you can see a military compass can be almost twice as accurate.
Map Data
USGS topo maps are full of data, but not all are always exactly the same. Let’s take a look at the magnetic declination sample above, but zoom out a little bit.

This map data is from 1999. The map is 18 years old and the declination is no longer accurate. The map is from an area in the mountains above Palm Springs, and using www.magnetic-declination.com it has changed more than 2 degrees since 1999 and is now 11.63 degrees east versus 13.50 degrees in 1999.
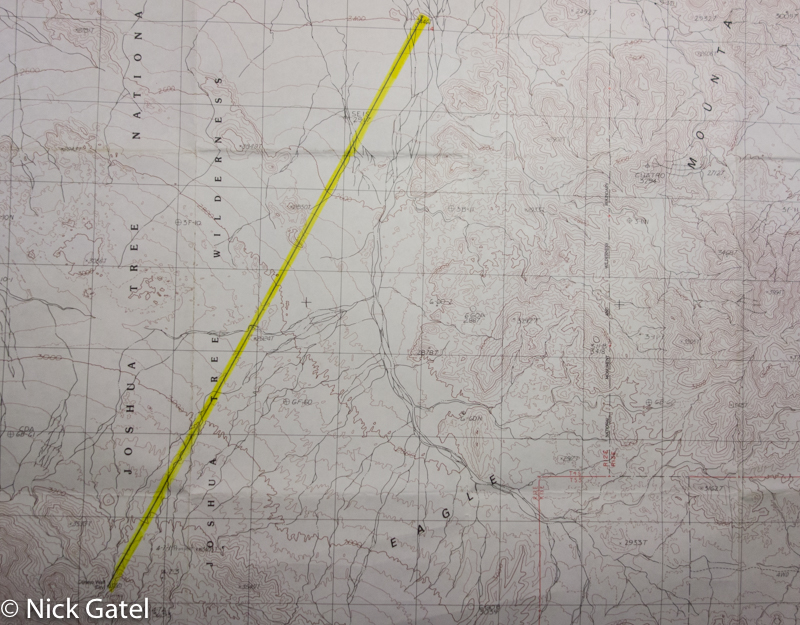
I hike a lot in Joshua Tree National Park where, like most deserts, navigation can be difficult due to lots of canyons and few prominent landmarks. Take a look at these USGS Topo maps I bought years ago. They are four contiguous maps covering 15 minutes of longitude and latitude.

None of the maps have a magnetic declination graph in the bottom margins. There is just one arrow showing the north gridline.
Closer inspection shows more information in the text in the margin right of the North arrow. This map was edited in 1988 and it states the 1980 magnetic north declination is 14 degrees east.
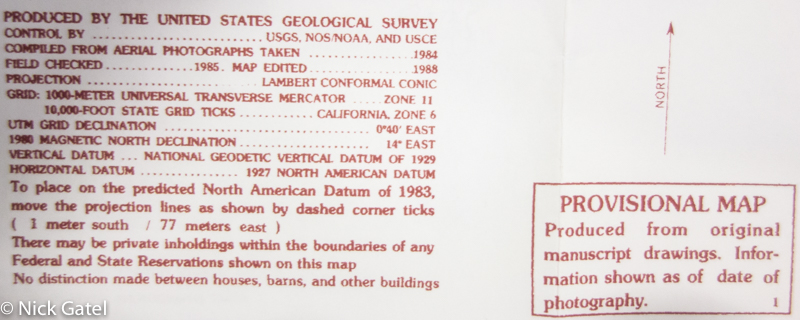
Another map was edited a year earlier in 1987, and it shows the magnetic north declination is 13 degrees 30 minutes (13.5 degrees) east.

Today these four maps have a magnetic declination of 11.63 degrees east. Moral of the story is to check your maps carefully before going out into the field and obtain the latest declination for the area you will be hiking in.
Adjusting for Declination and Orienting the Map
Before we discuss a map protractor, let’s take a look at the two most common types of compasses and see how we would compensate for magnetic declination. Both are baseplate orienting compasses. Basically these are simple compasses mounted on a plastic protractor with limited functionality compared to a dedicated map protractor. Keep in mind that there are many ways to adjust for declination and orient a map. The following methods are from the instruction manuals and might be different than how some people do their set up.
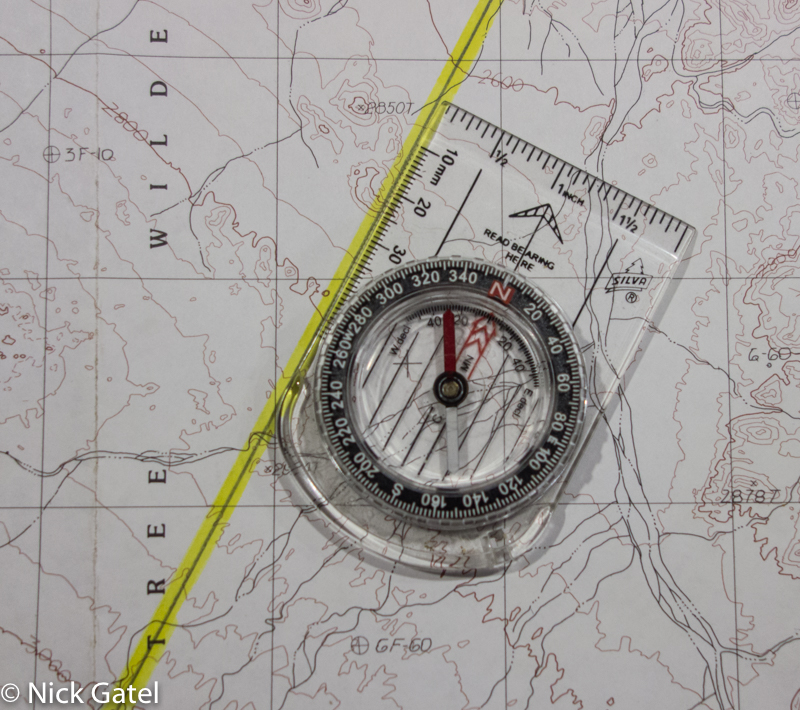
For this exercise I am using the Conejo Well USGS topo map quadrangle in Joshua Tree National Park. Our starting point is the dry well below Conejo Spring and our target is a small hill with a mining prospect. The current magnetic declination is 11.63 degrees east, which we will round up to 12 degrees east. I have drawn a line with a straight edge from our starting point to the target and highlighted it with a yellow marker to show on the map.
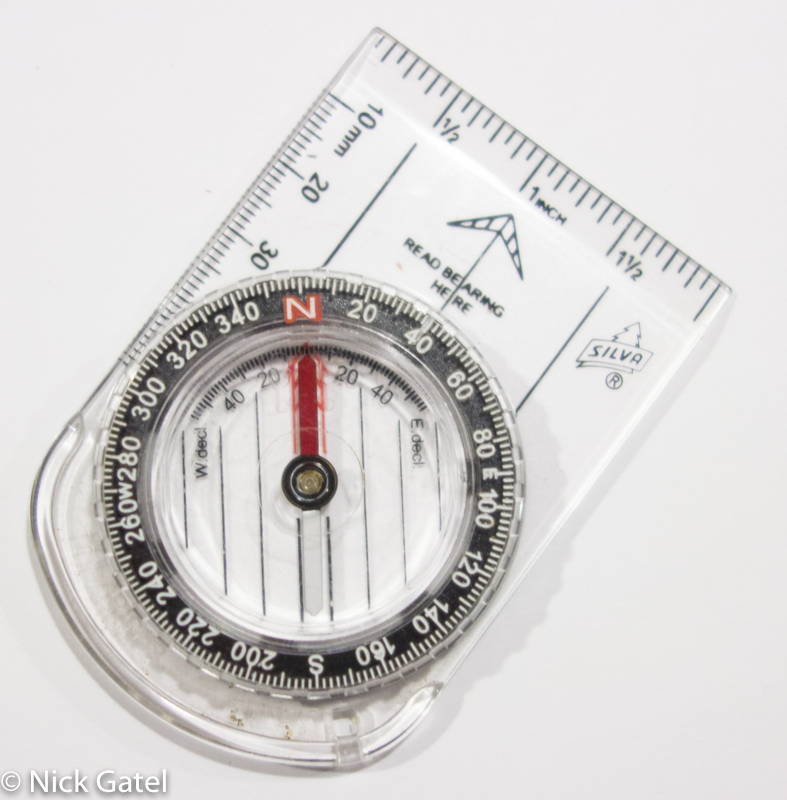
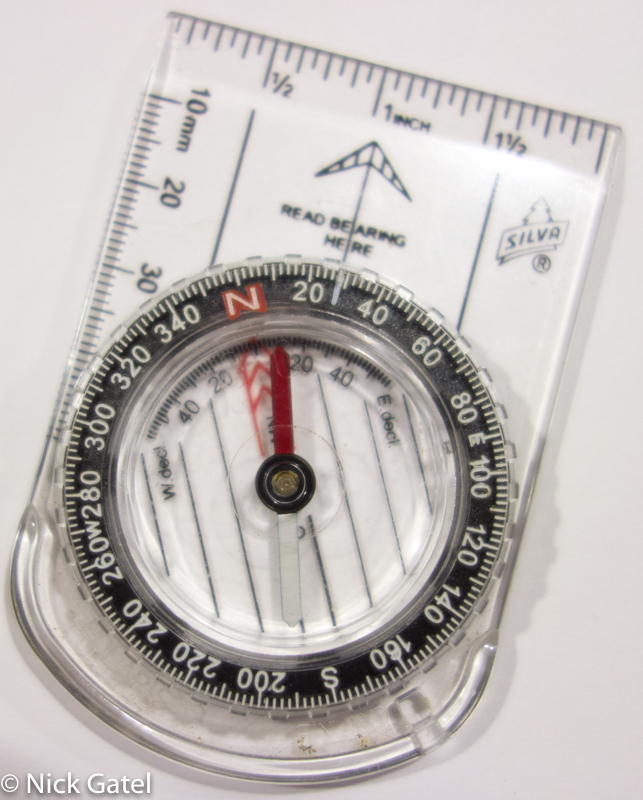
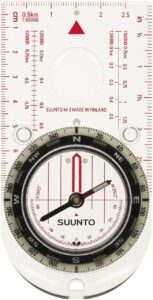
Base Plate Compass with Fixed Declination Scale: Silva Polaris
I bought this compass a long time ago. Probably purchased it in the late 1970’s or early 80’s. It was manufactured in Finland. Silva is a well-known brand. However there are differences. In the United States the Silva brand is now owned by Johnson Outdoors. The Silva brand in Europe is manufactured by a different company. My Silva compass has held up well over the years. I feel Brunton now makes a better product than Silva, and Suunto is better than Brunton. Those would be my choices if I was in the market for a baseplate orienting compass.
Step 1: Orient the map
- Place the compass on your map with the edge along a north-south grid line.
- Turn the map and compass together until the red needle is pointing north.
- Your map is now aligned to magnetic north.
Note that we will be moving and adjusting the compass on the map. Great care must be taken NOT to move the map at all, otherwise the map will need to be oriented again and the steps below re-done.
Step 2: Determine your bearing and adjust for declination
Place the compass on the map between your starting point and your destination with the bearing arrow pointing in the direction of travel.
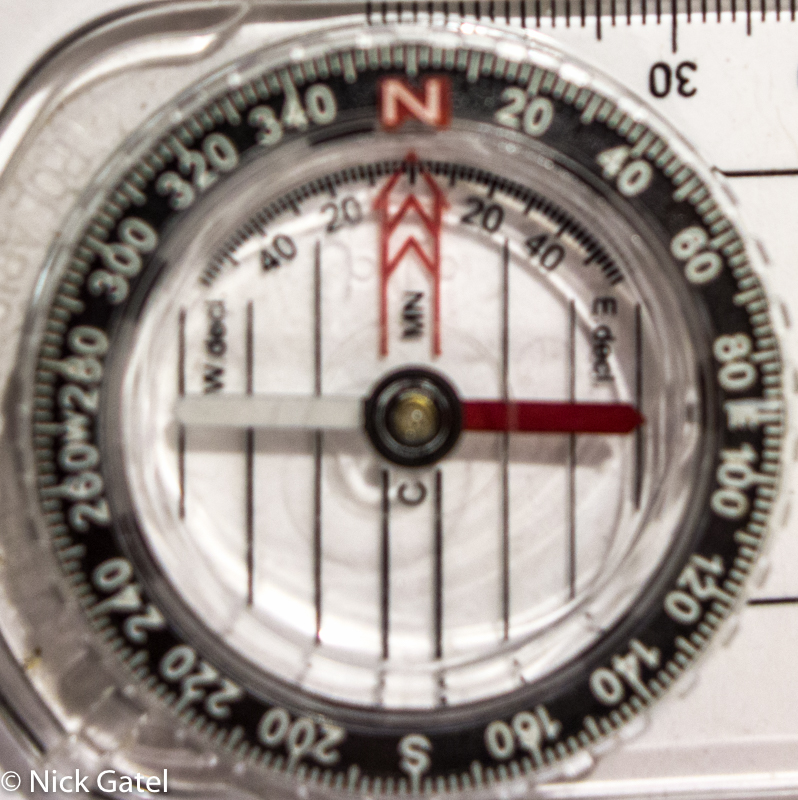
Turn the degree wheel until the orienting lines are parallel to the meridian lines on the map with N pointing north.

Holding the compass level at waist height, and turn yourself until the red needle is aligned with the red North Arrow.
Adjust for declination by turning left or right until the needle points to the degree of declination on the fixed declination scale matching to your current location.
Hold the compass steady and turn the degree wheel to align the orienting arrow with the new needle position.
Select a visible target in front of you to help you continue your direction while traveling.
Track your progress by associating landmarks to the map.
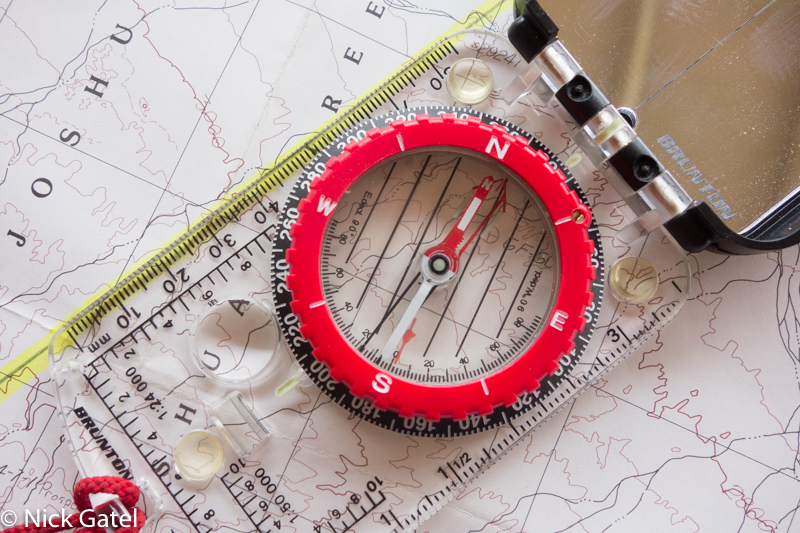
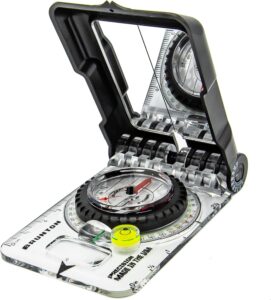
Base Plate Compass with an Adjustable Declination: Brunton Type 15
For this example we will be using a Brunton Type 15 compass, which has an adjustable declination feature. Once you set the declination (using a small screw and included tool), you don’t have to worry about re-setting the declination unless you move to an area where the magnetic declination is different.
In addition to the adjustable declination, this compass also has a sighting mirror function that allows for more accurate travel. Compasses with adjustable declination can be purchased with or without the sighting mirror. This compass also comes with a clinometer that is used to measure the angle of a slope in winter to assess avalanche danger.
Step 1: Adjust the compass declination with the key and screw
There are a set of small black numbers inside the red ring. They are the adjustable declination scale. In the picture below the declination is set at zero.
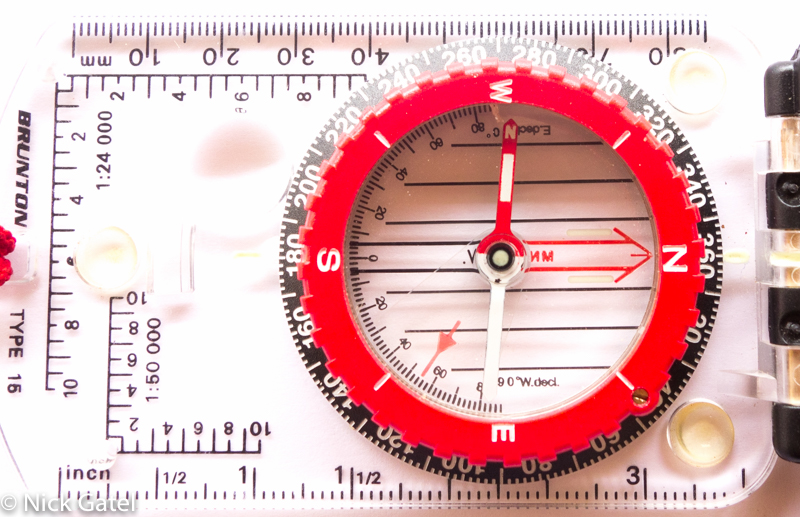
Using the Key we will adjust the declination to 12 degrees east as shown below.

Step 2: Orient and navigate with the map and compass
- Place compass on map with the straight edge along your desired direction of travel. Make sure that the direction of travel arrow points toward your destination.
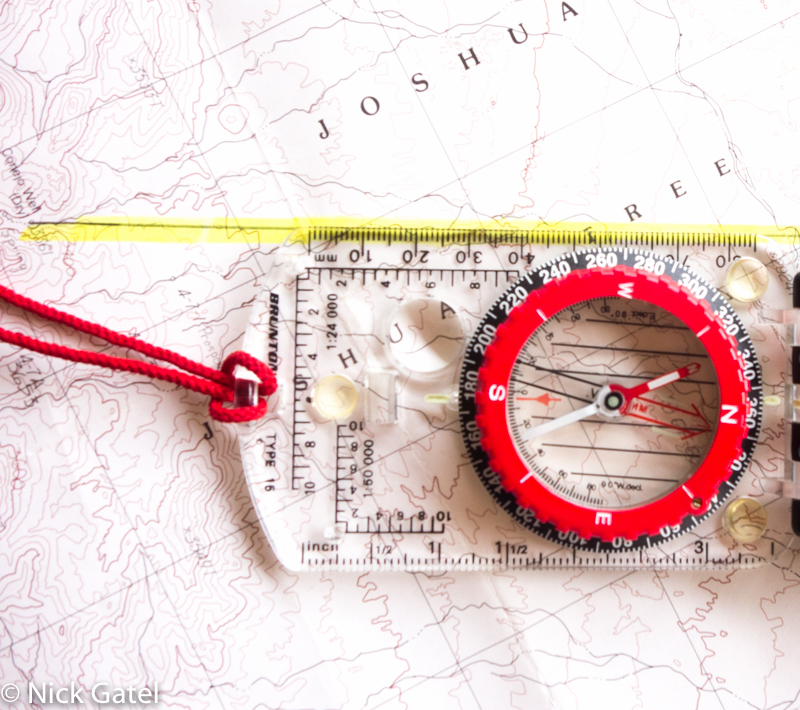
- Keeping the map in place, turn the compass dial until the black grid marks in the center of the compass are aligned with the North-South map gridlines.
- Keeping the compass in place along your desired direction of travel, reposition the map until red needle outline and the needle are aligned.
- Your map is now oriented to Grid North and is lined up with the terrain around you.
- Pick out a landmark along your direction of travel and move towards it, checking periodically that your needle and red needle outline are aligned. Repeat this procedure until your destination is reached.
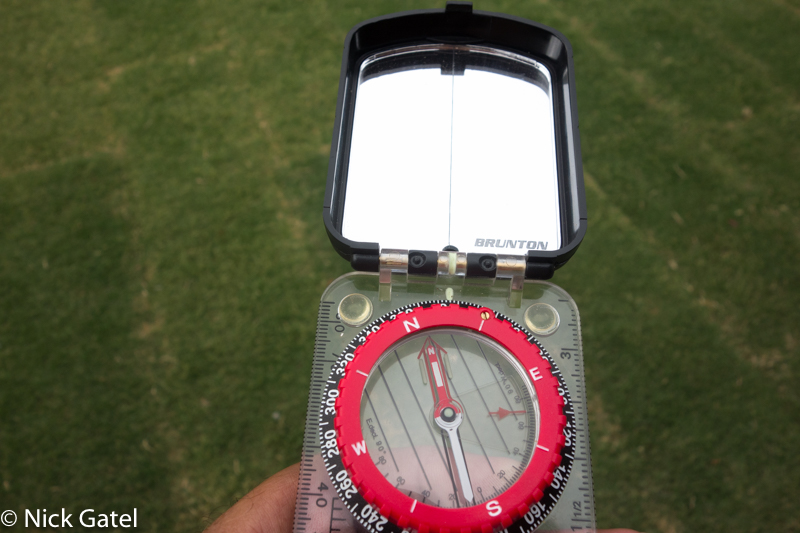
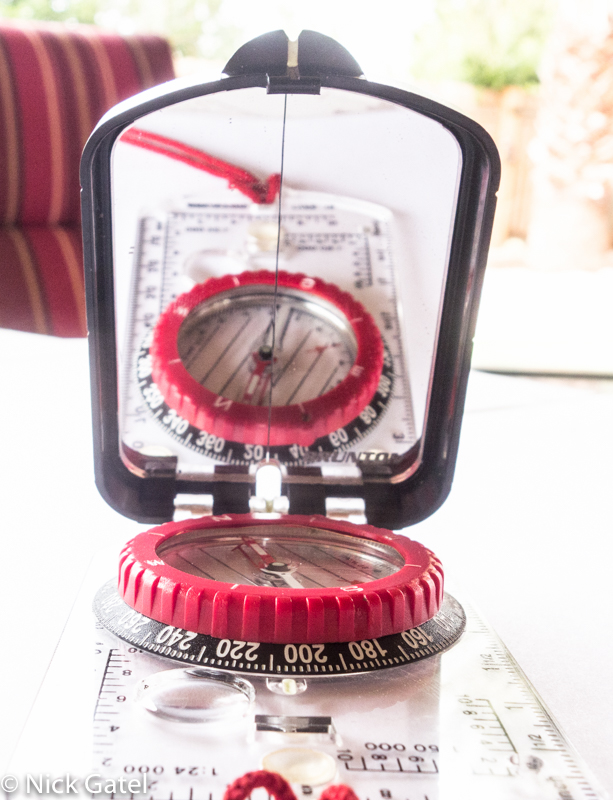
Because this model has a sighting mirror, there isn’t a line of travel marking like the Silva Polaris. You can open the mirror and use the mirror’s index line to sight and follow your bearing.
Better yet, fold the mirror back. This way you can ensure that the needle and the red needle outline are aligned and at the same time look through the notch at the top of the mirror housing to pick out landmarks that are lined up with your bearing.
As you can see setting up and using a baseplate compass with a fixed declination scale is much different than using baseplate compasses with an adjustable declination function. It takes practice to become expert at either, and more importantly it takes several steps to be able to move from map to compass and begin walking. So think about this. If you are expert with one kind and suddenly need to switch to another in the field, you will probably struggle and more than likely be unable to properly navigate. Your knowledge is probably compass-specific, not general map and compass navigation expertise.
Military Lensatic Compass vs. Baseplate Orienting Compass
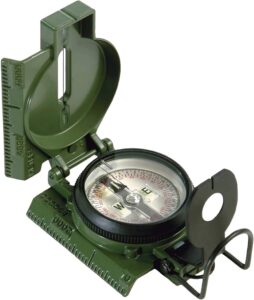
My “go to” compass is a military Cammenga Model 3H lensatic compass. This is the same exact model that is used today by our military. Unlike most baseplate compasses, the Cammenga has an aluminum body that is sand and water proof. The compass needle is mounted on a jeweled bearing allowing it to quickly stabilize the needle compared to baseplate compass needles that are housed in a liquid capsule and subject to air bubbles rendering them inaccurate. Plus the Cammenga is operation between -50F to +150F temperature. The dial has 7 tritium micro lights on the dial that will remain luminous for 12 years.
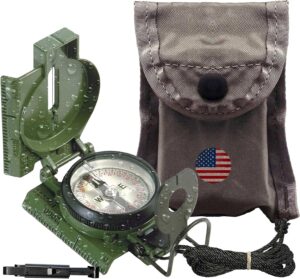
Cammenga also makes a Model 27 civilian model. The only difference between both models is the Model 27 has phosphorous dial, which requires a burst of light to charge the dial so it can glow at night. Both the military and civilian model can be purchased by the general public. Both models are more accurate than a baseplate model.
These Cammenga compasses have two draw backs compared to the typical baseplate compass. First is they are much heavier and secondly they are more difficult to use because they do not have a built-in protractor. However, used in conjunction with a protractor they are so accurate you could use it to direct artillery fire — one of the reasons it was developed. For these reasons I am not going to describe how to use a lensatic compass with just a map because it does not have a fixed or adjustable declination scale.
The Map Protractor
EAST IS LEAST, WEST IS BEST
What if I told you there is a tool that weighs 13 grams (less than ½ ounce) that can allow you to figure out a bearing quicker than all the compasses mentioned above, that you could use it with any kind of compass – meaning you wouldn’t have to study all the functions of each kind of compass and become familiar with the unique operation of each. Would you be interested? That tool is the map protractor.
Numbers are your friend
When my kids were young, I used to tell them that numbers were their friend – meaning that if one is good with mathematics and science life will present many opportunities. With mindset it will be helpful to review some concepts.
There are two prerequisites to using a map protractor:
-
- You need to be competent with 3rd grade math (e.g., add and subtract simple numbers)
- In high school you learned (and remember) how a simple chart works
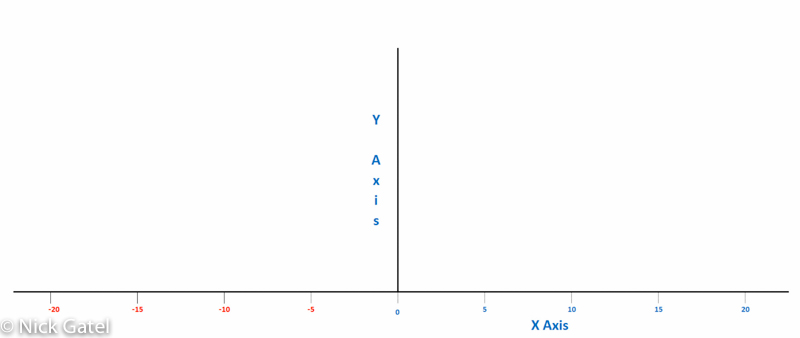
A simple chart has an X-axis and a Y-axis. The intersection of both axes has a value of zero. As you move to the right of the X axis, the values increase. As you move up the Y axis the values increase as shown below.

If we extend the left axis to the left, the numbers decrease and are negative. See below
Now let’s change the labels on the above chart with some map nomenclature.

When you hold a map, north is at the top, west is left, and east right. If you move from Grid North towards the west, you are moving in a negative direction. The following pictures below will help explain this better.
A compass is divided into a circle, which by definition has 360 degrees. On a compass Zero degrees is designated north. If we travel from this “zero” around the circle 360 degrees we end up back at point zero or the 360 degree mark. Zero and 360 are the same point. Some compasses read 360, some zero, and some just have N below the zero/360 tick mark.
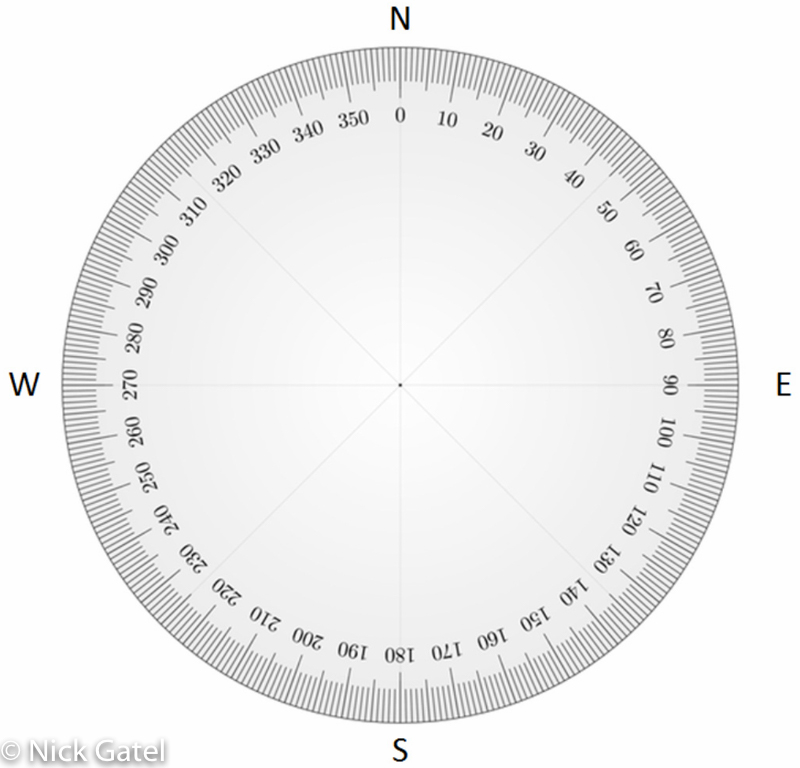
If we are standing in the center of this circle and walk any direction in a straight line, we can describe the direction of our travel by the intersection of our straight line and the numbers along the circle.
If we walk east of North with a bearing of 15 degrees if will look like this:

The direction we are walking is the blue line and it intersects our circle at the 15˚ East mark. Pretty straight forward stuff.
Now let’s start over and walk 15˚ west of North We will also draw a line for our starting point to where we would cross the circle.
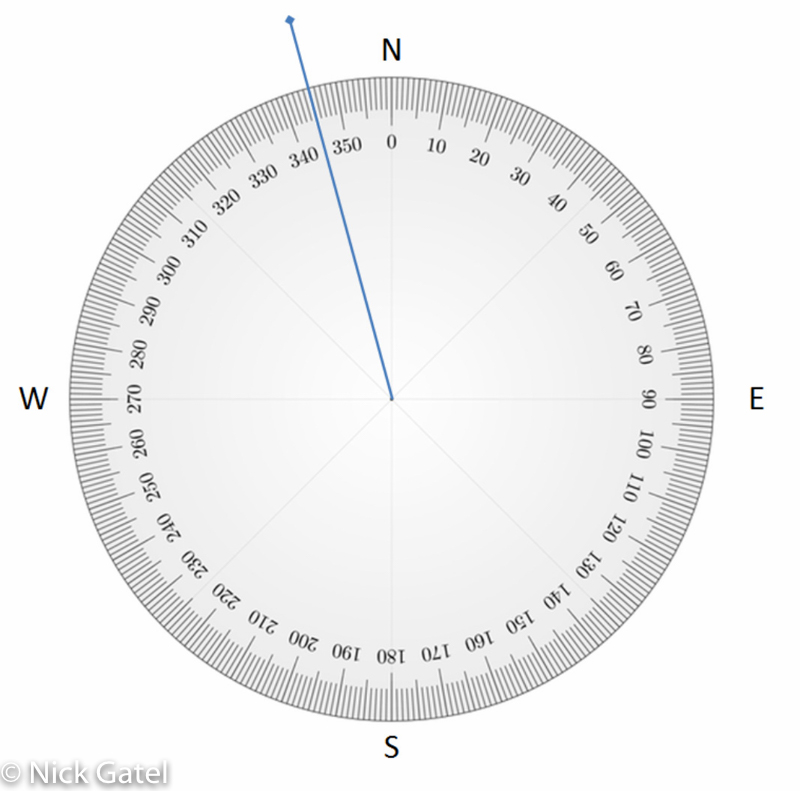
If we remember from the chart example, anything to the left or west of the Y Axis is a negative number. However in our chart (above) we crossed the circle at 345˚. The top of our map or north is 360˚ and we traveled in a direction west of 15˚ or -15˚ degrees. And if we subtract 15˚ from 360˚ we get 345˚, which is our bearing! This is an important concept. East is negative and west is positive.
What would happen if we oriented our map without taking magnetic declination into account and we plotted a course of 20˚east and the declination for our location is 15˚ East?
We would place the edge of our compass along a North/South Grid Line and the measure the bearing on the compass along the line we drew from our beginning to end point, just as we did in the sample compass exercises in the beginning of this post. Our results would look like this:
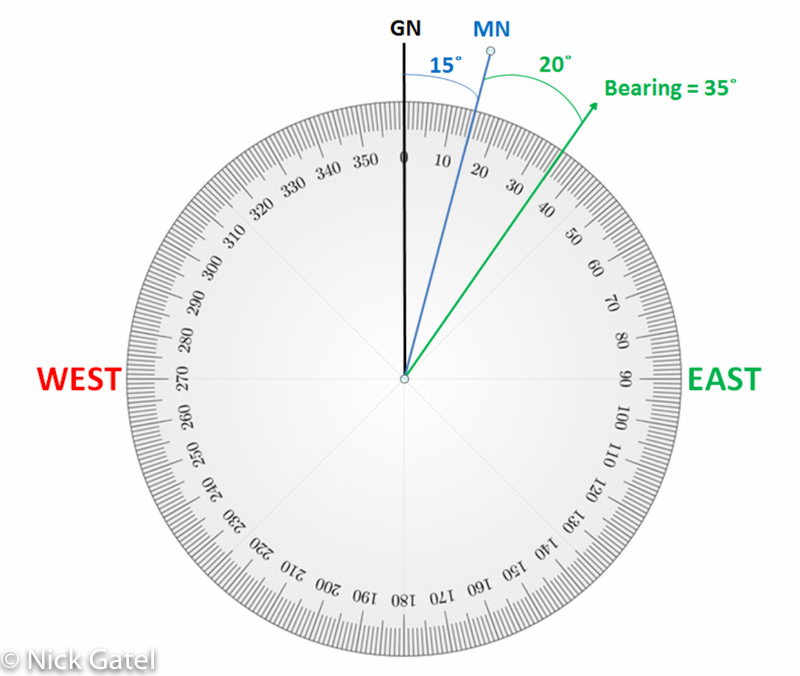
Because we oriented our map without taking magnetic declination into consideration, True North or Grid North was pointing to Magnetic North, which is 15˚ East, and we mapped a bearing 20˚ east of this point, so we would travel on a bearing of 35˚ East or 15˚ off of where we need to go. Since we ignored our declination, we need to adjust it mathematically using this formula:
Correct Bearing = Mapped Bearing – Magnetic Declination
Correct Bearing = 20˚ – 15˚
Correct Bearing = 5˚
In other words, we would set our compass to a bearing of 5˚ and it will really be pointing to 20˚ because we didn’t orient the map by adjusting the declination. This will become clear when we look at an actual map protractor. But first we need to consider what happens when or declination is West. At first this seems really complicated.
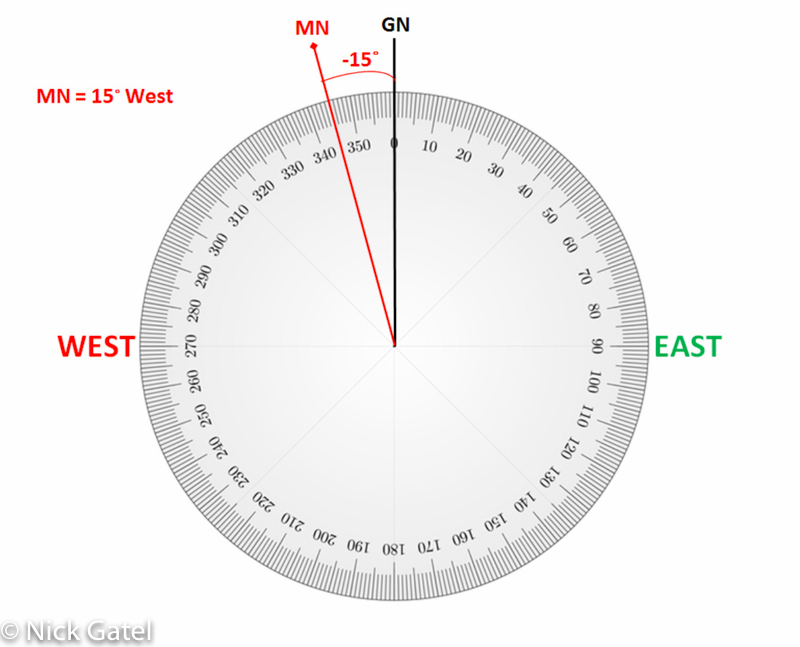
For the next example let’s use the following data:
- Magnetic Declination = 15˚ West
- Our bearing measured on the map is 300˚
- We did not adjust the map or compass for declination
Instead of 15˚ West, we are going to use -15˚ so we can use the same formula as in the previous example.
Now we take the bearing reading from our map, which is 300˚.

Now let’s apply our formula:
Correct Bearing = Mapped Bearing – Magnetic Declination
Correct Bearing = 300˚ – (-15˚)
Correct Bearing = 300˚ + 15˚
Correct Bearing = 315˚
Okay, it sounds complicated and many people can’t keep things straight, so they go buy baseplate compass with a declination feature built in. But, we can make this really, really simple.
East is Least, West is Best
Here’s the definition of the above saying:
If something is least, it is less. If something is best, it is more.
In other words,
- if Magnetic Declination is East, it is less, so subtract it from the bearing taken on the map with a compass or protractor
- if Magnetic Declination is West, it is more, so add it to the bearing taken on the map with a compass or protractor.
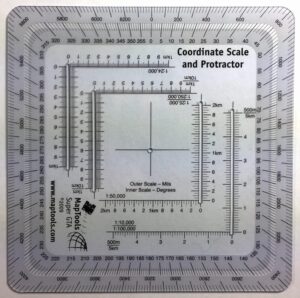
Map Protractor Demonstration
Using a map protractor we don’t need to orient the map and we don’t need to even lay our compass on the map. We just:
-
- Place the protractor on the map and read the bearing
- After we get our bearing we do our math (East is Least, West is Best)
- We set the bearing on our compass from the calculation in step 2
We are going to use the same Conejo Well USGS topo map from the prior exercises and we will be traveling along the same route. Our Magnetic Declination is 11.63˚ East (or 207 mils East) which we will round up to 12˚ East.
1. Place the protractor on the map and read the bearing
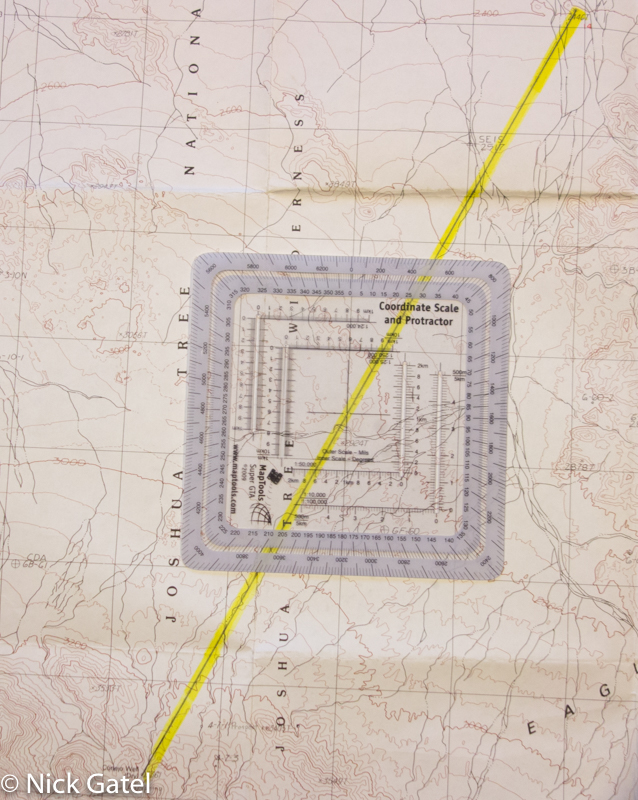
- There is a small hole in the center that must be on top of you line of travel
- Align the vertical line with a North-South grid line where it crosses the line of travel
- If a North-South grid line does not cross your line of travel, you can align the horizontal line with an East-West grid line that crosses your line of travel
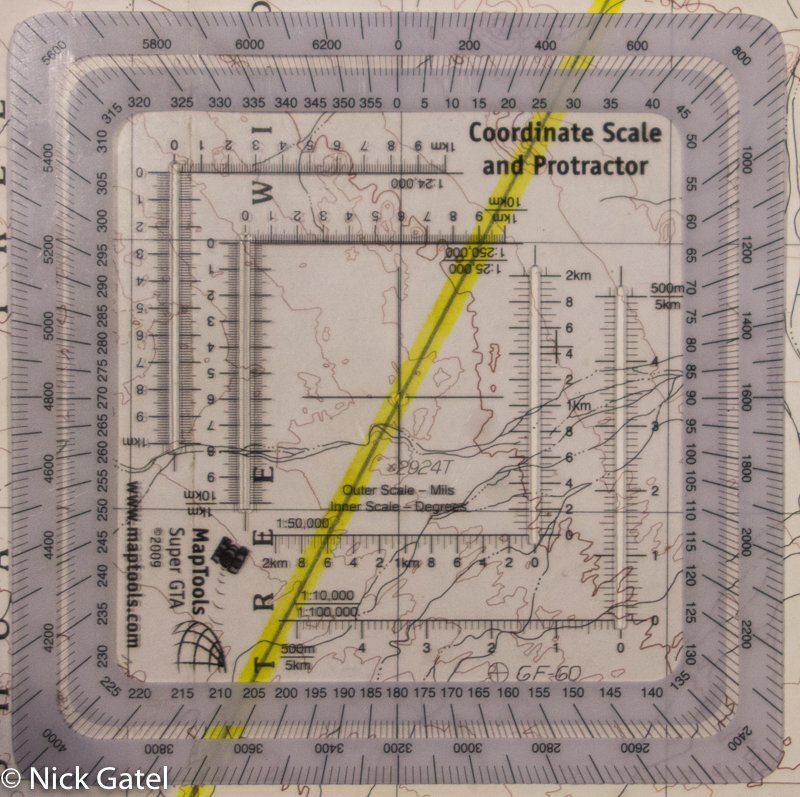
Read the bearing at the top of the protractor. There are two scales: the top one is Mils, the lower is Degrees
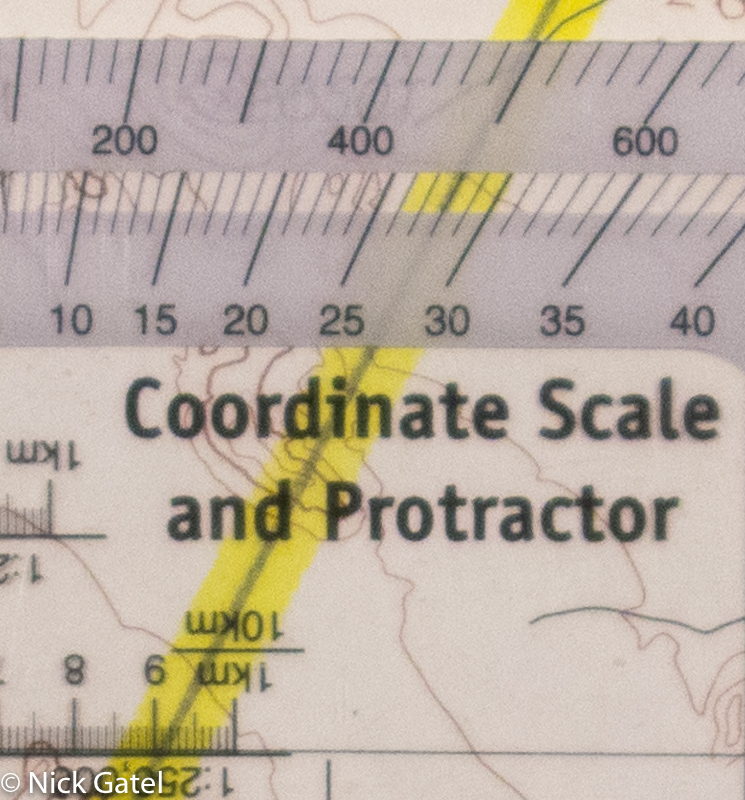
Our bearing on the map is just under 500 Mils or 28 degrees.
2. Now Do the math
Mapped Bearing – Magnetic Declination = Correct Bearing
28˚- 12˚ = 16˚
or
500 Mils – 207 Mils = 293 mils
3. Set your compass to 16˚ (or 293 mils for military lensatic)


Parting Thoughts
In the map protractor demo we learned how to determine our bearing on the map and transfer it to a compass using 3 simple steps.
-
- Place the protractor on the map and read the bearing
- Read the map bearing and do the math (East is Least, West is Best)
- Set the bearing on the compass from the calculation in step 2
Because we are not laying a compass on the map, moving it around, and adjusting the compass, it is more likely your measurement will be more accurate with a map protractor. Plus you are not lining the edge of a compass on grid lines and lines of travel — just a single line view directly over the grid. Lastly the map protractor uses bearing marks that are in 1 degree increments, instead of the 2 degree increments on most compasses. Add all of these advantages and you will find a map protractor to be much, much more accurate than the typical baseplate orienting compass.
A couple of pointers on the math when you add or subtract the magnetic declination from the bearing on the map:
- If the calculation is greater than 360˚ subtract 360˚from your calculation (e.g., 365˚= 5˚)
- If your calculation is a negative number, add it to 360˚ (e.g., -2˚ = -2˚+ 360˚ = 358˚)
Transferring bearings from the compass to the map (usually used to determine your location via triangulation) is a little bit different than the steps outlined in the map protractor instructions. I cover that in Part 2.
This website may be compensated for linking to other sites for sales of products. As an Amazon Associate I earn a small fee from qualifying purchases at no additional cost to the purchaser.
MapTools Improved Military Style MGRS/UTM Coordinate Grid Reader, and Protractor
![]()
![]()
![]()
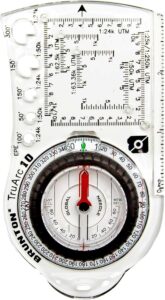
Suunto M-3 Compass
![]()
Cammenga 3HCS Official US Military Lensatic Compass Tritium
![]()
Cammenga Compass Military Grade Phosphorescent – Lensatic Compass
![]()