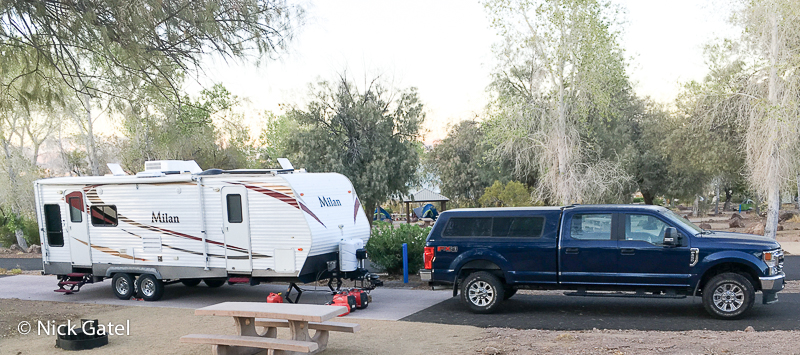
We’ve had this hitch for 8 years now and still love it. In this post I’ll share a few tips and one small upgrade.
This website may be compensated for linking to other sites for sales of products. As an Amazon Associate I earn a small fee from qualifying purchases at no additional cost to the purchaser.
Here are some links to earlier posts Wrote about the ProPride hitch:
For complete information about this hitch, visit the ProPride Website.
First of all, other than lubing the hitch every 500 – 1,000 miles, there has been almost no maintenance.
When we replaced our 2012 Ford Expedition with the 2020 Ford F-250 Super Duty, there was nothing to change, other than using the 3″ draw tube adapter than came with the truck. I didn’t even have to change the riding height.
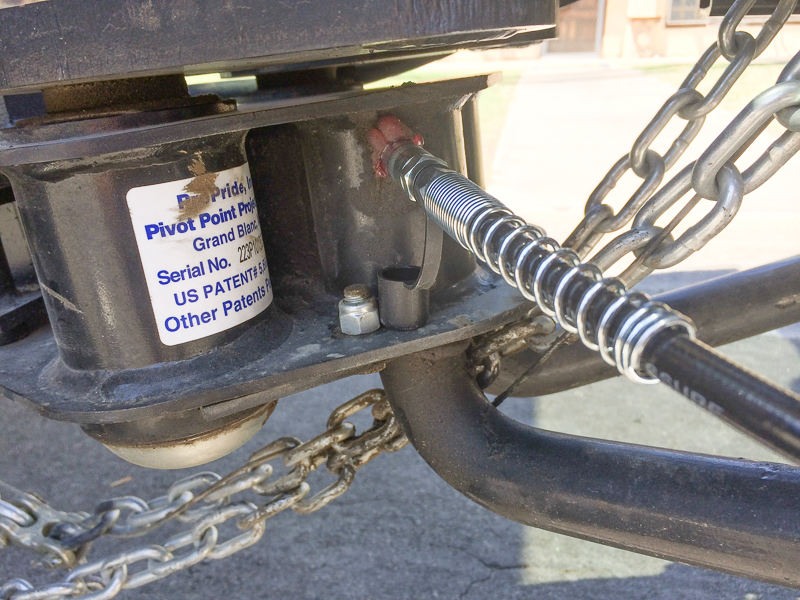
ProPride Drawbar
The ProPride uses a unique drawbar, which makes connecting the truck and trailer a 1 minute job. Unlike the common drawbar and ball, that requires you to raise the trailer, then perfectly center the ball under the trailer hitch coupler, you just back up the trailer making sure the ProPride receiver is at the same height and angle as the draw bar.

Typical drawbar and hitch ball.
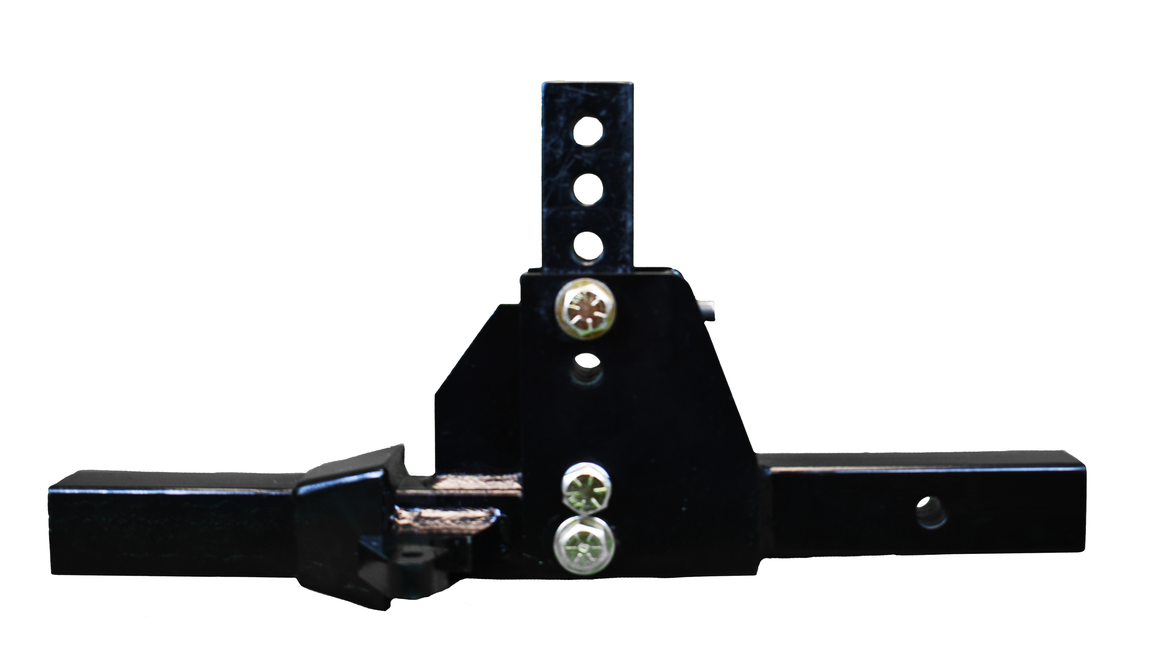
ProPride drawbar.The “stinger” above (left side of image) simply slides into the receiver on the ProPride hitch. The right side of drawbar (above) goes into the truck’s standard receiver.

Connecting the Trailer to the Truck
So here are the steps for me to connect the trailer and truck.
Back Up the Truck to the Trailer
Our truck came with an itty-bitty back-up camera. But it works just great when backing up, especially considering the truck is super, super long, with a crew cab and an 8 foot bed. I back up the truck and can see the stinger and the receiver on the hitch. What I mainly do is ensure the stinger is lined up with the hitch, left to right. Although our previous tow vehicle did not have a back-up camera, I could usually get the hitch and stinger aligned on the first try.
Then I get out of the truck and check that the receiver and stinger are at the same height, center-on-center. I raise or lower the trailer with the Ultra-Fab Phoenix 5500 power tongue jack as needed.
Back in the truck, I back up until the stinger is fully engaged in the receiver. Usually I can tell just by the feel of the truck. With the back-up camera, I can just look at it to verify. Now it is time to complete the connection.
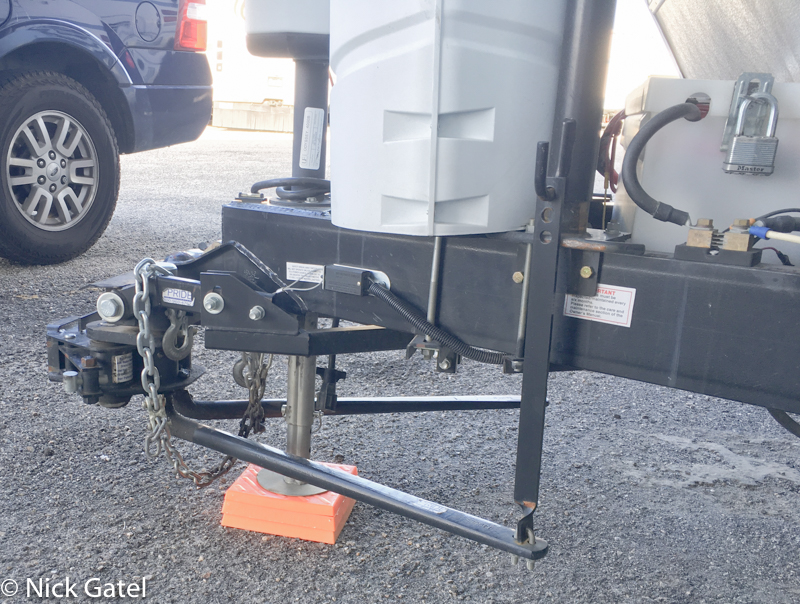
Securing the Drawbar and Hitch
There are two swivel latches on the hitch that connect to the drawbar. Often I can latch these by hand, other times I need a wrench although it doesn’t take much force to latch. Two lynch pins are insert to keep the latches secure. The trailer is now connected.
Set the Weight Distribution Height
There are two weight distribution jacks permanently mounted on the trailer’s frame, along with the permanently mounted weight distribution bars. Using the tongue jack, I lift the trailer, which at the same time lifts the rear of the truck. I just “eye ball” this. I probably raise everything 6 inches or so.
Now, using my portable drill, I apply tension on the weight bars by raising the jacks with the drill. I have markings on the propane tank cover to indicate how high the jacks need to go. I have never measured this, but I suspect the jacks lift about 8 inches or so. This can be done by hand with a wrench, but the drill makes quick work of things.
Umbilical Cord and Chains
Now I plug the trailer electrical cord into the truck’s Bargman connector and attach both safety chains to the truck.
Final Steps
- Retract the jack. Remove the jack drop leg and store it.
- Check that the trailer he lights work.
- Remove the wheel chocks and store it. (Note: if we are camping, then I need to remove the X-Chocks before hitching up).
- Do a walk around inspection.
Disconnecting the Trailer from the Truck
This post, Rock Steady, How Level, Chock, and Stabilize a Travel Trailer is a step-by-step process when setting up at a campsite. However there are a couple steps when disconnecting the ProPride I would like to share.
First of all, most of the time we are camping on ground that is nowhere near level. Sometimes the low spot is somewhere near the connection between the trailer and truck. Lastly, occasionally I will have to back in and the truck and trailer are not perfectly aligned, that is, the truck is at an angle relative to the trailer.
Once the trailer is where we want it to be at our site, these are the steps:
- Level the trailer side to side using Andersen Camper Leveler System.
- Chock the trailer wheels.
- Lower the weight distribution jacks until the distribution bars have no tension on them. Sometimes the front of the trailer will be very low, given the conditions of the site.
- Attach the jack drop leg.
- Place a wood block or Lynx Leveler under the trailer jack.
- Raise the trailer (lower the tongue jack) until the truck has no pressure from the trailer. Meaning there is no upward or downward pressure at all from the trailer hitch. It is pretty simple to do, by watching the draw bar in the truck’s receiver.
- Remove the latch lynch pins, and open the latches.
- Disconnecting the electrical cord
- Disconnect the safety chains.
- Pull the truck forward.
Andersen Camper Leveler System
![]()
How the ProPride Works
The ProPride eliminates trailer sway, while most other hitches, such as the popular Equal-i-zer or Reese brands, attempt to control trailer sway.
To understand how the ProPride works, we first need to take a look at a conventional trailer hitch.
Conventional Hitches
A trailer that uses a ball mount (almost all hitches) creates a pivot point at the ball.
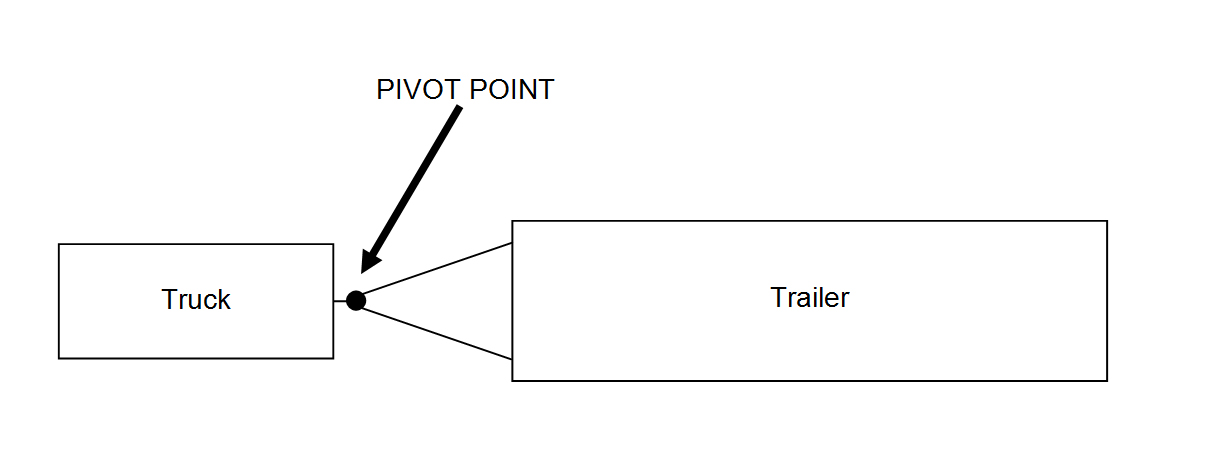
In windy weather, especially when there are higher speed gusts of wind, the wind pushes the side of the trailer. Since there is a point at the front of the trailer than can pivot, the trailer will pivot pushing the back of the trailer. Sometimes this pivot or sway can be a foot or two at the back of the trailer, as you have probably witnessed on freeways in poor weather.
The same effect often happens when a big rig tractor-trailer passes at high speed. In this case, the big rig’s action pulls the trailer towards it.

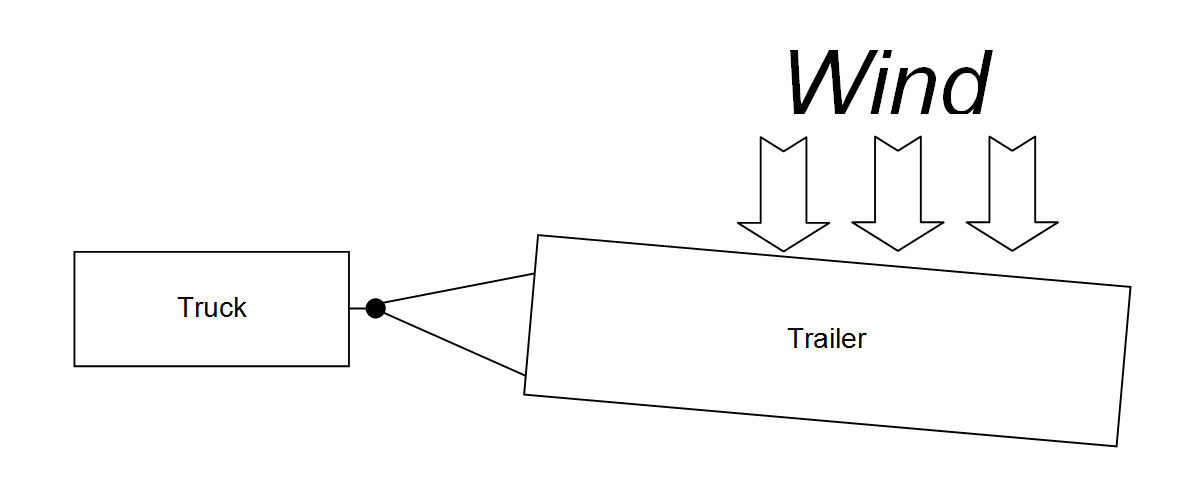
The ProPride Head
The head is mounted to the front to the trailer’s tongue. The head itself is rigid and cannot move.
Underneath this head, is a swivel assembly that can move from side to side a few inches, using four large bearings. If a gust of wind hits the trailer, or a big rig passes, instead of pivoting like a conventional hitch, the entire swivel mechanism moves sideways and the trailer will follow — it cannot pivot. What does happen, is the entire trailer will move a few inches as shown below.
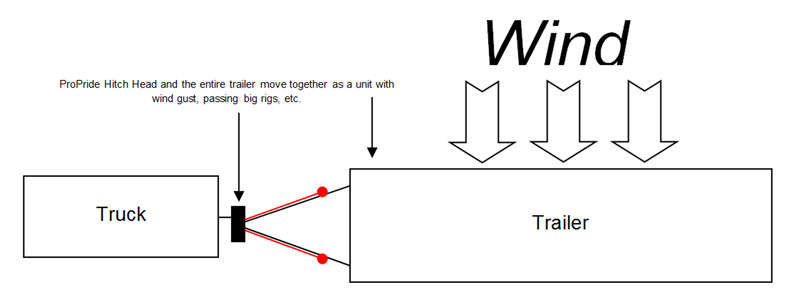
Then the assembly will return back to its normal position, following the tow vehicle.
When a big rig passes us, I don’t notice is at all and the truck/trailer combinations tracks straight. In windy conditions I can feel the wind buffeting the truck, just as you would feel the wind buffeting a car. But the truck/trailer pretty much tracks straight. What little movement there is at the hitch really isn’t noticeable.
But the hitch can cause some minor inconveniences when backing up into a tight and narrow campsite.
Overcoming Some Unhitching Challenges
Leveling Issues
With very uneven sites, I sometimes had difficulty after unhitching the from the truck and then raising or lower in the trailer to get it level. Raising could be fixed by extra wood blocks, lowering often did not have enough travel down.
This has nothing to do with the ProPride, but where we choose to camp at times. The solution was simple and it also solved another issue when we have to back into some small tight places.
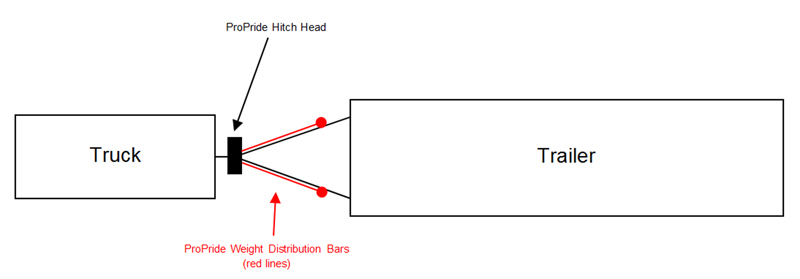
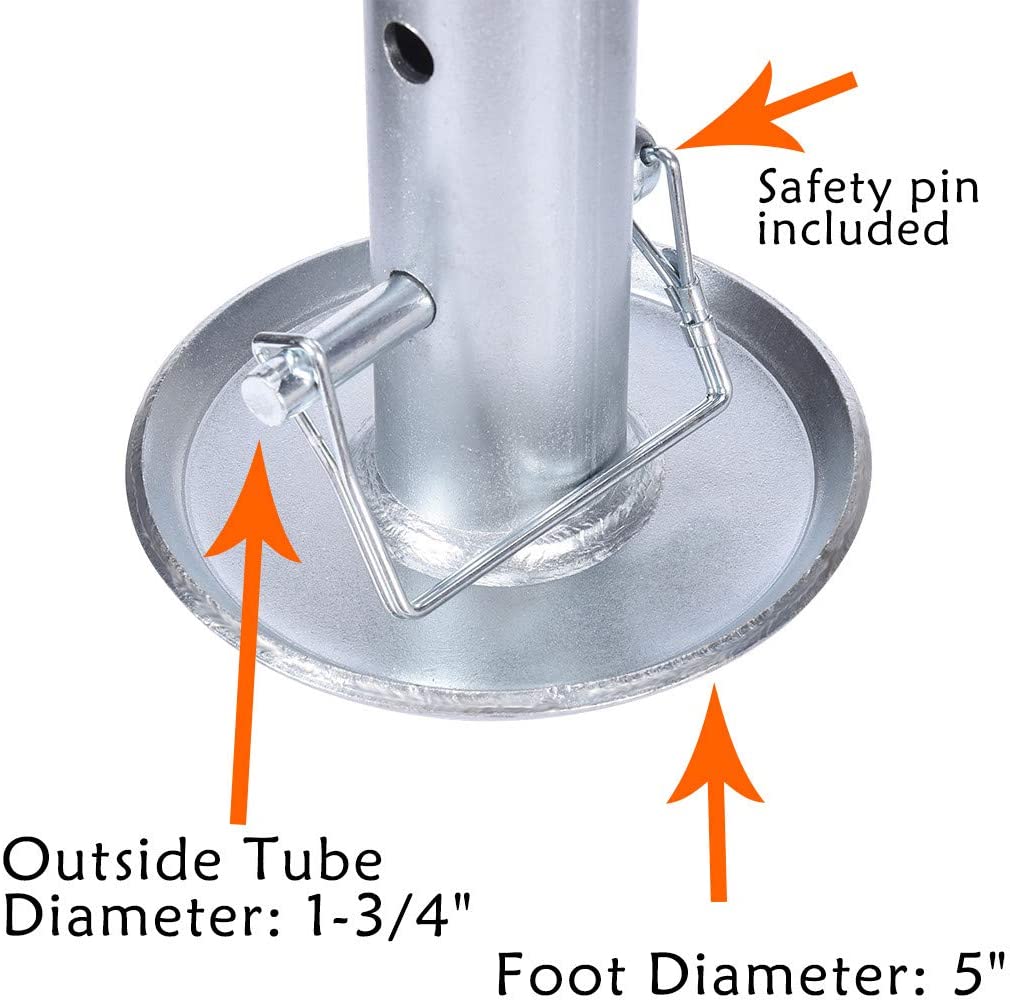
Angle Issues
If the truck is at too much of an angle after backing up into a spot, the foot of the jack drop leg, which has an 8″ diameter would interfere with the weight distribution bars. It mostly happened when I was needed to insert the jack drop leg — the angles were off and I couldn’t insert it. This meant that I needed to get the truck pretty much aligned straight with the trailer.
The diagram below, which is not to scale, shows how the weight distribution bars can cause some interference when the truck is at an angle to the trailer.

Looking at the picture below, you can sort of see how the foot has to be centered.
Neither of these issues were super serious. In most cases with a little finagling I could get things to work.
The jack drop leg is 8 inches tall and the bottom foot 8 inches in diameter. This seems to be a standard size. What I really needed was a taller jack drop leg (especially since my trailer tongue is a lot taller than many trailers when it is level) with a much smaller diameter foot.
As it turns out, Amazon had exactly what I needed.
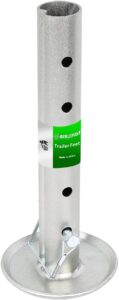
Tall Trailer Jack Drop Leg
This is 12 inches long with a 5 inch diameter foot pad. Perfect!


For sites where I normally might need several wood blocks or Lynx Levelers, this drop leg allows me to eliminate 4″ of wood blocks or other stacking strategies. With the much narrower diameter foot pad, it is easier to park the trailer if the truck is at an angle to the trailer.

12″ Adjustable Trailer Jack Foot Plate
![]()